SpringBoot MVC配置
在使用 SpringBoot 进行实际的项目开发前,最后再了解一下 SpringBoot 中对于 MVC 的配置!仍对应 SpringBoot-03-Web 项目。
1. MVC配置简介
SpringBoot 对 MVC 进行了许多的配置,查看官方文档可以看到其中的介绍
Spring MVC Auto-configuration
Spring Boot provides auto-configuration for Spring MVC that works well with most applications.
The auto-configuration adds the following features on top of Spring’s defaults:
Inclusion of ContentNegotiatingViewResolver and BeanNameViewResolver beans.
Support for serving static resources, including support for WebJars
Automatic registration of Converter, GenericConverter, and Formatter beans.
Support for HttpMessageConverters (covered later in this document).
Automatic registration of MessageCodesResolver (covered later in this document).
Static index.html support.
Custom Favicon support (covered later in this document).
Automatic use of a ConfigurableWebBindingInitializer bean (covered later in this document).
接下来就分析一下其中的几个配置!
2. 视图解析器
2.1 配置
SpringBoot 对 MVC 中的视图解析器进行了自动配置,首先查看 Web 的自动配置类 WebMvcAutoConfiguration,在其中可以看到视图解析器的构造方法
@ConditionalOnBean(ViewResolver.class)
@ConditionalOnMissingBean(name = "viewResolver", value = ContentNegotiatingViewResolver.class)
public ContentNegotiatingViewResolver viewResolver(BeanFactory beanFactory) {
    ContentNegotiatingViewResolver resolver = new ContentNegotiatingViewResolver();
    ...
    return resolver;
}
它创建了一个 ContentNegotiatingViewResolver 类型的视图解析器,点进这个类,首先可以看到它实现了 ViewResolver 接口,所以它就是一个视图解析器!
public class ContentNegotiatingViewResolver extends WebApplicationObjectSupport
		implements ViewResolver, Ordered, InitializingBean
再找到它关于视图解析的部分,是一个方法 resolveViewName,返回了一个视图
@Nullable
public View resolveViewName(String viewName, Locale locale) throws Exception {
    RequestAttributes attrs = RequestContextHolder.getRequestAttributes();
    Assert.state(attrs instanceof ServletRequestAttributes, "No current ServletRequestAttributes");
    List<MediaType> requestedMediaTypes = this.getMediaTypes(((ServletRequestAttributes)attrs).getRequest());
    if (requestedMediaTypes != null) {
        List<View> candidateViews = this.getCandidateViews(viewName, locale, requestedMediaTypes);
        View bestView = this.getBestView(candidateViews, requestedMediaTypes, attrs);
        if (bestView != null) {
            return bestView;
        }
    }

    String mediaTypeInfo = this.logger.isDebugEnabled() && requestedMediaTypes != null ? " given " + requestedMediaTypes.toString() : "";
    if (this.useNotAcceptableStatusCode) {
        if (this.logger.isDebugEnabled()) {
            this.logger.debug("Using 406 NOT_ACCEPTABLE" + mediaTypeInfo);
        }

        return NOT_ACCEPTABLE_VIEW;
    } else {
        this.logger.debug("View remains unresolved" + mediaTypeInfo);
        return null;
    }
}
其中有两句关键的代码
List<View> candidateViews = this.getCandidateViews(viewName, locale, requestedMediaTypes);
View bestView = this.getBestView(candidateViews, requestedMediaTypes, attrs);
查看获取所有候选视图方法 getCandidateViews,可以看到它遍历了所有的视图解析器,向候选视图列表中添加视图
List<View> candidateViews = new ArrayList<>();
...
for (ViewResolver viewResolver : this.viewResolvers) {
    View view = viewResolver.resolveViewName(viewName, locale);
    if (view != null) {
        candidateViews.add(view);
    }
    for (MediaType requestedMediaType : requestedMediaTypes) {
        List<String> extensions = this.contentNegotiationManager.resolveFileExtensions(requestedMediaType);
        for (String extension : extensions) {
            String viewNameWithExtension = viewName + '.' + extension;
            view = viewResolver.resolveViewName(viewNameWithExtension, locale);
            if (view != null) {
                candidateViews.add(view);
            }
        }
    }
}
这就是 SpringBoot 默认的关于视图解析器的配置!
2.2 自定义
此时我们先尝试自定义一个视图解析器,在 com.qiyuan 包下创建 config 包,并在其中创建 MyMvcConfig 类,添加 @Configuration 注解并实现 WebMvcConfigurer 接口,表明它是 WebMvc 的配置类
@Configuration
public class MyMvcConfig implements WebMvcConfigurer {

}
在其中创建一个静态内部类 MyViewResolver,实现 ViewResolver 接口,即是一个视图解析器;再使用 @Bean 将它作为组件放入容器中
@Configuration
public class MyMvcConfig implements WebMvcConfigurer {
@Bean
public ViewResolver myViewResolver(){
return new MyViewResolver();
}
public static class MyViewResolver implements ViewResolver{
@Override
public View resolveViewName(String viewName, Locale locale) throws Exception {
return null;
}
}
}
这样我们自定义的视图解析器就放入 Spring 中了,运行的时候就会被检测到!
2.3 测试
查看完 SpringBoot 的视图解析器配置,并且有自定义了一个视图解析器的配置后,就可以来测试一下了。
首先在 SpringMVC 中我们知道,任何请求都要经过 DispatcherServlet,全局搜索这个类,并找到其中的核心方法 doDispatcher
protected void doDispatch(HttpServletRequest request, HttpServletResponse response) throws Exception
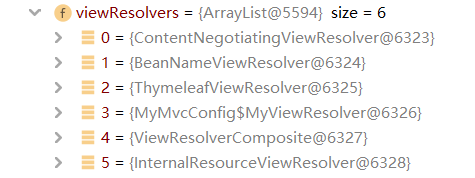
具体内容是什么不用关心,先在这个方法上打上断点,然后开始程序调试。访问 localhost:8080,程序进入了断点。此时查看 DispatcherServlet 类中的变量,可以看到 viewResolver

这里就出现了四个见过的面孔!ContentNegotiatingViewResolver 和 BeanNameViewResolver 是 SpringBoot 中的 MVC 配置包含的,ThymeleafViewResolver 则是上节导入 Thymeleaf 而产生的,最后是 MyMvcConfig 中的( $ 符号应该是表示类中的对象)MyViewResolver ,我们自定义的视图解析器!
2.4 小结
从上面的测试中我们就可以知道,SpringBoot 中有默认的配置,它们会被自动装配为组件(如上面的0和 1);如果我们引入了别的配置,它也会被装配为一个组件(如上面的2,Thymeleaf );如果我们想自定义地为 SpringBoot 添加组件,只要写好对应的配置类,将这个组件放到 Spring 容器中,它也会自动地被装配(如上面的3,MyViewResolver )!
简而言之,如果我们想要进行一些功能的定制,只要给 Spring 容器添加这个功能的组件就行了!
3. 扩展MVC功能
现在来尝试扩展 MVC 的功能,在官方文档中,还有这么一段话
If you want to keep Spring Boot MVC features and you want to add additional MVC configuration
(interceptors, formatters, view controllers, and other features), you can add your own
@Configuration class of type WebMvcConfigurer but without @EnableWebMvc. If you wish to provide
custom instances of RequestMappingHandlerMapping, RequestMappingHandlerAdapter, or
ExceptionHandlerExceptionResolver, you can declare a WebMvcRegistrationsAdapter instance to provide such components.
即如果需要添加功能,即创建一个 WebMvcConfigurer 类并加上 @Configuration 注解,也就是上面创建视图解析器的过程,当然也可以创建拦截器、视图控制器等组件。
现在尝试创建一个视图控制器,在 MyMvcConfig 类中重写 addViewControllers 方法
@Configuration
public class MyMvcConfig implements WebMvcConfigurer {
...
@Override
public void addViewControllers(ViewControllerRegistry registry) {
registry.addViewController("/test").setViewName("hello");
}
}
这样就为我们的 MVC 配置添加了一个视图控制器,运行程序 ,访问 localhost:8080/test,成功进入之前的 hello.html 页面,当然因为没有设置模型,所以没有内容。
为什么我们写的配置类也会被加载呢?下面分析一下原理!
-
首先,Web 的自动配置需要 WebMvcAutoConfiguration 组件,它里面有一个内部类 WebMvcAutoConfigurationAdapter,即配置适配器类
@Configuration(proxyBeanMethods = false)
@Import(EnableWebMvcConfiguration.class)
...
@Order(0)
public static class WebMvcAutoConfigurationAdapter implements WebMvcConfigurer, ServletContextAware
-
这个配置适配器类通过注解 @Import(EnableWebMvcConfiguration.class) 又导入了一个类,即开启配置类
@Configuration(proxyBeanMethods = false)
@EnableConfigurationProperties(WebProperties.class)
public static class EnableWebMvcConfiguration extends DelegatingWebMvcConfiguration implements ResourceLoaderAware
-
这个开启配置类继承了一个父类 DelegatingWebMvcConfiguration,即删除配置类(?),它的开头就有这么一段代码
@Configuration(proxyBeanMethods = false)
public class DelegatingWebMvcConfiguration extends WebMvcConfigurationSupport {
private final WebMvcConfigurerComposite configurers = new WebMvcConfigurerComposite();
@Autowired(required = false)
public void setConfigurers(List<WebMvcConfigurer> configurers) {
if (!CollectionUtils.isEmpty(configurers)) {
this.configurers.addWebMvcConfigurers(configurers);
}
}
...
}
可以看到它获取并设置了所有的 WebMvcConfigurer 配置类!
-
以 DelegatingWebMvcConfiguration 类中的 addViewControllers 方法为例(之前的例子就是添加了一个视图控制器)
@Override
protected void addViewControllers(ViewControllerRegistry registry) {
	this.configurers.addViewControllers(registry);
}
-
继续查看它调用的 addViewControllers 方法,跳转到了 WebMvcConfigurerComposite 类中的 addViewControllers 方法,这个类就是 3 中的 configurers 的类型!
private final List<WebMvcConfigurer> delegates = new ArrayList<>();
...
@Override
public void addViewControllers(ViewControllerRegistry registry) {
for (WebMvcConfigurer delegate : this.delegates) {
delegate.addViewControllers(registry);
}
}
这里就可以看到,所有的 WebMvcConfigurer 都会被调用加载,包括 SpringBoot 自带的和我们自己配置的!(这里有点乱,但先这样吧)
4. 全面接管MVC
在官方文档中还有一小段不起眼的话
If you want to take complete control of Spring MVC, you can add your own @Configuration annotated with @EnableWebMvc.
意思就是,只要在自定义的配置类( @Configuration )上添加了 @EnableWebMvc,就可以由我们全面接管 SpringMVC!
如在 MyMvcConfig 类上加上 @EnableWebMvc 注解
@Configuration
@EnableWebMvc
public class MyMvcConfig implements WebMvcConfigurer {
    ...
}
此时再运行程序,访问 localhost:8080(注意不是 /test 也不是 /hello,因为之前自定义了配置,所以这两个是能请求到的),就会产生 404 错误,因为默认的配置已经被屏蔽掉了!
为什么加了一个 @EnableWebMvc 注解自动配置就失效了呢?再分析一下原理!
-
点进 @EnableWebMvc 注解,可以看到它导入了删除配置类 DelegatingWebMvcConfiguration 的组件,这个类在上面也见过了!
@Import(DelegatingWebMvcConfiguration.class)
public @interface EnableWebMvc {
}
-
点进 DelegatingWebMvcConfiguration 类,可以看到它也继承了一个父类 WebMvcConfigurationSupport
@Configuration(proxyBeanMethods = false)
public class DelegatingWebMvcConfiguration extends WebMvcConfigurationSupport
-
这时回到最开始的配置类 WebMvcAutoConfiguration 上,可以看到生效场景的注解 @ConditionalOnMissingBean(WebMvcConfigurationSupport.class)
@ConditionalOnMissingBean(WebMvcConfigurationSupport.class)
...
public class WebMvcAutoConfiguration
说明这个自动配置类只有在没有导入 WebMvcConfigurationSupport 类的场景下才会被自动装配!而使用 @EnableWebMvc 注解正是导入了这个类,导致了自动配置类的失效,回到了最原始的状态!
总而言之,@EnableWebMvc 引入了 WebMvcConfigurationSupport 类,而这个类只有 SpringMVC 最基本的支持!
5. 总结
这节又深入了解了 SpringBoot 中 MVC 的一些配置,以及如何去扩展 MVC 的配置,如拦截器、视图解析器、视图控制器等,这就是编写实际项目前的最后一块拼图😤!
本文内容由网友自发贡献,版权归原作者所有,本站不承担相应法律责任。如您发现有涉嫌抄袭侵权的内容,请联系:hwhale#tublm.com(使用前将#替换为@)