.
一、环境规划
| hostname |
IP地址 |
系统版本 |
角色 |
| master |
192.168.3.171 |
centos 7.6 |
主节点 |
| node01 |
192.168.3.172 |
centos 7.6 |
从节点 |
| node02 |
192.168.3.173 |
centos 7.6 |
从节点 |
二、Mariadb的主从复制介绍
1.主从复制简介
主从同步使得数据可以从一个数据库服务器复制到其他服务器上,在复制数据时,一个服务器充当主服务器(master),其余的服务器充当从服务器(slave)。
2.半同步复制介绍
半同步复制是解决主库数据挂掉,从库数据不一致的问题。 解决方法:半同步复制,半同步复制场景中,master会监视所有的slave,确保其中至少一台数据完全同步成功,master才会返回客户端信息,此数据写成功。
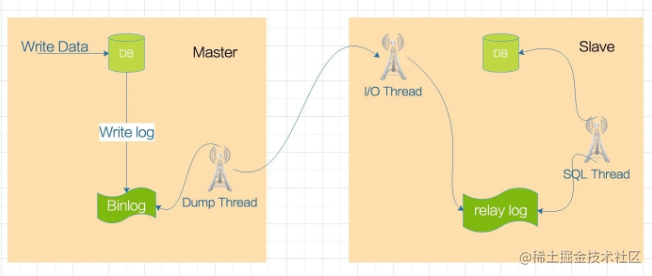
3.主从复制原理图
三、安装Mariadb
1.配置yum仓库
3个节点都安装Mariadb数据库
[root@master yum.repos.d]# cat mariadb.repo
# MariaDB 10.6 CentOS repository list - created 2021-12-27 11:21 UTC
# https://mariadb.org/download/
[mariadb]
name = MariaDB
baseurl = https://mirrors.ustc.edu.cn/mariadb/yum/10.6/centos7-amd64
gpgkey=https://mirrors.ustc.edu.cn/mariadb/yum/RPM-GPG-KEY-MariaDB
gpgcheck=0
sed -i 's#//mirrors.xtom.com.hk#//mirrors.ustc.edu.cn#g' /etc/yum.repos.d/mariadb.repo
2.检查yum仓库
[root@master yum.repos.d]# yum repolist all
Loaded plugins: fastestmirror
Loading mirror speeds from cached hostfile
repo id                                                              repo name                                                             status
mariadb                                                              MariaDB                                                               enabled: 96
repolist: 96
3.安装mariadb
yum -y install mariadb-server
4.启动mariadb服务
[root@master yum.repos.d]# systemctl start mariadb
[root@master yum.repos.d]# systemctl enable  mariadb
Created symlink from /etc/systemd/system/multi-user.target.wants/mariadb.service to /usr/lib/systemd/system/mariadb.service.
[root@master yum.repos.d]#
5.从节点安装mariadb
如上步骤安装即可。
四、mariadb主库配置
1.mariadb的初始化
[root@master ~]# mariadb-secure-installation

NOTE: RUNNING ALL PARTS OF THIS SCRIPT IS RECOMMENDED FOR ALL MariaDB
      SERVERS IN PRODUCTION USE!  PLEASE READ EACH STEP CAREFULLY!

In order to log into MariaDB to secure it, we'll need the current
password for the root user. If you've just installed MariaDB, and
haven't set the root password yet, you should just press enter here.

Enter current password for root (enter for none):
OK, successfully used password, moving on...

Setting the root password or using the unix_socket ensures that nobody
can log into the MariaDB root user without the proper authorisation.

You already have your root account protected, so you can safely answer 'n'.

Switch to unix_socket authentication [Y/n] n
 ... skipping.

You already have your root account protected, so you can safely answer 'n'.

Change the root password? [Y/n] n
 ... skipping.

By default, a MariaDB installation has an anonymous user, allowing anyone
to log into MariaDB without having to have a user account created for
them.  This is intended only for testing, and to make the installation
go a bit smoother.  You should remove them before moving into a
production environment.

Remove anonymous users? [Y/n] y
 ... Success!

Normally, root should only be allowed to connect from 'localhost'.  This
ensures that someone cannot guess at the root password from the network.

Disallow root login remotely? [Y/n] n
 ... skipping.

By default, MariaDB comes with a database named 'test' that anyone can
access.  This is also intended only for testing, and should be removed
before moving into a production environment.

Remove test database and access to it? [Y/n] y
 - Dropping test database...
 ... Success!
 - Removing privileges on test database...
 ... Success!

Reloading the privilege tables will ensure that all changes made so far
will take effect immediately.

Reload privilege tables now? [Y/n] y
 ... Success!

Cleaning up...

All done!  If you'</