一、指令
1、v-bind:绑定属性【:】
2、v-on:绑定事件【@】
3、v-if和v-show
(1)介绍
<template>
    <div>
        <h1 v-if="false"> hello world</h1>
        <h2 v-show="false"> hello world</h2>
    </div>
</template>
值为false时,页面上不显示数据。
打开控制台:
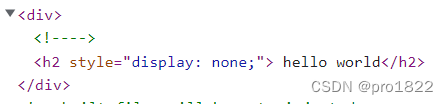
v-if:不渲染DOM。如果值为false的话。
v-show:渲染DOM,将元素设置为【display:none】
(2)案例
<template>
<div>
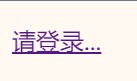
<p v-if="isLogin">欢迎:</p>
<p v-if="!isLogin"><a href="">请登录...</a></p>
</div>
</template>
<script>
export default {
data() {
return {
isLogin: true,
};
},
};
</script>
isLogin为true时:

isLogin为false时:
4、v-for
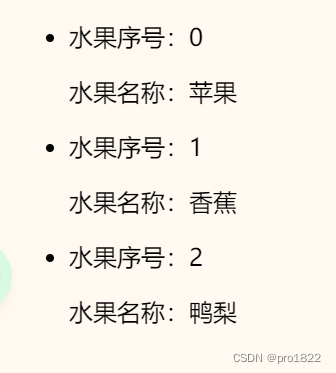
(1)案例(一)——水果列表
<template>
    <div>
        <ul>
            <li v-for="(fruit,index) of fruits" :key="index">
                <p>水果序号:{{index}}</p>
                <p>水果名称:{{fruit}}</p>
            </li>
        </ul>
    </div>
</template>

<script>
export default {
    data() {
        return {
            fruits: ["苹果", "香蕉", "鸭梨"],
        };
    },
};
</script>
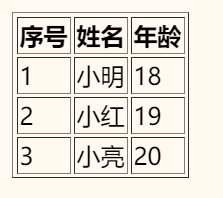
(2)案例(二)——学生表格
<template>
    <div>
        <table border="1">
            <thead>
                <th>序号</th>
                <th>姓名</th>
                <th>年龄</th>
            </thead>
            <tbody>
                <tr v-for="(student,index) of students" :key="index">
                    <td>{{index+1}}</td>
                    <td>{{student.name}}</td>
                    <td>{{student.age}}</td>
                </tr>
            </tbody>
        </table>
    </div>
</template>

<script>
export default {
    data() {
        return {
            students: [
                { name: "小明", age: 18 },
                { name: "小红", age: 19 },
                { name: "小亮", age: 20 },
            ],
        };
    },
};
</script>
二、组件嵌套
1、组件命名:大写字母开头,驼峰命名
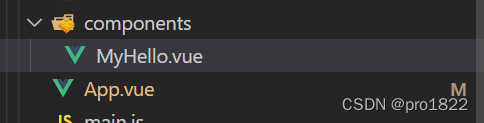
自定义组件一般放在components文件夹里面。
在components文件夹,新建MyHello.vue文件。
2、注册组件
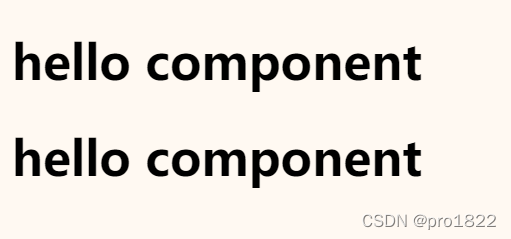
(1)MyHello.vue文件:
<template>
    <h1>hello component</h1>
</template>
(2)App.vue文件:
<template>
    <div>
        <MyHello></MyHello>
        <My-hello></My-hello>
    </div>
</template>

<script>
// 引入组件
import MyHello from "./components/MyHello.vue";
export default {
    // 注册组件
    components: {
        MyHello: MyHello,
    },
};
</script>
中间可以加上横线。
也可以简写:
components: {
        MyHello
    },
(3)页面效果:
3、组件传值
App.vue:父级
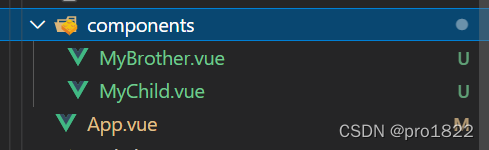
MyBrother.vue,MyChild.vue:子级
(1)父级向子级传递数据——使用标签的属性传递
App.vue:(父级)
<template>
    <div>
        <h1>hello world</h1>
        <MyChild :msg="message"></MyChild>
    </div>
</template>

<script>
import MyChild from "./components/MyChild.vue";
export default {
    components: {
        MyChild: MyChild,
    },
    data() {
        return {
            message: "app.vue data",
        };
    },
};
</script>
msg是自定义的属性。
MyChild.vue:(子级)
<template>
    <h1>{{msg}}</h1>
</template>

<script>
export default {
    props: ["msg"],
};
</script>
props:属性的属性。
页面显示:
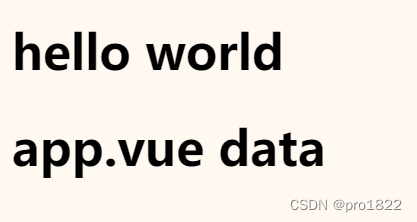
父级的数据:【message】,传递给了子级:【MyChild】。
通过标签的属性传递。
关键代码:
<MyChild :msg="message"></MyChild>
(2)子级向父级传递数据——用自定义事件
App.vue:(父级)
<template>
    <div>
        <h1>{{h1Data}}</h1>
        <my-child @myevent="changeData"></my-child>
    </div>
</template>

<script>
import MyChild from "./components/MyChild.vue";
export default {
    components: { MyChild },
    data() {
        return {
            h1Data: "before",
        };
    },
    methods: {
        changeData(data) {
            this.h1Data = data;
        },
    },
};
</script>
@myevent = “”:自定义事件。
changeData(data):参数data是从子级那边传过来的。并且,将h1标签的h1Data值更改。
MyChild.vue:(子级)
<template>
    <div>
        <button @click="sendData">传递数据</button>
    </div>
</template>

<script>
export default {
    data(){
        return {
            childData:"i am childData"
        }
    },
    methods: {
        sendData() {
            // $emit可以触发父级的自定义事件,把childData传给myevent
            this.$emit("myevent",this.childData)
        },
    },
};
</script>
// $emit可以触发父级的自定义事件,把childData传给myevent
this.$emit("myevent",this.childData)
点击按钮时,触发sendData方法。
效果:
原先数据为:before,点击按钮后,子级向父级传递了数据:i am childData。

(3)案例——购物车(一)
项目目录:
App.vue:
<template>
    <div>
        <my-cart></my-cart>
    </div>
</template>

<script>
import MyCart from "./components/MyCart.vue";
export default {
    components: { MyCart },
};
</script>
App.vue引入MyCart.vue组件。
MyCart.vue:
<template>
    <span>
        <h1>购物车</h1>
        <ul>
            <li v-for="(fruit,index) of fruits" :key="index">
                {{fruit.name}},单价:{{fruit.price}},数量:
                <my-count :count="fruit.count" :index="index" @add="add" @sub="sub">
                </my-count>
            </li>
        </ul>
    </span>
</template>

<script>
import MyCount from "./MyCount.vue";
export default {
    components: {
        MyCount,
    },
    data() {
        return {
            fruits: [
                { name: "苹果", price: "5", count: "0" },
                { name: "香蕉", price: "3", count: "0" },
                { name: "鸭梨", price: "4", count: "0" },
            ],
        };
    },
    methods: {
        sub(index) {
            if (this.fruits[index].count > 0) {
                this.fruits[index].count--;
            }
        },
        add(index) {
            this.fruits[index].count++;
        },
    },
};
</script>
MyCart.vue里面有一个水果列表,按钮是引入MyCount.vue组件
MyCount.vue:
<template>
    <span>
        <button @click="sub">-</button>
        <span>{{count}}</span>
        <button @click="add">+</button>
    </span>
</template>

<script>
export default {
    props: ["count", "index"],
    methods: {
        sub() {
            this.$emit("sub", this.index);
        },
        add() {
            this.$emit("add", this.index);
        },
    },
};
</script>
这个案例是,父级向子级、子级向父级,传递数据,的一个应用。
(4)非父子级传递数据
项目目录:

MyBrother.vue和MySister.vue为同级。
MyBrother.vue:
<template>
    <div>
        <h1>Brother</h1>
        <button @click="changeData">改变数据</button>
        <p>{{state.message}}</p>
    </div>
</template>

<script>
import Store from "../store";
export default {
    data() {
        return {
            state: Store.state,
        };
    },
    methods: {
        changeData() {
            Store.setStateMessage("new data");
        },
    },
};
</script>
MySister.vue:
<template>
    <div>
        <h1>Sister</h1>
        <p>{{state.message}}</p>
    </div>
</template>

<script>
import Store from "../store";
export default {
    data() {
        return {
            state: Store.state,
        };
    },
};
</script>
新建store.js文件,存放共同数据。
export default {
    // 状态(规范写法),存放共同数据
    state: {
        message: "hello vue"
    },
    setStateMessage(str) {
        this.state.message = str
    }
}
App.vue:
<template>
    <div>
        <my-brother></my-brother>
        <my-sister></my-sister>
    </div>
</template>

<script>
import MyBrother from "./components/MyBrother.vue";
import MySister from "./components/MySister.vue";
export default {
    components: { MyBrother, MySister },
};
</script>
效果:
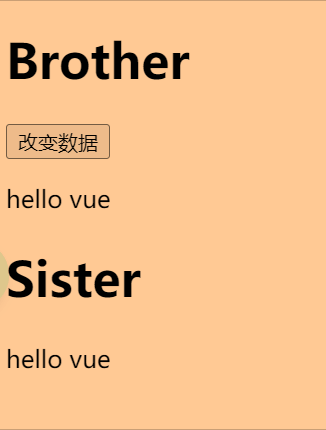
点击按钮时,调用store.js的方法,更改共同数据。
从而实现,非父子级间的传递数据。
(5)购物车重置按钮
修改MyCart.vue即可。
<template>
    <div>
        <h1>购物车</h1>
        <button @click="clear">重置数量</button>
        <ul>
            <li v-for="(fruit,index) of fruits" :key="index">
                {{fruit.name}},单价:{{fruit.price}},数量:
                <my-count :count=fruit.count @sub="sub" @add="add" :index="index"></my-count>
            </li>
        </ul>
    </div>
</template>

<script>
import MyCount from "./MyCount.vue";
export default {
    components: {
        MyCount,
    },
    data() {
        return {
            fruits: [
                { name: "苹果", price: "3", count: "0" },
                { name: "香蕉", price: "4", count: "0" },
                { name: "鸭梨", price: "5", count: "0" },
            ],
        };
    },
    methods: {
        sub(index) {
            if (this.fruits[index].count > 0) {
                this.fruits[index].count--;
            }
        },
        add(index) {
            this.fruits[index].count++;
        },
        clear() {
            for (let i in this.fruits) {
                this.fruits[i].count = 0;
            }
        },
    },
};
</script>
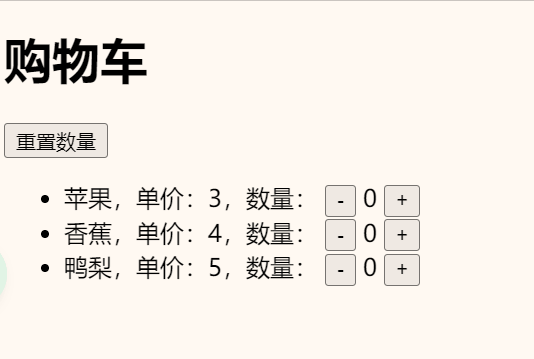
效果:
三、总结
将系统拆分成组件,一方面降低了功能的耦合,但是另一方面也提升了数据的传输难度。