前端小白记录学习笔记,不做他用。
类与实例
类的声明
·
- 用构造函数模拟类(传统写法)
function Person1(name){
this.name=name;
}
- 用class声明(ES6写法)
class Person2{
construtor(name){
this.name=name;
}
}
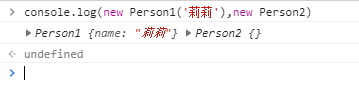
控制台输出:

生成实例
类的实例化很简单,直接new就可以。
类与继承
如何实现继承
继承的本质就是原型链。
继承的几种方式
- 借助构造函数
function Parent1(){
	this.name="parent莉莉";
}
function Child1(){
	Parent1.call(this);//改变this的指向,非常重要。用apply或者call都行
	this.type="child莉莉";
}
console.log(new Child1);
在上面的代码中,最重要的是在子类的构造函数中写了 Parent1.call(this);,这样是为了让Parent1的构造函数在Child1的构造函数中执行。this的指向发生改变,Parent的实例——>改为指向Child1的实例,导致Parent1的实例属性挂到Child1的实例上,这样就实现了继承。
控制台打印结果:
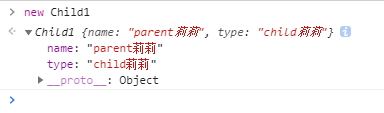
上面截图表明:Child1先有Parent1实例的属性,再有Child1实例的属性。
分析:
这种方式虽然改变了this的指向,但是Child1无法继承Parent1的原型。也就是说,如果我给Parent1的原型添加一个方法:
Parent1.prototype.say=function(){...};
这个方法是无法被Child1继承的。
- 通过原型链实现继承
function Parent(){
	this.name="parent属性";
}
function Child(){
	this.type="child属性";
}
Child.prototype = new Parent();//原型链
console.log(new Child);
上方代码最重要的是Child.prototype = new Parent();。每个函数都有prototype属性,构造函数也有这个属性,这个属性是一个对象。我们用这行代码Child.prototype = new Parent();把Parent的实例赋给Child的prototype,从而实现继承。Child的实例,Child构造函数,Parent的实例构成一个三角关系,从而,new Child.__proto__===new Parent() =true;
分析:
这种继承方式,Child可以继承Parent原型,但是有个缺点:如果修改了child1实例的name属性,那么child2实例的name属性值也会发生变化,显然这样不太好。
在实际业务中,两个子模块对象应该隔离开才对。如果修改一个对象,另一个对象也发生改变,这样对业务设计不太好。造成这种缺点的原因是child1和child2共用原型,也就是说child1.__proto__===child2.__proto__的结果为true。
- 组合的方式:构造函数+原型链
//组合方式实现继承:构造函数+原型链
function Parent2(){
	this.name="parent属性";
	this.arr=['1','2','3'];
}
function Child2(){
	Parent2.call(this);//执行parent方法
	this.type="child属性";
}
Child2.prototype=new Parent2();//第二次执行parent方法
var child = new Child2();
这种组合的方式能够解决以上两种继承方式的缺点:既能继承原型的属性内容,也不会造成原型属性的修改。
- 原型式继承
不用严格意义上的构造函数,借助原型可以根据已有的对象创建新对象,而且不必因此创建自定义类型。
function Object(obj){
	function Func(){};
	Func.prototype = o;
	return new Func();
}
从本质上讲,Object对传入其中的对象做了一次浅复制。举个例子:
var person={
	name:'Lily',
	friends:['ann','julia']
}
var onePerson=Object(person);
onePerson.name='jun';
onePerson.friends.push('jessica');

var anotherPerson = Object(person);
anotherPerson.name='ton';
anotherPerson.friends.push('jennie');

console.log(person.friends);
//['ann','julia','jessica','jennie']
在这个例子中,相当于创建了person的两个副本。
- 寄生式继承
寄生式继承是与原型式继承紧密相关的一种思路,它创造一个仅用于封装继承过程的函数,在函数内部增强对象,最后再返回对象。
function CreatePerson(origin){
	var clone = Object(origin);
	clone.say=function(){
		console.log('hello');
	};
	return clone;
}
缺点:使用寄生式继承来为对象添加函数,会因为函数不可复用而降低效率,这个与构造函数继承类似。
- 寄生组合式继承
基本思想:通过借用构造函数来继承属性,通过原型链的混成方法来继承方法,不必为了指定子类型的原型而调用超类型的构造函数,只需要超类型的一个副本。本质上,就是使用寄生式继承来继承超类型的原型,然后再将结果指定给子类的原型。
function inherit(sub,super){
	var obj = Object(super);//创建对象
	obj.constructor=sub;//增强对象
	sub.prototype=obj;//指定对象
}
因此,前面的例子可以改成以下形式:
function super(name){
	this.name=name;
	this.colors=['red','green'];
}
super.prototype.sayName=function(){
	console.log(this.name)
}
//继承属性
function sub(name,age){
	super.call(this,name);
	this.age=age;
}
//继承方法
inherit(sub,super);
sub.prototype.sayAge=function(){
	console.log(this.age);
}
优点:只调用一次super构造函数,因此避免了在sub.prototype上创建不必要的、多余的属性,与此同时,原型链还能保持不变,还能正常使用instanceof和isPrototypeOf(),因此,寄生组合式继承被认为是引用类型最理想的继承范式。
以上六种方式是ES5继承。ES5的继承可以用下图概括

ES6继承主要注意class的继承。class之间通过extends关键字实现继承,这比修改原型链实现继承要好。
class ColorPoint extends Point{
	constructor(x,y,color){
		super(x,y);
		this.color=color;
	}
	toString(){
		return this.color+' '+super.toString();
	}
}
注意:子类必须在constructor方法中调用super方法,否则新建实例时会报错。这是因为子类没有自己的this对象,而是继承父类的this对象,然后对其进行加工。如果不调用super方法,子类就得不到this对象。因此,只有调用super之后,才可以使用this关键字。
一条继承语句同时存在两条继承链:一条继承属性,一条继承方法。
class A extends B{};
A.__proto__=B;//继承属性
A.prototype.__proto__=B.prototype;//继承方法
ES6的继承可以用下图概括:
