ubuntu 通过 apt-get 安装软件失败时的解决方案

2023-05-16

 最近在 vmware上的ubuntu系统下安装 软件时出现安装失败情况,在网上搜了一通,终于找到了解决方案。遇到的问题和解决方案如下:

      • 一、 apt-get install vim
      • 二、 apt-get update时网络连接失败
      • 三、 提示镜像秘钥丢失
      • 四、提示apt源版本不一致
      • 四、 高版本安装低版本的软件

一、 apt-get install vim

提示如下:

“E: Package ‘vim’ has no installation candidate”

解决方案:

sudo apt-get update

二、 apt-get update时网络连接失败

解决方案为替换软件镜像:

sudo vi /etc/apt/sources.list

将内存容替换为阿里云的镜像地址:

deb http://mirrors.aliyun.com/ubuntu/ bionic main restricted universe multiverse
deb-src http://mirrors.aliyun.com/ubuntu/ bionic main restricted universe multiverse
deb http://mirrors.aliyun.com/ubuntu/ bionic-security main restricted universe multiverse
deb-src http://mirrors.aliyun.com/ubuntu/ bionic-security main restricted universe multiverse
deb http://mirrors.aliyun.com/ubuntu/ bionic-updates main restricted universe multiverse
deb-src http://mirrors.aliyun.com/ubuntu/ bionic-updates main restricted universe multiverse
deb http://mirrors.aliyun.com/ubuntu/ bionic-backports main restricted universe multiverse
deb-src http://mirrors.aliyun.com/ubuntu/ bionic-backports main restricted universe multivers
deb http://mirrors.aliyun.com/ubuntu/ bionic-proposed main restricted universe multiverse
deb-src http://mirrors.aliyun.com/ubuntu/ bionic-proposed main restricted universe multiverse

或者使用清华的镜像地址:

# 默认注释了源码镜像以提高 apt update 速度,如有需要可自行取消注释
deb https://mirrors.tuna.tsinghua.edu.cn/ubuntu/ jammy main restricted universe multiverse
# deb-src https://mirrors.tuna.tsinghua.edu.cn/ubuntu/ jammy main restricted universe multiverse
deb https://mirrors.tuna.tsinghua.edu.cn/ubuntu/ jammy-updates main restricted universe multiverse
# deb-src https://mirrors.tuna.tsinghua.edu.cn/ubuntu/ jammy-updates main restricted universe multiverse
deb https://mirrors.tuna.tsinghua.edu.cn/ubuntu/ jammy-backports main restricted universe multiverse
# deb-src https://mirrors.tuna.tsinghua.edu.cn/ubuntu/ jammy-backports main restricted universe multiverse
deb https://mirrors.tuna.tsinghua.edu.cn/ubuntu/ jammy-security main restricted universe multiverse
# deb-src https://mirrors.tuna.tsinghua.edu.cn/ubuntu/ jammy-security main restricted universe multiverse

# 预发布软件源,不建议启用
# deb https://mirrors.tuna.tsinghua.edu.cn/ubuntu/ jammy-proposed main restricted universe multiverse
# deb-src https://mirrors.tuna.tsinghua.edu.cn/ubuntu/ jammy-proposed main restricted universe multiverse

三、 提示镜像秘钥丢失

提示如下:

Err:1 http://mirrors.aliyun.com/ubuntu bionic InRelease
  The following signatures couldn't be verified because the public key is not available: NO_PUBKEY 3B4FE6ACC0B21F32
Err:2 http://mirrors.aliyun.com/ubuntu bionic-security InRelease
  The following signatures couldn't be verified because the public key is not available: NO_PUBKEY 3B4FE6ACC0B21F32
Err:3 http://mirrors.aliyun.com/ubuntu bionic-updates InRelease
  The following signatures couldn't be verified because the public key is not available: NO_PUBKEY 3B4FE6ACC0B21F32
Err:4 http://mirrors.aliyun.com/ubuntu bionic-backports InRelease
  The following signatures couldn't be verified because the public key is not available: NO_PUBKEY 3B4FE6ACC0B21F32
Err:5 http://mirrors.aliyun.com/ubuntu bionic-proposed InRelease
  The following signatures couldn't be verified because the public key is not available: NO_PUBKEY 3B4FE6ACC0B21F32

解决方案:sudo apt-key adv --keyserver hkp://keyserver.ubuntu.com:80 --recv 3B4FE6ACC0B21F32 (密钥要和提示的一致)
或者: sudo apt-key adv --keyserver keyserver.ubuntu.com --recv-keys 公钥

四、提示apt源版本不一致

  t通过 apt-get install g++ 安装时提示如下图:
在这里插入图片描述
这是因为当前版本与 apt 镜像源的版本代号不一致导致的,需要通过 lsb_release -a 查看当前ubuntu系统的版本。
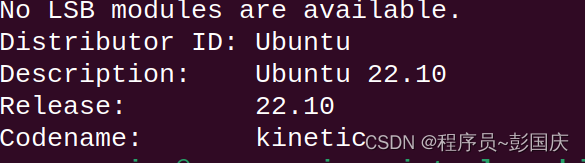
在这里插入图片描述
kinetic 替换之前的阿里云地址中的 ubuntu 版本代号,修改后如下:

deb http://mirrors.aliyun.com/ubuntu/ kinetic main restricted universe multiverse
deb-src http://mirrors.aliyun.com/ubuntu/ kinetic main restricted universe multiverse
deb http://mirrors.aliyun.com/ubuntu/ kinetic-security main restricted universe multiverse
deb-src http://mirrors.aliyun.com/ubuntu/ kinetic-security main restricted universe multiverse
deb http://mirrors.aliyun.com/ubuntu/ kinetic-updates main restricted universe multiverse
deb-src http://mirrors.aliyun.com/ubuntu/ kinetic-updates main restricted universe multiverse
deb http://mirrors.aliyun.com/ubuntu/ kinetic-backports main restricted universe multiverse
deb-src http://mirrors.aliyun.com/ubuntu/ kinetic-backports main restricted universe multivers
deb http://mirrors.aliyun.com/ubuntu/ kinetic-proposed main restricted universe multiverse
deb-src http://mirrors.aliyun.com/ubuntu/ kinetic-proposed main restricted universe multiverse

这里贴上这个问题文章:大佬的文章:https://blog.csdn.net/WU2629409421perfect/article/details/110881141

到此为止就可以顺利的通过 apt-get install 安装软件了

四、 高版本安装低版本的软件

 参考文章:https://linuxconfig.org/how-to-downgrade-ubuntu-linux-system-to-its-previous-version
 某些时候可能会需要安装低版本的 ubuntu 镜像, 但是部分低版本的镜像官网已经不提供安装包了。这个时候直接安装就会安装失败,会提示如下没有 Release file 的错误:

在这里插入图片描述

可以选择安装一个低版本的包来解决这个问题。比如系统是 18.10 (Cosmic Cuttlefish)的,可以选择安装 18.04 (Bionic Beaver)。相关设置如下:
  先把 /etc/apt/sources.list 里面的镜像换成 Bionic。

deb http://mirrors.aliyun.com/ubuntu/ bionic main restricted universe multiverse
#deb-src http://mirrors.aliyun.com/ubuntu/ bionic main restricted universe multiverse
deb http://mirrors.aliyun.com/ubuntu/ bionic-security main restricted universe multiverse
#deb-src http://mirrors.aliyun.com/ubuntu/ bionic-security main restricted universe multiverse
deb http://mirrors.aliyun.com/ubuntu/ bionic-updates main restricted universe multiverse
#deb-src http://mirrors.aliyun.com/ubuntu/ bionic-updates main restricted universe multiverse
deb http://mirrors.aliyun.com/ubuntu/ bionic-backports main restricted universe multiverse
#deb-src http://mirrors.aliyun.com/ubuntu/ bionic-backports main restricted universe multivers
deb http://mirrors.aliyun.com/ubuntu/ bionic-proposed main restricted universe multiverse
#deb-src http://mirrors.aliyun.com/ubuntu/ bionic-proposed main restricted universe multiverse

然后再将 /etc/apt/preferences 改写成(假如没有这个文件就创建一个):

Package: *
Pin: release a=bionic
Pin-Priority: 1001

至此,就可以安装低版本的软件包了。

本文内容由网友自发贡献,版权归原作者所有,本站不承担相应法律责任。如您发现有涉嫌抄袭侵权的内容,请联系:hwhale#tublm.com(使用前将#替换为@)

ubuntu 通过 apt-get 安装软件失败时的解决方案 的相关文章

  • http请求方法(GET、POST、HEAD、OPTIONS、PUT、DELETE、TRACE、CONNECT)

    根据HTTP标准 xff0c HTTP请求可以使用多种请求方法 HTTP的1 0版本中只有三种请求方法 xff1a GET POST 和 HEAD方法 到了1 1版本时 xff0c 新增加了五种请求方法 xff1a OPTIONS PUT
  • MongoDB可视化工具 Studio 3T

    告别终端使用可视化工具Studio 3T对MongoDB进行数据库的操作 简单的使用步骤介绍 1 启动MongoDB服务器 xff08 方法见MongoDB介绍与安装中的介绍 xff09 2 连接MongoDB服务器 3 操作数据库
  • 微信小程序开发——form表单

    WeChat小程序交流 xff08 QQ群 xff1a 769977169 xff09 效果图 代码示例 1 xxx wxml lt form bindsubmit 61 39 submitClick 39 bindreset 61 39
  • 苹果电脑(Mac mini或Macbook或iMac)恢复出厂设置

    苹果电脑 xff08 Mac mini或Macbook或iMac xff09 恢复出厂设置 xff0c 首先要做好如下的准备 xff1a 第一 xff1a 数据的备份 xff1b 第二 xff1a 保证正常的wifi连接 xff1b 第三
  • 【NLP】用ML实现中文短文本分类(二分类)

    1 用ML实现外卖评论的分类 步骤 语料加载 分词 去停用词 抽取词向量特征 分别进行算法建模和模型训练 评估 计算AUC值 模型对比 1 进行语料加载 在此之前 xff0c 引入python依赖的包 xff0c 并将全部语料和停用词dic
  • jupyter报错:[Errno 2] No such file or directory: xxx

    可能解决方法1 xff1a 使用 pwd语句查看当前代码所在目录 xff0c 根据这个目录地址 xff08 如 home lp xff09 xff0c 再导入文件 xff0c 如np load data test txt 导入的就是 hom
  • ASP.NET Core Blazor与JavaScript 互操作(相互调用)

    1 xff09 C 调用JS xff0c 需要依赖注入IJSRuntime xff08 默认已经包含了 xff09 xff0c 只能在组件或者页面中进行调用 InvokeAsync lt TValue gt String Object 异步
  • leetcode多线程合集

    1114 按序打印 与1116题类似 xff0c 使用condition variable span class token keyword class span span class token class name Foo span s
  • 人工智能是什么?

    人工智能是什么 xff1f 欢迎大家迈入人工智能的大门1 人工智能的定义2 人工智能的话题3 人工智能的四大技术分支4 人工智能的主要应用领域5 人工智能的三种形态5 1 弱人工智能到强人工智能有多难 xff1f 5 2 弱人工智能的前进方
  • Gradle Wrapper 详解

    Gradle Wrapper 详解 我们介绍了 Android 项目的目录及 Gradle 配置 xff0c 我们提到有个目录是 gradle wrapper 今天这篇文章我们来学习 Gradle Wrapper 通过这篇文章我们将了解什么
  • 一、LCD12864(带字库的)使用教程:

    一 LCD12864简介 LCD12864液晶显示 xff0c 也就是屏幕上总共有128 64 xff0c 个点 xff0c 每个点就只有两种状态亮和不亮我这里使用的就是带字库的 xff0c 直接可以显示中文 xff0c 不需要自己去编码
  • 使用cpolar发布群晖NAS上的网页 下篇(7.X版)

    系列文章 使用cpolar发布群晖NAS上的网页 上篇 xff08 7 X版 xff09 使用cpolar发布群晖NAS上的网页 中篇 xff08 7 X版 xff09 使用cpolar发布群晖NAS上的网页 下篇 xff08 7 X版 x
  • 滴水石穿

    不积跬步 xff0c 无以至千里 xff1b 不积小流 xff0c 无以成江海 1 hashcode相等两个类一定相等吗 equals呢 相反呢 hashcode相等 xff0c 两个类不一定相等 xff1b equals相等 xff0c
  • CAD批量打图精灵功能列表

    功能简介功能细分识别图框识别直线 多段线 二维多段线 三维多段线 面域 视口 代理实体 块参照 外部参照单图模式 xff0c 识别整个图形的边界 xff0c 适用于模型或布局只有一张图的情况多图模式 xff0c 识别矩形或无矩形块边界标准
  • Linux下VirtualBox虚拟机的命令行启动/关闭方法和开机自动启动

    SUN VirtualBox 的命令行启动 关闭方法简介 VirtualBox 详细命令 linux开机自动启动虚拟机系统 当你安装很多套Virtualbox的虚拟机器系统后 xff0c 希望能在开机后自动启动虚拟机器的系统 开启记事本 x
  • NSIS制作安装软件过程

    目录 1 工具介绍 1 1 界面设计用 xff0d xff0d NSIS Dialog Designer 1 2 编辑及向导 xff0d xff0d nisedit2 0 3 1 3 控件信息查看 Au3Info exe 2 脚本的结构 1
  • 欧拉题目收集

    nbsp https www oschina net group kunpeng 赛题6 容器网络可视化 赛题类别 操作系统 nbsp 赛题难度 中 nbsp 赛题描述 容器场景的微服务运维已经在向可视化方式演进 可视化运维中最大的内容是A
  • ASP.NET Core Blazor: 两种IJSRuntime依赖注入的方式

    1 xff09 将 IJSRuntime 抽象注入Razor组件或者页面 razor 中 xff1a public partial class ToolsWidget Inject private IJSRuntime JSRuntime
  • x86 smbus 下挂eeprom不能写问题

    目录 背景 分析 驱动影响 SPD register 接口 只读 修改验证 总结 背景 x86 smbus上下挂一个eeprom xff0c 只能读取 xff0c 不能写入 写入命令采用 xff1a i2cset y f 0 0x50 0
  • ubuntu编译rk3588异常

    问题现象 在ubuntu上编译 rk3588 的kernel时 xff0c 报如下错误 xff1a LZ4C arch arm64 boot Image lz4 Incorrect parameters Usage lz4 arg inpu

随机推荐

  • linux rs485功能增加

    目录 串口驱动层级结构 485配置流程 dts相关 配置注册 初始化 485收发切换 delay after send 目前linux 内核中已经支持了485的实现 xff0c 但由于底层驱动的支持情况 xff0c 导致我们采用不同芯片时需
  • intel I2C的速率配置

    目录 寄存器篇 修改寄存器 intel I2C 驱动结构 lpss pci文件 lpss文件 驱动结构 Synopsys DesignWare I2C BIOS配置修改 ACPI表的查看 I2C速率 寄存器篇 修改速率很简单 xff0c 看
  • spark 例子运行- spark pi

    原计划用cygwin来运行linux的脚本 xff0c 进行测试 但是在实际运行过程中 xff0c 出现java cp x jar class xff0c 总是失败的问题 xff0c 一直没有解决 xff0c 因而 xff0c 直接用win
  • sas控制器驱动之设备管理

    本文以2 6 32 68内核中的mpt2sas为例子 xff0c 介绍了sas驱动的设备管理 1 基本结构 内核中scsi的结构分三层 xff0c 此在网上已有大量资料 xff0c 不再赘述 本文在此基础上增加了mid layer的 tra
  • 主成分分析、聚类分析、因子分析的基本思想及优缺点

    点击打开链接
  • pyqt5之menu和action

    exitAct 61 QAction QIcon 39 exit png 39 39 amp Exit 39 self exitAct setShortcut 39 Ctrl 43 Q 39 exitAct setStatusTip 39
  • 如何获取控件所在的坐标位置

    窗口的坐标体系及接口 获取坐标的接口在Widget类中 xff0c 即控件的坐标信息属于基类的成员 基本的坐标体系如图所示 通过接口打印出 lable 3的坐标值 print self label 3 geometry x print se
  • 【转载+修改】Gnome菜单项与文件打开方式(文件关联)的更改

    转载自 xff1a http hi baidu com red woods blog item 30a5f845a2247f24cffca397 html 转载有修改 xff01 在KDE中我们可以使用系统设置中提供的设置进行文件关联的修改
  • Kali Linux从零基础入门到精通,看完这一篇就够了。

    1 目录 基于Android设备的Kali Linux渗透测试教程基于Android设备的Kali Linux渗透测试教程2Web渗透测试使用kali linuxkali linux中文指南kali linux wireless pente
  • 客户机无法通过mstsc连接到远程主机的解决方法

    客户机无法通过 mstsc 连接到远程主机的解决方法 症状 当通过 mstsc 命令进行连接时 系统提示 客户端无法连接远程计算机 xff1b 连接可能没有启用 xff0c 或者计算机太忙 xff0c 无法接受新连接 也可能网络问题使您无法
  • 五个同步问题的经典模型之一:生产者/消费者问题

    也叫缓存绑定问题 xff08 bounded buffer xff09 xff0c 是一个经典的 多进程同步问题 单生产者和单消费者 有两个进程 xff1a 一组生产者进程和一组消费者进程共享一个初始为空 固定大小为n的缓存 xff08 缓
  • Android 以太网/有线网Ethernet功能开发

    1 功能介绍 以太网的功能是允许设备提供硬件接口通过插入网线的形式访问互联网的功能 接入网线之后 xff0c 设备可以动态的获取 IP xff0c DNS xff0c Gateway等一系列网络属性 xff0c 我们也可以手动配置设备的网络
  • 解决www.54kk.com/baidu劫持浏览器的问题

    endurer 原创 2005 10 27第一版 endurer注 xff1a 为了安全起见 xff0c 下文中的 http 均用 hxxp 代替 刚才一位同事的电脑中的浏览器被恶意网站劫持了 xff0c 请我帮忙处理 同事的电脑使用的是
  • Automatic Login

    sudo vim etc gdm custom confAdd the following lines to the field daemon AutomaticLoginEnable 61 true AutomaticLogin 61 i
  • Java Annotation手册

    版权声明 xff1a 本文可以自由转载 xff0c 转载时请务必以超链接形式标明文章原始出处和作者信息及本声明 作者 cleverpig 作者的Blog http blog matrix org cn page cleverpig 原文 h
  • shell 函数 入参说明

    1 入参个数 2 入参 0 脚本名 1第一个参数 3 64 和 xff1a 34 64 34 34 34 都是所有入参 64 将入参变成一个数组 将入参变成一个字符串 4 数组作为入参 fucn2 arr xff0c 函数内部获取入参数组
  • 程序媛工作几年后的感受!体验?

    黑客技术 点击右侧关注 xff0c 了解黑客的世界 xff01 Java开发进阶 点击右侧关注 xff0c 掌握进阶之路 xff01 Python开发 点击右侧关注 xff0c 探讨技术话题 xff01 作者 xff1a hq nuan 来
  • TIOBE 5月编程语言榜单出炉,C#最受开发者欢迎,C++将冲击Top 3

    x1f447 x1f447 关注后回复 进群 xff0c 拉你进程序员交流群 x1f447 x1f447 TIOBE Index for May 2022 和 4 月相比 xff0c 本月编程语言 Top 10 并没有明显的位置变化 xff
  • crontab 定时任务避免重复执行

    使用crontab设置一个脚本每个一段时间自动执行一次 xff0c 当脚本的执行时间超过crontab设置的时间间隔 xff0c 那个脚本就会在同一时刻同时执行 比如设置crontab每隔五分钟执行一次task sh xff1a span
  • ubuntu 通过 apt-get 安装软件失败时的解决方案

    最近在 vmware上的ubuntu系统下安装 软件时出现安装失败情况 xff0c 在网上搜了一通 xff0c 终于找到了解决方案 遇到的问题和解决方案如下 xff1a 一 apt get install vim二 apt get upda