应该如何使用vcpkg 提供的库呢,vcpkg提供2种使用方式,一种是在CMake 工程使用,另一种是在MSbuild 工程使用,我们分别提供了示例。
如何在CMake 工程中使用?示例:sqlite3
第一步: 安装库
PS E:\vcpkg\clean\vcpkg> ./vcpkg install sqlite3:x64-windows

Computing installation plan...
The following packages will be built and installed:

    sqlite3[core]:x64-windows -> 3.34.1

Detecting compiler hash for triplet x64-windows...
Could not locate cached archive: C:\Users\phoebe\AppData\Local\vcpkg\archives\1e\1e772ef47022be1c658daf2d07997ec134ada023.zip
Starting package 1/1: sqlite3:x64-windows
Building package sqlite3[core]:x64-windows...
-- Downloading https://sqlite.org/2021/sqlite-amalgamation-3340100.zip -> sqlite-amalgamation-3340100.zip...
-- Extracting source E:/vcpkg/clean/vcpkg/downloads/sqlite-amalgamation-3340100.zip
-- Applying patch fix-arm-uwp.patch
-- Using source at E:/vcpkg/clean/vcpkg/buildtrees/sqlite3/src/3340100-3d888d9856.clean
-- Configuring x64-windows
-- Building x64-windows-dbg
-- Building x64-windows-rel
-- Performing post-build validation
-- Performing post-build validation done
Stored binary cache: C:\Users\phoebe\AppData\Local\vcpkg\archives\1e\1e772ef47022be1c658daf2d07997ec134ada023.zip
Building package sqlite3[core]:x64-windows... done
Installing package sqlite3[core]:x64-windows...
Installing package sqlite3[core]:x64-windows... done
Elapsed time for package sqlite3:x64-windows: 38.07 s

Total elapsed time: 54.06 s

The package sqlite3:x64-windows provides CMake targets:

    find_package(unofficial-sqlite3 CONFIG REQUIRED)
    target_link_libraries(main PRIVATE unofficial::sqlite3::sqlite3)
第二步:集成
通过以下命令可以把vcpkg提供的库集成到我们的工程中,之后的文章会详细介绍这部分内容,现在只需要拿到toolchain 文件。
PS E:\vcpkg\clean\vcpkg> ./vcpkg integrate install

Applied user-wide integration for this vcpkg root.
All MSBuild C++ projects can now #include any installed libraries.
Linking will be handled automatically.
Installing new libraries will make them instantly available.

CMake projects should use: "-DCMAKE_TOOLCHAIN_FILE=E:/vcpkg/clean/vcpkg/scripts/buildsystems/vcpkg.cmake"
第三步:使用
我们可以通过visual studio IDE 集成cmake 来使用vcpkg 提供的库, 也可以通过cmake 命令行直接来使用,以下分别给出示例。
CMake 命令行使用示例:
1,在 E:\vcpkg\vcpkgtest\sliqte3 目录下创建文件CMakeLists.txt 与 main.cpp文件。
# CMakeLists.txt
cmake_minimum_required(VERSION 3.0)
project(test)

find_package(unofficial-sqlite3 CONFIG REQUIRED)
add_executable(main main.cpp)
target_link_libraries(main PRIVATE unofficial::sqlite3::sqlite3)
// main.cpp
#include <sqlite3.h>
#include <stdio.h>

int main()
{
    printf("%s\n", sqlite3_libversion());
    return 0;
}
2, 打开x64 Native Tools 命令框,执行以下命令创建build文件夹 并进入build目录。
**********************************************************************

** Visual Studio 2019 Developer Command Prompt v16.9.0

** Copyright (c) 2021 Microsoft Corporation

**********************************************************************

[vcvarsall.bat] Environment initialized for: 'x64'

C:\Program Files (x86)\Microsoft Visual Studio\2019\Community>pushd E:\vcpkg\vcpkgtest\sliqte3

E:\vcpkg\vcpkgtest\sliqte3>mkdir build

E:\vcpkg\vcpkgtest\sliqte3>cd build
3, 执行CMake 命令生成VS工程文件。
cmake.exe .. -G "Visual Studio 16 2019" -DCMAKE_TOOLCHAIN_FILE=E:/vcpkg/clean/vcpkg/scripts/buildsystems/vcpkg.cmake -DVCPKG_TARGET_TRIPLET=x64-windows
注意:CMAKE_TOOLCHAIN_FILE 文件就是在第二步集成时获取的,VCPKG_TARGET_TRIPLET需要与安装sqlite3选用的triplet保持一致。
输出信息:
E:\vcpkg\vcpkgtest\sliqte3\build>cmake.exe .. -G "Visual Studio 16 2019" -DCMAKE_TOOLCHAIN_FILE=E:/vcpkg/clean/vcpkg/scripts/buildsystems/vcpkg.cmake -DVCPKG_TARGET_TRIPLET=x64-windows -DVCPKG_BUILD_TYPE=debug
-- Selecting Windows SDK version 10.0.19041.0 to target Windows 10.0.19042.
-- The C compiler identification is MSVC 19.28.29910.0
-- The CXX compiler identification is MSVC 19.28.29910.0
-- Detecting C compiler ABI info
-- Detecting C compiler ABI info - done
-- Check for working C compiler: C:/Program Files (x86)/Microsoft Visual Studio/2019/Community/VC/Tools/MSVC/14.28.29910/bin/Hostx64/x64/cl.exe - skipped
-- Detecting C compile features
-- Detecting C compile features - done
-- Detecting CXX compiler ABI info
-- Detecting CXX compiler ABI info - done
-- Check for working CXX compiler: C:/Program Files (x86)/Microsoft Visual Studio/2019/Community/VC/Tools/MSVC/14.28.29910/bin/Hostx64/x64/cl.exe - skipped
-- Detecting CXX compile features
-- Detecting CXX compile features - done
-- Configuring done
-- Generating done
-- Build files have been written to: E:/vcpkg/vcpkgtest/sliqte3/build
4, 构建
E:\vcpkg\vcpkgtest\sliqte3\build>cmake --build .
Microsoft (R) Build Engine version 16.9.0+57a23d249 for .NET Framework
Copyright (C) Microsoft Corporation. All rights reserved.
  Checking Build System
  Building Custom Rule E:/vcpkg/vcpkgtest/sliqte3/CMakeLists.txt
  main.cpp
  main.vcxproj -> E:\vcpkg\vcpkgtest\sliqte3\build\Debug\main.exe
  Building Custom Rule E:/vcpkg/vcpkgtest/sliqte3/CMakeLists.txt
5,测试
E:\vcpkg\vcpkgtest\sliqte3\build> .\Debug\main.exe
3.34.1
通过visual studio IDE 集成cmake 来使用示例:
1,创建cmake 工程 ‘sqlite3test’。
2,修改CMakeSettings.json配置文件。
{
  "configurations": [
    {
      "name": "x64-Debug",
      "generator": "Visual Studio 16 2019 Win64",
      "configurationType": "Debug",
      "inheritEnvironments": [ "msvc_x64_x64" ],
      "buildRoot": "${projectDir}\\out\\build\\${name}",
      "installRoot": "${projectDir}\\out\\install\\${name}",
      "cmakeCommandArgs": "-DCMAKE_TOOLCHAIN_FILE=E:/vcpkg/clean/vcpkg/scripts/buildsystems/vcpkg.cmake",
      "buildCommandArgs": "",
      "ctestCommandArgs": ""
    }
  ]
}
3, 打开 与Sqlite3test.cpp 同一级目录的CMakeLists.txt 文件, 添加:
  find_package(unofficial-sqlite3 CONFIG REQUIRED)
  target_link_libraries(sqlite3test PRIVATE unofficial::sqlite3::sqlite3)
4,打开 Sqlite3test.cpp 添加:
  // Sqlite3test.cpp
  #include "sqlite3test.h"
  #include <sqlite3.h>
  #include <stdio.h>

  int main()
  {
      printf("%s\n", sqlite3_libversion());
      return 0;
  }
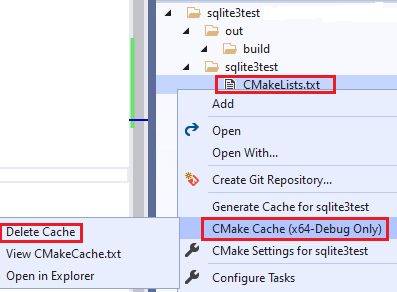
5,CMakeSettings.json 保存之后会自动配置生成 vs 工程文件,现在只需要build 这个工程, 选中最外层的CMakeLists.txt 文件 点击build。

6,构建好之后,选中sqlite3test.exe, 并且点击运行测试。
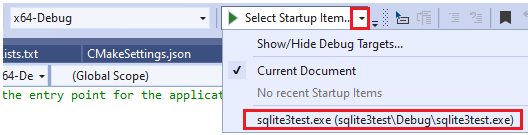
可以看到执行的结果是:
3.34.1
注意:如果需要改动 CMakeSettings.json配置文件,最好把CMake cache 文件删掉,重新再生成一遍。
首次发布于 https://www.cnblogs.com/vcpkg/p/14550478.html
本文内容由网友自发贡献,版权归原作者所有,本站不承担相应法律责任。如您发现有涉嫌抄袭侵权的内容,请联系:hwhale#tublm.com(使用前将#替换为@)