使用websocket实现服务端主动发送消息到客户端

2023-05-16

平时我们都是由客户端浏览器主动发送请求到服务端,然后服务器处理请求后返回结果,服务器无法主动向客户端浏览器发送消息。

但是在某些业务场景下我们需要由服务器主动发送消息到客户端浏览器,如当客户用户下订单后,服务器需要主动发消息提醒商户用户有新的订单被创建,请及时处理。在这种需求下我们就需要使用到websocket。

WebSocket是一种在单个TCP连接上进行全双工通信的协议。

下面来看一看websocket的使用示例:

前端代码

创建一个发送消息到服务端的页面sendMessage.html,模拟用户下订单

通过ajax方式发送消息到服务端

<!DOCTYPE html>
<html lang="en">
<head>
    <meta charset="UTF-8">
    <title>Title</title>
</head>
<body>
    输入需要发送的消息:<input type="text" id="sendText">
    <input type="button" id="sendBtn" value="发送消息">
</body>
<script>
    var sendText = document.getElementById('sendText');
    var sendBtn = document.getElementById('sendBtn');
    //按下按钮后通过ajax发送消息到服务端
    sendBtn.onclick = function () {
        var send = sendText.value;
        var xmlHttp = new XMLHttpRequest();
        var url = "/sendMessage?msg=" + send;
        console.log(url);
        xmlHttp.open("get",url,true);
        xmlHttp.send();
    }
</script>
</html>

创建一个接收服务端消息的页面websocketPage.html,模拟商户接收到消息

这里只是将接收到的消息展示在页面上,也可以做成弹出弹窗、消息图标显示角标等其它形式。

注意:websocket协议的url是以ws开头的而不是http!

<!DOCTYPE html>
<html lang="en">
<head>
    <meta charset="UTF-8">
    <title>Title</title>
</head>
<body>
消息展示区:<br/>
<div id="textArea"></div>

</body>
<script>
    var textArea = document.getElementById('textArea');


    var websocket = null;
    //如果浏览器支持websocket就建立一个websocket,否则提示浏览器不支持websocket
    if('websocket' in window){
        websocketPage = new WebSocket('ws://localhost:8080/websocketurl');
    }else{
        alert('浏览器不支持websocket!');
    }
    //建立websocket时自动调用
    websocketPage.onopen = function (event) {
        console.log('建立连接');
    }
    //关闭webscoket时自动调用
    websocketPage.oncolse = function (event){
        console.log('关闭连接');
    }
    //websocket接收到消息时调用
    websocketPage.onmessage = function (event){
        //将接收到的消息展示在消息展示区
        textArea.innerText += event.data;
        textArea.innerHTML += "<br/>";
    }
    //websocket出错自动调用
    websocketPage.onerror = function () {
        alert('websocket出错');
    }
    //关闭窗口前关闭websocket连接
    window.onbeforeunload = function (){
        websocketPage.close();
    }

</script>
</html>

后端代码

在springboot项目中引入websocket依赖

<dependency>
		<groupId>org.springframework.boot</groupId>
		<artifactId>spring-boot-starter-websocket</artifactId>
</dependency>

创建一个websocket服务点导出器

import org.springframework.context.annotation.Bean;
import org.springframework.context.annotation.Configuration;
import org.springframework.stereotype.Component;
import org.springframework.web.socket.server.standard.ServerEndpointExporter;

@Configuration
public class WebsocketConfig {
    @Bean
    public ServerEndpointExporter getServerEndpointExporter(){
        return new ServerEndpointExporter();
    }
}

创建一个websocket服务类

import org.springframework.stereotype.Component;

import javax.websocket.OnClose;
import javax.websocket.OnMessage;
import javax.websocket.OnOpen;
import javax.websocket.Session;
import javax.websocket.server.ServerEndpoint;
import java.io.IOException;
import java.util.concurrent.CopyOnWriteArraySet;

@Component
@ServerEndpoint("/websocketurl")//设置websocket连接url,就是前端创建websocket需要提供的url
public class MyWebSocketService {
    private Session session;
    
    //存放所有的websocket连接
    private static CopyOnWriteArraySet<MyWebSocketService> myWebSocketServicesSet = new CopyOnWriteArraySet<>();
    
    //建立websocket连接时自动调用
    @OnOpen
    public void onOpen(Session session){
        this.session = session;
        myWebSocketServicesSet.add(this);
        System.out.println("有新的websocket连接进入,当前连接总数为" + myWebSocketServicesSet.size());
    }

    //关闭websocket连接时自动调用
    @OnClose
    public void onClose(){
        myWebSocketServicesSet.remove(this);
        System.out.println("连接断开,当前连接总数为" + myWebSocketServicesSet.size());
    }

    //websocket接收到消息时自动调用
    @OnMessage
    public void onMessage(String message){
        System.out.println("this:" + message);
    }

    //通过websocket发送消息
    public void sendMessage(String message){
        for (MyWebSocketService webSocketService : myWebSocketServicesSet){
            try {
                webSocketService.session.getBasicRemote().sendText(message);
            } catch (IOException e) {
                System.err.println(this + "发送消息错误:" + e.getClass() + ":" + e.getMessage());
            }
        }
    }
}

创建一个接收创建订单信息的控制器

import org.springframework.stereotype.Controller;
import org.springframework.web.bind.annotation.RequestMapping;
import org.springframework.web.bind.annotation.ResponseBody;
import xyz.syyrjx.websockettest.websocketService.MyWebSocketService;

import javax.annotation.Resource;

@Controller
public class MyController {

    @Resource
    MyWebSocketService webSocketService;

    @RequestMapping("/sendMessage")
    @ResponseBody
    public Object sendMessage(String msg){
        webSocketService.sendMessage(msg);
        return null;
    }
}

规定url和视图的映射关系

import org.springframework.context.annotation.Configuration;
import org.springframework.web.servlet.config.annotation.ViewControllerRegistry;
import org.springframework.web.servlet.config.annotation.WebMvcConfigurer;

@Configuration
public class MVCConfiguration implements WebMvcConfigurer {
    @Override
    public void addViewControllers(ViewControllerRegistry registry) {
        registry.addViewController("/websocketPage").setViewName("websocketPage");
        registry.addViewController("/sendMessagePage").setViewName("sendMessage");
    }
}

启动项目进行测试

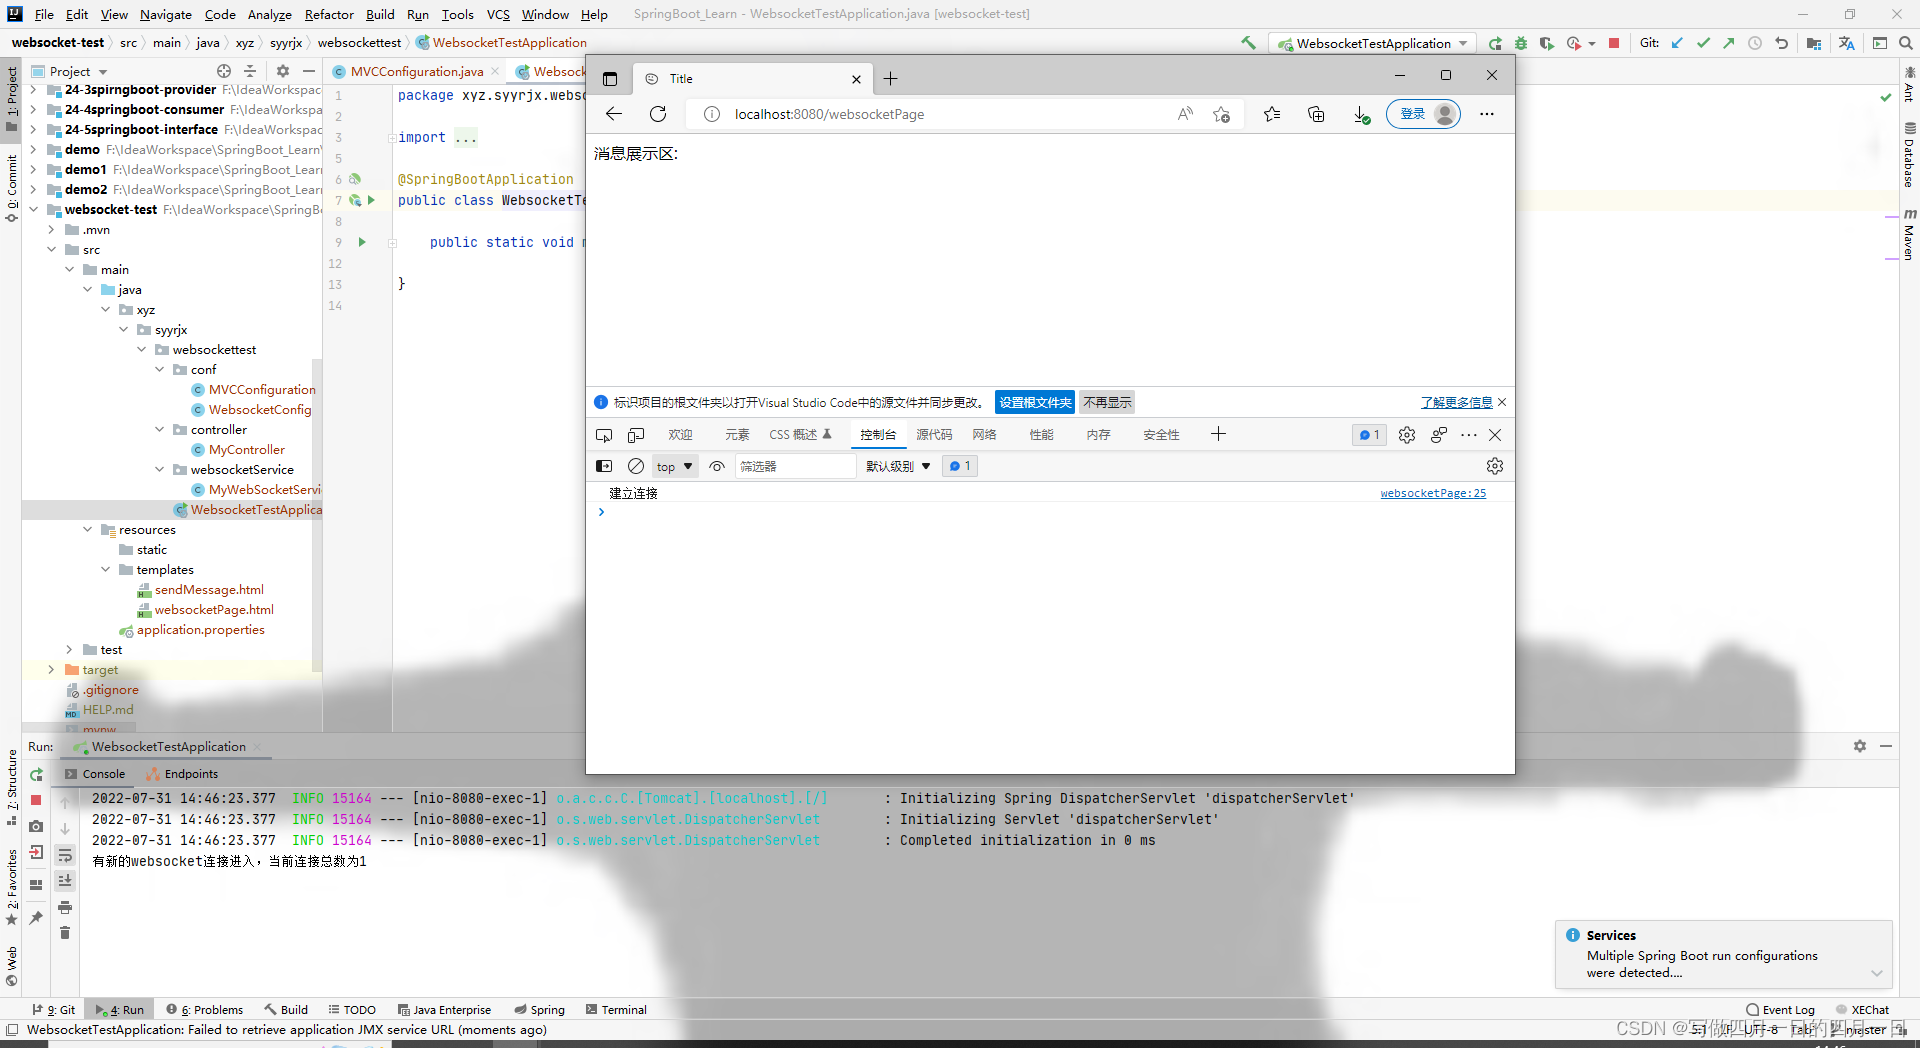
启动一个edge浏览器,进入websocketPage页面等待消息,服务端接收到websocket连接,打印当前连接数

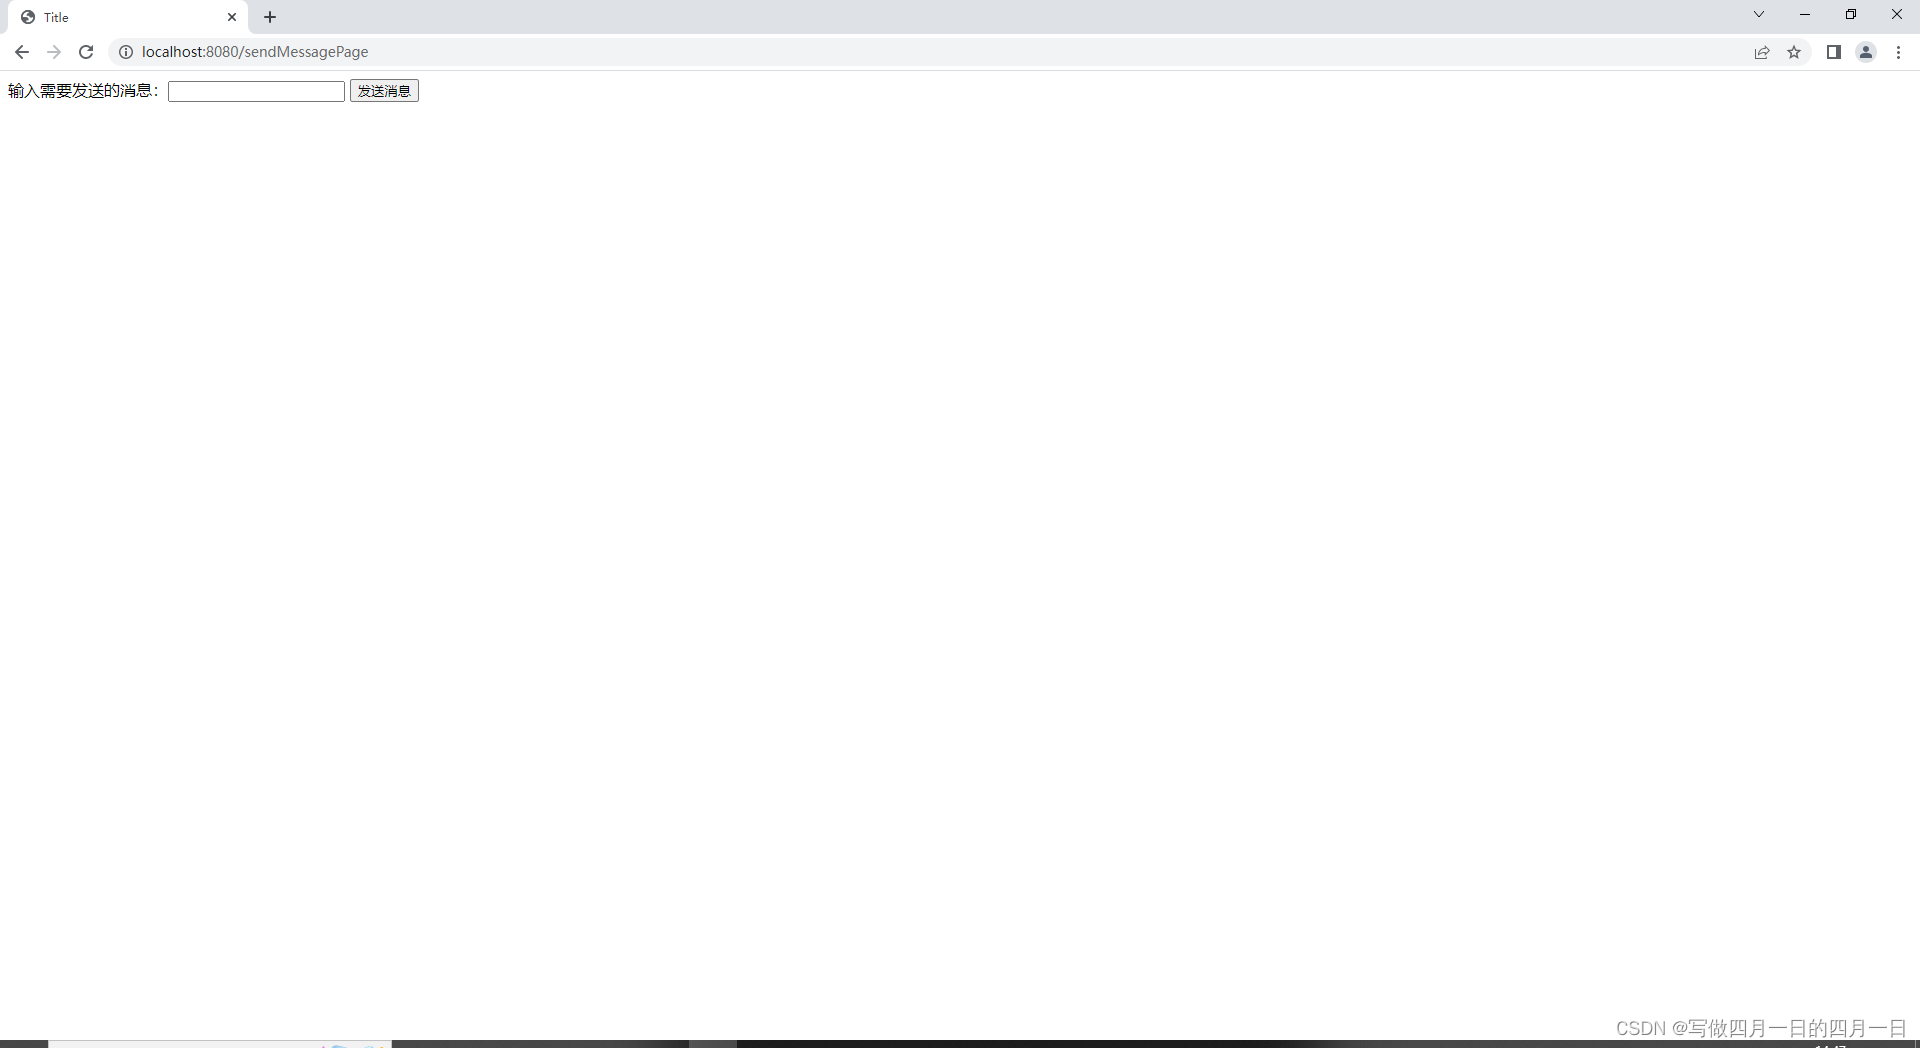
 启动一个chrome浏览器,进入sendMessagePage页面发送消息

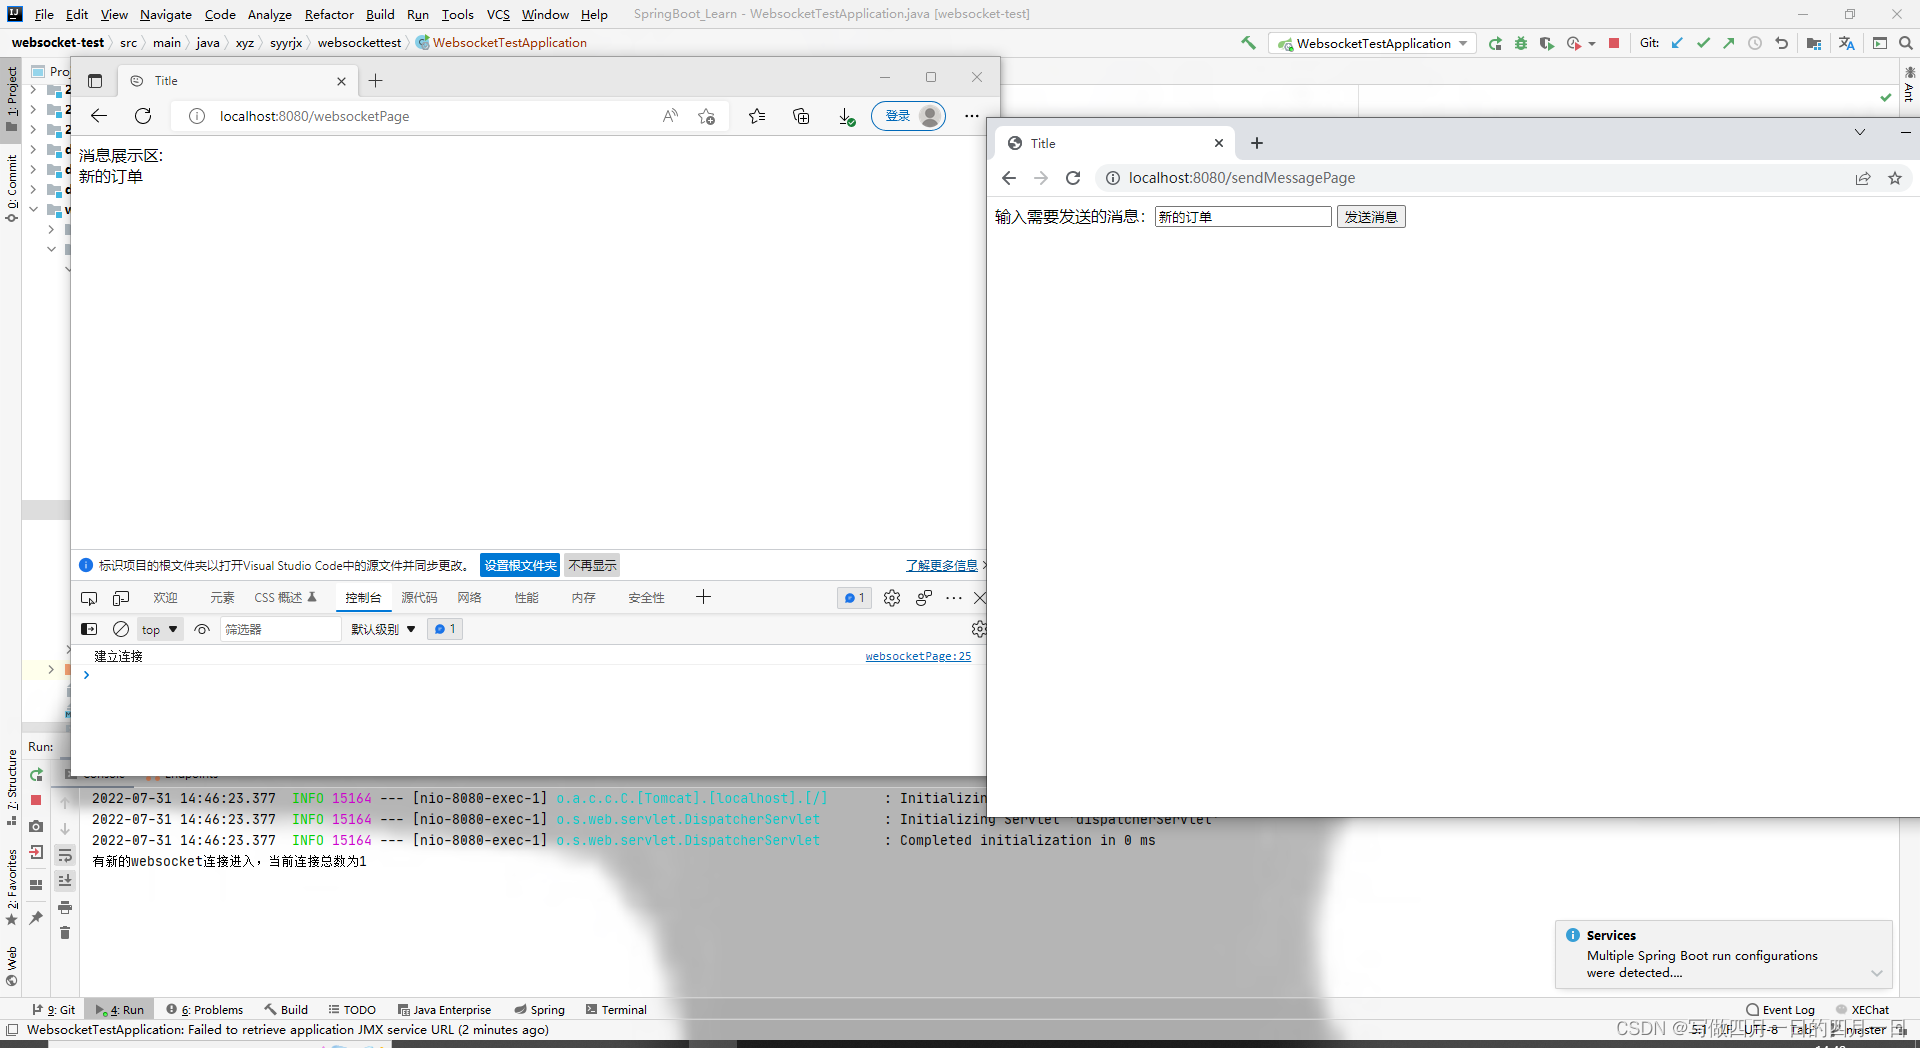
 在sendMessagePage页面输入消息并发送,在websocketPage页面就会接收到消息并展示,此时websocketPage没有主动发送请求给服务器,而是服务器主动发送消息给浏览器


本文内容由网友自发贡献,版权归原作者所有,本站不承担相应法律责任。如您发现有涉嫌抄袭侵权的内容,请联系:hwhale#tublm.com(使用前将#替换为@)

使用websocket实现服务端主动发送消息到客户端 的相关文章

  • Git Bash中怎么复制与粘贴

    git里面的复制粘贴 一 第一种键盘复制粘贴 右击 xff0c 把git bash应用的Options 配置项打开 复制 ctrl 43 insert 粘贴 shift 43 insert 二 第二种鼠标复制粘贴 1 选中你要复制的部分 x
  • 最新版 springboot集成kafka

    在上一篇文章中介绍了怎么在mac系统上搭建kafka xff0c 既然搭建成功了 xff0c 肯定要集成到项目中使用啊 xff0c 但是怎么集成呢 xff0c 这里把我本人集成的代码以及怎么一步步集成的放上来 xff0c 源码也会在本文的后
  • Python循环输出1~100,每10个换一行

    for i in range 1 101 print i end 61 34 34 if i 10 61 61 0 print
  • JavaScript中matches和match方法

    matches 主要是用来判断当前DOW节点是否能完全匹配对应的CSS选择器 xff0c 如果匹配成功 xff0c 返回true xff0c 反之则返回false 语法如下 xff1a element mathces seletor 这个方
  • Row size too large (> 8126). Changing some columns to TEXT or BLOB… | Mysql / MariaDB

    Row size too large gt 8126 Changing some columns to TEXT or BLOB Mysql MariaDB 我们最近将客户网站迁移到新服务器 xff0c 并在尝试导入其数据库时遇到以下错误
  • 一文教你完美解决Linux中Unable to locate package xxx问题,解决不了你打我!

    项目场景 xff1a 使用Ubuntu系统进行开发 问题描述 这两天跟着一门网 课学 把html的网页部署到云服务器 xff0c 于是租了个Ubuntu云服务器 xff0c 照着网课的代码去执行 xff0c 然后一直出现这个问题 xff0c
  • Spring相关知识点(全集)

    1Spring概述 1 1Spring概述 1 spring是一个开源框架 2 spring为简化企业级开发而生 xff0c 使用spring xff0c Javabean就可以实现很多以前要考EJB才能实现的功能 同样的功能 xff0c
  • 云服务的三种模式

    1 laaS 基础设施即服务 laaS xff08 Infrastructure as a Service xff09 即基础设施即服务 提供给消费者的服务是对所有计算基础设施的利用 xff0c 包括处理CPU 内存 存储 网络和其他基本的
  • Caused by: java.lang.IllegalStateException: No application config found or it‘s not a valid config!

    复习springboot时遇到的问题 xff0c 找不到application properties 配置文件 xff0c 很奇怪 xff0c 明明放到resource下面了 xff0c 就是编译不进去 xff0c 运行后target根本没
  • Win系统远程桌面连接教程/查询用户名和密码

    要连接的电脑命名为A 被连接的电脑命名为B B电脑 xff1a 右键电脑属性 点击远程设置 点击允许远程连接此电脑 win 43 r打开cmd输入ipconfig查询ip地址 不知道用户名和密码的 输入net user查询用户名 xff0c
  • Tomcat 9.0安装及配置

    目录 一 获取安装包 二 Tomcat9 0 67 环境配置 三 验证 四 补充 一 获取安装包 官网下载https tomcat apache org 解压至英文文件夹下 xff08 路径中需要全英文 xff09 xff0c 记住路径 百
  • 1.Matlab图像的读取和显示

    在开始之前 xff0c 我们需要在脚本里创建个 m文件 xff0c 然后运行 每次运行时要更换至脚本的路径 clc clear closeall 在一个文件的开头经常会看到 那么他们的作用是什么呢 xff1f clc span class
  • 分享一个word转pdf的工具类Aspose[java]

    项目中使用到office文件的格式转换pdf阅读 xff0c 但是没有一款好用的转换工具 由于本人是mac系统 xff0c openoffice也没法使用 xff0c 前期使用itext转换一直中文乱码 xff0c 也没有解决这个问题 xf
  • Window Sever 2012 密码忘记,修改密码的方法

    在VMWare中安装Window Server 2012忘记密码后如何进行破译修复 xff1f 方法如下 xff1a 进入BIOS 设置界面 xff0c 华硕是按f2 xff08 可以查询一下自己相应电脑进入BIOS界面的按键 xff09
  • UNIX环境高级编程笔记

    UNIX环境编程 一 UNIX基础知识1 1 Linux 主要特性1 2 Linux 内核1 3 Linux 目录结构1 4 登录1 登录名2 shell 1 5 输入和输出1 文件描述符2 标准输入 标准输出 标准错误3 不带缓冲的IO4
  • 实现map有序输出

    我们知道golang里的map是无序的 xff0c 不像python里的字典还可以对键值对顺序反序啥的 所以我们下面手动实现map的有序输出 xff0c 其实原理很简单 xff01 package main import 34 fmt 34
  • 三大框架-Spring

    一 概述 spring框架是以一个分层架构 有七个定义良好的模块组成 Spring模块构建在核心容器之上 核心容器定义了创建 配置和管理bean方式 1 Spring Core 核心容器 提供Spring的基本功能 2 SPring Con
  • Java——泛型和Io流

    目录 1 泛型 2 File对象 3 IO流 4 字节输入和输出流 5 缓存流 6 对象流 1泛型 1 1什么是泛型 1 泛型就是限制我们得数据类型 2 为什么使用泛型 我们原来在定义集合时 xff0c 是如下得定义方式 xff1a Lis
  • Spring框架入门学习笔记

    Spring概述 目录 Spring概述 IOC容器 概念 底层原理 Spring提供IOC容器实现两种方式 基于xml方式实现属性注入和对象创建 属性注入 xml注入集合属性 Spring中的bean类型 bean的作用域 bean的生命
  • &和&&的区别?

    amp 和 amp amp 都是Java中的逻辑运算符 xff0c 用于对两个布尔值进行逻辑运算 xff0c 但它们有着不同的特点和使用场景 xff0c 具体区别如下 xff1a 1 运算规则 amp 是按位与运算符 xff0c 它会对两个

随机推荐

  • MAC电脑GOland2022.2.1版本DEBUG问题

    在使用goland使用debug调试代码出现 API server listening at 127 0 0 1 56871 could not launch process debugserver or lldb server not f
  • Maven连接数据库

    1 创建一个maven项目 2 在resources中创建db properties配置文件和log4j properties日志的配置文件 db username 61 root db password 61 root db url 61
  • 关于vs2019网络问题解决方案

    首先将IPV4 的DNS设置为默认的114 114 114 114 xff0c 备用DNS为8 8 8 8 xff0c 若没有用 xff0c 则不勾选IPV6 xff0c 亲测有效 这个问题曾经也困扰了我好几个月 xff0c 甚至都想换掉v
  • Spring Boot启动器

    文章目录 Spring Boot启动器简介自定义springboot启动器命名规约自定义starter步骤1 创建一个Spring boot项目2 导入pom3 编写配置类4 在resources META INF目录下新建spring f
  • web开发入门

    在vscode中输入英文 xff0c 按tab键 xff0c 叩可显示html5的框架 搭建好框架之后 xff0c 再进行局部设计即可制作一张简易静态网页
  • springboot学习笔记

    http t csdn cn aLaeJ
  • spring中的annotation简介

    1 注解介绍 注解 xff0c 是一种用来描述数据的数据 比如说 64 override表示我们重载父类函数 如果我们不用这个注解 xff0c 程序也能执行 xff0c 但是我们加了这个注解代表我告诉编译器这个方法是一个重写的方法 如果父类
  • C语言中如何使用字符数组和字符型指针变量

    案例一 使用字符数组统计字符串的长度以及实现字符串的反转 参考代码 xff1a include lt stdio h gt include lt stdlib h gt include lt string h gt int main cha
  • 拓扑排序详解

    提示 xff1a 古人学问无遗力 少壮功夫老始成 xff0c 纸上得来终觉浅 觉知此事须躬行 文章目录 一 AOV网的特点二 问题三 拓扑排序四 拓扑排序的方法五 检查AOV网中是否存在一个环六 两种思路6 1 思路一6 1 1 思路一代码
  • Altium Designer——设置电源线规则

    1 创建类来新建规则 执行菜单Design Classes 快捷键DC 将这多个网络建立一个class 执行菜单命令Design Rules 快捷键DR xff09 xff0c 进入规则设置栏 xff1b 新建个线宽规则 xff0c 在规则
  • 【Archlinux】(3) —— dwm+st+firefox+fcitx=愉快上网

    Archlinux dwm 43 st 43 firefox 43 fcitx 61 愉快上网 1 dwm窗口管理器2 ST简单终端3 firefox浏览器4 fcitx中文输入法参考资料 注意 后的命令是root用户和普通用户均可以的操作
  • idea创建maven项目产生卡死问题

    2021版idea创建maven项目时卡死问题解决 xff1a 问题描述 xff1a 在file project structure中新建maven的modules时 xff0c 点击finish后idea会卡死 xff0c 其他人有的说要
  • SpringBoot配置环境

    typora copy images to upload 微服务架构 第一个Spring Boot程序 jdk 1 8maven 3 6 1springboot 最新版IDEA 修改端口号 banner banner在线制作网站 Sprin
  • 【坑】导入项目报错Could not find com.android.tools.build:gradle:7.4.0

    报错的图没得了 xff0c 反正就是Could not find com android tools build gradle 7 4 0 这个报错解决思路 xff1a 1 首先导入项目你不要直接File Open xff0c 你要FIle
  • 通过adb命令安装卸载apk

    一 安装apk xff1a 1 正常安装APK adb install xxxx apk 2 覆盖安装APK adb install r xxxx apk 2 安装测试APK adb install t xxxx apk 3 组合使用 ad
  • 使用VNC远程连接云服务器,连接超时问题

    这里用的本地VNC工具为VNC viewer xff0c 使用的服务器为腾讯云CentOS服务器 已经在服务器端完成了图形化界面的安装以及开启vncserver xff0c 但是无法连接 已经创建完成vnc的服务器端 开启vnc命令 vnc
  • Spring框架的知识整理(项目流程)以及SSM框架的整合

    前言 上一篇文章我们发表Mybatis框架的学习心得 xff0c 以及针对一个项目而言说了一些流程 Spring学习的时候我们需要知道它的两个核心功能Ioc Aop xff0c 本文今日对Ioc做重点解释 Ioc功能阐述 Ioc 主要是一个
  • Ubuntu安装文件

    安装Java 首先在官网下载linux版本的jdk 然后传给linux xff0c 在解压到 usr local目录下 xff0c 在进入 url local目录 xff0c 并完成环境配置 tar zxvf jdk 8u331 linux
  • 快速排序(java实现)

    快速排序的思想 在一个无序的数组中 xff0c 取最后的一个数字为基准值 xff0c 在经过一次排序后 xff0c 使得改无效而的数组中 xff0c 小于基准值的在左侧 xff0c 等于基准值的在中间 xff0c 大于基准值的在右侧 假设一
  • 使用websocket实现服务端主动发送消息到客户端

    平时我们都是由客户端浏览器主动发送请求到服务端 xff0c 然后服务器处理请求后返回结果 xff0c 服务器无法主动向客户端浏览器发送消息 但是在某些业务场景下我们需要由服务器主动发送消息到客户端浏览器 xff0c 如当客户用户下订单后 x