学习目标:
提示:OAuth2.0是目前使用非常广泛的授权机制,用于授权第三方应用获取用户的数据。
例如:
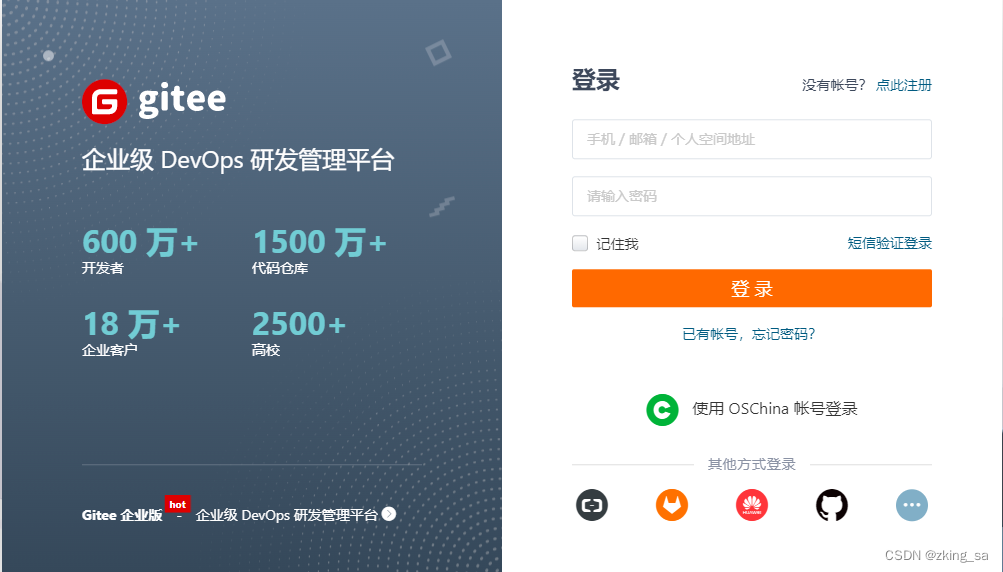
用户可以通过选择其他登录方式来使用gitee,这里就使用到了第三方认证。
来自RFC 6749
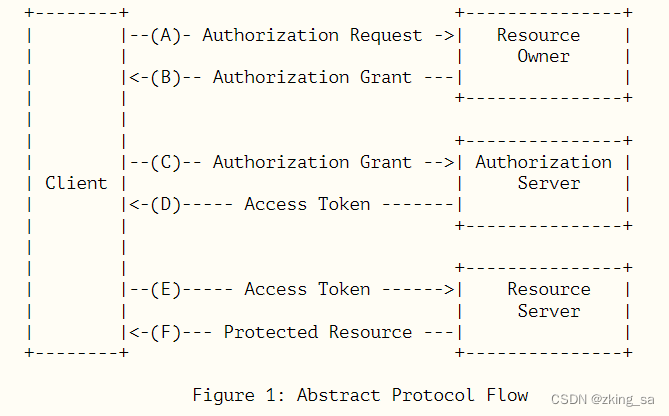
OAuth 引入了一个授权层,用来分离两种不同的角色:客户端和资源所有者。......资源所有者同意
以后,资源服务器可以向客户端颁发令牌。客户端通过令牌,去请求数据。
2. OAuth2中的角色:
提示:
1. 资源所有者
 能够授予对受保护资源的访问权限的实体,如果资源的所有者为个人,也被成为最终用户
 1. 资源服务器
 存储有受保护资源的服务器, 能够接受并验证访问令牌,并响应受保护资源的访问请求
 1. 客户
 需要被授权,然后再访问受保护资源的实体。客户这个术语,并不是特指应用程序,服务器,计算机
 等。
 1. 授权服务器
 验证资源所有者并获取授权成功后,向客户发出访问令牌
3. 认证流程:
RFC 6749 - The OAuth 2.0 Authorization Framework
4. 生活中的Oauth2思维:
提示:
场景设置:小王出差在外,为家中买了一台空调需要上门安装,小王的老爸老王在家,小王家是小王的
 老婆做主,只用获得老婆的许可方能有进入家中。现在空调客服人员需要进到小王家中安装空调。设计
 的流程如下:
 客服人员发一个进门安装空调的的申请给小王
 小王看到了服务人员的申请,在验证了客服人员的公司名称,工号等信息后,同意申请,并发给他
 一个授权码
 客服人员获取授权码之后,使用授权码去申请进门的令牌,申请发到小王的老婆那里,小王老婆在
 验证了授权码之后给客服人员发了一个含有有效期为一天的令牌(小王的老婆可以查看到小王发的
 原始验证码)
 客服人员拿着令牌到小王家
 老王在验证令牌有效后可客服人员进入客厅安装空调,但这个令牌不能进入其他房间。
 一天后令牌会过期,如有需要则需要重新申请
 上面的过程反应了OAuth2认证的典型流程,流程中的角色对应关系
 客户 ---> 客服人员
 资源所有者 ---> 小王
 授权服务器 ---> 小王老婆
 资源服务器 ---> 客厅
5. 令牌的特点:
使用令牌方式的优点:
令牌又时效性,一般是短期的,且不能修改,密码一般是长期有效的
令牌可以由颁发者撤销,且即时生效,密码一般可以不用修改而长期有效
令牌可以设定权限的范围,且使用者无法修改
在使用令牌时需要保证令牌的保密,令牌验证有效即可进入系统,不会再做其他的验证。
6. OAuth2授权方式
由于互联网有多种场景,OAuth2定义了四种获取令牌的方式,可以选择合适与自己的方式
授权码(authorization-code)
隐藏式(implicit)
密码式(password):
客户端凭证(client credentials)
6.1 授权码
第三方应用先申请一个授权码,然后再用该码获取令牌。
最常见的用法,安全性高,适合web应用。 授权码通过前端传送,令牌则是储存在后端,而且所有与资
源服务器的通信都在后端完成。这样的前后端分离,可以避免令牌泄漏。
流程如下:

1. 资源服务器提供一个链接,用户点击后就会跳转到认证服务器,授权用户数据给资源服务器使用,
资源服务器提供的连接的示例:
https://b.com/oauth/authorize?
response_type=code&
client_id=CLIENT_ID&
redirect_uri=CALLBACK_URL&
scope=read
response_type=code,表示使用授权码方式
client_id=CLIENT_ID,请求者的身份ID
redirect_uri=CALLBACK_URL, 认证服务器接受请求之后的调转连接,可以根据这个连接将生成
的code发送给资源服务器
scope=read,授权范围为只读
1. 页面跳转后,用户登录认证服务器,同意或拒绝资源服务器的授权请求,认证服务器根据上一步的
redirect_uri地址,将生成的授权码返回给资源服务器。
https://resouce.com/callback_url?code=AUTHORIZATION_CODE
code 返回的认证码
1. 客户拿到认证码之后,向认证服务器发给请求,申请令牌
https://b.com/oauth/token?
client_id=CLIENT_ID&
client_secret=CLIENT_SECRET&
grant_type=authorization_code&
code=AUTHORIZATION_CODE&
redirect_uri=CALLBACK_URL
client_id 资源服务器的身份ID
client_secret=CLIENT_SECRET 安全参数,只能在后端发请求
grant_type=authorization_code 表示授权的方式为授权码
code=AUTHORIZATION_CODE 用来获取令牌的授权码
redirect_uri=CALLBACK_URL 令牌生成后的颁发地址
1. 认证服务器对授权码进行认证,通过后颁发令牌,
{
"access_token":访问令牌,
"token_type":"bearer",
"expires_in":过期时间,
"refresh_token":"REFRESH_TOKEN",
"scope":"read",
"uid":用户ID,
"info":{...}
}
6.2 隐藏方式
隐藏方式合适的场景:
当web应用为纯前端应用没有后端,此时必须将令牌放在前端保存,省略了申请授权码的步骤。
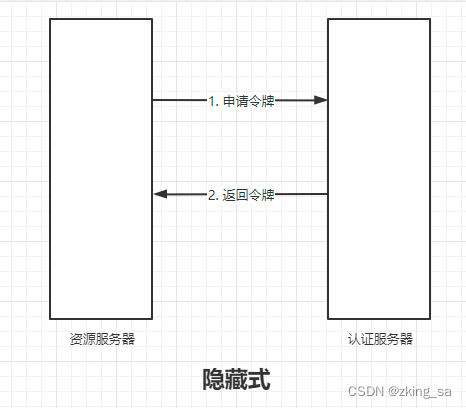
1. 资源服务器提供连接,跳转到认证服务器,
https://b.com/oauth/authorize?
response_type=token&
client_id=CLIENT_ID&
redirect_uri=CALLBACK_URL&
scope=read
response_type=token 表示直接返回令牌
client_id=CLIENT_ID 客户的身份ID
redirect_uri=CALLBACK_URL 生成令牌后的回调地址
scope=read 授权范围,只读
1. 用户需要在认证服务器登录,并进行授权, 授权成功后会根据第一步提供的CALLBACK_URL地址返回生成的token
https://a.com/callback#token=ACCESS_TOKEN
这种方式的特点:这种方式不安全,适用于对安全性不高的场景,令牌的有效期一般设置的比较短,通
常是会话期间有效,浏览器关闭令牌就时效了
6.3 密码方式
非常信任某个应用,将用户名和密码直接告诉应用,应用拿到用户名和密码后直接申请令牌
1. 资源服务器要求用户提供认证服务器的用户名和密码,拿到以后资源服务器向认证服务器申请令牌
https://oauth.b.com/token?
grant_type=password&
username=USERNAME&
password=PASSWORD&
client_id=CLIENT_ID
grant_type=password 认证方式
username=USERNAME 用户名
password=PASSWORD 密码
client_id=CLIENT_ID 客户id
1. 认证服务器验证身份通过后,直接在响应中发放令牌,资源服务器在响应中获取令牌。
6.4 凭证方式
这种方式适用于没有前端的命令行应用,通过命令行的方式请求令牌
1. 资源服务器使用命令行向认证服务器发送请求
https://oauth.b.com/token?
grant_type=client_credentials&
client_id=CLIENT_ID&
client_secret=CLIENT_SECRET
grant_type=client_credentials 凭证方式
client_id=CLIENT_ID 客户身份ID
client_secret=CLIENT_SECRET 认证码
该方式真对的是第三方应用,而不是用户,可以多个用户共享一个令牌
7. OAuth2流程演示示例 :
client 客户
authorization-server 认证服务
resource-owner 资源所有者
resource-server 资源服务器
流程:
客户向资源所有者申请授权码
资源所有者下发授权码
客户拿到授权码后向认证服务器申请令牌
认证服务器接到申请下方令牌
客户获取令牌后向资源服务器请求数据
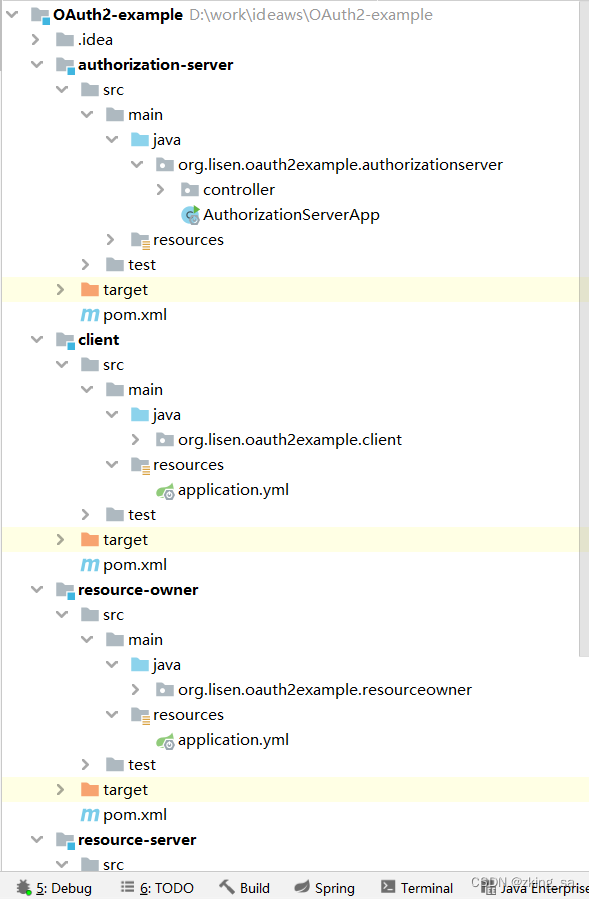
7.1 创建项目结构
7.1.1 客户
创建springboot项目,加入配置必要的依赖包
<dependencies>
<dependency>
<groupId>org.apache.oltu.oauth2</groupId>
<artifactId>org.apache.oltu.oauth2.client</artifactId>
</dependency>
<dependency>
<groupId>org.springframework.boot</groupId>
<artifactId>spring-boot-starter-web</artifactId>
</dependency>
<dependency>
<groupId>org.springframework.boot</groupId>
<artifactId>spring-boot-starter-test</artifactId>
</dependency>
<dependency>
<groupId>org.projectlombok</groupId>
<artifactId>lombok</artifactId>
<optional>true</optional>
</dependency>
</dependencies>
application.yml
spring:
application:
name: OAuth2-client
server:
port: 8080
7.1.2 认证服务器
pom.xml
<dependencies>
<dependency>
<groupId>org.apache.oltu.oauth2</groupId>
<artifactId>org.apache.oltu.oauth2.authzserver</artifactId>
</dependency>
<dependency>
<groupId>org.apache.oltu.oauth2</groupId>
<artifactId>org.apache.oltu.oauth2.resourceserver</artifactId>
</dependency>
<dependency>
<groupId>org.springframework.boot</groupId>
<artifactId>spring-boot-starter-web</artifactId>
</dependency>
<dependency>
<groupId>org.projectlombok</groupId>
<artifactId>lombok</artifactId>
<optional>true</optional>
</dependency>
<dependency>
<groupId>org.springframework.boot</groupId>
<artifactId>spring-boot-starter-test</artifactId>
<scope>test</scope>
</dependency>
</dependencies>
application.yml
spring:
application:
name: OAuth2-authorization-server
server:
port: 8081
7.1.3 资源拥有者
pom.xml
<dependencies>
<dependency>
<groupId>org.apache.oltu.oauth2</groupId>
<artifactId>org.apache.oltu.oauth2.authzserver</artifactId>
</dependency>
<dependency>
<groupId>org.apache.oltu.oauth2</groupId>
<artifactId>org.apache.oltu.oauth2.resourceserver</artifactId>
</dependency>
<dependency>
<groupId>org.springframework.boot</groupId>
<artifactId>spring-boot-starter-web</artifactId>
</dependency>
<dependency>
<groupId>org.projectlombok</groupId>
<artifactId>lombok</artifactId>
<optional>true</optional>
</dependency>
<dependency>
<groupId>org.springframework.boot</groupId>
<artifactId>spring-boot-starter-test</artifactId>
<scope>test</scope>
</dependency>
</dependencies>
application.yml
spring:
application:
name: OAuth2-resource-owner
server:
port: 8082
7.1.4 资源服务器
pom.xml
<dependencies>
<dependency>
<groupId>org.apache.oltu.oauth2</groupId>
<artifactId>org.apache.oltu.oauth2.authzserver</artifactId>
</dependency>
<dependency>
<groupId>org.apache.oltu.oauth2</groupId>
<artifactId>org.apache.oltu.oauth2.resourceserver</artifactId>
</dependency>
<dependency>
<groupId>org.springframework.boot</groupId>
<artifactId>spring-boot-starter-web</artifactId>
</dependency>
<dependency>
<groupId>org.projectlombok</groupId>
<artifactId>lombok</artifactId>
<optional>true</optional>
</dependency>
<dependency>
<groupId>org.springframework.boot</groupId>
<artifactId>spring-boot-starter-test</artifactId>
<scope>test</scope>
</dependency>
</dependencies>
application.yml
spring:
application:
name: oauth2-resource-server
server:
port: 8083
7.2 流程
7.2.1 资源所有者
资源所有者接到客户的请求,需要返回授权码
7.2.2 客户
编写一个controller,向资源所有者发送请求来获取授权码
7.2.3 客户
资源所有者生成授权码后,需要回调客户的一个接口,将授权码传回, 客户得到授权码后,需要向认证
服务器发出请求,申请令牌
7.2.4 认证服务器
认证服务器接到客户请求,生成令牌,并返回令牌数据
7.2.5 客户
客户获取了令牌,并使用令牌向资源服务器请求数据
7.2.6 资源服务器
资源服务器接到请求,返回数据
演示代码下载:
https://gitee.com/lisenaq/oauth2-example.git
演示客户发请求:
http://localhost:8080/client/getCode
本文内容由网友自发贡献,版权归原作者所有,本站不承担相应法律责任。如您发现有涉嫌抄袭侵权的内容,请联系:hwhale#tublm.com(使用前将#替换为@)