不是进来找报错原因,看怎么上传图片的,先看上传流程和分清区别:配置区域和访问域名找到域名,再看代码
前端上传图片到七牛云的流程
- 前端调用后端接口获取uploadToken
- 返回给前端需要的参数
- 前端通过Vue+Element-UI上传,只要封装好上传的文件对象和文件名的一些属性成dataObj,然后指定上传路径即可
七牛云地址
说到七牛云地址,真的是一把鼻涕一把泪(;´༎ຶД༎ຶ)
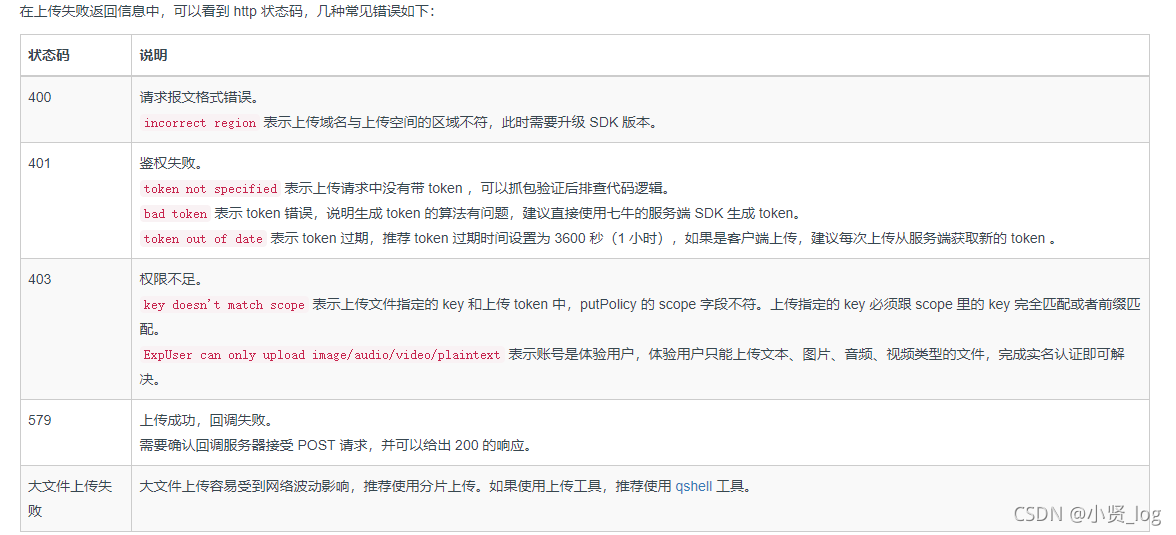
1、常见问题
各位要 先 看返回的上传失败常见状态码,找到原因解决是否是配置的问题
七牛云上传失败常见状态码
接下来就是前端最坑的问题
2、分清区别:配置区域和访问域名
设置没问题了,请求到七牛云一直返回 404,报错:Document not found
我尝试在七牛云打开空间访问日志,到这一步是可以访问的空间的。


搞了N个小时,一直以为是设置或者代码有问题,后来终于想起七牛云创建的空间是有个区域的;
在后端上传图片,是会配置区域服务器的,然后再直接使用该空间的外链域名地址访问七牛云
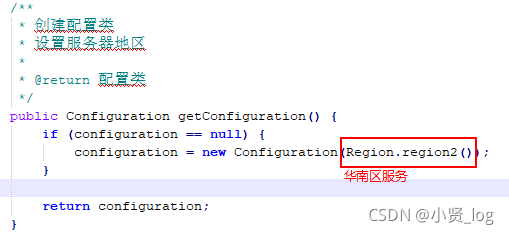
而在前端,没有配置区域服务器,使用该空间的外链域名地址访问七牛云,自然就一直返回404
终于找到原因了 (;´༎ຶД༎ຶ)
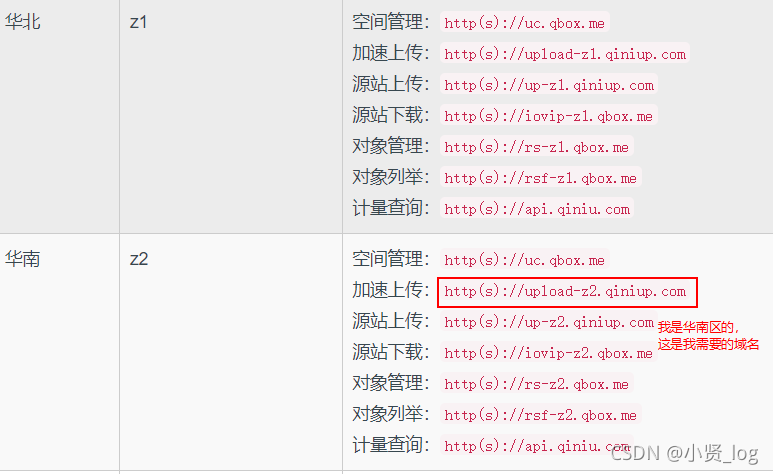
在前端上传图片,每个七牛云存储区域都对应着相应的服务器端\客户端上传域名
去下面官网地址,找到你需要的域名,放到表单的action
七牛云官方提供的存储区域
没了,就这样没了 ( ̄_ ̄|||)
代码示例
后端具体代码:
@RestController
@RequestMapping("/qiniu")
public class QiNiuController {
@Value("${qiniu.accessKey}")
private String accessKey;
@Value("${qiniu.secretKey}")
private String secretKey;
@Value("${qiniu.bucket}")
private String bucket;
@Value("${qiniu.path}")
private String path;
@Value("${qiniu.host}")
private String host;
@GetMapping("/policy")
public CommonResult policy(){
System.out.println("accessKey = " + accessKey);
SimpleDateFormat sdf = new SimpleDateFormat("yyyy-MM-dd");
String dir = sdf.format(new Date());
Auth auth = Auth.create(accessKey, secretKey);
String upToken = auth.uploadToken(bucket);
Map<String, String> respMap = new LinkedHashMap<String, String>();
respMap.put("upToken", upToken);
respMap.put("dir", dir);
respMap.put("path", path);
respMap.put("host", host);
return CommonResult.success(respMap);
}
el-upload组件:
<el-upload
action="dataObj.host"
:data="dataObj"
list-type="picture"
:multiple="false" :show-file-list="showFileList"
:file-list="fileList"
:before-upload="beforeUpload"
:on-remove="handleRemove"
:on-success="handleUploadSuccess"
:on-preview="handlePreview">
<el-button size="small" type="primary">点击上传</el-button>
<div slot="tip" class="el-upload__tip">只能上传jpg/png文件,且不超过10MB</div>
</el-upload>
<el-dialog :visible.sync="dialogVisible">
<img width="100%" :src="fileList[0].url" alt="">
</el-dialog>
后端具体代码:
<script>
dataObj: {
key: '',
path: '',
dir: '',
host: '',
token:'',
},
</script>
<script>
methods: {
emitInput(val) {
this.$emit('input', val)
},
handleRemove(file, fileList) {
this.emitInput('');
},
handlePreview(file) {
this.dialogVisible = true;
},
beforeUpload(file) {
console.log("上传之前文件信息;",file)
let _self = this;
return new Promise((resolve, reject) => {
policy().then(response => {
this.dataObj.key = response.data.dir +"/" + this.dateFormat()+"-" + Number.parseInt(Math.random() * 1000, 10) + file.name;
this.dataObj.dir = response.data.dir;
this.dataObj.host = response.data.host;
this.dataObj.token = response.data.upToken;
this.dataObj.path = response.data.path;
resolve(true)
}).catch(err => {
reject(false)
})
})
},
handleUploadSuccess(res, file) {
console.log("上传成功...")
this.showFileList = true;
this.fileList.pop();
let url = this.dataObj.path + '/' + this.dataObj.key;
this.fileList.push({name: file.name, url: url});
this.emitInput(this.fileList[0].url);
}
}
</script>
提醒:Element-UI是默认自动上传的,若不需要,用http-request属性来重写上传方式
本文内容由网友自发贡献,版权归原作者所有,本站不承担相应法律责任。如您发现有涉嫌抄袭侵权的内容,请联系:hwhale#tublm.com(使用前将#替换为@)