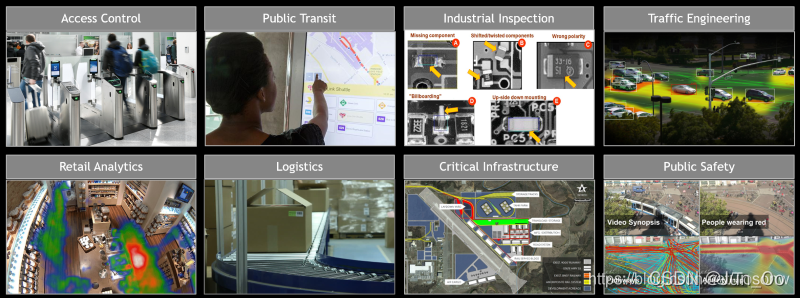
DeepStream应用程序将深度神经网络和其他复杂的处理任务引入到流处理管道中,以实现对视频和其他传感器数据的近实时分析。从这些传感器中提取有意义的见解为提高运营效率和安全性创造了机会。例如,摄像头是当前使用最多的物联网传感器。在我们的家中,街道上,停车场,大型购物中心,仓库,工厂中都可以找到相机–无处不在。视频分析的潜在用途是巨大的:访问控制,防止丢失,自动结帐,监视,安全,自动检查(QA),包裹分类(智能物流),交通控制/工程,工业自动化等。
DeepStream

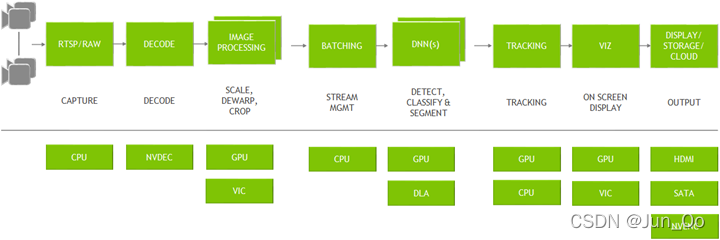
DeepStream Graph Architecture
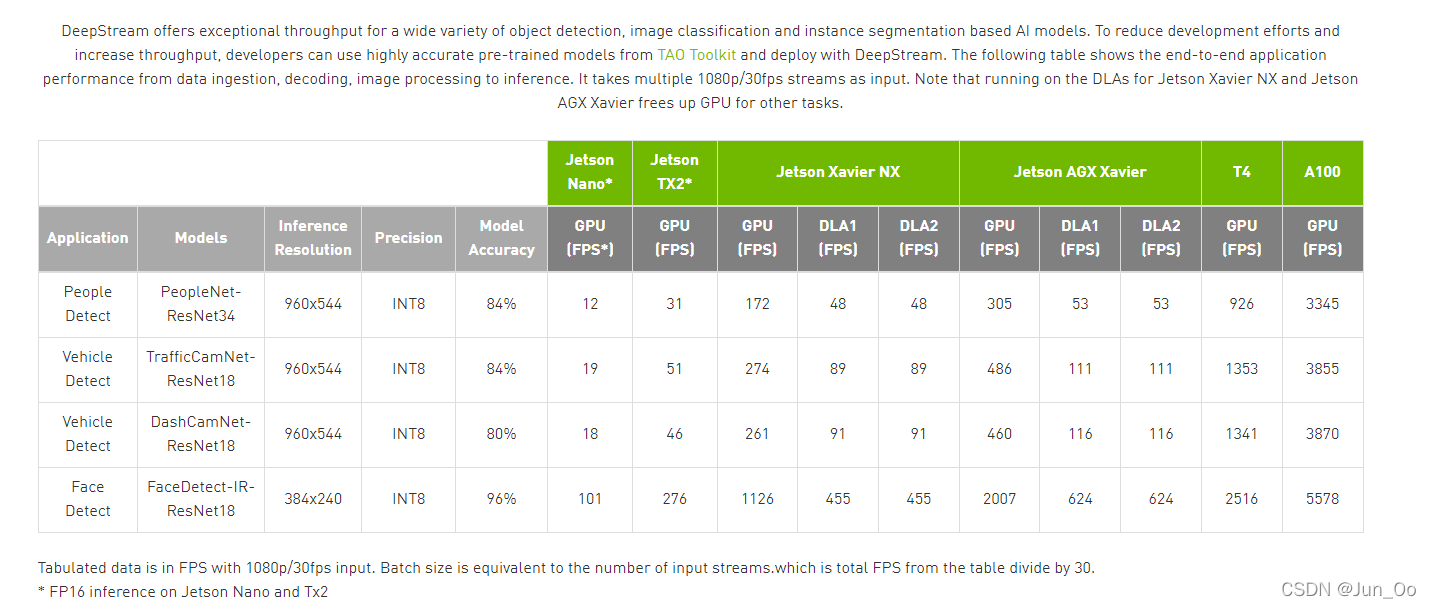
Achieving Higher Accuracy & Real-Time Performance Using DeepStream
安装Deepstream
- 这部分参考网上教程,一步一步安装就行。
- 安装成功,可以运行samples里得程序,测试下是否安装成功,这里就不多介绍。
生成TRT模型(.engine文件)
-
网上大多数是基于 trtexec 来生成 .engine 文件,这里选择基于tensorrtx来生成 .engine 文件。参考: https://github.com/wang-xinyu/tensorrtx/tree/master/scaled-yolov4
- generate yolov4_csp.wts from pytorch implementation with yolov4-csp.cfg and yolov4-csp.weights.
git clone https://github.com/wang-xinyu/tensorrtx.git
git clone -b yolov4-csp https://github.com/WongKinYiu/ScaledYOLOv4.git
cp {tensorrtx}/scaled-yolov4/gen_wts.py {ScaledYOLOv4/}
cd {ScaledYOLOv4/}
python gen_wts.py yolov4-csp.weights
- put yolov4_csp.wts into {tensorrtx}/scaled-yolov4, build and run
mv yolov4_csp.wts {tensorrtx}/scaled-yolov4/
cd {tensorrtx}/scaled-yolov4
mkdir build
cd build
cmake ..
make
sudo ./yolov4csp -s
sudo ./yolov4csp -d ../../yolov3-spp/samples
部署 Deepstream_rtsp
- 基于Deepstream实现RTSP访问。 参考: https://github.com/tosonw/deepstream-test1-app_rtsp
- 修改 deepstream_test1_app_demo_rtsp.c 。 在nvosd上增加一个探头,测试下识别是否正确。修改部分如下。
#ifdef PLATFORM_TEGRA
if (!gst_element_link_many(rtppay, parse, decoder, NULL))
{
printf("\nFailed to link elements 0.\n");
return -1;
}
if (!gst_element_link_many(streammux, pgie, nvvidconv, nvosd, transform, sink, NULL))
{
printf("\nFailed to link elements 2.\n");
return -1;
}
#else
if (!gst_element_link_many(rtppay, parse, decoder, sink, NULL))
{
printf("\nFailed to link elements.\n");
return -1;
}
#endif
#ifdef PLATFORM_TEGRA
osd_sink_pad = gst_element_get_static_pad(nvosd, "sink");
if (!osd_sink_pad)
g_print("Unable to get sink pad\n");
else
gst_pad_add_probe(osd_sink_pad, GST_PAD_PROBE_TYPE_BUFFER,
osd_sink_pad_buffer_probe, NULL, NULL);
gst_object_unref(osd_sink_pad);
#endif
static GstPadProbeReturn
osd_sink_pad_buffer_probe (GstPad * pad, GstPadProbeInfo * info,
gpointer u_data)
{
GstBuffer *buf = (GstBuffer *) info->data;
guint num_rects = 0;
NvDsObjectMeta *obj_meta = NULL;
guint vehicle_count = 0;
guint person_count = 0;
NvDsMetaList * l_frame = NULL;
NvDsMetaList * l_obj = NULL;
NvDsDisplayMeta *display_meta = NULL;
NvDsBatchMeta *batch_meta = gst_buffer_get_nvds_batch_meta (buf);
for (l_frame = batch_meta->frame_meta_list; l_frame != NULL;
l_frame = l_frame->next) {
NvDsFrameMeta *frame_meta = (NvDsFrameMeta *) (l_frame->data);
int offset = 0;
for (l_obj = frame_meta->obj_meta_list; l_obj != NULL;
l_obj = l_obj->next) {
obj_meta = (NvDsObjectMeta *) (l_obj->data);
if (obj_meta->class_id == PGIE_CLASS_ID_VEHICLE) {
vehicle_count++;
num_rects++;
}
if (obj_meta->class_id == PGIE_CLASS_ID_PERSON) {
person_count++;
num_rects++;
}
}
display_meta = nvds_acquire_display_meta_from_pool(batch_meta);
NvOSD_TextParams *txt_params = &display_meta->text_params[0];
display_meta->num_labels = 1;
txt_params->display_text = g_malloc0 (MAX_DISPLAY_LEN);
offset = snprintf(txt_params->display_text, MAX_DISPLAY_LEN, "Person = %d ", person_count);
offset = snprintf(txt_params->display_text + offset , MAX_DISPLAY_LEN, "Vehicle = %d ", vehicle_count);
txt_params->x_offset = 10;
txt_params->y_offset = 12;
txt_params->font_params.font_name = "Serif";
txt_params->font_params.font_size = 10;
txt_params->font_params.font_color.red = 1.0;
txt_params->font_params.font_color.green = 1.0;
txt_params->font_params.font_color.blue = 1.0;
txt_params->font_params.font_color.alpha = 1.0;
txt_params->set_bg_clr = 1;
txt_params->text_bg_clr.red = 0.0;
txt_params->text_bg_clr.green = 0.0;
txt_params->text_bg_clr.blue = 0.0;
txt_params->text_bg_clr.alpha = 1.0;
nvds_add_display_meta_to_frame(frame_meta, display_meta);
}
g_print ("Frame Number = %d Number of objects = %d "
"Vehicle Count = %d Person Count = %d\n",
frame_number, num_rects, vehicle_count, person_count);
frame_number++;
return GST_PAD_PROBE_OK;
}
- 测试
- mkdir build & cd build & make
- ./deepstream_test1_app_demo_rtsp_ (拷贝 deepstream-test1中 dstest1_pgie_config.txt )
- 成功运行后,会看到画面中的识别效果。 下面开始集成我们自己的yolov4模型。
部署 Yolov4 模型
git clone https://github.com/NVIDIA-AI-IOT/yolov4_deepstreamcd yolov4_deepstream/- 修改 nvdsparsebbox_Yolo.cpp (修改按照tensorrtx方式去转换bbox)
#include <algorithm>
#include <cassert>
#include <cmath>
#include <cstring>
#include <fstream>
#include <iostream>
#include <unordered_map>
#include <map>
#include "nvdsinfer_custom_impl.h"
#define BBOX_CONF_THRESH 0.5
#define NMS_THRESH 0.4
static constexpr int LOCATIONS = 4;
struct alignas(float) Detection {
float bbox[LOCATIONS];
float det_confidence;
float class_id;
float class_confidence;
};
static const int NUM_CLASSES_YOLO = 1;
static const int MAX_OUTPUT_BBOX_COUNT = 1000;
static const int DETECTION_SIZE = sizeof(Detection) / sizeof(float);
bool cmp(const Detection& a, const Detection& b) {
return a.det_confidence > b.det_confidence;
}
float clamp(const float val, const float minVal, const float maxVal) {
assert(minVal <= maxVal);
return std::min(maxVal, std::max(minVal, val));
}
extern "C" bool NvDsInferParseYoloV4(
std::vector<NvDsInferLayerInfo> const& outputLayersInfo,
NvDsInferNetworkInfo const& networkInfo,
NvDsInferParseDetectionParams const& detectionParams,
std::vector<NvDsInferParseObjectInfo>&objectList);
static void convertBBoxYoloV4(const Detection& detect, const uint& netW, const uint& netH, NvDsInferParseObjectInfo& b) {
const float* bbox = detect.bbox;
float xCenter = bbox[0];
float yCenter = bbox[1];
float w = bbox[2];
float h = bbox[3];
float x0 = xCenter - w * 0.5;
float y0 = yCenter - h * 0.5;
float x1 = x0 + w;
float y1 = y0 + h;
x0 = clamp(x0, 0, netW);
y0 = clamp(y0, 0, netH);
x1 = clamp(x1, 0, netW);
y1 = clamp(y1, 0, netH);
b.left = x0;
b.width = clamp(x1 - x0, 0, netW);
b.top = y0;
b.height = clamp(y1 - y0, 0, netH);
}
static void
decodeYoloV4Tensor(std::vector<Detection>& probs, const uint& netW, const uint& netH, std::vector<NvDsInferParseObjectInfo>& objInfos)
{
for (uint i = 0; i < probs.size(); ++i)
{
NvDsInferParseObjectInfo obj;
convertBBoxYoloV4(probs[i], netW, netH, obj);
if (obj.width < 1 || obj.height < 1) return;
obj.detectionConfidence = probs[i].det_confidence;
obj.classId = probs[i].class_id;
objInfos.push_back(obj);
}
}
extern "C" bool NvDsInferParseYoloV4(
std::vector<NvDsInferLayerInfo> const& outputLayersInfo,
NvDsInferNetworkInfo const& networkInfo,
NvDsInferParseDetectionParams const& detectionParams,
std::vector<NvDsInferParseObjectInfo>&objectList)
{
const NvDsInferLayerInfo& layer = outputLayersInfo[0];
std::vector<Detection> res;
std::map<float, std::vector<Detection>> m;
float* output = (float*)layer.buffer;
for (int i = 0; i < output[0] && i < MAX_OUTPUT_BBOX_COUNT; i++) {
if (output[1 + DETECTION_SIZE * i + 4] <= BBOX_CONF_THRESH) continue;
Detection det;
memcpy(&det, &output[1 + DETECTION_SIZE * i], DETECTION_SIZE * sizeof(float));
res.push_back(det);
}
decodeYoloV4Tensor(res, networkInfo.width, networkInfo.height, objectList);
return true;
}
static NvDsInferParseObjectInfo convertBBox(const float& bx, const float& by, const float& bw,
const float& bh, const int& stride, const uint& netW,
const uint& netH)
{
NvDsInferParseObjectInfo b;
float xCenter = bx * stride;
float yCenter = by * stride;
float x0 = xCenter - bw / 2;
float y0 = yCenter - bh / 2;
float x1 = x0 + bw;
float y1 = y0 + bh;
x0 = clamp(x0, 0, netW);
y0 = clamp(y0, 0, netH);
x1 = clamp(x1, 0, netW);
y1 = clamp(y1, 0, netH);
b.left = x0;
b.width = clamp(x1 - x0, 0, netW);
b.top = y0;
b.height = clamp(y1 - y0, 0, netH);
return b;
}
static void addBBoxProposal(const float bx, const float by, const float bw, const float bh,
const uint stride, const uint& netW, const uint& netH, const int maxIndex,
const float maxProb, std::vector<NvDsInferParseObjectInfo>& binfo)
{
NvDsInferParseObjectInfo bbi = convertBBox(bx, by, bw, bh, stride, netW, netH);
if (bbi.width < 1 || bbi.height < 1) return;
bbi.detectionConfidence = maxProb;
bbi.classId = maxIndex;
binfo.push_back(bbi);
}
CHECK_CUSTOM_PARSE_FUNC_PROTOTYPE(NvDsInferParseYoloV4);
- make 编译,生成 libnvdsinfer_custom_impl_Yolo_plugins.so
- 修改 dstest1_pgie_config.txt
[property]
gpu-id=0
net-scale-factor=0.0039215697906911373
# yolov4
#0=RGB, 1=BGR
model-color-format=0
model-engine-file=yolov4-face.engine
labelfile-path=labels.txt
batch-size=1
## 0=FP32, 1=INT8, 2=FP16 mode
network-mode=2
num-detected-classes=1
gie-unique-id=1
network-type=0
is-classifier=0
## 0=Group Rectangles, 1=DBSCAN, 2=NMS, 3= DBSCAN+NMS Hybrid, 4 = None(No clustering)
cluster-mode=2
maintain-aspect-ratio=1
parse-bbox-func-name=NvDsInferParseYoloV4
custom-lib-path=nvdsinfer_custom_impl_Yolo/libnvdsinfer_custom_impl_Yolo_plugins.so

[class-attrs-all]
nms-iou-threshold=0.6
pre-cluster-threshold=0.4
- 参数根据自己路径配置
- model-engine-file : trt模型路径
- num-detected-classes: 类别数
- parse-bbox-func-name: 对应我们实现的方法名 NvDsInferParseYoloV4
- custom-lib-path: 生成得动态库路径。 这里有个问题就是: 我们还需要链接 myplugins。但无论怎么配置,都无法链接多个动态库,上网查了一圈也没找到好的解决办法,有知道的大佬麻烦指导下,感谢。我的解决办法是将两个库合并成一个库。
- 重新编译,测试后发现,无法识别出结果。然后经过一番查找,参考这位大佬的方案: https://github.com/wang-xinyu/tensorrtx/issues/146 得到完美解决,抱拳。 修改内容如下
yololayer.cu
1.
CalDetection<<< (yolo.width*yolo.height*batchSize + mThreadCount - 1) / mThreadCount, mThreadCount>>>
to:
CalDetection<<< (yolo.width*yolo.height*batchSize + mThreadCount - 1) / mThreadCount, mThreadCount, 0, stream>>>
2.
CUDA_CHECK(cudaMemset(output + idx*outputElem, 0, sizeof(float)));
to:
CUDA_CHECK(cudaMemsetAsync(output + idx*outputElem, 0, sizeof(float)));

mish.cu
1.
mish_kernel<<<grid_size, block_size>>>(inputs[0], output, input_size_ * batchSize);
to:
mish_kernel<<<grid_size, block_size, 0, stream>>>(inputs[0], output, input_size_ * batchSize);
- 编译生成 nvdsinfer_custom_impl_Yolo_plugins.so
- 运行 ./deepstream_test1_app_demo_rtsp_ (顺利的话,就可以正确的识别出结果了)
- 这里我使用的是: scaled-yolov4 模型,那么别的模型,以此类推应该都没什么问题。
- 最后想说下,为什么选择使用这个方式去实现。主要因为我个人感觉tensorrtx使用 trt c++ api方式去实现,效率上可能更优一些,而且也可以解决许多op不支持的问题,所以个人比较倾向使用tensorrtx. (个人想法)
END
- 以上就差不多就是实现的全部过程了,如果有不对的方法,欢迎大佬指正,感谢。
- 内容全部纯人工手动输出,感觉有用的小伙伴,给个好评,亲。

参考连接
- https://github.com/wang-xinyu/tensorrtx
- https://github.com/tosonw/deepstream-test1-app_rtsp
- https://blog.csdn.net/weixin_38369492/article/details/104859567
- https://docs.nvidia.com/metropolis/deepstream/dev-guide/text/DS_C_Sample_Apps.html
- https://docs.nvidia.com/metropolis/deepstream/dev-guide/text/DS_custom_YOLO.html
- https://blog.csdn.net/Tosonw/article/details/104154090
本文内容由网友自发贡献,版权归原作者所有,本站不承担相应法律责任。如您发现有涉嫌抄袭侵权的内容,请联系:hwhale#tublm.com(使用前将#替换为@)