在实际的 API 自动化测试过程中,我们需要在不同的环境中运行测试用例,以确保 API 在各个环境中都能正常运行。
通过使用 Pytest 的 fixture 功能,我们可以轻松地实现多环境支持。
可参考 demo:https://github.com/Automation-Test-Starter/Pytest-API-Test-Demo
新建不同环境测试配置文件
配置文件会以 json 格式存储为例,其他格式如 YAML、CSV 等类似,均可参考
// 新建测试配置文件夹mkdir config// 进入测试配置文件夹 cd config// 新建开发环境测试配置文件touch dev_config.json// 新建生产环境测试配置文件touch prod_config.json
编写不同环境测试配置文件
根据实际情况配置开发环境测试配置文件
{ "host": "https://jsonplaceholder.typicode.com", "getAPI": "/posts/1", "postAPI":"/posts"}
根据实际情况配置生产环境测试配置文件
{ "host": "https://jsonplaceholder.typicode.com", "getAPI": "/posts/1", "postAPI":"/posts"}
新建不同环境测试数据文件
不同环境请求数据文件和响应数据文件分别存储测试用例的不同环境请求数据和不同环境预期响应数据。
// 新建测试数据文件夹mkdir data// 进入测试数据文件夹cd data// 新建开发环境请求数据文件touch dev_request_data.json// 新建开发环境响应数据文件touch dev_response_data.json// 新建生产环境请求数据文件touch prod_request_data.json// 新建生产环境响应数据文件touch prod_response_data.json
编写不同环境测试数据文件
开发环境请求数据文件中配置了 getAPI 接口的请求数据和 postAPI 接口的请求数据
{ "getAPI": "", "postAPI":{ "title": "foo", "body": "bar", "userId": 1 }}
开发环境响应数据文件中配置了 getAPI 接口的响应数据和 postAPI 接口的响应数据
{ "getAPI": { "userId": 1, "id": 1, "title": "sunt aut facere repellat provident occaecati excepturi optio reprehenderit", "body": "quia et suscipit\nsuscipit recusandae consequuntur expedita et cum\nreprehenderit molestiae ut ut quas totam\nnostrum rerum est autem sunt rem eveniet architecto" }, "postAPI":{ "title": "foo", "body": "bar", "userId": 1, "id": 101 }}
生产环境请求数据文件中配置了 getAPI 接口的请求数据和 postAPI 接口的请求数据
{ "getAPI": "", "postAPI":{ "title": "foo", "body": "bar", "userId": 1 }}
生产环境响应数据文件中配置了 getAPI 接口的响应数据和 postAPI 接口的响应数据
{ "getAPI": { "userId": 1, "id": 1, "title": "sunt aut facere repellat provident occaecati excepturi optio reprehenderit", "body": "quia et suscipit\nsuscipit recusandae consequuntur expedita et cum\nreprehenderit molestiae ut ut quas totam\nnostrum rerum est autem sunt rem eveniet architecto" }, "postAPI":{ "title": "foo", "body": "bar", "userId": 1, "id": 101 }}
配置支持多环境的 fixture
fixture 会以 conftest.py 文件存储为例,其他格式如 YAML、CSV 等类似,均可参考
mkdrir conftest.py
import pytest
import json
import json
import os


@pytest.fixture(scope="session")
def env_config(request):
    # get config file from different env
    env = os.getenv('ENV', 'dev')
    with open(f'config/{env}_config.json', 'r') as config_file:
        config = json.load(config_file)
    return config


@pytest.fixture(scope="session")
def env_request_data(request):
    # get request data file from different env
    env = os.getenv('ENV', 'dev')
    with open(f'data/{env}_request_data.json', 'r') as request_data_file:
        request_data = json.load(request_data_file)
    return request_data


@pytest.fixture (scope="session")
def env_response_data(request):
    # get response data file from different env
    env = os.getenv('ENV', 'dev')
    with open(f'data/{env}_response_data.json', 'r') as response_data_file:
        response_data = json.load(response_data_file)
    return response_data
更新测试用例来支持多环境
为做区分,这里新建测试用例文件,文件名为 test_demo_multi_environment.py
import requests
import json


class TestPytestMultiEnvDemo:

    def test_get_demo_multi_env(self, env_config, env_request_data, env_response_data):
        host = env_config["host"]
        get_api = env_config["getAPI"]
        get_api_response_data = env_response_data["getAPI"]
        # send request
        response = requests.get(host+get_api)
        # assert
        assert response.status_code == 200
        assert response.json() == get_api_response_data

    def test_post_demo_multi_env(self, env_config, env_request_data, env_response_data):
        host = env_config["host"]
        post_api = env_config["postAPI"]
        post_api_request_data = env_request_data["postAPI"]
        post_api_response_data = env_response_data["postAPI"]
        # send request
        response = requests.post(host + post_api, post_api_request_data)
        # assert
        assert response.status_code == 201
        assert response.json() == post_api_response_data
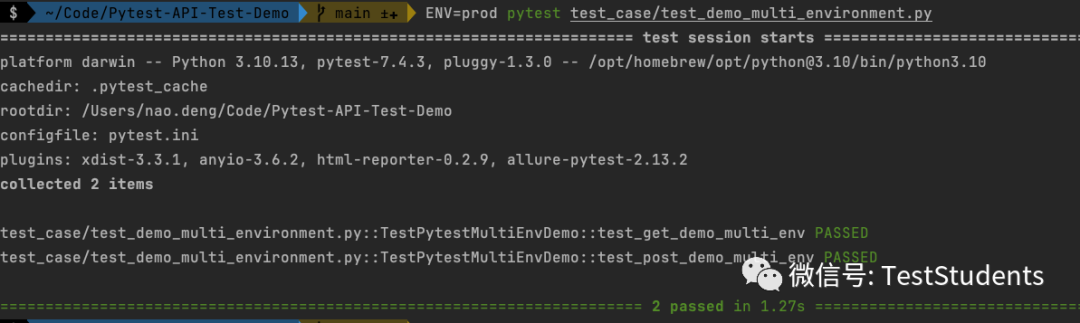
运行该测试用例确认多环境支持是否生效
ENV=dev pytest test_case/test_demo_multi_environment.py

Wb0owW
ENV=prod pytest test_case/test_demo_multi_environment.py
2kITJT
集成 allure 报告
allure 是一个轻量级的、灵活的、易于扩展的测试报告工具,它提供了丰富的报告类型和功能,可以帮助您更好地可视化测试结果。
allure 报告可以与 Pytest 集成,以生成详细的测试报告。
可参考 demo:https://github.com/Automation-Test-Starter/Pytest-API-Test-Demo
安装 allure-pytest 依赖
pip install allure-pytest
避免之前安装的 pytest-html-reporter 与 allure-pytest 冲突,建议先卸载 pytest-html-reporter
pip uninstall pytest-html-reporter
配置 allure-pytest
更新 pytest.ini 文件来指定 allure 报告的存储位置
[pytest]# allureaddopts = --alluredir ./allure-results
调整测试用例来支持 allure 报告
为做区分,这里新建测试用例文件,文件名为 test_demo_allure.py
import allure
import requests


@allure.feature("Test example API")
class TestPytestAllureDemo:

    @allure.story("Test example get endpoint")
    @allure.title("Verify the get API")
    @allure.description("verify the get API response status code and data")
    @allure.severity("blocker")
    def test_get_example_endpoint_allure(self, env_config, env_request_data, env_response_data):
        host = env_config["host"]
        get_api = env_config["getAPI"]
        get_api_request_data = env_request_data["getAPI"]
        get_api_response_data = env_response_data["getAPI"]
        # send get request
        response = requests.get(host + get_api)
        # assert
        print("response status code is" + str(response.status_code))
        assert response.status_code == 200
        print("response data is" + str(response.json()))
        assert response.json() == get_api_response_data

    @allure.story("Test example POST API")
    @allure.title("Verify the POST API")
    @allure.description("verify the POST API response status code and data")
    @allure.severity("Critical")
    def test_post_example_endpoint_allure(self, env_config, env_request_data, env_response_data):
        host = env_config["host"]
        post_api = env_config["postAPI"]
        post_api_request_data = env_request_data["postAPI"]
        post_api_response_data = env_response_data["postAPI"]
        # send request
        response = requests.post(host + post_api, json=post_api_request_data)
        # assert
        print("response status code is" + str(response.status_code))
        assert response.status_code == 201
        print("response data is" + str(response.json()))
        assert response.json() == post_api_response_data
运行测试用例生成 allure 报告
ENV=dev pytest test_case/test_demo_allure.py
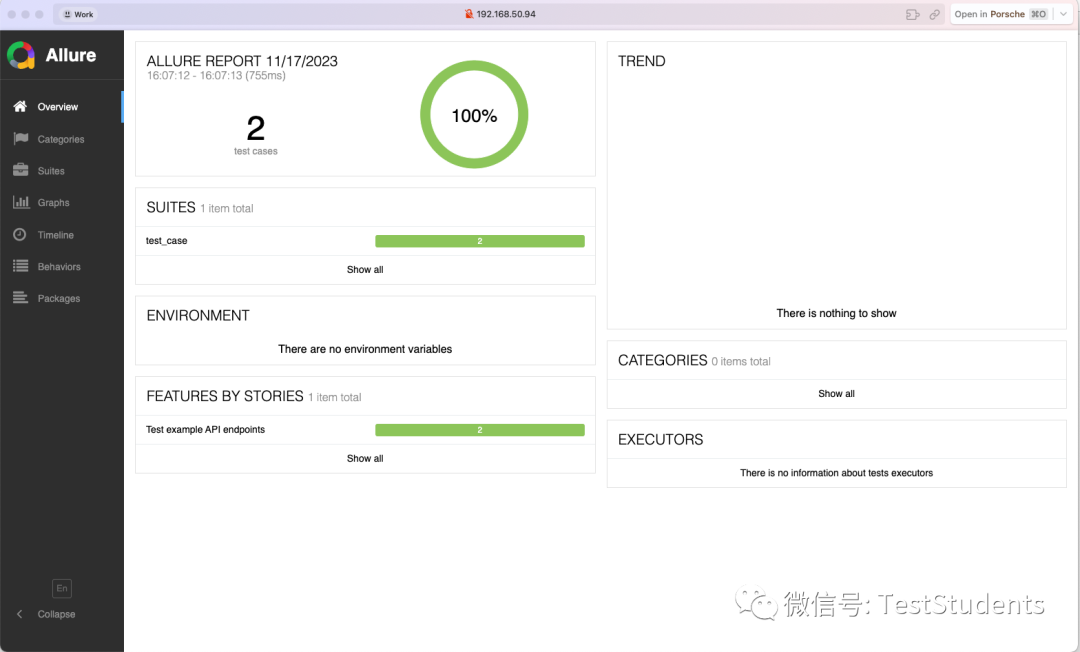
查看 allure 报告
输入以下命令来启动 allure 服务并浏览器中查看 allure 报告
allure serve allure-results
Pr1E3W

OsUO2e
调整 CI/CD 流程来支持 allure 报告
以 github action 为例,其他 CI 工具类似
更新.github/workflows/pytest.yml 文件内容来上传 allure 报告到 GitHub
name: Pytest API Testing

on:
  push:
    branches: [ "main" ]
  pull_request:
    branches: [ "main" ]

permissions:
  contents: read

jobs:
  Pytes-API-Testing:

    runs-on: ubuntu-latest

    steps:
    - uses: actions/checkout@v3
    - name: Set up Python 3.10
      uses: actions/setup-python@v3
      with:
        python-version: "3.10"
    - name: Install dependencies
      run: |
        python -m pip install --upgrade pip
        pip install -r requirements.txt

    - name: Test with pytest
      run: |
        ENV=dev pytest

    - name: Archive Pytest allure test report
      uses: actions/upload-artifact@v3
      with:
        name: Pytest-allure-report
        path: allure-results

    - name: Upload Pytest allure report to GitHub
      uses: actions/upload-artifact@v3
      with:
        name: Pytest-allure-report
        path: allure-results
查看 github action allure 报告
在 GitHub 中,导航到你的仓库。单击上方的 Actions 选项卡,然后单击左侧的 Pytest API Testing 工作流。你应该会看到工作流正在运行,等待执行完成,就可以查看结果。

Lz2pPh
参考
更多信息
行动吧,在路上总比一直观望的要好,未来的你肯定会感谢现在拼搏的自己!如果想学习提升找不到资料,没人答疑解惑时,
请及时加入群: 786229024
,里面有各种测试开发资料和技术可以一起交流哦。
最后:
下方这份完整的软件测试视频教程已经整理上传完成,需要的朋友们可以自行领取
【保证100%免费】
软件测试面试文档
我们学习必然是为了找到高薪的工作,下面这些面试题是来自阿里、腾讯、字节等一线互联网大厂最新的面试资料,并且有字节大佬给出了权威的解答,刷完这一套面试资料相信大家都能找到满意的工作。