ggeditor脑图开发
目录
- 配置说明
- api介绍
①,引入插件
②,获取api (withPropsAPI)
③,获取node api
④,常用api汇总
⑤,绑定事件 - 功能实现,api使用
①,查找节点,并居中显示 (setSelect 不居中)
②,切换数据之后居中显示
③,禁止指定node被修改
1,配置说明
ggeidtor 版本: 2.0.2
其他版本:很高(node,react,umi,  Ant Design)
说明:
	用的 Ant Design Pro 为底子开发的项目,他给的ggeditor版本较低,但样式不错,且工具模块好用,所以不做升级

参考网址
g6官网: https://g6.antv.antgroup.com/api/graph           (某些api能用)
语雀文档: https://www.yuque.com/blueju/gg-editor
因项目实际需求,本文侧重点:1,选择node,2,获取点dom以及canvas内部点,3,一部分api介绍
2, api介绍
①,引入插件
import GGEditor, { Mind, withPropsAPI } from 'gg-editor';
const mindContent = useRef();
<GGEditor ref={mindContent} className={styles.editor}>
<Mind
	onNodeClick={(obj: any) => {bindCruxGroupHandler(obj)}}
	onMouseDown={(obj: any) => {mindShouldUpdate(obj)}}
	data={data}
	className={styles.mind}
/>
</GGEditor>
import drawDataGroup from './drawDataGroup.json';
const [data, setData] = useState({
roots:[
{
id: '0',
key: '0',
label: '知识点',
children: []
}
]
});
const [data, setData] = useState([
{
id: '0',
key: '0',
label: '知识点',
children: []
}
]);
样式调整
<Mind
data={data}
graphConfig={{
defaultNode: {
size: [100, 30],
type: 'rect',
anchorPoints: [
[0, 0.5],
[1, 0.5],
]
},
nodeStateStyles:{
},
edgeStateStyles: {
lineWidth: '2',
},
comboStateStyles: {
fill: 'red',
stroke: 'red',
},
defaultEdge: {
type: 'cubic-horizontal',
},
defaultCombo: {
shape: 'rect',
size: '0'
},
layout: {
type: 'mindmap',
direction: 'H',
getVGap: () => {
return 10;
},
getHGap: () => {
return 50;
},
},
fitCenter: true,
directed: true,
fitViewPadding: [1, 1, 1, 1],
autoPaint: true,
modes: {
default: [
{
type: 'collapse-expand',
onChange: function onChange(item, collapsed) {
const data = item.get('model').data;
data.collapsed = collapsed;
return true;
},
},
'drag-canvas',
'zoom-canvas',
],
}
}}
>
</Mind>
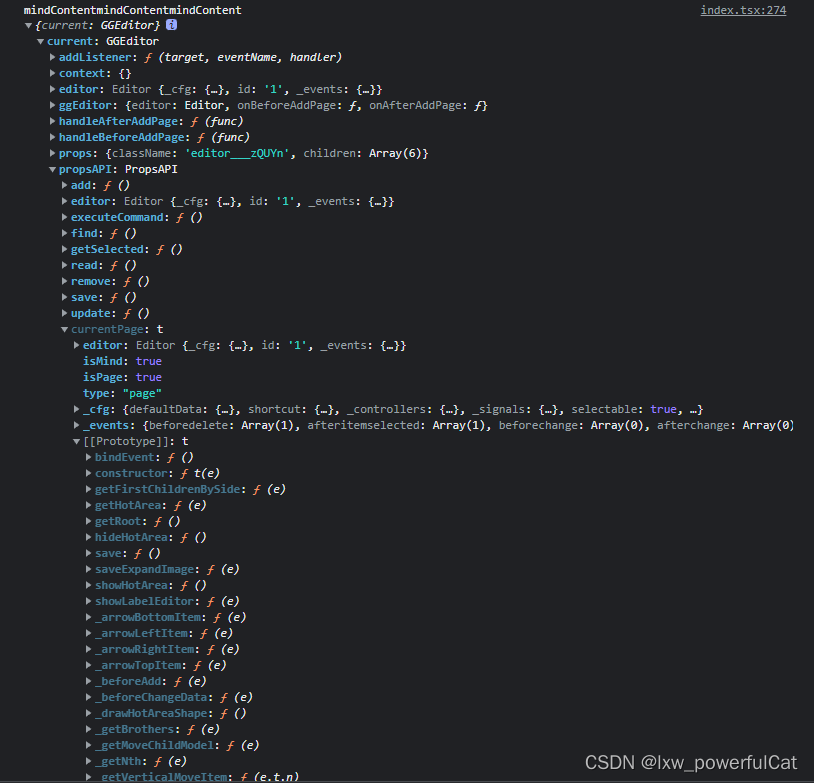
② 获取api (withPropsAPI)
console.log(mindContent.current)
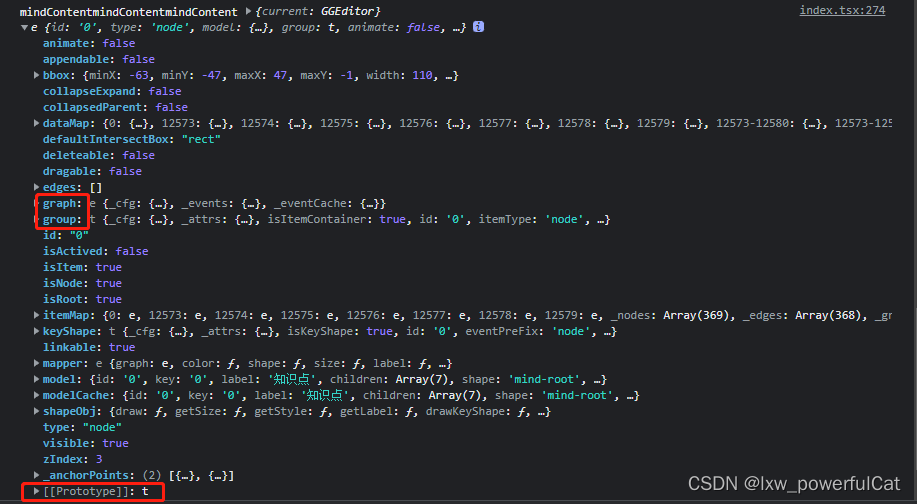
③ 获取node api
let node = mindContent.current.propsAPI.find('0')
console.log(node)
④ 常用api汇总
mindContent.current.propsAPI.currentPage.setSelected(node, text)
| api | 功能 |
|---|
| mindContent.current.propsAPI.find(‘0’) ( ‘0’为node 的 id) | 查找结点 |
| node.graph.getPoint({x: document.body.clientWidth/2,y: document.body.clientHeight/2-60}) | 获取canvas点的位置 |
| node.graph.getCanvasPoint({x:0,y:0}) | 获取canvas点位置,在dom中使用 |
| mindContent.current.propsAPI.currentPage.clearSelected() | 清除所有选中节点 |
| mindContent.current.propsAPI.currentPage.clearActived() | 清除所选选中节点 |
| mindContent.current.propsAPI.currentPage.clearItemActived(item) | 清除所选节点 |
| mindContent.current.propsAPI.currentPage.update(item,{label: text}) | 更新节点 |
| mindContent.current.propsAPI.currentPage.getSelected() | 获取所选节点 |
| mindContent.current.propsAPI.currentPage.getZoom() | 放大倍数 |
⑤ 绑定事件
上方有介绍
<Mind
onNodeClick={(obj: any) => {bindCruxGroupHandler(obj)}}
onMouseDown={(obj: any) => {mindShouldUpdate(obj)}}
data={data}
className={styles.mind}
/>
3, 功能实现,api使用
①, 查找节点,并居中显示 (setSelect 不居中)
 <TreeSelect
     allowClear
     onChange={(value) => {onSearchText(value)}}
     placeholder={'请输入...'}
     treeNodeFilterProp="label"
     showSearch
     style={{width: '240px'}}
     onFocus={() => updateSearchData()}
     treeData={searchData}//  data.roots[0].children searchData
     treeDefaultExpandAll
>
const onSearchText = (text) => {
let node = mindContent.current.propsAPI.find(text);
if(node){
let posObj = node.graph.getPoint({x: document.body.clientWidth/2,y: document.body.clientHeight/2-60});
let zoom = node.graph.getZoom();
node.graph.translate( zoom * ( posObj.x - node.bbox.centerX ), zoom * ( posObj.y - node.bbox.centerY))
mindContent.current.propsAPI.currentPage.clearSelected()
mindContent.current.propsAPI.currentPage.setSelected(node, text)
}
}
② ,切换数据之后居中显示
const moveToCanvasCenter = () => {
    let node = mindContent.current.propsAPI.find('0');
    if(node){
      let posObj = node.graph.getPoint({x: document.body.clientWidth/2,y: document.body.clientHeight/2-60});
      let zoom = node.graph.getZoom();
      node.graph.translate( zoom * ( posObj.x - node.bbox.centerX ), zoom * ( posObj.y - node.bbox.centerY ))
    }
  }
③, 禁止指定node被修改
重点说明, 因为是低版本,没有 visible 等参数使用, 且 clearSelected 无法生效。
所以想到一个办法: 在canvas外部构造div,在mouseDown node节点的时候,瞬间将div移至节点上方进行遮挡。
const [coverVisible, setCoverVisible] = useState(false);
const [coverWidth, setCoverWidth] = useState(100);
const [coverHeight, setCoverHeight] = useState(100);
const [coverLeft, setCoverLeft] = useState(100);
const [coverTop, setCoverTop] = useState(100);
const mindShouldUpdate = (obj: any) => {
if(obj.item && obj.item.model.id == 0){
setCoverVisible(true);
setCoverWidth(obj.item.bbox.width);
setCoverHeight(obj.item.bbox.height+5);
let posObj = obj.item.graph.getClientPoint({x: obj.item.bbox.centerX-obj.item.bbox.width/2, y: obj.item.bbox.centerY-80});
setCoverLeft( posObj.x);
setCoverTop( posObj.y);
}else{
setCoverVisible(false);
}
}
<div className={styles.coverDiv} style={{
width: coverWidth + 'px',
height: coverHeight + 'px',
left: coverLeft + 'px',
top: coverTop + 'px',
display: coverVisible ? 'block' : 'none'
}}></div>
总结
不得不说 ggeditor 还是非常好用的,有了这个就可以自己制作头脑风暴,计划等图,简单好用。
缺点:api不好使,且没有明确文档,建议参考最上方给的两个网址使用,g6的一些api,ggeditor也有。
扩展:谁学了这个不想自己做一个头脑风暴的网站帮自己建立计划呢? 事半功倍有木有?但想想老板给的工资,还是算了。
划~~划~~划~~,摸~~摸~~摸~~
本文内容由网友自发贡献,版权归原作者所有,本站不承担相应法律责任。如您发现有涉嫌抄袭侵权的内容,请联系:hwhale#tublm.com(使用前将#替换为@)