转载自:http digest认证过程分析及例子_希哈科技的博客-CSDN博客
http digest认证过程分析及例子
技术标签: http digest 认证
验证过程:
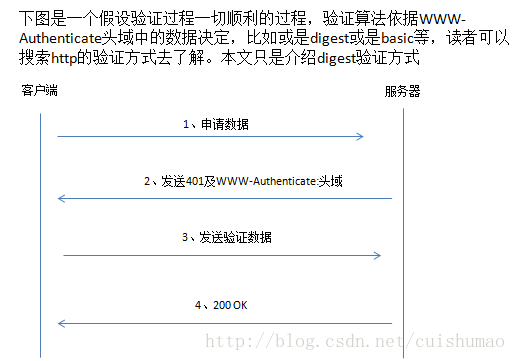
步骤一、客户端向服务器申请数据
****************************Request******************************
GET /auth HTTP/1.1(\r\n)
Accept: */*(\r\n)
Host: 192.168.1.15(\r\n)
Content-Length: 0(\r\n)
(\r\n\r\n)
步骤二、服务器回复说需要验证,并发送了需要的数据(注意这里是Digest,决定了需要使用Digest认证方式,而不是Basic等),这些数据决定了客户端验证需要遵循的算法。
****************************Response******************************
HTTP/1.1 401 Unauthorized(\r\n)
Connection: Keep-Alive(\r\n)
Content-Length: 0(\r\n)
Date: Wed, 11 Sep 2013 09:35:54 GMT(\r\n)
WWW-Authenticate: Digestrealm="TestDigest",nonce="c7237893-4eca-478e-b016-548f7998933b",algorithm=MD5,qop="auth"(\r\n)
(\r\n\r\n)
步骤三、发送验证信息
步骤二数据包的分析:
状态码401表示该客户端未被授权,需要客户端发送验证信息,注意这时候必须发送WWW-Authenticate头域,否则客户端不知道该依据什么规则来发送验证信息。依据http头域中WWW-Authenticate中的字段。根据“RFC 2617 - HTTP Authentication: Basic and Digest Access Authenti”该文档中,介绍了如何依据服务器返回的数据发送验证信息。
服务器通过规则计算出的结果与客户端发送的response进行比较,相等才认为是合法用户,于是服务器发送200 OK。
依据该文档:digest的计算如下(附录2,生成发送WWW-Authenticate的函数),即上文中说到的response,计算出来的digest通过response字段发送给服务器。
If "qop" is used, the digest is:
H(H(A1):nonce:nc:cnonce:qop:H(A2))-----其中cnonce是有自己产生的随机字符串(本文后面附录(1)生成随机字符串函数),其他字符串依据下面规则得出
where H is the hash function such as MD5; A1 and A2 will be given later.
If "qop" is not used, the digest is:
H(H(A1):nonce:H(A2))
If the "algorithm" chosen is "MD5" or is unspecified:
A1 = Username:realm:password
If the "algorithm" chosen is "MD5-sess", then A1 is calculated only once –
on the first request by the client following receipt of a WWW-Authenticate challenge from the server.
It uses the server nonce from that challenge, and the first client nonce:
A1 = Username:realm:password:nouce:cnonce
If "qop" is "auth" , then
A2 = Method:URL
If "qop" is "auth-int" for message integrity, then
A2 = Method:URL:H(entity-body)
显然本例中Response如下计算:
H(H(A1):nonce:nc:cnonce:qop:H(A2))
A1 = unq(username-value) ":" unq(realm-value) ":" passwd
A2 = Method ":" digest-uri-value
其中H是MD5算法。
****************************Request******************************
GET /Auth HTTP/1.1
Accept: */*
Host: 192.168.1.15
Authorization: Digest username="LiPing",realm="TestDigest",qop="auth",algorithm="MD5",uri="/Auth",nonce="1f4b9851-bc18-4dee-91ad-683b5adee7ae",nc=00000001,cnonce="L0RGJ52PLai068jYU55G036655qZF6D7",response="9471d8765dc5c88a78829b2e2e6eb7dd"
步骤四、服务器返回OK,否则继续返回401来告诉客户端需要验证
****************************Response******************************
HTTP/1.1 200 OK
Connection: Keep-Alive
Date: Thu, 12 Sep 2013 00:52:40 GMT
关于该验证过程实现的双向验证机制,是通过服务器或是客户端产生的随机字符串,然后经过MD5算法来实现的。该文最后服务器没有返回Authorization头域,这个也可以的,只是不够规范。
附录:
(1)
-
//函数功能:生成随机字符串
-
//函数参数:生成随机字符串的长度
-
//返回值:成功返回随机字符串
-
char *createRandomNum(int N)
-
{
-
int flag;
-
int k=0,j=0;
-
char *random_str = (char*)malloc(N+1);
-
random_str[0] = '\0';
-
//1970到现在的时间sec作为种子
-
unsigned int seed = (unsigned)time(NULL);
-
srand(seed);
-
for(j=0;j<N;j++)
-
{
-
unsigned int random_num = rand();
-
flag = random_num%3;
-
if(flag == 0)
-
{
-
random_str[k++]='0'+random_num%10;
-
}
-
else if(flag == 1)
-
{
-
random_str[k++]='a'+random_num%26;
-
}
-
else if(flag == 2)
-
{
-
random_str[k++]='A'+random_num%26;
-
}
-
srand(random_num);
-
}
-
random_str[k]='\0';
-
return random_str;
-
}
附录2
-
//函数功能:获取子串
-
//函数参数:source目标字符串;start_str开始字符串;end_chr结束字符
-
//返回值:成功返回该子串,失败返回NULL
-
char* GetTargetStr(const char*source,char*start_str,char end_chr)
-
{
-
char *p_start = NULL;
-
char *p_end = NULL;
-
p_start = strstr(source,start_str);
-
p_start += strlen(start_str);
-
p_end = strchr(p_start,end_chr);
-
char *ret = NULL;
-
if(p_end != NULL)
-
{
-
ret = (char*)malloc(p_end - p_start +1);
-
ret[p_end - p_start] = '\0';
-
memcpy(ret,p_start,p_end - p_start);
-
}
-
return ret;
-
}
-
//函数功能:获取WWW_Authenticate认证信息
-
//函数参数:self通信句柄;HttpRsp服务器响应数据包;HttpRspSize数据包的尺寸;head_len头长度;user登陆用户名;pwd用户密码
-
//返回值:成功返回OK,失败
-
//备注:该函数中nc的值,这里客户端不保存服务器发送的nonce,所以每次都是00000001
-
char *GetClientWWW_Authenticate(const char*response,long responseSize,int head_len\
-
,const char*user,const char*pwd)
-
{
-
char *realm = GetTargetStr(response,"realm=\"",'\"');
-
char *nonce = GetTargetStr(response,"nonce=\"",'\"');
-
char *algorithm = GetTargetStr(response,"algorithm=",',');
-
char *qop = GetTargetStr(response,"qop=\"",'\"');
-
assert(realm && nonce && algorithm && qop);
-
//FIXME
-
char *nc = "00000001";
-
char *cnonce = createRandomNum(32);//需要生成随机字符串
-
char A1[100] = {0};
-
sprintf(A1,"%s:%s:%s",user,realm,pwd);
-
char *md5_A1 = MD5_sign((unsigned char*)A1,strlen(A1));
-
char A2[80] = {0};
-
sprintf(A2,"GET:/Auth");
-
char *md5_A2 = MD5_sign((unsigned char*)A2,strlen(A2));
-
char contact[512] = {0};
-
sprintf(contact,"%s:%s:%s:%s:%s:%s",md5_A1,nonce,nc,cnonce,qop,md5_A2);
-
FREE_MALLOC(md5_A1);
-
FREE_MALLOC(md5_A2);
-
char *rsp = MD5_sign((unsigned char*)contact,strlen(contact));
-
char WWW_Authenticate[256] = {0};
-
char*format = "Digest username=\"%s\",realm=\"%s\",qop=\"%s\",algorithm=\"%s\",uri=\"/Auth\",nonce=\"%s\",nc=%s,cnonce=\"%s\",response=\"%s\"";
-
sprintf(WWW_Authenticate,format,user,realm,qop,algorithm,nonce,nc,cnonce,rsp);
-
FREE_MALLOC(realm);
-
FREE_MALLOC(qop);
-
FREE_MALLOC(algorithm);
-
FREE_MALLOC(nonce);
-
FREE_MALLOC(cnonce);
-
FREE_MALLOC(rsp);
-
return strdup(WWW_Authenticate);
-
}
版权声明:本文为博主原创文章,遵循 CC 4.0 BY-SA 版权协议,转载请附上原文出处链接和本声明。
本文链接:http digest认证过程分析及例子_希哈科技的博客-CSDN博客
本文内容由网友自发贡献,版权归原作者所有,本站不承担相应法律责任。如您发现有涉嫌抄袭侵权的内容,请联系:hwhale#tublm.com(使用前将#替换为@)