oauth2.0协议是一种对外开放式协议,主要用于第三方登录授权。
例如:在豆瓣官网点击用qq登录
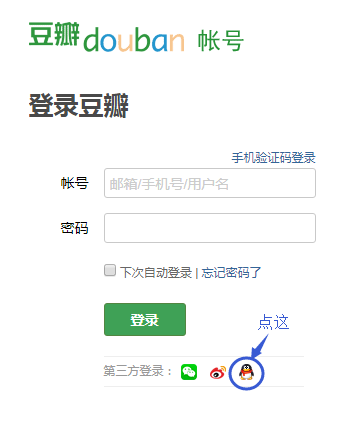
以及微信的授权都是基于oauth2.0协议做的。
oauth2.0的认证流程
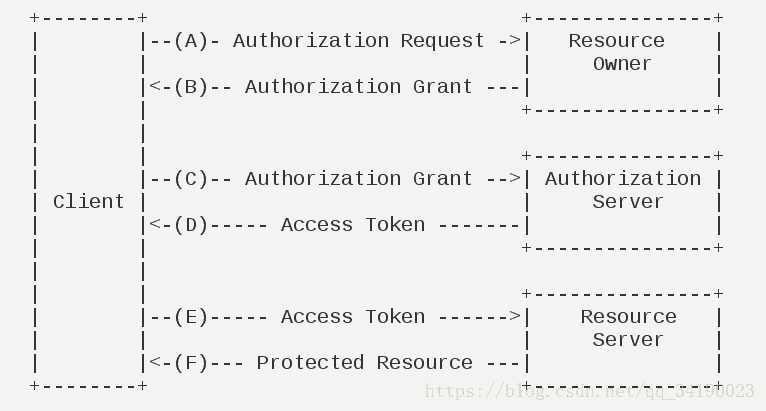
(A)用户打开客户端,客户端要求用户给予授权。
(B)用户同意给予客户端授权。
(C)客户端使用上一步获得的授权(一般是Code),向认证服务器申请令牌TOKEN。
(D)认证服务器对客户端进行认证以后,确认无误,同意发放令牌。
(E)客户端使用令牌,向资源服务器申请获取资源(用户信息等)。
(F)资源服务器确认令牌无误,同意向客户端开放资源。
主要分为
1:Authorization serve:授权服务器。
2:client 客户端
3:Resource server:资源服务器,即服务提供商存放用户生成的资源的服务器。它与认证服务器,可以是同一台服务器,也可以是不同的服务器。
oauth2.0的五种协议:
授权码模式(authorization code)
简化模式(implicit)
密码模式(resource owner password credentials)
客户端模式(client credentials)
扩展模式(Extension)
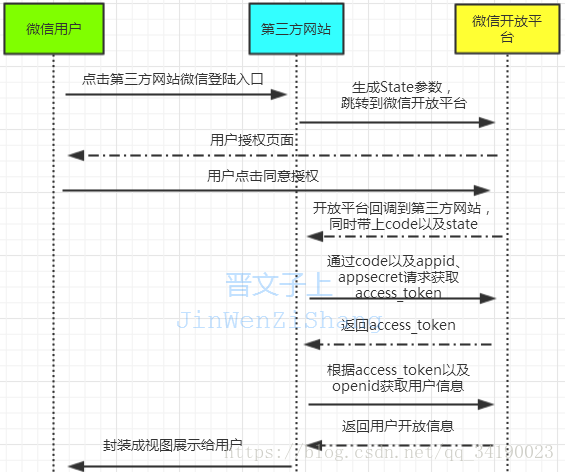
1 授权码模式
2 简化模式
不通过第三方应用程序的服务器,直接在浏览器中向认证服务器申请令牌,跳过"授权码"这个步骤。
所有步骤在浏览器中完成,令牌对访问者是可见的,且客户端不需要认证
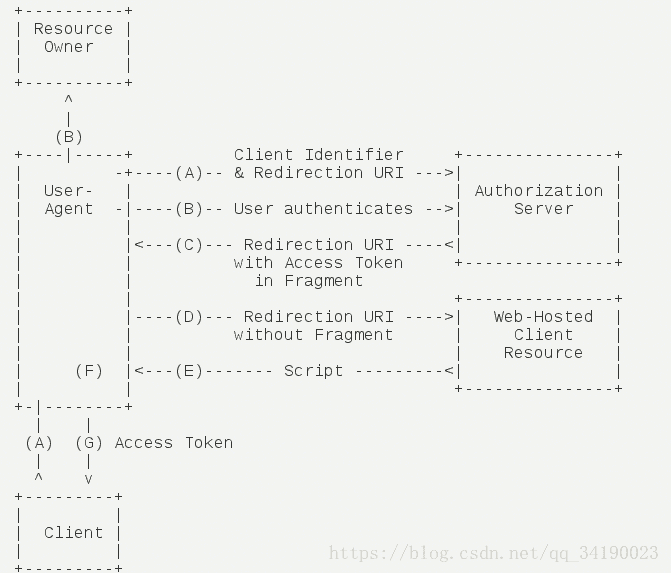
步骤如下:
(A)客户端将用户导向认证服务器。
(B)用户决定是否给于客户端授权。
(C)若用户授权,认证服务器将用户导向客户端指定的"重定向URI",并在URI的Hash部分包含了访问令牌。
(D)浏览器向资源服务器发出请求,其中不包括上一步收到的Hash值。
(E)资源服务器返回一个网页,其中包含的代码可以获取Hash值中的令牌。
(F)浏览器执行上一步获得的脚本,提取出令牌。
(G)浏览器将令牌发给客户端。
3 密码模式
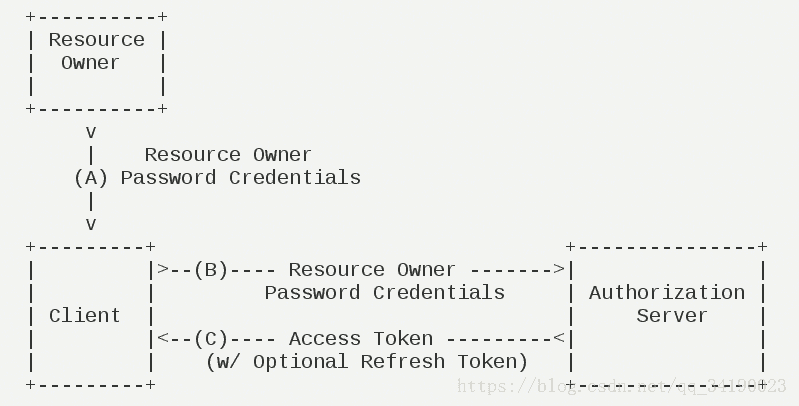
(A)用户向客户端提供用户名和密码。
(B)客户端将用户名和密码发给认证服务器,向后者请求令牌。
(C)认证服务器确认无误后,向客户端提供访问令牌。
4客户端模式
指客户端以自己的名义,而不以用户的名义,向"服务提供商"进行认证。严格地说,客户端模式并不属于OAuth框架所要解决的问题。在这种模式中,用户直接向客户端注册,客户端以自己的名义要求"服务提供商"提供服务,其实不存在授权问题。
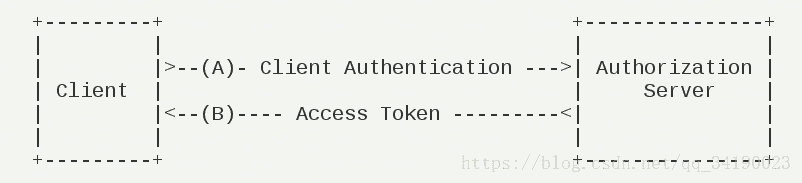
(A)客户端向认证服务器进行身份认证,并要求一个访问令牌。
(B)认证服务器确认无误后,向客户端提供访问令牌。
jwt介绍
jwt 主要由3个部分组成
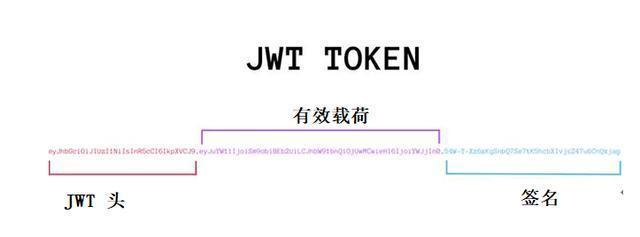
3.1 JWT头
JWT头部分是一个描述JWT元数据的JSON对象,通常如下所示。
{
"alg": "HS256",
"typ": "JWT"
}
3.2 有效载荷
有效载荷部分,是JWT的主体内容部分,也是一个JSON对象,包含需要传递的数据。 JWT指定七个默认字段供选择。
iss:发行人
exp:到期时间
sub:主题
aud:用户
nbf:在此之前不可用
iat:发布时间
jti:JWT ID用于标识该JWT
除以上默认字段外,我们还可以自定义私有字段,如下例:
{
"sub": "1234567890",
"name": "chongchong",
"admin": true
}
请注意,默认情况下JWT是未加密的,任何人都可以解读其内容,因此不要构建隐私信息字段,存放保密信息,以防止信息泄露。
JSON对象也使用Base64 URL算法转换为字符串保存。
3.3签名哈希
签名哈希部分是对上面两部分数据签名,通过指定的算法生成哈希,以确保数据不会被篡改。
首先,需要指定一个密码(secret)。该密码仅仅为保存在服务器中,并且不能向用户公开。然后,使用标头中指定的签名算法(默认情况下为HMAC SHA256)根据以下公式生成签名。
HMACSHA256(base64UrlEncode(header) + "." + base64UrlEncode(payload),
secret)
在计算出签名哈希后,JWT头,有效载荷和签名哈希的三个部分组合成一个字符串,每个部分用"."分隔,就构成整个JWT对象。
jwt和普通token的区别,主要是普通token的加密解密都是由我们自己定义,但是jwt是基于一种加密标准,统一了token的各自加密,大家遵守的一种标准。
oauth2.0和jwt实现 登录验证
1 :资源服务器的配置
@Configuration
@EnableResourceServer
public class OAuth2ResourceServer extends
    ResourceServerConfigurerAdapter {
    @Override
    public void configure(HttpSecurity http) throws Exception {
        http
            .authorizeRequests()
            .anyRequest().authenticated().and()
            .requestMatchers().antMatchers("/api/**");
    }
}
application.properties配置
server.port=8081
security.oauth2.resource.jwt.key-value=123456
2 :授权服务器的配置
@Configuration
@EnableAuthorizationServer
public class OAuth2AuthorizationServer  extends AuthorizationServerConfigurerAdapter{

    @Autowired
    private AuthenticationManager authenticationManager;

    @Value("${security.oauth2.jwt.signingKey}")
    private String signingKey;

    @Bean
    public JwtAccessTokenConverter accessTokenConverter() {
        JwtAccessTokenConverter jwtAccessTokenConverter=new JwtAccessTokenConverter();
        jwtAccessTokenConverter.setSigningKey(signingKey);
        return jwtAccessTokenConverter;
    }
    @Bean
    public JwtTokenStore tokenStore() {
        return new JwtTokenStore(accessTokenConverter());
    }
    @Override
    public  void configure(AuthorizationServerEndpointsConfigurer authorizationServerEndpointsConfigurer) throws Exception{
        authorizationServerEndpointsConfigurer
                .authenticationManager(authenticationManager)
                .tokenStore(tokenStore())
                .accessTokenConverter(accessTokenConverter());
    }
    @Override
    public void configure(ClientDetailsServiceConfigurer clients)throws Exception{
       clients.inMemory().withClient("clientapp")
               .secret("112233")
               .scopes("read_userinfo")
               .authorizedGrantTypes(
                       "password",
                       "authorization_code",
                       "refresh_token");
    }
}
application.properties配置
security.user.name=zhu
security.user.password=xiang
#jwt的密钥
security.oauth2.jwt.signingKey=123456

这样就配置好了。
获取token,访问授权服务器
http://localhost:8080/oauth/token?grant_type=password&username=zhu&password=xiang&scope=read_userinfo
1 进入 /oauth/token ,到
TokenEndpoint
public ResponseEntity<OAuth2AccessToken> postAccessToken(Principal principal, @RequestParam Map<String, String> parameters) throws HttpRequestMethodNotSupportedException {
    if (!(principal instanceof Authentication)) {
        throw new InsufficientAuthenticationException("There is no client authentication. Try adding an appropriate authentication filter.");
    } else {
        String clientId = this.getClientId(principal);
        //获取客户端信息 InMemoryClientDetailsService和JdbcClientDetailsService  是根据启动时候加载授权服务的时候clients.inMemory().withClient("clientapp") 决定加载哪个,我这边明显就是从内存获取那个
ClientDetails authenticatedClient = this.getClientDetailsService().loadClientByClientId(clientId);
        TokenRequest tokenRequest = this.getOAuth2RequestFactory().createTokenRequest(parameters, authenticatedClient);
        if (clientId != null && !clientId.equals("") && !clientId.equals(tokenRequest.getClientId())) {
            throw new InvalidClientException("Given client ID does not match authenticated client");
        } else {
            if (authenticatedClient != null) {
                this.oAuth2RequestValidator.validateScope(tokenRequest, authenticatedClient);
            }

            if (!StringUtils.hasText(tokenRequest.getGrantType())) {
                throw new InvalidRequestException("Missing grant type");
            } else if (tokenRequest.getGrantType().equals("implicit")) {
                throw new InvalidGrantException("Implicit grant type not supported from token endpoint");
            } else {
                if (this.isAuthCodeRequest(parameters) && !tokenRequest.getScope().isEmpty()) {
                    this.logger.debug("Clearing scope of incoming token request");
                    tokenRequest.setScope(Collections.emptySet());
                }

                if (this.isRefreshTokenRequest(parameters)) {
                    tokenRequest.setScope(OAuth2Utils.parseParameterList((String)parameters.get("scope")));
                }
                //校验账号密码以及生成token,我们这边由于是从内存中校验,所以就不需要重写userdetailService,否则是加载数据库的话 需要重写
                //在DefaultTokenServices  OAuth2AccessToken accessToken = this.createAccessToken(authentication, refreshToken); 生成token
                //存储token  this.tokenStore.storeAccessToken(accessToken, authentication); 分为四种模式 1 redis,2 jdbc 3 内存 4 jwt 其实jwt并不需要存储的地方,因为它本身就是一种算法加密来的,通过再次加密就可以获取到,所以说它的tokenstore是为空的
                OAuth2AccessToken token = this.getTokenGranter().grant(tokenRequest.getGrantType(), tokenRequest);
                if (token == null) {
                    throw new UnsupportedGrantTypeException("Unsupported grant type: " + tokenRequest.getGrantType());
                } else {
                    return this.getResponse(token);
                }
            }
        }
    }

获取到token 后
访问 http://localhost:8081/api/userinfo
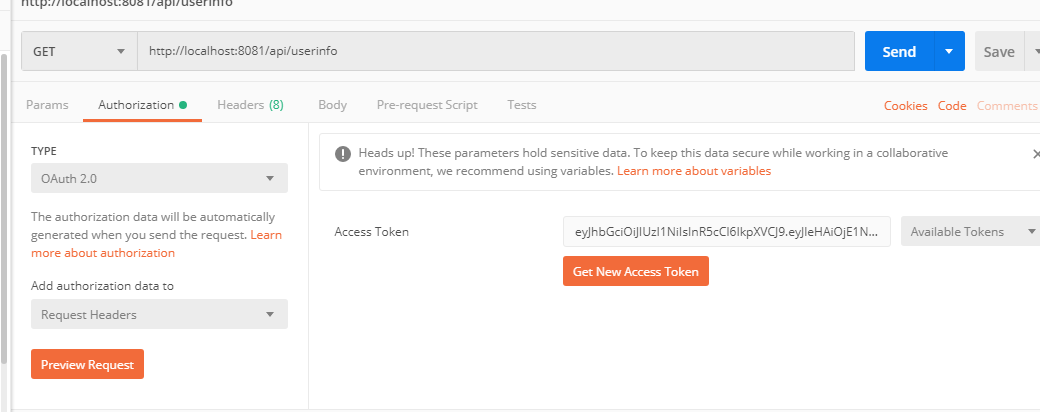
校验token
OAuth2AuthenticationProcessingFilter 会拦截url请求
public void doFilter(ServletRequest req, ServletResponse res, FilterChain chain) throws IOException, ServletException {
    boolean debug = logger.isDebugEnabled();
    HttpServletRequest request = (HttpServletRequest)req;
    HttpServletResponse response = (HttpServletResponse)res;

    try {
        Authentication authentication = this.tokenExtractor.extract(request);
        if (authentication == null) {
            if (this.stateless && this.isAuthenticated()) {
                if (debug) {
                    logger.debug("Clearing security context.");
                }

                SecurityContextHolder.clearContext();
            }

            if (debug) {
                logger.debug("No token in request, will continue chain.");
            }
        } else {
            request.setAttribute(OAuth2AuthenticationDetails.ACCESS_TOKEN_VALUE, authentication.getPrincipal());
            if (authentication instanceof AbstractAuthenticationToken) {
                AbstractAuthenticationToken needsDetails = (AbstractAuthenticationToken)authentication;
                needsDetails.setDetails(this.authenticationDetailsSource.buildDetails(request));
            }
            //检查token
            Authentication authResult = this.authenticationManager.authenticate(authentication);
            if (debug) {
                logger.debug("Authentication success: " + authResult);
            }

            this.eventPublisher.publishAuthenticationSuccess(authResult);
            SecurityContextHolder.getContext().setAuthentication(authResult);
        }
    } catch (OAuth2Exception var9) {
        SecurityContextHolder.clearContext();
        if (debug) {
            logger.debug("Authentication request failed: " + var9);
        }

        this.eventPublisher.publishAuthenticationFailure(new BadCredentialsException(var9.getMessage(), var9), new PreAuthenticatedAuthenticationToken("access-token", "N/A"));
        this.authenticationEntryPoint.commence(request, response, new InsufficientAuthenticationException(var9.getMessage(), var9));
        return;
    }

    chain.doFilter(request, response);

}
OAuth2AuthenticationManager类
public Authentication authenticate(Authentication authentication) throws AuthenticationException {
    if (authentication == null) {
        throw new InvalidTokenException("Invalid token (token not found)");
    } else {
        String token = (String)authentication.getPrincipal();
。     //查找token验证,
        OAuth2Authentication auth = this.tokenServices.loadAuthentication(token);
        if (auth == null) {
            throw new InvalidTokenException("Invalid token: " + token);
        } else {
            Collection<String> resourceIds = auth.getOAuth2Request().getResourceIds();
            if (this.resourceId != null && resourceIds != null && !resourceIds.isEmpty() && !resourceIds.contains(this.resourceId)) {
                throw new OAuth2AccessDeniedException("Invalid token does not contain resource id (" + this.resourceId + ")");
            } else {
                this.checkClientDetails(auth);
                if (authentication.getDetails() instanceof OAuth2AuthenticationDetails) {
                    OAuth2AuthenticationDetails details = (OAuth2AuthenticationDetails)authentication.getDetails();
                    if (!details.equals(auth.getDetails())) {
                        details.setDecodedDetails(auth.getDetails());
                    }
                }

                auth.setDetails(authentication.getDetails());
                auth.setAuthenticated(true);
                return auth;
            }
        }
    }
}
DefaultTokenServices类
public OAuth2Authentication loadAuthentication(String accessTokenValue) throws AuthenticationException, InvalidTokenException {
    OAuth2AccessToken accessToken = this.tokenStore.readAccessToken(accessTokenValue);
    if (accessToken == null) {
        throw new InvalidTokenException("Invalid access token: " + accessTokenValue);
    } else if (accessToken.isExpired()) {
        this.tokenStore.removeAccessToken(accessToken);
        throw new InvalidTokenException("Access token expired: " + accessTokenValue);
    } else {
        //这边从之前储存的地方获取,也有4种,本次是从jwt中获取
        OAuth2Authentication result = this.tokenStore.readAuthentication(accessToken);
        if (result == null) {
            throw new InvalidTokenException("Invalid access token: " + accessTokenValue);
        } else {
            if (this.clientDetailsService != null) {
                String clientId = result.getOAuth2Request().getClientId();

                try {
                    this.clientDetailsService.loadClientByClientId(clientId);
                } catch (ClientRegistrationException var6) {
                    throw new InvalidTokenException("Client not valid: " + clientId, var6);
                }
            }

            return result;
        }
    }
}