Welcome back! This is the fourth post in the deep learning development environment configuration series which accompany my new book, Deep Learning for Computer Vision with Python.
Today, we will configure Ubuntu + NVIDIA GPU + CUDA with everything you need to be successful when training your own deep learning networks on your GPU.
Links to related tutorials can be found here:
If you have an NVIDIA CUDA compatible GPU, you can use this tutorial to configure your deep learning development to train and execute neural networks on your optimized GPU hardware.
Let’s go ahead and get started!
If you’ve reached this point, you are likely serious about deep learning and want to train your neural networks with a GPU.
Graphics Processing Units are great at deep learning for their parallel processing architecture — in fact, these days there are many GPUs built specifically for deep learning — they are put to use outside the domain of computer gaming.
NVIDIA is the market leader in deep learning hardware, and quite frankly the primary option I recommend if you are getting in this space. It is worth getting familiar with their lineup of products (hardware and software) so you know what you’re paying for if you’re using an instance in the cloud or building a machine yourself. Be sure to check out this developer page.
It is common to share high-end GPU machines at universities and companies. Alternatively, you may build one, buy one (as I did), or rent one in the cloud (as I still do today).
If you are just doing a couple of experiments then using a cloud service provider such as Amazon, Google, or FloydHub for a time-based usage charge is the way to go.
Longer term if you are working on deep learning experiments daily, then it would be wise to have one on hand for cost savings purposes (assuming you’re willing to keep the hardware and software updated regularly).
Note: For those utilizing AWS’s EC2, I recommend you select the p2.xlarge, p2.8xlarge, or p2.16xlarge machines for compatibility with these instructions (depending on your use case scenario and budget). The older instances, g2.2xlarge and g2.8xlarge are not compatible with the version of CUDA and cuDNN in this tutorial. I also recommend that you have about 32GB of space on your OS drive/partition. 16GB didn’t cut it for me on my EC2 instance.
It is important to point out that you don’t need access to an expensive GPU machine to get started with Deep Learning. Most modern laptop CPUs will do just fine with the small experiments presented in the early chapters in my book. As I say, “fundamentals before funds” — meaning, get acclimated with modern deep learning fundamentals and concepts before you bite off more than you can chew with expensive hardware and cloud bills. My book will allow you to do just that.
You’ll soon find out below that configuring a GPU machine isn’t a cakewalk. In fact, there are quite a few steps and potential for things to go sour. That’s why I have built a custom Amazon Machine Instance (AMI) pre-configured and pre-installed for the community to accompany my book.
I detailed how to get it loaded into your AWS account and how to boot it up in this previous post.
Using the AMI is by far the fastest way to get started with deep learning on a GPU. Even if you do have a GPU, it’s worth experimenting in the Amazon EC2 cloud so you can tear down an instance (if you make a mistake) and then immediately boot up a new, fresh one.
Configuring an environment on your own is directly related to your:
First, you must be very comfortable with the command line.
Many of the steps below have commands that you can simply copy and paste into your terminal; however it is important that you read the output, note any errors, try to resolve them prior to moving on to the next step.
You must pay particular attention to the order of the instructions in this tutorial, and furthermore pay attention to the commands themselves.
I actually do recommend copying and pasting to make sure you don’t mess up a command (in one case below backticks versus quotes could get you stuck).
If you’re up for the challenge, then I’ll be right there with you getting your environment ready. In fact, I encourage you to leave comments so that the PyImageSearch community can offer you assistance. Before you leave a comment be sure to review the post and comments to make sure you didn’t leave a step out.
Without further ado, let’s get our hands dirty and walk through the configuration steps.
Before we get started I need to point out an important prerequisite. You need to perform one of the following prior to following the instructions below:
There are a few methods to accomplish this, some easy and others a bit more involved.
The first method is a bit of a hack, but it works:
This approach works great and is by far the easiest method. By unplugging your monitor X server will not automatically start. From there you can SSH into your machine from a separate computer and follow the instructions outlined in this post.
The second method assumes you have already booted the machine you want to configure for deep learning:
Please note that you’ll need a separate computer next to you to read the instructions or execute the commands. Alternatively, you could use a text-based web browser.
Now that we’re ready, let’s get our Ubuntu OS up to date:
Setting up Ubuntu 16.04 + CUDA + GPU for deep learning with Python
Shell
| 1 2 | $ sudo apt-get update $ sudo apt-get upgrade |
Then, let’s install some necessary development tools, image/video I/O, GUI operations and various other packages:
Setting up Ubuntu 16.04 + CUDA + GPU for deep learning with Python
Shell
| 1 2 3 4 5 6 7 8 | $ sudo apt-get install build-essential cmake git unzip pkg-config $ sudo apt-get install libjpeg-dev libtiff5-dev libjasper-dev libpng12-dev $ sudo apt-get install libavcodec-dev libavformat-dev libswscale-dev libv4l-dev $ sudo apt-get install libxvidcore-dev libx264-dev $ sudo apt-get install libgtk-3-dev $ sudo apt-get install libhdf5-serial-dev graphviz $ sudo apt-get install libopenblas-dev libatlas-base-dev gfortran $ sudo apt-get install python-tk python3-tk python-imaging-tk |
Next, let’s install both Python 2.7 and Python 3 header files so that we can compile OpenCV with Python bindings:
Setting up Ubuntu 16.04 + CUDA + GPU for deep learning with Python
Shell
| 1 | $ sudo apt-get install python2.7-dev python3-dev |
We also need to prepare our system to swap out the default drivers with NVIDIA CUDA drivers:
Setting up Ubuntu 16.04 + CUDA + GPU for deep learning with Python
Shell
| 1 2 | $ sudo apt-get install linux-image-generic linux-image-extra-virtual $ sudo apt-get install linux-source linux-headers-generic |
That’s it for Step #1, so let’s continue on.
The CUDA Toolkit installation step requires attention to detail for it to go smoothly.
First disable the Nouveau kernel driver by creating a new file:
Setting up Ubuntu 16.04 + CUDA + GPU for deep learning with Python
Shell
| 1 | $ sudo nano /etc/modprobe.d/blacklist-nouveau.conf |
Feel free to use your favorite terminal text editor such as vim or emacs instead of nano .
Add the following lines and then save and exit:
Setting up Ubuntu 16.04 + CUDA + GPU for deep learning with Python
Shell
| 1 2 3 4 5 | blacklist nouveau blacklist lbm-nouveau options nouveau modeset=0 alias nouveau off alias lbm-nouveau off |
Your session should look like the following (if you are using nano):
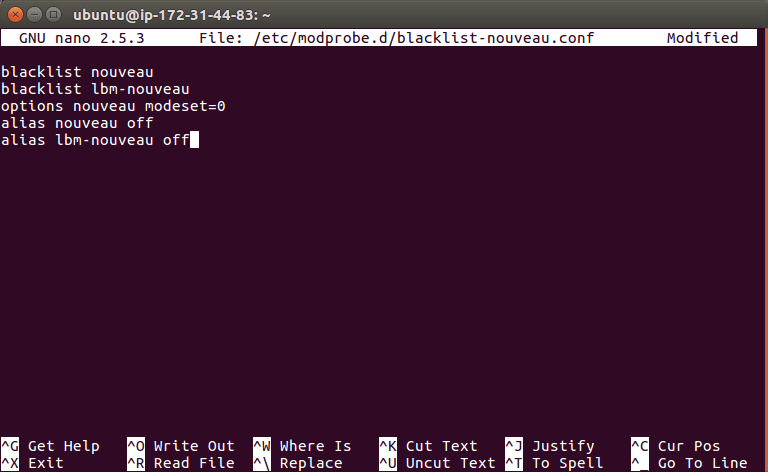
Figure 1: Editing the blacklist-nouveau.conf file with the nano text editor.
Next let’s update the initial RAM filesystem and reboot the machine:
Setting up Ubuntu 16.04 + CUDA + GPU for deep learning with Python
Shell
| 1 2 3 | $ echo options nouveau modeset=0 | sudo tee -a /etc/modprobe.d/nouveau-kms.conf $ sudo update-initramfs -u $ sudo reboot |
You will lose your SSH connection at the reboot step, so wait patiently and then reconnect before moving on.
You will want to download the CUDA Toolkit v8.0 via the NVIDIA CUDA Toolkit website:
https://developer.nvidia.com/cuda-80-ga2-download-archive
Once you’re on the download page, select Linux => x86_64 => Ubuntu => 16.04 => runfile(local) .
Here is a screenshot of the download page:
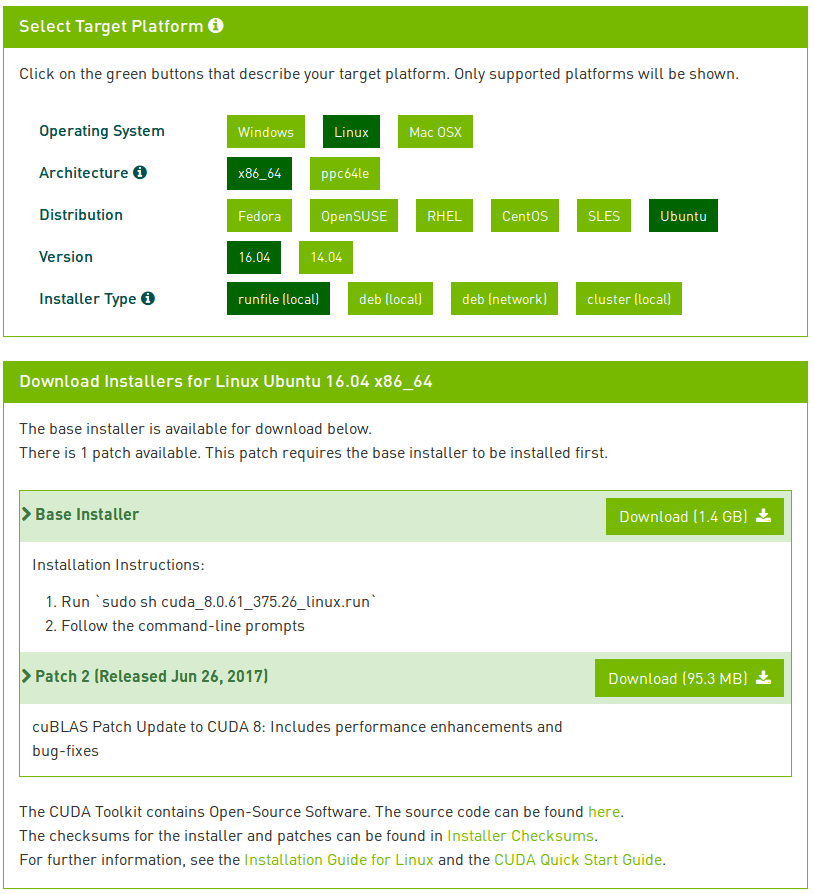
Figure 2: The CUDA Toolkit download page.
From there, download the -run file which should have the filenamecuda_8.0.61_375.26_linux-run or similar. To do this, simply right-click to copy the download link and use wget on your remote GPU box:
Setting up Ubuntu 16.04 + CUDA + GPU for deep learning with Python
Shell
| 1 | $ wget https://developer.nvidia.com/compute/cuda/8.0/Prod2/local_installers/cuda_8.0.61_375.26_linux-run |
Important: At the time of this writing there is a minor discrepancy on the NVIDIA website. As shown in Figure 2 under the “Base Installer” download, the filename (as is written) ends with.run . The actual downloadable file ends with -run . You should be good to go in copying mywget + URL command for now unless NVIDIA changes the filename again.
Note: You will need to click the “<=>” button in the code block toolbar above to expand the code block. This will enable you to copy the full URL to the -run file.
From there, unpack the -run file:
Setting up Ubuntu 16.04 + CUDA + GPU for deep learning with Python
Shell
| 1 2 3 | $ chmod +x cuda_8.0.61_375.26_linux-run $ mkdir installers $ sudo ./cuda_8.0.61_375.26_linux-run -extract=`pwd`/installers |
The last step in the block above can take 30-60 seconds depending on the speed of your machine.
Now it is time to install the NVIDIA kernel driver:
Setting up Ubuntu 16.04 + CUDA + GPU for deep learning with Python
Shell
| 1 2 | $ cd installers $ sudo ./NVIDIA-Linux-x86_64-375.26.run |
During this process, accept the license and follow prompts on the screen.
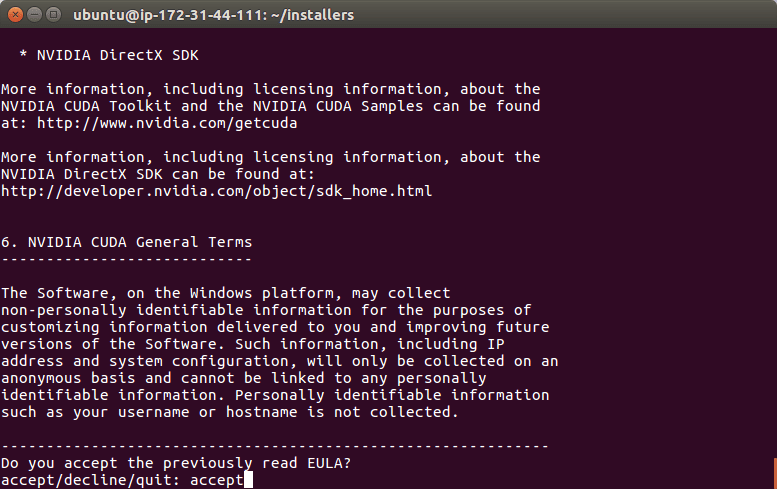
Figure 3: Accepting the NVIDIA End User License Agreement.
From there, add the NVIDIA loadable kernel module (LKM) to the Linux kernel:
Setting up Ubuntu 16.04 + CUDA + GPU for deep learning with Python
Shell
| 1 | $ modprobe nvidia |
Install the CUDA Toolkit and examples:
Setting up Ubuntu 16.04 + CUDA + GPU for deep learning with Python
Shell
| 1 2 | $ sudo ./cuda-linux64-rel-8.0.61-21551265.run $ sudo ./cuda-samples-linux-8.0.61-21551265.run |
Again, accepting the licenses and following the default prompts. You may have to press ‘space’ to scroll through the license agreement and then enter “accept” as I’ve done in the image above. When it asks you for installation paths, just press <enter> to accept the defaults.
Now that the NVIDIA CUDA driver and tools are installed, you need to update your ~/.bashrc file to include CUDA Toolkit (I suggest using terminal text editors such as vim , emacs , or nano ):
Setting up Ubuntu 16.04 + CUDA + GPU for deep learning with Python
Shell
| 1 2 3 | # NVIDIA CUDA Toolkit export PATH=/usr/local/cuda-8.0/bin:$PATH export LD_LIBRARY_PATH=/usr/local/cuda-8.0/lib64/ |
Now, reload your ~/.bashrc ( source ~/.bashrc ) and then test the CUDA Toolkit installation by compiling the deviceQuery example program and running it:
Setting up Ubuntu 16.04 + CUDA + GPU for deep learning with Python
Shell
| 1 2 3 4 5 6 | $ source ~/.bashrc $ cd /usr/local/cuda-8.0/samples/1_Utilities/deviceQuery $ sudo make $ ./deviceQuery deviceQuery, CUDA Driver = CUDART, CUDA Driver Version = 8.0, CUDA Runtime Version = 8.0, NumDevs = 1, Device0 = Tesla K80 Result = PASS |
Note: Calling source on ~/.bashrc only has to be done once for our current shell session. Anytime we open up a new terminal, the contents of ~/.bashrc will be automatically executed (including our updates).
At this point, if you have a Result = PASS , then congratulations because you are ready to move on to the next step.
If you do not see this result, I suggest you repeat Step #2 and examine the output of each and every command carefully to ensure there wasn’t an error during the install.
For this step, you will need to Create a free account with NVIDIA and download cuDNN.
For this tutorial, I used cuDNN v6.0 for Linux which is what TensorFlow requires.
Due to NVIDIA’s required authentication to access the download, you may not be able to usewget on your remote machine for the download.
Instead, download the file to your local machine and then (on your local machine) use scp (Secure Copy) while replacing <username> and <password> with appropriate values to update the file to your remote instance (again, assuming you’re accessing your machine via SSH):
Setting up Ubuntu 16.04 + CUDA + GPU for deep learning with Python
Shell
| 1 2 | scp -i EC2KeyPair.pem ~/Downloads/cudnn-8.0-linux-x64-v6.0.tgz \ username@your_ip_address:~ |
Next, untar the file and then copy the resulting files into lib64 and include respectively, using the -P switch to preserve sym-links:
Setting up Ubuntu 16.04 + CUDA + GPU for deep learning with Python
Shell
| 1 2 3 4 5 6 | $ cd ~ $ tar -zxf cudnn-8.0-linux-x64-v6.0.tgz $ cd cuda $ sudo cp -P lib64/* /usr/local/cuda/lib64/ $ sudo cp -P include/* /usr/local/cuda/include/ $ cd ~ |
That’s it for Step #3 — there isn’t much that can go wrong here, so you should be ready to proceed.
In this section, we will get a Python virtual environment configured on your system.
Installing pip
The first step is to install pip , a Python package manager:
Setting up Ubuntu 16.04 + CUDA + GPU for deep learning with Python
Shell
| 1 2 3 | $ wget https://bootstrap.pypa.io/get-pip.py $ sudo python get-pip.py $ sudo python3 get-pip.py |
Installing virtualenv and virtualenvwrapper
Using pip , we can install any package in the Python Package Index quite easily including virtualenv and virtualenvwrapper. As you know, I’m a fan of Python virtual environments and I encourage you to use them for deep learning as well.
In case you have multiple projects on your machine, using virtual environments will allow you to isolate them and install different versions of packages. In short, using both virtualenv andvirtualenvwrapper allow you to solve the “Project X depends on version 1.x, but Project Y needs 4.x dilemma.
The folks over at RealPython may be able to convince you if I haven’t, so give this excellent blog post on RealPython a read.
Again, let me reiterate that it’s standard practice in the Python community to be leveraging virtual environments of some sort, so I suggest you do the same:
Setting up Ubuntu 16.04 + CUDA + GPU for deep learning with Python
Shell
| 1 2 | $ sudo pip install virtualenv virtualenvwrapper $ sudo rm -rf ~/.cache/pip get-pip.py |
Once we have virtualenv and virtualenvwrapper installed, we need to update our~/.bashrc file to include the following lines at the bottom of the file:
Setting up Ubuntu 16.04 + CUDA + GPU for deep learning with Python
Shell
| 1 2 3 4 | # virtualenv and virtualenvwrapper export WORKON_HOME=$HOME/.virtualenvs export VIRTUALENVWRAPPER_PYTHON=/usr/bin/python3 source /usr/local/bin/virtualenvwrapper.sh |
After editing our ~/.bashrc file, we need to reload the changes:
Setting up Ubuntu 16.04 + CUDA + GPU for deep learning with Python
Shell
| 1 | $ source ~/.bashrc |
Now that we have installed virtualenv and virtualenvwrapper, the next step is to actually create the Python virtual environment — we do this using the mkvirtualenv command.
Creating the dl4cv virtual environment
In past install tutorials, I’ve presented the choice of Python 2.7 or Python 3. At this point in the Python 3 development cycle, I consider it stable and the right choice. You may elect to use Python 2.7 if you have specific compatibility requirements, but for the purposes of my book, we will use Python 3.
With that said, for the following command, ensure you set the -p flag to python3 .
Setting up Ubuntu 16.04 + CUDA + GPU for deep learning with Python
Shell
| 1 | $ mkvirtualenv dl4cv -p python3 |
You can name this virtual environment whatever you like (and create as many Python virtual environments as you want), but for the time being, I would suggest sticking with the dl4cv name as that is what I’ll be using throughout the rest of this tutorial.
Verifying that you are in the “dl4cv” virtual environment
If you ever reboot your Ubuntu system; log out and log back in; or open up a new terminal, you’ll need to use the workon command to re-access your dl4cv virtual environment. An example of the workon command follows:
Setting up Ubuntu 16.04 + CUDA + GPU for deep learning with Python
Shell
| 1 | $ workon dl4cv |
To validate that you are in the dl4cv virtual environment, simply examine your command line — if you see the text (dl4cv) preceding your prompt, then you are in the dl4cv virtual environment:
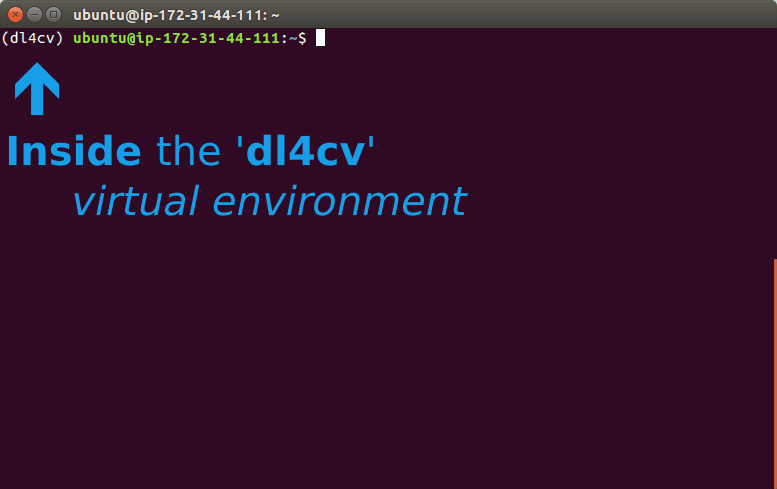
Figure 4: Inside the dl4cv virtual environment.
Otherwise, if you do not see the dl4cv text, then you are not in the dl4cv virtual environment:
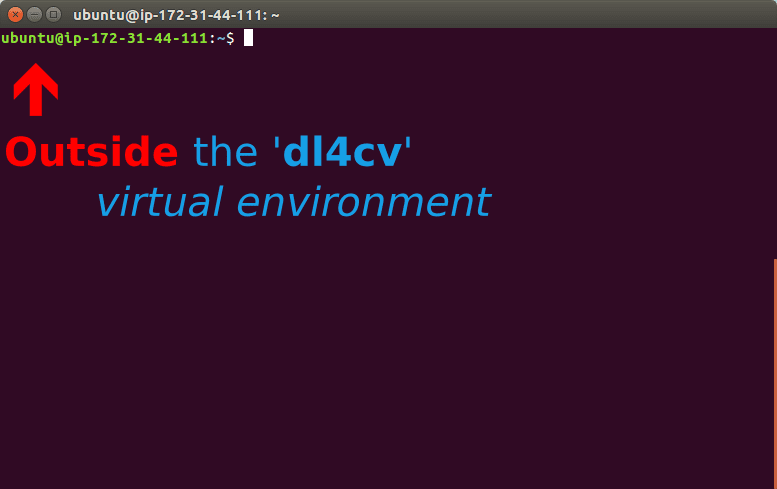
Figure 5: Outside the dl4cv virtual environment. Execute workon dl4cv to activate the environment.
Installing NumPy
The final step before we compile OpenCV is to install NumPy, a Python package used for numerical processing. To install NumPy, ensure you are in the dl4cv virtual environment (otherwise NumPy will be installed into the system version of Python rather than the dl4cv environment).
From there execute the following command:
Setting up Ubuntu 16.04 + CUDA + GPU for deep learning with Python
Shell
| 1 | $ pip install numpy |
Once NumPy is installed in your virtual environment, we can move on to compile and install OpenCV.
First you’ll need to download opencv and opencv_contrib into your home directory. For this install guide, we’ll be using OpenCV 3.3:
Setting up Ubuntu 16.04 + CUDA + GPU for deep learning with Python
Shell
| 1 2 3 | $ cd ~ $ wget -O opencv.zip https://github.com/Itseez/opencv/archive/3.3.0.zip $ wget -O opencv_contrib.zip https://github.com/Itseez/opencv_contrib/archive/3.3.0.zip |
Then, unzip both files:
Setting up Ubuntu 16.04 + CUDA + GPU for deep learning with Python
Shell
| 1 2 | $ unzip opencv.zip $ unzip opencv_contrib.zip |
Running CMake
In this step we create a build directory and then run CMake:
Setting up Ubuntu 16.04 + CUDA + GPU for deep learning with Python
Shell
| 1 2 3 4 5 6 7 8 9 | $ cd ~/opencv-3.3.0/ $ mkdir build $ cd build $ cmake -D CMAKE_BUILD_TYPE=RELEASE \ -D CMAKE_INSTALL_PREFIX=/usr/local \ -D WITH_CUDA=OFF \ -D INSTALL_PYTHON_EXAMPLES=ON \ -D OPENCV_EXTRA_MODULES_PATH=~/opencv_contrib-3.3.0/modules \ -D BUILD_EXAMPLES=ON .. |
Note: I turned CUDA off as it can lead to compile errors on some machines. The CUDA optimizations would internally be used for C++ functions so it doesn’t make much of a difference with Python + OpenCV. Again, the primary use of CUDA in this blog post is to optimize our deep learning libraries, not OpenCV itself.
For CMake, it is important that your flags match mine for compatibility. Also, make sure that youropencv_contrib version is the exact same as the opencv version you downloaded (in this case version 3.3.0 ).
Before we move on to the actual compilation step, make sure you examine the output of CMake.
Start by scrolling to the section titled Python 3 .
Make sure that your Python 3 section looks like the figure below:
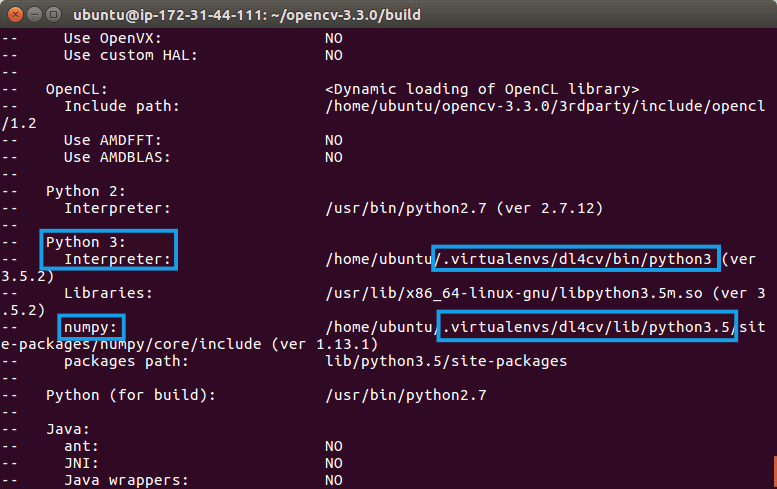
Figure 6: Verifying that CMake has properly set up the compile to use the correct Python 3 Interpreter and version of NumPy. Both Python 3 and NumPy should be pulled from the dl4cv virtual environment.
Ensure that the Interpreter points to our python3.5 binary located in the dl4cv virtual environment while numpy points to our NumPy install.
In either case if you do not see the dl4cv virtual environment in these variables’ paths, then it’s almost certainly because you are NOT in the dl4cv virtual environment prior to running CMake!
If this is the case, access the dl4cv virtual environment using workon dl4cv and re-run the command outlined above.
Compiling OpenCV
Now we are now ready to compile OpenCV :
Setting up Ubuntu 16.04 + CUDA + GPU for deep learning with Python
Shell
| 1 | $ make -j4 |
Note: If you run into compilation errors, you may run the command make clean and then just compile without the flag: make . You can adjust the number of processor cores you use the compile OpenCV via the -j switch (in the example above, I’m compiling OpenCV with four cores).
From there, all you need to do is to install OpenCV 3.3:
Setting up Ubuntu 16.04 + CUDA + GPU for deep learning with Python
Shell
| 1 2 3 | $ sudo make install $ sudo ldconfig $ cd ~ |
You can also delete your opencv and opencv_contrib directories to free up space on your system; however, I highly recommend that you wait until the end of this tutorial and ensured OpenCV has been correctly installed before you delete these files (otherwise you’ll have to download them again).
Symbolic linking OpenCV to your virtual environment
To sym-link our OpenCV bindings into the dl4cv virtual environment, issue the following commands
Setting up Ubuntu 16.04 + CUDA + GPU for deep learning with Python
Shell
| 1 2 3 | $ cd ~/.virtualenvs/dl4cv/lib/python3.5/site-packages/ $ ln -s /usr/local/lib/python3.5/site-packages/cv2.cpython-35m-x86_64-linux-gnu.so cv2.so $ cd ~ |
Note: Make sure you click “<=>” button in the toolbar above to expand the code block. From there, ensure you copy and paste the ln command correctly, otherwise you’ll create an invalid sym-link and Python will not be able to find your OpenCV bindings.
Your .so file may be some variant of what is shown above, so be sure to use the appropriate file.
Testing your OpenCV 3.3 install
Now that we’ve got OpenCV 3.3 installed and linked, let’s do a quick sanity test to see if things work:
Setting up Ubuntu 16.04 + CUDA + GPU for deep learning with Python
Python
| 1 2 3 4 | $ python >>> import cv2 >>> cv2.__version__ '3.3.0' |
Make sure you are in the dl4cv virtual environment before firing up Python. You can accomplish this by running workon dl4cv .
When you print the OpenCV version in your Python shell it should match the version of OpenCV that you installed (in our case OpenCV 3.3.0 ).
When your compilation is 100% complete you should see output that looks similar to the following:
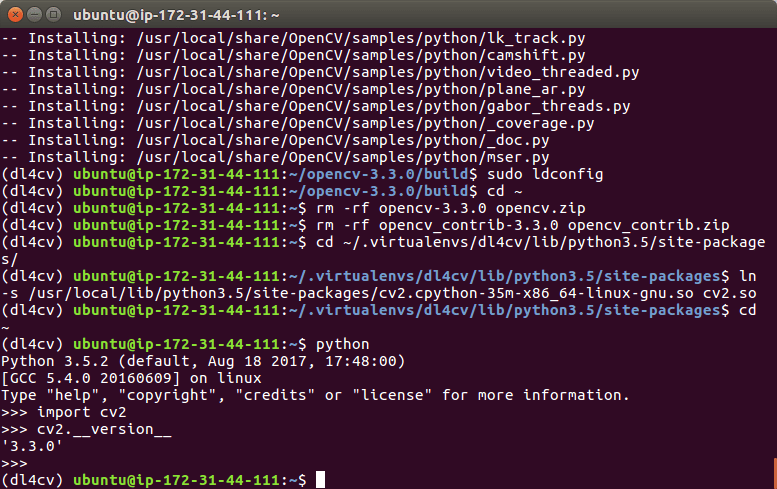
Figure 7: OpenCV 3.3.0 compilation is complete.
That’s it — assuming you didn’t have an import error, then you’re ready to go on to Step #6 where we will install Keras.
For this step, make sure that you are in the dl4cv environment by issuing the workon dl4cv command.
From there we can install some required computer vision, image processing, and machine learning libraries:
Setting up Ubuntu 16.04 + CUDA + GPU for deep learning with Python
Shell
| 1 2 3 | $ pip install scipy matplotlib pillow $ pip install imutils h5py requests progressbar2 $ pip install scikit-learn scikit-image |
Next, install Tensorflow (GPU version):
Setting up Ubuntu 16.04 + CUDA + GPU for deep learning with Python
Shell
| 1 | $ pip install tensorflow-gpu |
You can verify that TensorFlow has been installed by importing it in your Python shell:
Setting up Ubuntu 16.04 + CUDA + GPU for deep learning with Python
Python
| 1 2 3 | $ python >>> import tensorflow >>> |
Now we’re ready to install Keras:
Setting up Ubuntu 16.04 + CUDA + GPU for deep learning with Python
Shell
| 1 | $ pip install keras |
Again, you can verify Keras has been installed via your Python shell:
Setting up Ubuntu 16.04 + CUDA + GPU for deep learning with Python
Python
| 1 2 3 4 | $ python >>> import keras Using TensorFlow backend. >>> |
You should see that Keras has been imported with no errors and the TensorFlow backend is being used.
Before you move on to Step #7, take a second to familiarize yourself with the~/.keras/keras.json file:
Setting up Ubuntu 16.04 + CUDA + GPU for deep learning with Python
| 1 2 3 4 5 6 | { "image_data_format": "channels_last", "backend": "tensorflow", "epsilon": 1e-07, "floatx": "float32" } |
Ensure that image_data_format is set to channels_last and backend is tensorflow .
Congratulations! You are now ready to begin your Deep learning for Computer Vision with Python journey (Starter Bundle and Practitioner Bundle readers can safely skip Step #7).
This step is only required for readers who purchased a copy of the ImageNet Bundle of Deep Learning for Computer Vision with Python. You may also choose to use these instructions if you want to configure mxnet on your system.
Either way, let’s first clone the mxnet repository and checkout branch 0.11.0 :
Setting up Ubuntu 16.04 + CUDA + GPU for deep learning with Python
Shell
| 1 2 | $ cd ~ $ git clone --recursive https://github.com/apache/incubator-mxnet.git mxnet --branch 0.11.0 |
We can them compile mxnet:
Setting up Ubuntu 16.04 + CUDA + GPU for deep learning with Python
Shell
| 1 2 | $ cd mxnet $ make -j4 USE_OPENCV=1 USE_BLAS=openblas USE_CUDA=1 USE_CUDA_PATH=/usr/local/cuda USE_CUDNN=1 |
Followed by sym-linking to our dl4cv environment.
Setting up Ubuntu 16.04 + CUDA + GPU for deep learning with Python
Shell
| 1 2 3 | $ cd ~/.virtualenvs/dl4cv/lib/python3.5/site-packages/ $ ln -s ~/mxnet/python/mxnet mxnet $ cd ~ |
Finally, you may fire up Python in your environment to test that the installation was successful:
Setting up Ubuntu 16.04 + CUDA + GPU for deep learning with Python
Shell
| 1 2 3 | $ python >>> import mxnet >>> |
Note: Do not delete the mxnet directory in your home folder. Not only do our Python bindings live there, but we also need the files in ~/mxnet/bin when creating serialized image datasets.
Cheers! You are done and deserve a cold beer while you read Deep Learning for Computer Vision with Python (ImageNet bundle).
Note: To avoid significant cloud expenses (or power bills if your box is beneath your desk), I’d recommend that you power off your machine until you’re ready to use it.
Today we learned how to set up an Ubuntu + CUDA + GPU machine with the tools needed to be successful when training your own deep learning networks.
If you encountered any issues along the way, I highly encourage you to check that you didn’t skip any steps. If you are still stuck, please leave a comment below.
I want to reiterate that you don’t need a fancy, expensive GPU machine to get started on your deep learning for computer vision journey. Your CPU can handle the introductory examples in the book. To help you get started, I have provided an install tutorial here for Ubuntu CPU users. If you prefer the easy, pre-configured route, my book comes with a VirtualBox virtual machine ready to go.
I hope this tutorial helps you on your deep learning journey!
If you want to study deep learning in-depth, be sure to take a look at my new book, Deep Learning for Computer Vision with Python.
To be notified when future blog posts and tutorials are published on the PyImageSearch blog, be sure to enter your email address in the form below!
Enter your email address below to get my free 17-page Computer Vision, OpenCV, and Deep Learning Resource Guide PDF. Inside you'll find my hand-picked tutorials, books, courses, and Python libraries to help you master computer vision and deep learning!
deep learning, dl4cv, gpu, install, optimization, python, python 3, ubuntu, virtual environments
Configuring Ubuntu for deep learning with Python
macOS for deep learning with Python, TensorFlow, and Keras
Arash R September 27, 2017 at 12:06 pm #
I think you have to install NVIDIA driver again after installing Cuda. Or is it not required with this setup? (To be clear I followed the official NVIDIA guide and I think I remember that cuda-driver didn’t work or something so I didn’t install that but nonetheless I had to re-install my regular nvidia driver afterwards.)
REPLY
Adrian Rosebrock September 28, 2017 at 9:13 am #
I always install the kernel driver first, then the CUDA toolkit. This has always worked for me in the past.
REPLY
Misgana April 10, 2018 at 4:10 am #
I find this tutorial from nvidia website helpful.
http://docs.nvidia.com/cuda/cuda-installation-guide-linux/index.html#post-installation-actions
To make sure that nvidia-nouveau driver is disabled, just search for Additional Drivers
in Software and Updates and deselect the option Using X.org X server
That’s it. No need to SSH.
If you need to disable lightdm, you can go to tty and disable it from there- no guarantee though that it works for Ubuntu 16.04.
REPLY
Andrew September 27, 2017 at 2:13 pm #
Thank you Adrian. Great tutorial. Since I don’t have the $129k for the DGX-1 I will be doing this on my NIVIDA Jetson TX2 
REPLY
Adrian Rosebrock September 28, 2017 at 9:07 am #
The TX2 is a lot of fun, you’ll be able to execute the majority of the examples in Deep Learning for Computer Vision with Python on it.
REPLY
Samuel September 27, 2017 at 5:12 pm #
Hi Adrian,
I am having trouble with Step 2 when I try to run sudo ./NVIDIA-Linux-x86_64-375.26.run.
This is the error that I get:
ERROR: You appear to be running an X server; please exit X before installing. For further details, please see the section INSTALLING THE NVIDIA DRIVER in the README available on the Linux driver download page at http://www.nvidia.com.
ERROR: Installation has failed. Please see the file ‘/var/log/nvidia-installer.log’ for details. You may find suggestions on fixing installation problems in the READM available on the Linux driver download page at http://www.nvidia.com.
And here is the file /var/log/nvidia-installer.log
nvidia-installer log file ‘/var/log/nvidia-installer.log’
creation time: Wed Sep 27 12:28:34 2017
installer version: 375.26
PATH: /usr/local/sbin:/usr/local/bin:/usr/sbin:/usr/bin:/sbin:/bin:/snap/bin
nvidia-installer command line:
./nvidia-installer
Unable to load: nvidia-installer ncurses v6 user interface
Using: nvidia-installer ncurses user interface
-> Detected 8 CPUs online; setting concurrency level to 8.
-> The file ‘/tmp/.X0-lock’ exists and appears to contain the process ID ‘1016’ of a runnning X server.
ERROR: You appear to be running an X server; please exit X before installing. For further details, please see the section INSTALLING THE NVIDIA DRIVER in the README available on the Linux driver download page at http://www.nvidia.com.
ERROR: Installation has failed. Please see the file ‘/var/log/nvidia-installer.log’ for details. You may find suggestions on fixing installation problems in the README available on the Linux driver download page at http://www.nvidia.com.
I tried googling the error, but no luck so far. I did a rm /tmp/.X0-lock and then I didn’t get the “X server error”, but the installation still will not complete.
Any idea how to fix this?
Thanks
REPLY
Adrian Rosebrock September 28, 2017 at 9:06 am #
It sounds like you may have forgotten to disable the default Nouveau driver and reboot your machine. Please see the first few commands of “Step #2” for more information.
If you have disabled the driver, try booting directly to the terminal rather than trying to login to the GUI.
REPLY
Adrian Rosebrock September 29, 2017 at 6:30 am #
Hi Samuel — I updated the blog post to include “Step #0: Turn off X server/X window system”. This will help you resolve the error you are receiving.
Please give it a look!
REPLY
Rob Jones January 2, 2018 at 2:02 pm #
Is there a problem with running the X server *after* the install ?
…or is there some conflict between the cuda/cudnn code and the X server/gui code ?
thanks!
REPLY
Adrian Rosebrock January 3, 2018 at 1:00 pm #
There should be no issue running X server after the install. We have to disable it temporarily so we can swap the video drivers.
REPLY
Taro March 27, 2019 at 12:26 am #
Hi Adrian,
I seem to be encountering the same error as Samuel. I have followed your modified instructions to turn off the server as well. Any suggestions in this regard will be appreciated.
REPLY
Adrian Rosebrock March 27, 2019 at 8:30 am #
I would suggest following my updated tutorial for Ubuntu 18.04. It makes installing CUDA far, far easier.
REPLY
Alexander Sack September 29, 2017 at 11:06 am #
I think most would be better off doing a “network” based install which would mean adding the official nvidia ppa repos to so they can just do:
apt-get install cuda
And that’s that. Note that very recently Nvidia has released full support for cuda-9.0 on 17.04 with all the trimmings (so far works flawlessly with Keras/TF etc.).
Also, you don’t *have* to disable X11. X11 can co-exist.
Finally, I highly recommend Anaconda for machine learning projects: http://www.anaconda.org
For those of you who aren’t familiar with Anaconda think of it as virtualenv+pip all rolled into one. OpenCV, tensflow-gpu, keras, scikit, etc. have all been ported over to conda. Anaconda also applies to OSX as well.
Anyway, food for thought.
REPLY
Adrian Rosebrock October 2, 2017 at 10:15 am #
1. You can use apt-get to install the NVIDIA drivers, but I can’t recommend it. You can easily place yourself in a situation when you run an upgrade and install non-compatible kernel drivers.
2. When installing the NVIDIA drivers via the command line I needed to turn off X11. Perhaps I’m missing something?
3. Regarding Anaconda, please see my reply to “Shannon”.
REPLY
rania January 19, 2018 at 10:02 am #
yes i am facing this issue now with my cuda 9.1 and linux 4.13.0.26 kernel eany solutions or i had to re install every thing again
REPLY
Adrian Rosebrock January 22, 2018 at 6:43 pm #
Just to clarify, what particular error are you running into?
REPLY
Azam September 29, 2017 at 12:52 pm #
Thanks. I will try this to setup my machine for deep learning. I have Nvidia 1060. Would be enough for deep learning?
REPLY
Adrian Rosebrock October 2, 2017 at 10:13 am #
Is it the 1060 6GB or 3GB model? You’ll be able to run the majority of the examples inside the Starter Bundle and Practitioner Bundle of Deep Learning for Computer Vision with Python using 3GB. However, for deeper networks on larger datasets I would suggest at least 6GB, but ideally 8GB+.
REPLY
Hubert de Lassus September 29, 2017 at 1:44 pm #
On a fresh Ubuntu 16.04.3 installation, Nvidia driver version 375.66 is built in Ubuntu. By default the nouveau driver is installed but the Nvidia driver is available.
In graphic mode going to settings->Software & updates -> Additional Drivers select NVIDIA driver, click apply changes and reboot. This installs the Nvidia driver.
After this I was able to install Cuda 8.0 following the steps mentioned in this blog.
Attempting to install Nvidia driver as described by Adrian failed in my case even though the Xserver was disabled. So I suggest to use ubuntu settings->Software->Additional drivers to install the driver.
REPLY
Hubert de Lassus September 29, 2017 at 2:00 pm #
Adrian, could you please clarify:
the blog states “For this tutorial I used cuDNN v6.0 for Linux which is what TensorFlow requires.”
But then the blog uses cudnn-8.0:
scp -i EC2KeyPair.pem ~/Downloads/cudnn-8.0-linux-x64-v6.0.tgz \
username@your_ip_address:~
Is cudnn-8.0 the version you advise?
REPLY
Adrian Rosebrock October 2, 2017 at 10:10 am #
I saw your other comment, but I wanted to reply for other readers:
You need CUDA v8 for TensorFlow and cuDNN v6.
REPLY
Hubert de Lassus September 29, 2017 at 2:22 pm #
Ok my mistake, it is clear that cudnn to use is 8-0 version v6 for Tensorflow.
REPLY
john September 29, 2017 at 5:08 pm #
hi Adrian.
I have a question regarding ubuntu 16.04 and loading the Nvidia CUDA driver.
it seems to me that the instructions for loading the nvidia driver are for ubuntu 14, and below, which is the exact method I had to always use before to get the nvidia driver loaded and use CUDA
With Ubuntu 16.04 , all you need to do is go to Software & Updates -> Additional Drivers, and the Nvidia binary driver shows up , just load it , and thats it , no need to turn off X or go into the command line, turn off nouveau , lightdm stop/start etc . CUDA and all its examples once compiled work fine with no issue. At least thats what I did months ago and have had no issues using the GPU and CUDA. After a reboot all the latest / new Nvidia drivers as released also show up tin Additiona Drivers, to load if you want to . The driver that initially shows up is 381.22 but after that later drivers up to 384.90 show up to easily load.
Not sure if Im missing something loading the Nvidia driver with this easy method
REPLY
Adrian Rosebrock September 30, 2017 at 9:42 am #
Thanks for sharing, John! I normally use a terminal when using Ubuntu, a rarely use the GUI. I haven’t tried this GUI-based method, but it seems like it can work. I just want to note to other readers that if they are using EC2 they’ll need to use the pure terminal-based option.
REPLY
Don December 6, 2017 at 11:12 pm #
After MUCH frustration, I followed this advice and made it past Step #2… !!!! Thank you john!!
REPLY
Adam April 22, 2018 at 1:21 pm #
Which steps exactly did you guys omit? I’m on Ubuntu 16.04 and my Software & Updates/Additional drivers show “Using Nvidia … 384.111 …”
Did you guys omit the whole Step 2 or only a part of it?
@Adrian: I would prefer to keep the x-server on as when booting a fresh install of Ubuntu 16.04 without logging in – it doesn’t allow me to ssh into it (even after updating /etc/network/interfaces with wi-fi details manually),
Thanks Guys!
REPLY
Vic Jackson September 29, 2017 at 5:41 pm #
Adrian,
Thanks for this fantastic guide.
I just have one question regarding the “Note: To avoid significant cloud expenses (or power bills if your box is beneath your desk), I’d recommend that you power off your machine until you’re ready to use it.”
Is there something about these modules/drivers/packages that would required a higher than normal idle power consumption?
Just curious!
REPLY
Adrian Rosebrock September 30, 2017 at 9:40 am #
GPUs can require considerable more energy than your CPU. That note is really for readers using the EC2 cloud where the machine is billed on hourly usage. It’s just a quick reminder to shut down your instance so you don’t get charged hourly. The idle power consumption in your home/apartment is not that much, just be aware that the GPU requires more energy when it’s under full load.
REPLY
Michael Alex September 29, 2017 at 10:16 pm #
Hi Adrian,
If we already have successfully configured Ubuntu for Python with a CPU and compiled OpenCV, etc., must you do the full GPU configuration from scratch? Is it possible to “add on” the GPU capability in a different virtual environment? Thanks very much.
REPLY
Adrian Rosebrock September 30, 2017 at 9:39 am #
If you have already configured your dev environment for the CPU, simply install the GPU drivers, then install tensorflow-gpu into your “dl4cv” Python virtual environment.
REPLY
Fahim November 9, 2017 at 6:04 am #
Hi Adrian, same case here. I already configured my CPU for deep learning environment. But sometimes, the running time is way too slow and I get bored.
What is the exact process to install the GPU drivers and do the rest as you mentioned above? Would you please clarify?
REPLY
Adrian Rosebrock November 9, 2017 at 6:11 am #
Hi Fahim — it’s great to hear that you’re ready to start using your GPU for deep learning. The problem is that configuring your GPU for deep learning can be pretty challenging, especially if you’re new to Unix environments or this is the first time you’ve configured your GPU before.
My suggestion would be for you to follow this tutorial exactly, only use a separate Python virtual environment (or delete your original one). This will ensure you hit all steps and minimize the chance of you running into errors.
If you just want the GPU drivers and cuDNN, see Step 2 and Step 3 (just make sure you install tensorflow-gpu).
REPLY
Fahim November 9, 2017 at 7:16 am #
—> Due to NVIDIA’s required authentication to access the download, you may not be able to use wget on your remote machine for the download.
Instead, download the file to your local machine and then (on your local machine) use scp (Secure Copy) while replacing and with appropriate values to update the file to your remote instance (again, assuming you’re accessing your machine via SSH)
If I’ll be using just one computer, the one where I’m installing opencv,cuda and so on, what am I going to do in this step? As I understand, may be I can just skip this command—
scp -i EC2KeyPair.pem ~/Downloads/cudnn-8.0-linux-x64-v6.0.tgz \
username@your_ip_address:~
and follow the steps of untar that follows.
Am I correct?
And to follow this tutorial exactly, do I need to start from scratch? That means will I uninstall opencv, keras and tensorflow and start anew? Or should I just turn off the X server and follow the steps, and create a virtual environment with a name other than dl4cv(which I already have right now), like dl4cv1 or so on?
Adrian Rosebrock November 9, 2017 at 7:22 am #
Yes, if you are installing on your local machine you can skip the SCP step. Untar it on your local machine and install.
As I mentioned in a previous comment to you, you should consider creating a NEW Python virtual environment for the deep learning install, such as “dl4cv1” as you suggested. You could delete your “dl4cv” one and recreate it, but you don’t want to destroy your CPU install.
You can skip recompiling and reinstalling OpenCV (just add the sym-link to the cv2.so file to your new Python virtual environment).
You WILL need to reinstall Keras and TensorFlow. Make sure you install tensorflow-gpu.
I would also suggest going back to Step #1 and running all apt-get install commands before installing the CUDA driver. Any missing packages will be installed and any installed packages will be ignored.
jerry September 30, 2017 at 8:00 am #
Hi Adrian
The latest Nvidia Cuda is Cuda 9 not Cuda 8 and Cuda driver 384.81
should we be using Cuda 9 ?
REPLY
Adrian Rosebrock September 30, 2017 at 9:37 am #
You should be using CUDA 8. TenorFlow (currently) requires CUDA 8.
REPLY
Susie September 30, 2017 at 4:46 pm #
Hi Adrian
I been following your posts and your books for a while, thank you for the great post as always!
I purchased a gaming desktop with GTX 1080 ti today I am planning to install a second GPU and I wonder if the above processes changes with the a second GPU… I found little info on doing SLI with ubuntu 16.04 and since you have 4 GPUs on your workstation I wonder if you can provide some insights.
REPLY
Adrian Rosebrock October 2, 2017 at 9:49 am #
Nothing will change with multiple GPUs. I would suggest ensuring all your GPUs are the same model and then install CUDA + cuDNN. Run nvidia-smi and you should see that all your GPUs are recognized.
REPLY
vahid October 1, 2017 at 6:32 am #
thanks adrian very use full
REPLY
Alan October 1, 2017 at 11:03 am #
Hi Adrian,
I have an NVIDIA 730GT video card, I have checked on the NVIDIA site and it appears to have a compute value of 3.5, however before I follow this excellent GPU support document is there any chance of you reviewing the card for GPU compatibility please (a bit cheeky of me I know)
REPLY
Lavanya Seetharaman October 1, 2017 at 10:34 pm #
Hi Adrian ,
Excellent blog which I never seen before
Whether I can try this same steps in virtual box?
REPLY
Adrian Rosebrock October 2, 2017 at 9:37 am #
VirtualBox, by definition, cannot access external peripherals such as your GPU. You would need to use NVIDIA’s Docker image or configure your own native Ubuntu + GPU system.
REPLY
sierpinski September 2, 2018 at 11:57 am #
do you know a tutorial-link for this option Adrian? It would be very helpful.
REPLY
sierpinski September 2, 2018 at 11:59 am #
the option for the Nvidia’s docker image…
REPLY
Adrian Rosebrock September 5, 2018 at 9:03 am #
Refer to NVIDIA’s official documentation.
lightman October 5, 2017 at 7:49 am #
Excellent blog.
Should I install cuBLAS in Figure 2?
REPLY
Adrian Rosebrock October 6, 2017 at 5:03 pm #
You want to if you can, but it is not required.
REPLY
Abderrazak IAZZI October 6, 2017 at 9:22 am #
Hello all,
I have a problem with installation of nvidia driver. I have nvidia geforce gtx 960m for notbook computer. When i follow the above prompts especially when i use the command “$ modprobe nvidia “. I got this error : ” ERROR: could not insert ‘nvidia’ : required key not avaiable ” . i tried many tutorials but they are not clear as what you presented here. Although,i can’t install nvidia driver following the above prompts. Could you help me please ?
REPLY
Adrian Rosebrock October 6, 2017 at 4:48 pm #
Hi Abderrazak — that is indeed a strange error, although I’m not sure what the exact error is. I did a quick Google search and it sounds like it might be related to UEFI and Secure Boot. Do you have them both enabled? If so, please refer to this thread.
REPLY
Abderrazak IAZZI October 8, 2017 at 4:55 pm #
Thank you so much Adrian, that was a key of my error. Now, i installed nvidia driver and cud 8.0 cudnn5.1. As i want to use a caffe framework as Segnet, i got many errors when i use $ make all -j8 to compile caffe using cudnn and gpu.
REPLY
Adrian Rosebrock October 9, 2017 at 12:20 pm #
Fantastic, congrats on resolving the issue Abderrazak! As far as SegNet goes, I have not tried to install it or use it before so I’m not sure what the exact issue is.
REPLY
Jackson Cornelius October 9, 2017 at 12:34 pm #
This worked perfectly for my system. Thanks a lot!
REPLY
Adrian Rosebrock October 9, 2017 at 12:41 pm #
Fantastic, I’m glad to hear it Jackson! Congrats on getting your Ubuntu + GPU configured for deep learning
REPLY
Sudeep V October 9, 2017 at 7:51 pm #
Hello Adrian,
Thanks alot for detailed steps for installation. By far this is the best post I have seen for any installation.
I am able to successful in Setting up Ubuntu 16.04 + CUDA + GPU for deep learning with Python.
One thing I noted is that as said in the earlier replies, once I installed Nvidia binary driver using Software & Updates -> Additional Drivers, in Ubunto GUI , we can directly go to step for CUDA Installation.
Really appreciate your effort in helping us.
REPLY
Adrian Rosebrock October 13, 2017 at 9:15 am #
Congrats on configuring your Ubuntu system + GPU for deep learning Sudeep, great job!
Thank you for the note on the software and updates panel. I created this tutorial with the assumption that people are not using the GUI or are SSH’d into a cloud instance where the GUI is not available. If you are using a desktop this seems like it would work as well.
REPLY
Arun October 10, 2017 at 7:53 am #
Hello Adrian, I am using Google cloud compute engine with a Tesla K80. I followed the steps you have mentioned. I am facing issue while running
sudo ./NVIDIA-Linux-x86_64-375.26.run
It stops with error.
ERROR: An error occurred while performing the step: “Building kernel modules”. See /var/log/nvidia-installer.log for details.
I looked into the log couldn’t figure out the issue. Please find the log file here https://pastebin.com/wXNTxTJM
Thanks
REPLY
Adrian Rosebrock October 13, 2017 at 9:07 am #
Hi Arun — I have not tried this method with the Google compute engine, only with my desktop and Amazon EC2. Unfortunately I’m not sure what the error is.
REPLY
Andrew October 28, 2017 at 11:10 am #
Try to install with .deb not the .run.
That might solve your problem.
REPLY
Richard Everts October 11, 2017 at 12:10 am #
Awesome as always Adrian. Works like a charm. Glad to see the CUDA 8.0/cuDNN 5.1/Tensorflow bug was fixed. Thanks!
REPLY
Adrian Rosebrock October 13, 2017 at 8:59 am #
Fantastic, I’m glad to hear it Richard! Congrats on getting your Ubuntu + GPU system configured for deep learning
REPLY
Arun October 12, 2017 at 9:56 am #
Nvidia has released the new version cuda 9.0. Installing the latest version fixed the issue(mentioned in my previous comment) for me. Thanks Adrian for the great post. Adds lot of value for the deep learning community.
REPLY
Adrian Rosebrock October 13, 2017 at 8:40 am #
Hi Arun — congrats on resolving the issue. I haven’t tested TensorFlow with CUDA 9 yet. The TensorFlow docs (currently) state to use CUDA 8 so if you run into any issues along the way, that might be the reason.
REPLY
Jim October 29, 2017 at 10:12 pm #
Can somebody tell me what i did wrong here?
python knn.py –dataset ../datasets/animals
[INFO] loading images…
OpenCV Error: Assertion failed (ssize.width > 0 && ssize.height > 0) in resize
…
REPLY
Jim October 29, 2017 at 10:40 pm #
Sheesh…my bad, somehow.
Problem is that I tar’d the SB_Code and sftp it to GPU machine. Something broke?
So, now: sftp -r SB_Code…..now it works!!
REPLY
Adrian Rosebrock October 30, 2017 at 1:50 pm #
I’m glad you found the problem and that your code is running now, Jim. Happy learning!
REPLY
Fahim November 9, 2017 at 6:12 am #
Hi Adrian,
In step 3 , what does it actually mean by local machine and remote machine. I’m a bit confused at this point. Will I need two computers to perform this installation?And will I have to access the one where I will install OpenCV+CUDA+GPU etc. through a separate computer?
May be these are silly questions, but I just want to be sure before getting started because I already have my CPU configured for the deep learning but the speed is too slow. So I want to use my GeForce 940mx for the deep learning environment.
REPLY
Adrian Rosebrock November 9, 2017 at 6:35 am #
You do not need two computers for this unless you are installing deep learning + GPU support on a separate machine. I developed this tutorial using an Amazon Machine Instance (AMI) via SSH. If you are using two machines your local machine is the one you are typing on and the remote machine is the one you are SSH’d into.
Also, please see my previous reply to you.
REPLY
Fahim November 9, 2017 at 7:59 pm #
Hi Adrian, after finishing step 2 and rebooting, I got stuck in a login loop.
It says guest session, even if I enter correct password, it just won’t login.
I’ve searched the internet and found out that the nvidia drivers are causing the problem. Some say to install v-7.5 instead of v-8.0, some say to uninstall. But what’s the point of uninstalling if I went through all these hassles to install NVIDIA!
Please help me out here.
REPLY
Ankur November 17, 2017 at 12:42 am #
Hi,
Thanks for the wonderful guide. I am stuck at the same step – I cannot get the x ui started. At login I can start by pressing ctrl alt f2 .. but in no case can i start the GUi.
Your help is appreciated!!
REPLY
Dan Todor November 13, 2017 at 11:53 am #
Hi, Adrian!
I’m facing an issue in installing CUDA.
Here is my kernel config:
Linux bigone 4.10.0-28-generic #32~16.04.2-Ubuntu SMP Thu Jul 20 10:19:48 UTC 2017 x86_64 x86_64 x86_64 GNU/Linux
1060 with 3GB
In nvdia install log I see exactly the messages described here:
https://bugs.debian.org/cgi-bin/bugreport.cgi?bug=855802
What I find curious is that I’m the first one to fall on this bug ?
They say there is a patch, but I wasn’t able to find it yet …
Did you saw this before by any chance ? Any idea how can I move further ? Maybe kernel downgrade , or ?
TIA,
Dan
REPLY
Adrian Rosebrock November 13, 2017 at 1:55 pm #
Hi Dan — thanks for the comment. Unfortunately I haven’t encountered this error message before. Are you trying to install CUDA on your local machine? Or on a AWS/cloud instance?
REPLY
Dan Todor November 13, 2017 at 9:55 pm #
Local Ubuntu install, 16.04 LTS. For what is worth, the deb install worked, so I have now a working virtualenv with GPU … However, I’m a bit puzzled that I’m alone in encountering this bug, as I said before, apparently it’s a known bug when combining CUDA 8 and Kernel 4.x … Just for the record, for anyone hitting on this, try CUDA deb install, worked for me.
REPLY
Adrian Rosebrock November 15, 2017 at 1:11 pm #
Thank you for sharing the extra information and solution, Dan. I’ll be sure to let you know if I see anyone else running into this issue.
REPLY
Fahim November 13, 2017 at 1:36 pm #
Hi Adrian,
Is there a way to be sure whether my laptop is using the GPU for computation or not after all these tedious steps?
REPLY
Adrian Rosebrock November 13, 2017 at 1:52 pm #
That really depends on which deep learning library you are using. If it’s TensorFlow + Keras you can set the context. The same is true for mxnet. I also didn’t realize you were using your laptop GPU. In general I don’t recommend using your laptop GPU. A dedicated GPU on a desktop tends to give you the most optimal performance.
REPLY
Michaël November 14, 2017 at 5:21 am #
Hello everybody, just a comment to say that I follow the steps in this tutorial on “paperspace” cloud instance (instance GPU+ with Quadro M4000 GPU, ubuntu 16.04) – everything worked perfectly so this cloud service can be another option for those not wanting to use AWS.
Other dedicated GPU are available at paperspace but much more expensive.
Cheers
REPLY
Adrian Rosebrock November 15, 2017 at 1:04 pm #
Hey Michaël, congrats on getting your deep learning instance configured!
These instructions are intended to work on (1) your local machine and (2) cloud-based instances. I used AWS for this example because it was convenient.
REPLY
Peter James November 15, 2017 at 1:01 am #
Hi Adrian! Great article!
Quick question:
The CUDA installation directory is at /usr/local/cuda-8.0
# NVIDIA CUDA Toolkit
export PATH=/usr/local/cuda-8.0/bin:$PATH
export LD_LIBRARY_PATH=/usr/local/cuda-8.0/lib64/
but the cuDNN is installed at /usr/local/cuda
$ sudo cp -P lib64/* /usr/local/cuda/lib64/
$ sudo cp -P include/* /usr/local/cuda/include/
Shouldn’t cuDNN be copied to /user/local/cuda-8.0/* instead?
Thank you,
Peter James
REPLY
Adrian Rosebrock November 15, 2017 at 12:55 pm #
Hi Peter — if you take a look at the /usr/loca/cuda you’ll see that the cudadirectory is a sym-link to cuda-8.0. Nothing needs to be modified.
REPLY
Dan Barry November 18, 2017 at 2:11 am #
I ran into a problem installing CUDA with dual GTX 1080 Ti cards. First, you have to get the most current NVIDIA drivers (right now that is 387.12). Follow this guide to do that:
https://blog.nelsonliu.me/2017/04/29/installing-and-updating-gtx-1080-ti-cuda-drivers-on-ubuntu/
Next, when I ran
./deviceQuery
it failed with this notice:
./deviceQuery Starting…
CUDA Device Query (Runtime API) version (CUDART static linking)
cudaGetDeviceCount returned 30
-> unknown error
Result = FAIL
However, running it as sudo worked, and once it was run once with sudo, it did not need sudo to subsequently work. I found that solution here:
https://devtalk.nvidia.com/default/topic/1025243/ubuntu-14-04-error-cudagetdevicecount-returned-30/
REPLY
Dan Barry November 18, 2017 at 2:18 am #
See note on Nov. 18th, which answers this issue
REPLY
Adrian Rosebrock November 18, 2017 at 8:08 am #
Thanks so much for sharing, Dan!
REPLY
Dan Barry November 18, 2017 at 2:24 pm #
It all installs and works with dual GTX 1080 Ti cards, provided you have the right drivers and use sudo with ./deviceQuery, as noted in the comment above.
Given that this setup is complete, how do I setup another virtualenv, where I use python 2.7 instead of 3.5? Do I need to go through the entire process again, with a different name for the environment?
REPLY
Adrian Rosebrock November 20, 2017 at 4:15 pm #
Congrats on getting your machine configured, Dan! Nice job!
If you intend on using Python 3.5 you will need to:
1. Create a new Python virtual environment
2. Install all “pip” pre-reqs
3. Compile OpenCV for Python 3.5 bindings (but don’t actually install it, just sym-link the resulting cv2.so file in your build directory into the site-packages directory of your Python virtual environment)
REPLY
ram November 24, 2017 at 1:48 pm #
thanks a ton Adrian
REPLY
Adrian Rosebrock November 25, 2017 at 12:20 pm #
No problem Ram, I’m happy to help!
REPLY
Eng.3moor November 28, 2017 at 10:08 am #
Hi Adrian
I need your recommendation to laptop to help me to work with deep learning for computer vision for training and development deep learning applications.
Thanks
REPLY
Adrian Rosebrock November 28, 2017 at 1:56 pm #
In general, I do not recommend using your laptop for any type of substantial deep learning (outside of teaching yourself the fundamentals). If you’re serious about deep learning you should consider either (1) building a desktop or (2) simply using cloud servers with GPUs. I would suggest you by spend less money on your laptop and spend more money on the cloud, such as AWS. This will enable you to run deeper neural networks on larger datasets.
Secondly, don’t bother with external GPUs. They aren’t worth it. If you absolutely must buy a laptop do your research and find one with an NVIDIA GPU. But again, I don’t think it’s money well spend.
REPLY
Eng.3moor November 28, 2017 at 8:07 pm #
Thanks
I really appreciated your advice.
Thanks Awesome Adrian.
REPLY
Ying November 29, 2017 at 5:42 am #
Hi Adrian,
I’m following your steps to install CUDA and cuDNN on my desktop with NVIDIA GTX 1080. I failed at step 2 when installing NVIDIA Kernal drive. The error in log is: cc:error:unrecognised command line option: ‘-fstack-protector-strong’
could you please suggest how to fix this issue?
Many thanks!
REPLY
Ying November 29, 2017 at 9:11 am #
I have fixed this issue by upgrading gcc to 5.4 version, and add alternatives as well.
REPLY
Don December 6, 2017 at 8:56 pm #
This is absolutely absurd… I have spent hours upon hours trying to get a system running with these instructions. I can’s get the ‘sudo ./NVIDIA-Linux-x86_64-375.26.run’ to run without errors.
I have reinstalled ‘ubuntu-16.04.3-desktop-amd64.iso” a dozen times just to clean up any potential mess.
I’m running a GTX570
First error is, ‘The distribution-provided pre-install script failed! Are you sure you want to continue?” Other sites say ignore and continue.
Next error is, ‘ERROR: An error occurred while performing the step: “Building kernel modules”. See /var/log/nvidia-installer.log for details.’
I’m spent… and I really wanted to learn this stuff. I have actually been considering buy your course. But, if your you blog post doesn’t even work, how can I trust your course? Why not use the current versions? Update your post?
REPLY
Adrian Rosebrock December 8, 2017 at 5:00 pm #
Hi Don — I’m sorry to hear about the issues you’ve had configuring your development environment. In many cases it can be half the battle. I see from a later comment that you were able to resolve the issue. Congratulations on resolving it.
It’s great to hear that you are considering picking up a copy of my deep learning book (and I’m sure your frustration with getting the install to work contributed to the exasperation), but I do think your criticism is overly harsh. Each and every install tutorial I publish here on PyImageSearch is thoroughly tested over and over again. That said, I cannot test on your particular machine with your particular hardware and with whatever other libraries/tools you have installed that are may be causing conflicts. There are many, many unknowns and as I state at the top of this blog post, it can be a very real challenge for even experienced practitioners to correctly configure their machines.
As for “why not use the current versions” the instructions outlined in this post will work for the vast majority of machines using stable deep learning libraries and do use the current versions while ensuring stability as best as I can. I’m sorry that wasn’t the case for you.
I hope you’ll still consider picking up a copy of Deep Learning for Computer Vision with Python and in the future for you or any other PyImageSearch reader, be sure to take a look at my pre-configured Amazon EC2 instance. This cloud-based instance has all deep learning tools and libraries (including all the ones detailed in this post). It can be a real life-saver if you’re struggling taking that first step.
REPLY
Don December 9, 2017 at 1:13 pm #
Thanks for taking the time to respond.
Notwithstanding the lack of “Thank you”, I don’t believe my comment was harsh. Absurd was the only negative thing I said, and it best described the emotion I felt after the numerous hours I wasted trying achieve a successful result for the specific instruction that I referenced.
Your reply gives the impression that there is some acceptable excuse for the process failing. While, if fact, the reasons you give are extraneous based on the information I provided.
I made is clear that I installed a clean copy of ubuntu-16.04.3-desktop-amd64.iso, so one should assume there are no lingering libraries/tools. The processor and RAM (x86, 4GB) should not matter, save a malfunction. The GPU is a GTX570, which should be well supported by the 8.0 Nvidia driver. I followed each step (exactly), updating the system and installing libraries prior to attempting the nvidia driver. Still, no joy.
On the last iteration, I followed the advice of another user, installing the latest nvidia driver via the GUI, then started your instructions from the beginning (skipping the disable X and nvidia driver installation) and everything successfully installed.
I now realize the reason (TensorFlow) for requiring CUDA 8.0, but one question still stands. Why not update your blog to include the GUI install option. And, use the 9.0 Nvidia driver? My persistence with research is the ONLY reason I succeeded with this task. Not your instructions in their current form.
Despite the foregoing, I will say THANK YOU!! Without this blog post, I am sure I would have spent many more hours trying to get a system configured on my own. I really do appreciate what you have done and apologize if my candor hurt your feelings or made you feel unappreciated. It was my intent.
THANKS AGAIN!!
REPLY
Adrian Rosebrock December 11, 2017 at 5:35 pm #
Hi Don — thank you for the followup comment, I appreciate. I also appreciate you saying thanks although I am sorry that the tutorial did not work out of the box for you. That is always my goal when possible but configuring deep learning machines aren’t as simple as installing OpenCV (as you unfortunately found out).
It’s great that you provided your system information. There are readers who would not share such information and makes it harder to figure out what’s going on. However, when I wrote the tutorial I did not (and could not) know what hardware you were using. Your comment was certainly helpful and clarifying but I cannot own every individual GPU (although I do my best to test on every GPU that I can get my hands on).
Installing via the GUI is only one option. Most people developers/engineers configuring their machines for deep learning are doing so over SSH (and normally in the cloud) with no window manger. Developers configuring a deep learning machine with a standard keyboard + mouse + monitor are actually quite the minority. Therefore, I needed to cater the tutorial towards the strong majority. I do try to make my tutorials work on all platforms, and when I tested locally it worked as well, but that may not be the case for all machines and all configurations.
When it comes to TensorFlow you should be using CUDA 8 which provides the most reliable support (for the time being, of course). I use CUDA + TensorFlow daily and keep on top of these updates. I’m certainly not the “end all, be all” but I know quite a bit about configuring machines for deep learning from scratch.
Anyway, I hope that makes sense. I’m not one to make excuses so if the tutorial did not work for you, I do apologize.
Best of luck on your deep learning journey!
REPLY
Q December 23, 2017 at 11:26 am #
Adrian,
This is a fantastic instruction. I am reading this blog because I am considering a GPU in near future.
One question other than GPU: Does number of cores in a CPU affect the training speed as much as adding a GPU? For example, Core -i7 7700K (4.2GHz 4 core) vs Ryzen 1700X (3.4 GHz 8 Core) vs Core-i7 8700K (3.7GHz 6 Core).
Or it does not matter since we use GPU library only (CUDA/cuDNN) in your instruction?
REPLY
Adrian Rosebrock December 26, 2017 at 4:32 pm #
The number of cores/threads in a CPU can affect the training time. I would suggest increasing the number of threads/cores as this will enable you to take advantage of libraries that serialize/deserialize images and apply data augmentation. However, keep in mind that the GPU will by in large be the primary bottleneck and where you spend most of your time training your networks.
REPLY
Q December 27, 2017 at 10:47 pm #
Adrian,
Thank you very much for your advice.
Have great holidays
REPLY
Rob Jones January 2, 2018 at 4:29 pm #
The cuda installation script in step #2 failed for me so I dug around a bit and found that there is now cuda 9.1 with slightly different (and simpler) install instructions
The download link is https://developer.nvidia.com/cuda-downloads?target_os=Linux&target_arch=x86_64&target_distro=Ubuntu&target_version=1604&target_type=runfilelocal
Then just run ‘sudo sh cuda_9.1.85_387.26_linux’ and follow the prompts
no need for these steps:
$ sudo ./cuda-linux64-rel-8.0.61-21551265.run
$ sudo ./cuda-samples-linux-8.0.61-21551265.run
Testing it with deviceQuery works… so I think I have a good setup… we’ll see
REPLY
Rob Jones January 2, 2018 at 5:13 pm #
I spoke too soon – as of Jan 2nd 2018 – tensorflow still needs cuda 8.0
Although it looks like you can TF to work with 9.0 if you are willing to compile it from source
REPLY
Rob Jones January 2, 2018 at 6:33 pm #
…and for some reason I missed your comments on exactly this issue earlier… sorry about that :^(
REPLY
Rob Jones January 2, 2018 at 8:02 pm #
I’m up and running – thanks to this great tutorial
I’ve got a GTX 1080 Ti and could not get NVIDIA-Linux-x86_64-375.26.run to run successfully
After poking around I found mention that the 1080 Ti needs the 384 driver
Go to the nvidia downloads page http://www.nvidia.com/Download/index.aspx and pick the 1080 Ti card and follow the download instructions – that gives you NVIDIA-Linux-x86_64-384.98.run
Run that instead of the 375 version in Adrian’s instructions and it should work – did for me!
REPLY
Adrian Rosebrock January 3, 2018 at 12:55 pm #
Congrats on getting your development environment configured, Rob!
And thank you so much for sharing the note on the GTX 1080 Ti.
REPLY
Joel June 13, 2018 at 6:27 pm #
Adrian, thanks for the great blog & books!!
I’m also using GTX 1080 Ti, and had the same failure with Rob ( -375.26.run install error).
But I’m finally at devicequery and it’s saying,
deviceQuery,
– CUDA Driver = CUDART,
– CUDA Driver Version = 9.0,
– CUDA Runtime Version = 8.0,
– NumDevs = 2,
– Device0 = GeForce GTX 1080 Ti, Device1 = GeForce GTX 1080 Ti
– Result = PASS
I think CUDA is mixed up with 384.98 and 375.26. Do you think It’s ok to go to the step #3?
REPLY
Adrian Rosebrock June 15, 2018 at 12:35 pm #
If the deviceQuery is passing then I think it’s safe to proceed.
REPLY
Sudeep January 6, 2018 at 10:50 pm #
Thanks alot Adrian. Atlast I could make my workstation configure all the above softwares. Feeling good today, as I struggled alot initially with my Workstation to configure.
REPLY
Adrian Rosebrock January 8, 2018 at 2:50 pm #
Congrats on getting your Ubuntu deep learning environment configured, Sudeep! Great job!
REPLY
Amandeep January 12, 2018 at 10:25 pm #
I was able to run all Step-1 instructions, completed step-2 nouveau change and downloaded Cuda8 as instructed.
When I executed “sudo ./NVIDIA-Linux-x86_64-375.26.run”, I got into trouble. Installer throws errors:
ERROR: You appear to be running X Server; please exit X before Installing. For further details, please see the section INSTALLING THE NVIDIA DRIVER in the README available on Linux Driver download page.
I have 2 GPUs GTX 1080 Ti on SLI. I have installed 384.111 driver from Settings–>Software–> Additional Drivers
REPLY
Amandeep January 13, 2018 at 8:44 am #
I am user of DL with Python (SB, PB and Imagenet Bundle) and Gurus course. Recently I built a GPU rig for me at home with following configuration:
i9-7900, 64 GB RAM
2 GPUs (GTX 1080 Ti) on SLI
Ubuntu : 16.04
Nvidia Driver : 384.111
I followed steps in your blog to setup DL libraries (https://www.pyimagesearch.com/2017/09/27/setting-up-ubuntu-16-04-cuda-gpu-for-deep-learning-with-python/)
I completed step#1 (did Ctl+Alt+F2n lightdm stop before step-1), disabled the Nouveau kernel driver by creating a new “blacklist-nouveau.conf” file.
Next, when I executed cuda installer (cuda_8.0.61_375.26_linux-run), I ran into troubles.
First, I got following errors:
ERROR: You appear to be running an X server; please exit X before installing. For further details, please see the section INSTALLING THE NVIDIA DRIVER in the README available on the Linux driver download page at http://www.nvidia.com.
ERROR: Installation has failed. Please see the file ‘/var/log/nvidia-installer.log’ for details. You may find suggestions on fixing installation problems in the README available on the Linux driver download page at http://www.nvidia.com.
After this, I changed run level to 3 (sudo init 3)
Post this, I was getting DKMS errors (see pictures).
Now, I am not even able to login to Ubuntu with my login/password.
Can you please suggest what is something I am missing ?
REPLY
Adrian Rosebrock January 15, 2018 at 9:22 am #
Hey Amandeep! Congrats on building your own deep learning rig. 64GB of RAM and two 1080 Tis are a great choice.
As for your error, I assume you are using a keyboard + monitor hooked up to your rig to install the NVIDIA Driver?
Samuel (who commented on September 27, 2017) had the same issue. John (September 29, 2017) proposed an easy solution that involves using the GUI. Please take a look as that will likely resolve your error.
REPLY
Justin Hartman January 17, 2018 at 1:35 pm #
As a follow up to my comment. It seems it’s really important to have the driver that is linked to your NVIDIA card. I have the Tesla K80 and needed the 384 driver. I followed this to get the driver installed:
# Installs 384.66 for CUDA 8 on Ubuntu 16.04
wget http://us.download.nvidia.com/tesla/384.66/nvidia-diag-driver-local-repo-ubuntu1604-384.66_1.0-1_amd64.deb
 sudo dpkg -i nvidia-diag-driver-local-repo-ubuntu1604-384.66_1.0-1_amd64.deb
 sudo apt-get update
 sudo apt-get --allow-unauthenticated --assume-yes install cuda-drivers
 sudo reboot now
Once I had this then I was able to resume your installation from this point onwards:
Install the CUDA Toolkit and examples:
 $ sudo ./cuda-linux64-rel-8.0.61-21551265.run
 $ sudo ./cuda-samples-linux-8.0.61-21551265.run
I hope that this helps others because I see other people have banged out on the driver installation which I think is linked to which GPU you are using.
REPLY
Adrian Rosebrock January 18, 2018 at 8:55 am #
Thank you for sharing, Justin!
REPLY
Mark J January 27, 2018 at 2:28 pm #
Thanks for this guide btw. Other than the updating of Nvidia drivers via the gui, things have gone like clockwork.
However, step #6 now fails due to tensorflow now looking for cuda 9.0. I’ll try installing it and see if that works.
REPLY
Adrian Rosebrock January 30, 2018 at 10:33 am #
Hey Mark — I ran into this issue yesterday, myself. The solution is to either:
1. Install CUDA 9
2. Install tensorflow==1.4.1 or tensorflow-gpu==1.4.1 which will work with CUDA 8.
I want to debug this a further and test it on a few machines, then I’ll get the instructions updated.
REPLY
Luis R March 4, 2018 at 6:51 pm #
I also ran into this issue. The NVIDIA driver I used is the latest, 390 I think, which does not cause any problems. Tensorflow is now configured to be used with the CUDA 9.0 release. Becasue I have CUDA 8.0 installed I tried tensorflow-gpu==1.4 and it works.
Be aware that if you use the CUDA 9.0 release you will also have to use the CUDNN library for that release. I do not want to install the CUDA 9.0 library along with CUDA 8.0 yet as before finishing this tutorial I had 9.0 and 8.0 installed and it was a mess, I had to reinstall UBUNTU.
REPLY
Adrian Rosebrock March 7, 2018 at 9:32 am #
Thank you for sharing, Luis.
REPLY
Tony Holdroyd March 16, 2018 at 7:21 am #
Hello Adrian, I am very much enjoying your DL4CV book, although it took me a while to find time to start it. I am also a member of PyImagesearch, another great resource
I’m having an isssue with my installation of CUDA though, when I try to run the .run file, after following the instructons as carefully as I can (a couple of times) I’m getting an error ‘The distribution pre-installscript failed’, followedby more errors and no install. Do you have any ideas please what I might be doing wrong? THanks. Tony
REPLY
Tony Holdroyd March 16, 2018 at 7:29 am #
p.s. my gpu is a GTX 1080, I’m running a clean install of Ubuntu 16.04
REPLY
Adrian Rosebrock March 19, 2018 at 5:37 pm #
Hi Tony! THank you for being such a loyal PyImageSearch reader
As for the error, could you create a GitHub gist of it and them link to it from your comment? From there I can take a look.
REPLY
Yusra Shahid March 19, 2018 at 2:44 am #
Hey Adrian, thank you for such great tutorials. I wanted some help, in step 2 when i do reboot I get a dialog saying “the system is running in low-graphics mode your screen graphics card, and input device settings could not be detected correctly. you will need to configure these yourself.” Any idea what to do as i have tried options given after these dialog but none of it works.
REPLY
Adrian Rosebrock March 19, 2018 at 4:56 pm #
It seems like there was a problem installing the NVIDIA drivers or switching from your current video drivers to NVIDIA ones. This thread on the official Ubuntu forums has more information on the error. I hope that helps!
REPLY
Chad March 29, 2018 at 9:58 pm #
Hey Adrian, looks like I messed something up. This is a GTX 1050 and I actually had already installed the NVidia driver from the Ubuntu 16 GUI when I tried step 2 of the tutorial. I got a bunch of errors (not the XWindow errors) and now I can’t log in from the GUI anymore. It just jumps out to the to the login screen over and over. I still have access through SSH, though. Any suggestions? Is there a way to back out the blacklist stuff in Step 2 so that I can get the GUI back?
REPLY
Chad March 29, 2018 at 10:12 pm #
Wow, what a weird problem. Finally fixed it with this:
https://askubuntu.com/questions/762831/ubuntu-16-stuck-in-login-loop-after-installing-nvidia-364-drivers
It suggested “sudo ubuntu-drivers autoinstall”, which worked for some reason. Now to see if I can get past Step 2! I feel like I’m playing a video game and finally beat the 1st-level boss!
REPLY
Adrian Rosebrock March 30, 2018 at 6:46 am #
Congrats on resolving the issue, Chad! And thanks so much for sharing the solution so other PyImageSearch readers can see it. Installing and configuring a local deep learning machine can feel like a boss fight. But luckily the 1st level boss is the hardest and it should be much easier now
REPLY
Kevin April 9, 2018 at 6:56 pm #
for those who are getting errors during
$ sudo ./NVIDIA-Linux-x86_64-375.26.run
make sure you’re kernel is not 4.13 or above
referring to NVIDIA’s cuda installation guide, the only promising kernel version is 4.4
REPLY
Raissi May 16, 2018 at 12:50 pm #
for make it working in 4.13 . what to do ?
REPLY
Raissi May 16, 2018 at 12:57 pm #
Because this command sudo ./NVIDIA-Linux-x86_64-384.81.run it’s never running , i got the errors
REPLY
Yannis April 23, 2018 at 11:16 am #
Hello,
I have a MSI laptop and had to install nvidia drivers 384 to make it work on Ubuntu LTS 16.04. In System Settings, Software and Updates, Additionnal Drivers, “Using NVIDIA binary driver” is ticked instead of X.org/X server.
Should I deactivate it as well during the installation ? How ?
Thanks,
YK
REPLY
eddison May 20, 2018 at 7:36 am #
hello adrian,
i have installed ubuntu 16.04 in my laptop, after i follow the step till the installation of cuda, i unable to login to my Ubuntu.
can you help me to solve this? thanks
regards,
choon.
REPLY
Adrian Rosebrock May 22, 2018 at 6:13 am #
Hey Eddison, I’m sorry to hear about this issue. I know how frustrating it is when an install isn’t working properly.
This sounds like a driver issue where the login screen is looped. There are a few ways to fix this but I would start here. You’ll also want to Google for “Ubuntu 16.04 NVIDIA driver loop” and look at the articles most relevant to the specific drivers you used.
REPLY
Ashwin May 21, 2018 at 1:43 pm #
I have a doubt regarding step 2. When I sudo run the NVIDIA executable, I get an error saying that the distribution-provided pre-install script failed.
I’m not sure how to proceed after that. I have the X server disabled and I’ve followed the rest of the steps as well. It is possibly that sudo reboot necessitates me to redo a few steps(like logging in to terminal and disabling X server again).
REPLY
Adrian Rosebrock May 22, 2018 at 5:59 am #
Are you installing on a local machine with a monitor? Or are you installing on a cloud instance?
REPLY
Ashwin May 27, 2018 at 2:34 am #
I’m installing on a local machine.
REPLY
Adrian Rosebrock May 28, 2018 at 9:45 am #
Thanks for the clarification. Can you also share what GPU you are using along with the specific CUDA toolkit version you are trying to install?
REPLY
Eddison May 26, 2018 at 1:15 pm #
Hi Adrian, is this works for ubuntu 18.04 too?
thanks
regards,
Eddison
REPLY
Adrian Rosebrock May 28, 2018 at 10:01 am #
Ubuntu 18.04 is slightly different as it ships with Python 3 only — Python 2.7 is not included in the default installation of Ubuntu 18.04 (you could install it if you wanted to of course). This tutorial will work with Ubuntu 18.04 but you may run into slightly different package names, mostly related to the image I/O libraries. I detail them in this blog post.
REPLY
Ashwin May 28, 2018 at 12:28 pm #
The GPU I have is an Nvidia GeForce GTX 1050. I tried installing the cuda_8.0.61_375.26_linux-run file.
REPLY
Adrian Rosebrock May 31, 2018 at 5:21 am #
Thanks Ashwin. Your GTX 1050 would indeed support CUDA so that shouldn’t be an issue. You might want to check the install logs for a more detailed listing of the error. Also be sure to post the error on the NVIDIA developer forums as well.
REPLY
bikram kachari June 8, 2018 at 5:04 am #
Hi Adrian,
i am getting the error
“error unable to load the ‘nvidia-drm’ kernel module”
while doing the step ” $ sudo ./NVIDIA-Linux-x86_64-375.26.run” . I am on ubuntu server 16.04 and using gpu nvidia geforce gtx 1080
Can you please help in resolving the error
REPLY
Adrian Rosebrock June 8, 2018 at 6:47 am #
Take a look at the comment thread on this blog post with Dan Barry.
REPLY
json June 26, 2018 at 10:58 pm #
Hi Adrian!
So I just finished doing your tutorial on “Configuring Ubuntu for deep learning with Python” and I see some overlay with this tutorial. I’m still new to Linux but I do feel very comfortable with the terminal. So my question is since finishing up the earlier tutorial, do I need to repeat all the steps that overlay from the first one (“Configuring Ubuntu for deep learning with Python”)? And the reason I’m going this route vs the supplied VirtualBox is that I’d like to use my GPU’s.
REPLY
Adrian Rosebrock June 28, 2018 at 8:11 am #
You do not need to repeat all the steps but you will need to install your NVIDIA drivers and then install TensorFlow with GPU support as suggested in this post.
REPLY
anwar ariffin July 8, 2018 at 12:27 pm #
I’m sorry Adrian but i got stuck on step#2 with sudo ./cuda_8.0.61_375.26_linux-run -extract=pwd/installers, itu say error:extract: path mustika be absolut, how to fix that ?
REPLY
anwar ariffin July 8, 2018 at 12:35 pm #
It is extracting individual driver, toolkit and samples installers to /installers after i delete ‘pwd’. But There is nothing inside installers folder and i can’t do the step after that line. Do you know how to fix this ?
REPLY
Adrian Rosebrock July 10, 2018 at 8:37 am #
Hey Anwar — try removing the “pwd” and replace it with the absolute path to the “installers” directory:
$sudo ./cuda_8.0.61_375.26_linux-run -extract=path/to/installers
REPLY
Chris_ye July 10, 2018 at 1:09 pm #
Hi Adrian!
I followed this great tutorial,but I got stuck when “import tensorflow”,the error is blow:
libcudart.so.8.0: cannot open shared object file: No such file or directory, how can I fix it?
REPLY
Adrian Rosebrock July 13, 2018 at 5:33 am #
According to your error, TensorFlow is trying to utilize CUDA 8 (hence the “8.0” in the filename) but it cannot find the file. TensorFlow thinks it should be using CUDA 8. Can you double-check which version of CUDA you have installed on your machine?
REPLY
Poornachandra July 19, 2018 at 11:34 pm #
Hi
I have a NVIDIA GTX 970 GPU and RAM of 8GB . Can I proceed with the installation of Ubuntu 16.04, CUDA , cuDNN , tensorflow and other DL Python libraries?
REPLY
Adrian Rosebrock July 20, 2018 at 6:23 am #
Yes, you certainly can, but you should double-check with version of the CUDA drivers the GTX 970 needs. I know the CUDA 6.5 drivers work with the 970 but you’ll want to research that.
REPLY
Kapil Varshney July 27, 2018 at 2:58 am #
Hi Adrian,
thanks a lot for this amazing guide. Inspired from your writings, I have written a guide on how I did a similar configuration setup on my laptop (Lenovo Yoga 710 with 16GB RAM, 256 GB SSD, Nvidia 940MX 2GB GPU).
Please let me know what you think about it.
https://medium.com/@kapilvarshney/how-to-setup-ubuntu-16-04-with-cuda-gpu-and-other-requirements-for-deep-learning-f547db75f227
REPLY
Gustavo Lagos July 30, 2018 at 6:42 pm #
@Adrian , great tutorial! I managed to install almost everything, even thou i had some issues in between. I was trying to train darknet using GPU, it had been a nightmare until I follow these instructions but now everything goes well. Thanks a lot!
Sadly, seems there is a misconfiguration installing Tensorflow and Keras…
I’m getting
“Import error: libcublas.so.9.0: cannot open shared object file: No such file or directory”
Based on my findings, it has to be something Nvidia-related (i had to install latest drivers). It seems it points to another cuda version (9.0), but I installed 8.0 as your tutorial suggests.
Do you have any idea on how can I fix this?
Some people suggest to symlink something but I dont feel I understand that solution (and wont copy/paste anything since it could more damage).
Any thought will be well received! Best regards and see you on pyimageconf!
REPLY
Adrian Rosebrock July 31, 2018 at 9:47 am #
Congrats on being able to train YOLO, Gustavo! Were you training YOLO on the same machine? If so, I assume you were using a GPU, correct?
The reason I ask is because I think this is specifically related to your TensorFlow install. Could you check which version of TF you have installed? I think if you downgrade your TF it will use CUDA 8 vs. CUDA 9.
REPLY
Gustavo Lagos July 31, 2018 at 10:03 am #
Hi Adrian!
Yup I was talking about two things… Just in case it confuses somebody: darknet is the original deep cnn architecture implementation of YOLO, which is in C and dont talk to Keras neither Tensorflow. So I could use it right away after installing Nivida Drivers, CUDA & CuDNN.
After that I’m trying to implement my own Siamese Networks to perform Face Identification, which I’ll be doing in Keras…
Up until now, I was using Azure DLVM, but just for training (sooo expensive).
For pre-production testing I needed to configure a local old laptop (the one I’ll be taking with me to pyimageconf). This granted me a few FPS doing GPU processing. I think I’ll try to train the siamese networks on the laptop as well… now that is correctly configured. BTW, the fix for the error is in my other comment from today!
Again, thank you very much!
REPLY
Gustavo Lagos July 31, 2018 at 9:51 am #
Hi!
Finally i found the solution myself.
In case my last comment is missing somewhere (wrote it yesterday but cant find it now), I was getting an error about importing libcublas.9.0.so (or something like that).
I had installed cuda8.0, cudnn 6.0. But
$ pip intall tensorflow-gpu
requires a higher version of those.
So, i did
$ pip install tensorflow-gpu==1.4.1
$ pip install keras
But then keras needs a higher version of tensorflow…
So
$ pip install keras==2.1.5
After that, since I had already installed the last keras before that line, pip warned me that keras-preprocessing and other library wont be working since they need a higher version of Keras. Having said that, I’m currently running the mnist_cnn.py example with no errors until now.
Hope this helps somebody.
REPLY
Adrian Rosebrock July 31, 2018 at 10:44 am #
Thanks so much for sharing the solution, Gustavo!
REPLY
Douglas Jones August 6, 2018 at 1:24 pm #
Great tutorial again, Adrian!
I change things up a bit –
Ubuntu 18.04 server
Ubuntu desktop
Cuda 9.0
cuDNN 7.1
dLib 19.15 with Cuda support
Tensorflow GPU
Keras
mxnet
Now to run a few scripts and ensure everything is working!
Doug
REPLY
Ivo Germann August 12, 2018 at 3:54 am #
Hi Adrian,
Thanks for the tutorial. I’m following it closely with my fresh installed UBUNTU 16.04 using a GTX1080. I’ve chosen way 2 (no SSH) and fail at the end of step 1 after the command:
sudo update-initramfs -u
it says:
update-initramfs: Generating /boot/initrd.img-4.15.0-30-generic
W: Possible missing Firmware /lib/firmware/i915/kbl_guc_ver9_14.bin for mudule i915
W: Possible missing Firmware /lib/firmware/i915/btx_guc_ver8_7.bin for mudule i915
Any idea what I meassed up with?
Reading the comments I saw several issues in step 2 with the GTX1080 – what is the best advice to follow?
Thanks a lot!
REPLY
Adrian Rosebrock August 15, 2018 at 9:03 am #
Hey Ivo — I’m sorry to hear about the issues getting your GTX 1080 working. You should take a look at Don’s comment and see if you can install via the Ubuntu GUI.
REPLY
Mick August 15, 2018 at 6:23 pm #
Hi Ivo,
Did the full install yesterday all good (thx Adrian), Don’s comment : “In graphic mode going to settings->Software & updates -> Additional Drivers select NVIDIA driver, click apply changes and reboot. This installs the Nvidia driver.” Will solve your issue, and you can jump directly to cuda install.
Just in case you want to use different cuda vesrion// tensorflow, have a look at this compatibility list : https://www.tensorflow.org/install/install_sources#tested_source_configurations
REPLY
Adrian Rosebrock August 17, 2018 at 8:12 am #
Thanks for sharing this, Mick
REPLY
Ivo August 18, 2018 at 3:08 pm #
Hi Mick,
Thanks for the hint. I did what you proposed and selected the NVIDIA drivers in the SW&Updates menue. But now I face a new problem: My UBUNTU will not start up with the usual Linux version. It keeps hanging after counting the memory blocks.
But it works when I boot in recovery mode of Linux 4.4.0-131. Is there any way to solve the boot problems.
Sorry, I’m new to Linux – maybe the Linux version doesn’t matter that much. Then I would just get this version booting up properly. Or is the Linux version important?
REPLY
Adrian Rosebrock August 22, 2018 at 10:12 am #
Hey Ivo — that’s pretty strange behavior. I’m not sure what would be based on the NVIDIA driver and unfortunately without knowing your exact history of commands it’s pretty challenging to backtrack to what the exact issue is. I would suggest heading to the NVIDIA forums to actually validate if that could have been caused by a botched NVIDIA driver problem. The devs and support staff there should at least be able to confirm which I unfortunately cannot.
REPLY
Moemen August 30, 2018 at 9:32 pm #
Hey Adrian , I would like to know if this tutorial can be applied to Ubunutu 14.04 as well or not
Thank you
REPLY
Adrian Rosebrock September 5, 2018 at 9:25 am #
This tutorial was specifically designed for Ubuntu 16.04. Most commands will be similar for Ubuntu 14.04 but some library versions will be different. You may need to do some research there.
REPLY
Murthy Udupa September 18, 2018 at 4:15 am #
Hi Adrian,
First of all thanks very much for this installation guide. It save so much time especially when someone is new to these platforms. Also thanks to comments in this blog which help me steer towards a successful installation.
My plan was to use your guide except for parts of STEP #2 and STEP #3 of your guide so that I could install
A) CUDA 9.0
B) CUDNN 7.2
As that is currently supported by TENSORFLOW – see : https://www.tensorflow.org/install/install_linux#NVIDIARequirements
My starting point was a clean install of UBUNTU 16.04 LTS
——
x86_64
DISTRIB_ID=Ubuntu
DISTRIB_RELEASE=16.04
DISTRIB_CODENAME=xenial
DISTRIB_DESCRIPTION=”Ubuntu 16.04.5 LTS”
NAME=”Ubuntu”
VERSION=”16.04.5 LTS (Xenial Xerus)”
——
I then Installed GTX-1080 Ti Hardware along with its driver using “Additional drivers” : this was a BIG MISTAKE (wasted 1 full day trying to resolve version difference for NVIDIA DRIVER and LIBRARY – In case you face similar issues where you are getting errors as:
Where to look? Nvidia installer.log
CLIENT HAS VERSION XX THIS KERNEL HAS VERSION Y
Where to look? nvidia-smi
Failed to initialise NVML: Driver/Library version mismatch
Then do the following to remove existing drivers
# gets rid of existing Nvidia drivers
$ sudo apt-get purge nvidia*
Reboot and continue with installation – At this stage I am assuming you have completed STEP #1 and part of STEP #2 till the point where you are about to download CUDA
Using the browser download CUDA 9.0 from here : https://developer.nvidia.com/cuda-90-download-archive
I used the following download option:
Lunux => X86_64 => UBUNTU => 16.04 => runfile(local)
Check the checksum for downloaded file:
murthy@ugm-7976:~$ md5sum cuda_9.0.176_384.81_linux.run
7a00187b2ce5c5e350e68882f42dd507 cuda_9.0.176_384.81_linux.run
The checksums for comparison are available here : http://developer.download.nvidia.com/compute/cuda/9.0/Prod/docs/sidebar/md5sum-4.txt
The downloaded .run file can be executed straightaway – no need for chmod +x
Follow Adrian’s install guide from and including “mkdir installers” onwards till end of STEP #2
STEP #3 : INSTALL cuDNN 7.2
Assuming you have already signed in as developer – proceed to:
https://developer.nvidia.com/rdp/cudnn-download
Click : Download cuDNN 7.2.1 (August 7, 2018), for CUDA 9.0
This expands to all libraries for various platforms –
I chose to download:
cuDNN v7.2.1 Runtime Library for Ubuntu16.04 (Deb)
cuDNN v7.2.1 Developer Library for Ubuntu16.04 (Deb)
cuDNN v7.2.1 Code Samples and User Guide for Ubuntu16.04 (Deb)
Since these are .deb files install as follows:
# Install cuDNN files ;
# your current dir is the where you downloaded the cuDNN files
sudo dpkg -i libcudnn7_7.2.1.38-1+cuda9.0_amd64.deb
sudo dpkg -i libcudnn7-dev_7.2.1.38-1+cuda9.0_amd64.deb
sudo dpkg -i libcudnn7-doc_7.2.1.38-1+cuda9.0_amd64.deb
Use section 2.4 of installation guide to verify cuDNN. Installation guide is available here : https://docs.nvidia.com/deeplearning/sdk/cudnn-install/index.html
END OF STEP #3
Follow Adrian’s Guide from here on till the very end to install OpenCV, Tensorflow-gpu and Keras. (I did not install MXNET)
(dl4cv) murthy@ugm-7976:~$ python
Python 3.5.2 (default, Nov 23 2017, 16:37:01)
[GCC 5.4.0 20160609] on linux
Type “help”, “copyright”, “credits” or “license” for more information.
>>> import tensorflow
>>> tensorflow.__version__
‘1.10.1’
>>>
## INSTALL KERAS
pip install keras
(dl4cv) murthy@ugm-7976:~$ python
Python 3.5.2 (default, Nov 23 2017, 16:37:01)
[GCC 5.4.0 20160609] on linux
Type “help”, “copyright”, “credits” or “license” for more information.
>>> import keras
Using TensorFlow backend.
>>> keras.__version__
‘2.2.2’
>>>
REPLY
Adrian Rosebrock September 18, 2018 at 7:12 am #
Thank you for so such a detailed comment, Murthy! I really appreciate it — your comment will certainly help other PyImageSearch readers. It was also very helpful for me to read through as well. Thank you again
REPLY
Murthy September 21, 2018 at 2:01 am #
Here are some run times without GPU and with GPU on my
Desktop (i7-6700 CPU @3.4Ghz, 16GB RAM, GTX 1080 Ti )
Program : cifar10_lr_decay.py – from Ch 16 : Starter Bundle
Without GPU : Each EPOCH took: 580 seconds
With GPU : Each EPOCH took : 8 seconds!
Very pleased with the speedup.
REPLY
Adrian Rosebrock October 8, 2018 at 1:10 pm #
Awesome! Thank you for sharing your results, Murthy
REPLY
Wonchul Kim October 14, 2018 at 2:31 am #
I have a question!!!
While I am installing OpenCV, I complete the whole process for install opencv as you mentioned.
Then, when I am doing Symbolic linking opencv to my virutual environment,
I couldn’t find cv2.cpython-35m-x86_64-linux-gnu.so or cv2.so
Specifically, I couldn’t find them anywhere….
Could help me?
REPLY
Adrian Rosebrock October 16, 2018 at 8:42 am #
Check your “build/lib” directory. If the bindings are not there then your “Python” section of “cmake” was likely not filled out correctly. Go back and double check the output of “cmake”.
REPLY
Oormila October 16, 2018 at 12:55 am #
Hi Adrian, after finishing step 2 and rebooting, I got stuck in a login loop.
It says guest session, even if I enter correct password, it just won’t login. I have tried literally each and every command on the internet to remove the loop. Please help me out.
REPLY
Adrian Rosebrock October 16, 2018 at 8:16 am #
That sounds like a driver issue for sure. I assume you are trying to login to the system via the GUI? If so, boot into a shell and then revert to the old driver. That should resolve the login loop. From there you can continue to diagnose the NVIDA CUDA driver problem.
REPLY
Andrew Baker October 16, 2018 at 4:01 pm #
October 14th I updated my Ubuntu System. This is my software stack.
Ubuntu 18.04.1 LTS
Python 3.6.6
OpenCV 4.0.0-alpha.
Tensorflow with GPU support v1.12.0-rc0
Keras v2.2.4
CUDA Toolkit v10.0
cuDNN 7.3.1
NCCL 2.3.5
1. Mostly followed Adrian’s post above.
2. Compiled OpenCV 4.4.0-alpha
3. Tensorflow with GPU support: the standard sudo apt-get install tensorflow-gpu will install but will not run because it is looking for CUDA v9.0. I am using v10.0.
4. Compiled Tensorflow. I followed this tutorial:
https://www.python36.com/how-to-install-tensorflow-gpu-with-cuda-10-0-for-python-on-ubuntu/2/
5. This will take awhile. On my 12-core machine it was 60-90 minutes.
My graphics card is the Titan Xp (Galactic Empire)
Performance metrics:
MNIST dataset using LeNet architecture from Adrian’s Started Bundle chapter 14 example.
batch size = 128, epochs = 20
MacBook Pro (2014) : 300s per epoch (CPU support only)
NVIDIA Jetson Xavier: 14s per epoch
Andrew’s DL Machine: 3s per epoch
REPLY
Adrian Rosebrock October 20, 2018 at 8:03 am #
Thank you so much for sharing all this information, Andrew!
REPLY
Milton January 7, 2019 at 7:16 pm #
Dear Andrew:
I also have your same configuration. How did you manage to install mxnet with these new requirements? The latest version of mxnet is 1.3.1 and it looks for cuda 9.2 instead of cuda 10.0.
Regards,
Milton
REPLY
Adrian Rosebrock January 8, 2019 at 6:44 am #
I’ll be publishing a brand new tutorial in ~2 weeks with Ubuntu 18.04 + GPU support. It will be much easier to follow and will include the latest install instructions for mxnet. Stay tuned!
REPLY
Jorge October 24, 2018 at 2:22 pm #
Hi adrian, great tutorial, I’m new in deep learning and I chose yours bundles because the details are important for me and today I bought the bundles, but this tutorial work with ubuntu 18.04, with geforce gtx 1080 ti and the dependencies necessary ? or you will create a new tutorial with this indications?
thx
REPLY
Adrian Rosebrock October 29, 2018 at 1:56 pm #
Hi Jorge, thank you for picking up a copy of Deep Learning for Computer Vision with Python! I hope you are enjoying it so far
As far as your question goes, I still recommend Ubuntu 16.04 for just a little bit longer as 16.04 is a bit more “mature” in terms of driver stability and ease of install. You can try with 18.04 but keep in mind you may run into a couple hiccups along the way.
REPLY
gal October 28, 2018 at 2:40 am #
Hey all, and Adrian!
After 3 days of trying, breaking, formatting, and trying again.
I have successfully manages to install all the dependency on my msi gp63 (8th gen i7, gtx1060) laptop.
it was not a cakewalk :(, because apparently when fresh installing Ubuntu on msi, you need to tweak with the grub’s variable befor even starting with installation
(https://gist.github.com/mari-linhares/cef4cb3440408e44963d1447a7db5ae0)
after that, i have managed to install Ubuntu 18.04 with NVIDIA-driver 390, cuda 9, and cudnn 7.2.
it is not the version’s of this tutorial, but still. after 3 days of acrobatic scripts maneuvering, ill settle on that.
of course, after finishing with NVIDIA driver and cuda’s installation iv’e came back to this tutorial to Finnish my venv, and opencv, tensor flow (ive installed 1.11), and keras.
hope it helped to anyone.
REPLY
Adrian Rosebrock October 29, 2018 at 1:26 pm #
Thank you for sharing, Gal!
REPLY
nce3xin November 12, 2018 at 10:10 pm #
After the reboot in step 2, I could not ssh to my server anymore no matter how long I waited. Therefore I cannot carry out the following steps. Can anybody help me out? I am deeply desperate about this. I tried two servers, and they all collapsed in this step. Maybe I need to install the driver for the nvidia GPU before I start the steps in this tutorial?
REPLY
Adrian Rosebrock November 13, 2018 at 4:24 pm #
Oh no, I’m sorry to hear that! How were SSH’ing into your machines? Were they computers you “own” on a local network? Were they remote? It sounds like your system is not even properly booting.
REPLY
Lee November 15, 2018 at 3:09 am #
Hello, Adrian
This is unrelative question to this blog but I have to ask about this.
I have to make a code with Cuda but i have really hard time with Cuda programming.
If you have a time to reply my question,
could give me adivces or any tips for studying about Cuda?
Moroever, I want to thank you again with your blog which was very helpful.
REPLY
Pieter Blok December 24, 2018 at 8:54 am #
I was able to install everything correctly with a small work-around:
I got a “X server” error. I was not able to solve this error by the other suggestions from Adrian or fellow-members (including the “stop X server procedure” as mentioned by Adrian). I replaced the following code:
$ chmod +x cuda_8.0.61_375.26_linux-run
$ mkdir installers
$ sudo ./cuda_8.0.61_375.26_linux-run -extract=pwd/installers
$ cd installers
$ sudo ./NVIDIA-Linux-x86_64-375.26.run
$ modprobe nvidia
by the following code:
$ cd ~
$ sudo add-apt-repository ppa:graphics-drivers/ppa
$ sudo apt update
$ sudo apt install nvidia-375
$ sudo reboot
And indeed a small update later-on:
$ pip install tensorflow-gpu==1.4.1
$ pip install keras==2.1.5
The rest was followed as above described. Good luck!
REPLY
Adrian Rosebrock December 27, 2018 at 10:37 am #
Thanks for sharing, Pieter!
I’ll be releasing a brand new Ubuntu + deep learning configuration guide in a couple of weeks as well.
REPLY
Johannes Mae January 18, 2019 at 5:04 am #
Hi Adrian,
how can you make sure that tensorflow running on GPU? When I train my network, only CPU device is available. I running on my laptop with GTX1050Ti GPU.
I’m using CUDA version 9.0.176 with cuDNN version 7.4.2.
I installed tensorflow-gpu version 1.12.0
REPLY
Adrian Rosebrock January 22, 2019 at 9:41 am #
You can use the “nvidia-smi” command to ensure your GPU is being utilized. Make sure your GPU is being correctly recognized via that command first. From there, double-check that you don’t have *both* tensorflow and tensorflow-gpu installed. If both are installed then the CPU version will be used, not the GPU version.
REPLY
Tom Cipollone February 26, 2019 at 11:01 am #
Hi, Following instructions to the letter but the Nvidia driver fails to build. I can remember about a year ago going through this process on Fedora 23 (and it took days to figure out) but now trying it on Ubuntu 16.04, a fresh install, with a GTX1060.
Can I send the “nvidia-installer.log” for analysis? The only error that I was able to see in the log file was “Bad return status for module build on kernel: 4.15.0-45-generic (x86_64).
Thank You
Tom
REPLY
Tom Cipollone February 26, 2019 at 11:04 am #
P.S. I am doing an ssh into the system as per step #1. Also, even though I did look at the extensive instructions in the nvidia readme, I performed no additional steps so that this install will look as it was directed in the instructions by pyimagesearch.
REPLY
Adrian Rosebrock February 27, 2019 at 5:36 am #
Is there any way you could you use Ubuntu 18.04 instead of Ubuntu 16.04? I wrote an Ubuntu 18.04 deep learning configuration guide that is more streamlined — I would suggest using that one if at all possbile.
REPLY
Tom Cipollone February 27, 2019 at 4:02 pm #
Hi Adrian and thank you for the reply.
Yes, I could use ubuntu 18.04, and I say this without the slightest hint of snootiness, the only reason that I used 16.04 was the numerous comments that you had made about using 16.04 vs 18.04. But I am not opposed to changing if you think that I would be better off. The issue is to get rolling.
I DID get the cuda install working by going to the Nvidia site and looking at the directions for using the “Package manager installation” as opposed to the “Runfile installation”. The runfile just would not work. I got it to install and achieved the device query “RESULT = PASS”. I hope that will be sufficient. Also, cuda 10.0 was installed not cuda 8.0 as instructed in step #2.
I do have one question concerning the “cuDNN” download. The process that I had to use by downloading from Nvidia did not look anything like the directions given in step #3. I could only download a .deb archive for ubuntu 16.04 “libcudnn7_7.5.0.56-1+cuda10.0_amd64.deb”. I installed using the dpkg utility and I hope that it works.
I just loaded the virtual environment but have not run it yet.
Again, if you think that I am better off starting all over witih ubuntu 18.04 then I would do that without complaint.
Regards
Tom
REPLY
Adrian Rosebrock February 28, 2019 at 1:46 pm #
I’m not sure what file you ended up downloading, it’s hard to say, unfortunately.
I would really suggest you use Ubuntu 18.04 as the install guide is updated and easier to follow.
REPLY
Haruo March 20, 2019 at 3:09 pm #
Do we have to install the openCV inside the virtualenv created in the above steps?
REPLY
Adrian Rosebrock March 22, 2019 at 8:46 am #
You don’t technically have to bu to but I highly suggest it as virtualenvs are a best practice.