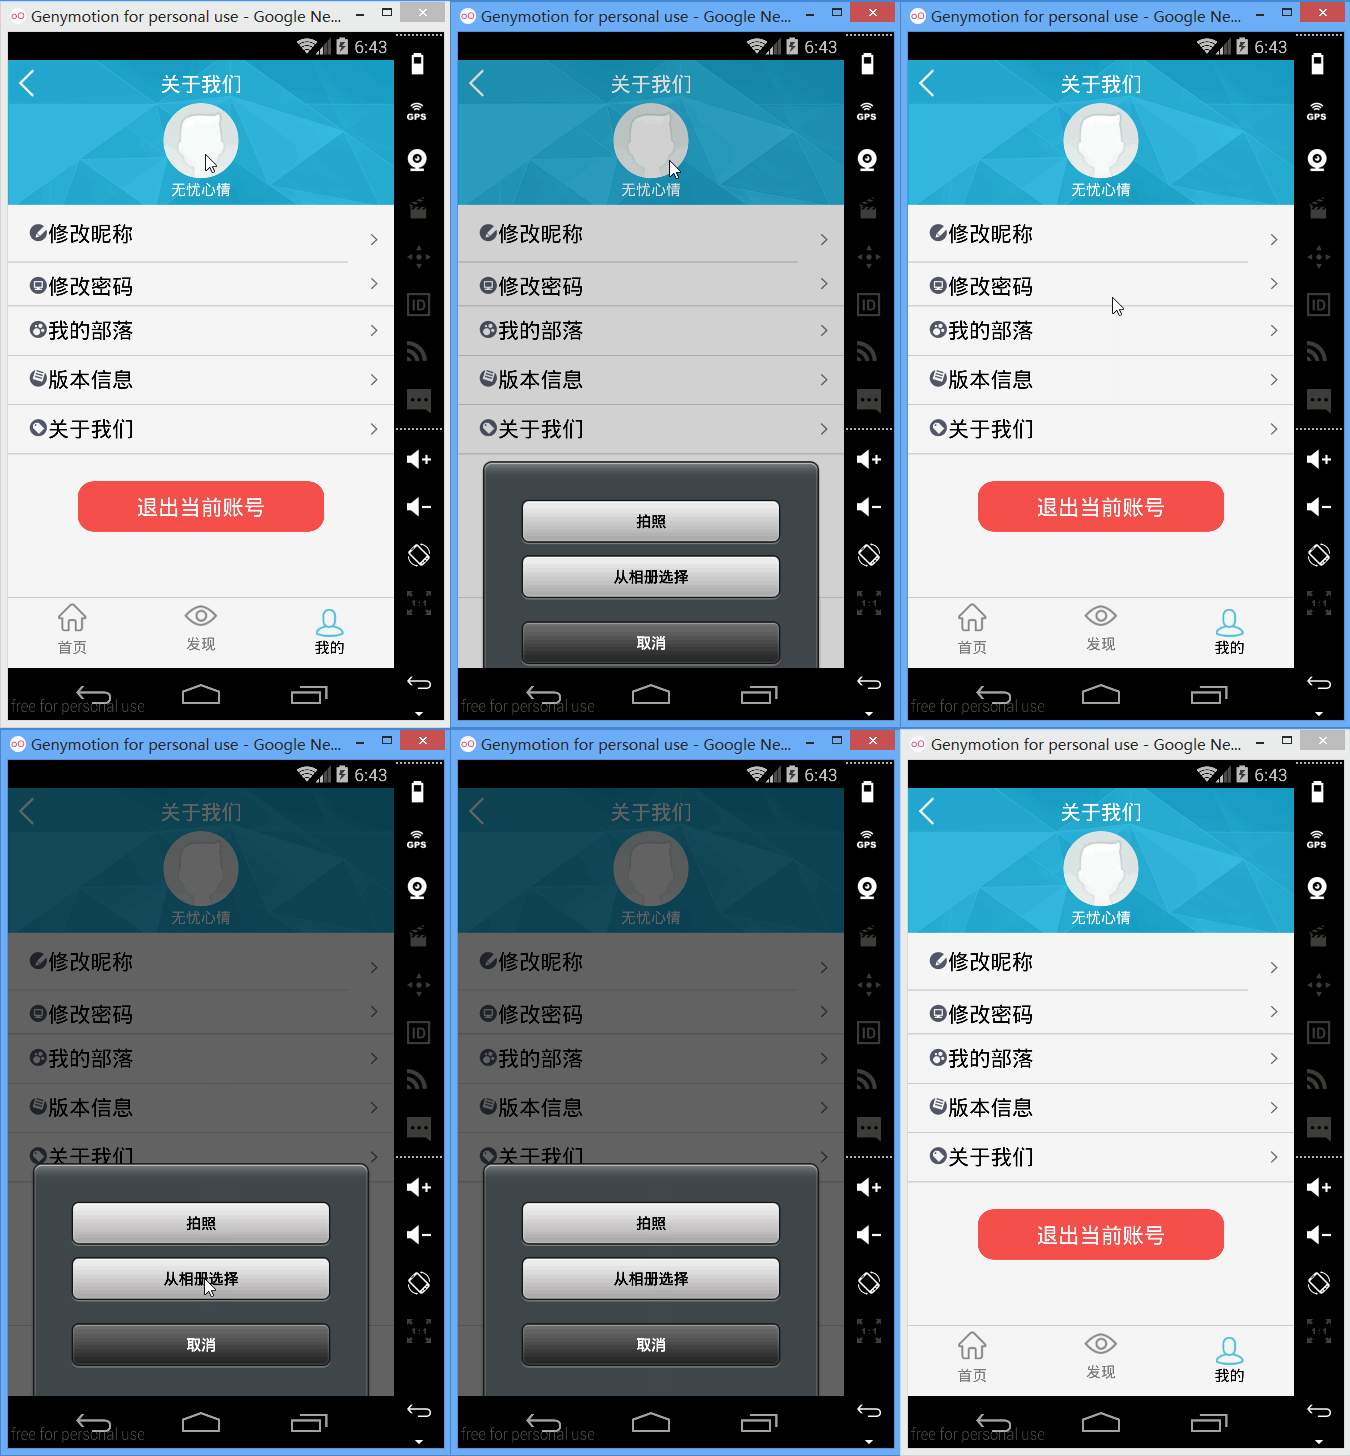
在前面的博文中,小编简单的介绍了如何制作圆角的按钮以及圆角的图片,伴着键盘和手指之间的舞步,迎来新的问题,不知道小伙伴有没有这样的经历,以App为例,点击头像的时候,会从底部弹出一个窗口,有从相册中选择、拍照、取消的字样,点击相应的按钮,完成相应的操作,在小编做项目的过程中遇到类似的问题,小编经过一番捣鼓,终于搞定了ing,今天这篇博文博文,小编简单的介绍一下,如何点击头像,实现从底部弹出窗口的故事,这个故事实现的是弹出滑动窗口,主要是使用了一些设置Activity的样式来实现弹出效果和滑动效果。
首先,第一步我们来编写xml代码,如下所示:
<?xml version="1.0" encoding="utf-8"?>
<RelativeLayout
    xmlns:android="http://schemas.android.com/apk/res/android"
    android:layout_width="fill_parent"
    android:layout_height="wrap_content"
    android:gravity="center_horizontal"
    android:orientation="vertical">

<LinearLayout
    android:id="@+id/pop_layout"
    android:layout_width="fill_parent"
    android:layout_height="wrap_content"
    android:gravity="center_horizontal"
    android:orientation="vertical"
    android:layout_alignParentBottom="true"
    android:background="@drawable/btn_style_alert_dialog_background">


    <Button
        android:id="@+id/btn_take_photo"
        android:layout_marginLeft="20dip"
        android:layout_marginRight="20dip"
        android:layout_marginTop="20dip"
        android:layout_width="fill_parent"
        android:layout_height="wrap_content"
        android:text="拍照"
        android:background="@drawable/btn_style_alert_dialog_button"
        android:textStyle="bold"/>

    <Button
        android:id="@+id/btn_pick_photo"
        android:layout_marginLeft="20dip"
        android:layout_marginRight="20dip"
        android:layout_marginTop="5dip"
        android:layout_width="fill_parent"
        android:layout_height="wrap_content"
        android:text="从相册选择"
        android:background="@drawable/btn_style_alert_dialog_button"
        android:textStyle="bold"/>

    <Button
       android:id="@+id/btn_cancel"
       android:layout_marginLeft="20dip"
       android:layout_marginRight="20dip"
       android:layout_marginTop="15dip"
       android:layout_marginBottom="15dip"
       android:layout_width="fill_parent"
       android:layout_height="wrap_content"
       android:text="取消"
       android:background="@drawable/btn_style_alert_dialog_cancel"
       android:textColor="#ffffff"
       android:textStyle="bold"/>
</LinearLayout>
</RelativeLayout>
第二步,新建java类,命名为SelectPicPopupWindow,继承Activity类并实现OnClickListener接口,这个接口可以不用实现,具体代码如下所示:
package com.h8.imageroundcorner;


import android.app.Activity;
import android.os.Bundle;
import android.view.MotionEvent;
import android.view.View;
import android.view.View.OnClickListener;
import android.widget.Button;
import android.widget.LinearLayout;
import android.widget.Toast;

public class SelectPicPopupWindow extends Activity implements OnClickListener{

	private Button btn_take_photo, btn_pick_photo, btn_cancel;
	private LinearLayout layout;

	@Override
	protected void onCreate(Bundle savedInstanceState) {
		super.onCreate(savedInstanceState);
		setContentView(R.layout.alert_dialog);
		btn_take_photo = (Button) this.findViewById(R.id.btn_take_photo);
		btn_pick_photo = (Button) this.findViewById(R.id.btn_pick_photo);
		btn_cancel = (Button) this.findViewById(R.id.btn_cancel);
		layout=(LinearLayout)findViewById(R.id.pop_layout);

		//添加选择窗口范围监听可以优先获取触点,即不再执行onTouchEvent()函数,点击其他地方时执行onTouchEvent()函数销毁Activity
		layout.setOnClickListener(new OnClickListener() {

			public void onClick(View v) {
				// TODO Auto-generated method stub
				Toast.makeText(getApplicationContext(), "提示:点击窗口外部关闭窗口!",
						Toast.LENGTH_SHORT).show();
			}
		});
		//添加按钮监听
		btn_cancel.setOnClickListener(this);
		btn_pick_photo.setOnClickListener(this);
		btn_take_photo.setOnClickListener(this);
	}

	//实现onTouchEvent触屏函数但点击屏幕时销毁本Activity
	@Override
	public boolean onTouchEvent(MotionEvent event){
		finish();
		return true;
	}

	public void onClick(View v) {
		switch (v.getId()) {
		case R.id.btn_take_photo:
			break;
		case R.id.btn_pick_photo:
			break;
		case R.id.btn_cancel:
			break;
		default:
			break;
		}
		finish();
	}

}
第三步,编写MainActivity类,点击头像的时候,让她从底部滑出一定弹出框,代码如下所示:
package com.h8.imageroundcorner;


import android.app.Activity;
import android.content.Intent;
import android.graphics.Bitmap;
import android.graphics.BitmapFactory;
import android.graphics.Canvas;
import android.graphics.Paint;
import android.graphics.PorterDuffXfermode;
import android.graphics.Rect;
import android.graphics.RectF;
import android.graphics.Bitmap.Config;
import android.graphics.PorterDuff.Mode;
import android.os.Bundle;
import android.view.View;
import android.view.View.OnClickListener;
import android.widget.ImageView;
import android.widget.TextView;

public class TestActivity extends Activity {
	ImageView imageView;

	@Override
	protected void onCreate(Bundle savedInstanceState) {
		super.onCreate(savedInstanceState);
		setContentView(R.layout.test);
		imageView = (ImageView) findViewById(R.id.imageView2);
		Bitmap b = BitmapFactory.decodeResource(getResources(), R.drawable.my);

		imageView.setImageBitmap(toRoundCorner(b,200));

	      //把文字控件添加监听,点击弹出自定义窗口
		imageView.setOnClickListener(new OnClickListener() {
				public void onClick(View v) {
					startActivity(new Intent(TestActivity.this,SelectPicPopupWindow.class));
				}
			});
	}

	public static Bitmap toRoundCorner(Bitmap bitmap, int pixels) {

		Bitmap output = Bitmap.createBitmap(bitmap.getWidth(), bitmap.getHeight(), Config.ARGB_8888);

		Canvas canvas = new Canvas(output);

		final int color = 0xff424242;

		final Paint paint = new Paint();

		final Rect rect = new Rect(0, 0, bitmap.getWidth(), bitmap.getHeight());

		final RectF rectF = new RectF(rect);

		final float roundPx = pixels;

		paint.setAntiAlias(true);

		canvas.drawARGB(0, 0, 0, 0);

		paint.setColor(color);

		canvas.drawRoundRect(rectF, roundPx, roundPx, paint);

		paint.setXfermode(new PorterDuffXfermode(Mode.SRC_IN));

		canvas.drawBitmap(bitmap, rect, rect, paint);
		return output;

	}

}
第四步,设置属性样式实现我们所需要的效果,代码如下所示:
<resources>

    <!--
        Base application theme, dependent on API level. This theme is replaced
        by AppBaseTheme from res/values-vXX/styles.xml on newer devices.
    -->
    <style name="AppBaseTheme" parent="android:Theme.Light">
        <!--
            Theme customizations available in newer API levels can go in
            res/values-vXX/styles.xml, while customizations related to
            backward-compatibility can go here.
        -->
    </style>

    <!-- Application theme. -->
    <style name="AppTheme" parent="AppBaseTheme">
        <!-- All customizations that are NOT specific to a particular API-level can go here. -->
    </style>
       <style name="AnimBottom" parent="@android:style/Animation">
        <item name="android:windowEnterAnimation">@anim/push_bottom_in</item>
        <item name="android:windowExitAnimation">@anim/push_bottom_out</item>
    </style>

    <style name="MyDialogStyleBottom" parent="android:Theme.Dialog">
        <item name="android:windowAnimationStyle">@style/AnimBottom</item>
        <item name="android:windowFrame">@null</item>
 <!-- 边框 -->
        <item name="android:windowIsFloating">true</item>
 <!-- 是否浮现在activity之上 -->
        <item name="android:windowIsTranslucent">true</item>
 <!-- 半透明 -->
        <item name="android:windowNoTitle">true</item>
 <!-- 无标题 -->
        <item name="android:windowBackground">@android:color/transparent</item>
 <!-- 背景透明 -->
        <item name="android:backgroundDimEnabled">true</item>
 <!-- 模糊 -->
    </style>

</resources>
第五步,在点击头像的时候,我们需要她是上下滑入式的效果,点击取消的时候需要她是上下滑出式的效果,怎么实现nie,具体代码如下图所示,首先是滑入式的效果:
<?xml version="1.0" encoding="utf-8"?>
<!-- 上下滑入式 -->
<set xmlns:android="http://schemas.android.com/apk/res/android" >

    <translate
        android:duration="200"
        android:fromYDelta="100%p"
        android:toYDelta="0"/>
</set>
接着,滑出式的效果代码如下所示:
<?xml version="1.0" encoding="utf-8"?>
<!-- 上下滑出式 -->
<set xmlns:android="http://schemas.android.com/apk/res/android" >


    <translate
        android:duration="200"
        android:fromYDelta="0"
        android:toYDelta="50%p" />
</set>
最后,我们来看一下运行的效果,如下图所示:

小编寄语:该博文小编主要简单的介绍了如何从底部滑出弹出框,希望可以帮助到需要的小伙伴们,每次实现一个简单的效果,小编都会特别开心,伴着实习的脚步,小编慢慢长大`(*∩_∩*)′,这就是生命的意义,还是那句话对于小编来说,既是挑战更是机遇,因为知识都是相通的,再者来说,在小编的程序人生中,留下最珍贵的记忆,虽然以后小编不一定从事安卓这个行业,代码世界里,很多种事,有的甜蜜,有的温馨,有的婉转成歌,有的绵延不息,在这些故事里,我们唯一的共通之处就是,某年,某月,某个波澜不惊的日子里,曾经很爱很爱你!爱你--这段实习的日子里,安卓带给小编的种种的惊喜。
本文内容由网友自发贡献,版权归原作者所有,本站不承担相应法律责任。如您发现有涉嫌抄袭侵权的内容,请联系:hwhale#tublm.com(使用前将#替换为@)