最近的项目中有一个纯前端实现的功能困扰了我好久,就是用户上传图片以后需要用户进入图片裁剪页并完成上传的功能,一开始我是打算自己去用canvas去写这样一个页面的,但是项目开发周期短,任务紧,所以我就在网上各种扒资源,还真让我找到了这么一款神仙插件——cropper.js。
cropper.js
jQuery.cropper是一款使用简单且功能强大的图片剪裁jQuery插件。该图片剪裁插件支持图片放大缩小,支持图片旋转,支持触摸屏设备,支持canvas,并且支持跨浏览器使用。
官方地址:http://fengyuanchen.github.io/cropper/
官方文档:https://github.com/fengyuanchen/cropper/blob/master/README.md
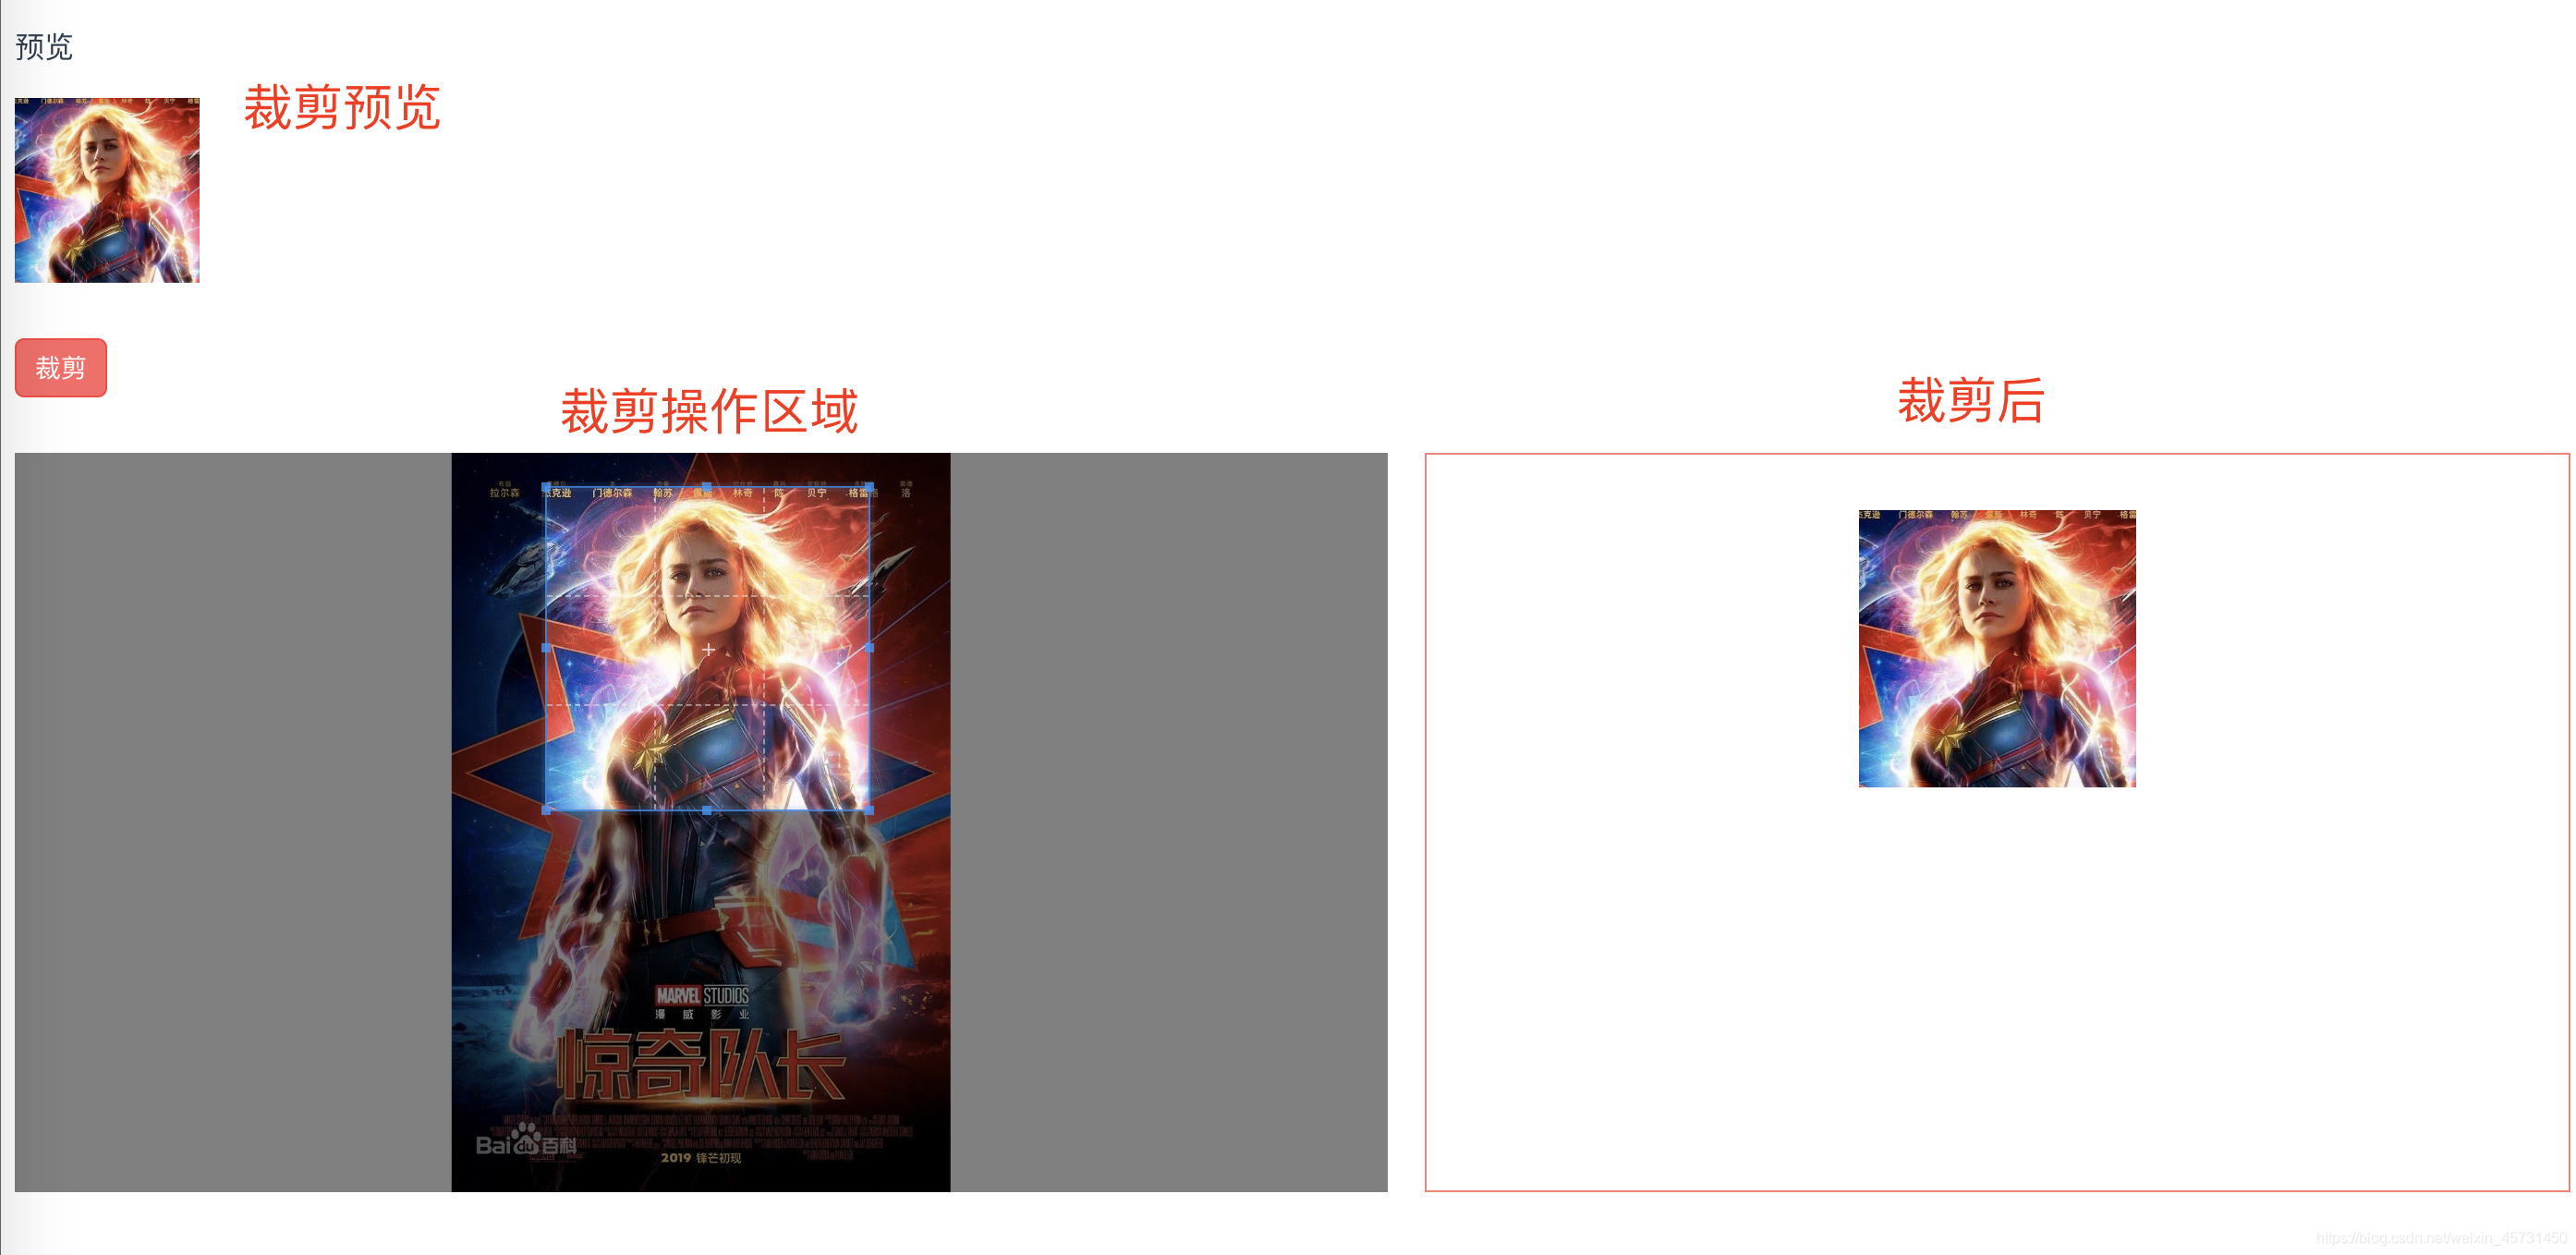
接下来就让我们一起来聊聊这个插件:
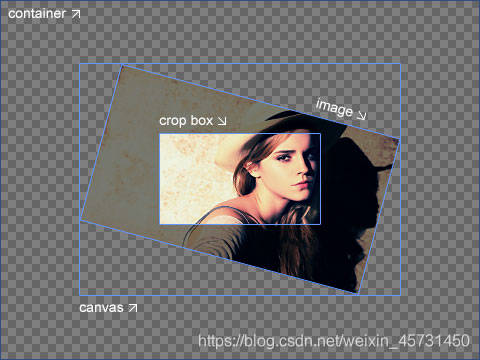
这个是官方上给出的一张图,从图上不难看出这个插件实现的原理。
通过canvas实现图片裁剪,最后在通过canvas获取裁剪区域的图片base64串。
cropper提供了大量的参数、方法和事件供图片的剪裁操作。
安装
可以通过Bower或NPM来安装该插件。
bower install cropper
npm install cropper
使用方法
使用该图片剪裁插件首先要引入必要的js和css文件。
<script src="/path/to/jquery.js"></script><!-- jQuery is required -->
<link  href="/path/to/cropper.css" rel="stylesheet">
<script src="/path/to/cropper.js"></script>
可以将图片或canvas直接包裹到一个块级元素中。
<!-- Wrap the image or canvas with a block element -->
<div class="container">
    <img src="picture.jpg">
</div>
可以使用$.fn.cropper方法来初始化该图片剪裁插件。
$('.container > img').cropper({
aspectRatio: 16 / 9,
crop: function(data) {
}
});
注意:剪裁区域的尺寸继承自图片的父容器(包裹容器),所以要确保包裹图片的是一个可见的块级元素。输出的剪裁数据基于原始的图片尺寸,你可以使用这些数据直接剪裁图片。如果你要使用跨源图片来作为剪裁图片,请确保你的浏览器支持HTML5 CORS settings attributes,并且你的图片服务器支持Access-Control-Allow-Origin属性。
配置参数
cropper.js提供了一些可配置的参数用来实现一些裁剪框和图片的功能
可以通过$().cropper(options)方法来设置参数。如果你想改变全局默认参数,可以使用$.fn.cropper.setDefaults(options)方法。
aspectRatio:类型:Number,默认值NaN。设置剪裁容器的比例。
crop:类型:Function,默认值null。当改变剪裁容器或图片时的事件函数。
preview:类型:String(jQuery选择器),默认值”。添加额外的元素(容器)的预览。
现在我粘出我的代码,这里是一些参数的设置:
this.createElement()
this.cropper = new Cropper(this.preview, {
aspectRatio: opt.aspectWithRatio / opt.aspectHeightRatio,
autoCropArea: opt.autoCropArea || 0.8,
viewMode: 2,
guides: true,
cropBoxResizable: true,
cropBoxMovable: true,
dragCrop: false,
dragMode: 'move',
center: true,
zoomable: true,
zoomOnTouch: true,
zoomOnWheel: true,
rotatable: true,
scalable: true,
background: false,
checkOrientation: false,
checkCrossOrigin: false,
toggleDragModeOnDblclick: true,
ready: function () {
if (opt.aspectRatio == 'Free') {
let cropBox = _this.cropper.cropBox
cropBox.querySelector('span.cropper-view-box').style.outline =
'none'
_this.cropper.disable()
}
},
})
这些参数的说明我都一一的标在了后面,其中需要特别注意的是checkCrossOrigin这个参数,这个参数会检测图片的源,并且会调用一个Origin的接口,在项目中就很容易造成跨域的错误,这个参数的默认值是true,当时我用这个的时候就报了一堆length的错误,搞得我头大。。。
https://blog.csdn.net/qq727013465/article/details/51823231,当时我就是看了这篇文章,这篇文章上有详细的参数说明并且还有详细的使用代码。
下面这里有详细代码展示,仅供大家参考一下,
<!-- 这个图片剪裁插件,兼容ios与安卓 -->
<template>
<div>
<input
class="upload-img"
type="file"
name="file"
ref="files"
accept="image/*"
@change="change($event)"
/>
</div>
</template>
<script>
import Cropper from 'cropperjs'
export default {
name: 'uploadpage',
components: {},
props: {
},
data() {
return {
widthRate: '650',
heightRate: '800',
rotateNum:0,//旋转的角度
}
},
methods: {
change(event) {
this.clip(event, {
aspectWithRatio: Number(this.widthRate),
aspectHeightRatio: Number(this.heightRate),
})
},
//初始化方法
initilize(opt) {
let _this = this
this.options = opt
//创建dom
      this.createElement()
      //初始化裁剪对象
      this.cropper = new Cropper(this.preview, {
        aspectRatio: opt.aspectWithRatio / opt.aspectHeightRatio, // 裁剪框比例 默认NaN
        // aspectRatio: 1/1,
        autoCropArea: opt.autoCropArea || 0.8, // 默认值0.8(图片的80%)。0-1之间的数值,定义自动剪裁框的大小。
        viewMode: 2, //显示模式
        guides: true, // 类型:Boolean,默认值true。是否在剪裁框上显示虚线。
        cropBoxResizable: true, //是否通过拖动来调整剪裁框的大小
        cropBoxMovable: true, //是否通过拖拽来移动剪裁框。
        dragCrop: false,
        dragMode: 'move', //‘crop’: 可以产生一个新的裁剪框3 ‘move’: 只可以移动3 ‘none’: 什么也不处理
        center: true, // 默认true  是否显示裁剪框 中间的+
        zoomable: true, //是否允许放大图像。
        zoomOnTouch: true, //是否可以通过拖动触摸来放大图像。
        zoomOnWheel: true, // 默认 true 是否允许鼠标滚轴 缩放图片
        rotatable: true, // 类型:Boolean,默认值true。是否允许旋转图片
        scalable: true,
        background: false, // 类型:Boolean,默认值true。是否在容器上显示网格背景
        checkOrientation: false,
        checkCrossOrigin: false, // 类型:Boolean,默认值true。默认情况下,插件会检测图片的源,如果是跨域图片,图片元素会被添加crossOrigin class,并会为图片的url添加一个时间戳来使getCroppedCanvas变为可用。
        toggleDragModeOnDblclick: true, // 认true .是否允许 拖动模式 “crop” 跟“move” 的切换状态。。即当点下为crop 模式,如果未松开拖动这时就是“move”模式。放开后又为“crop”模式
        ready: function () {
          if (opt.aspectRatio == 'Free') {
            let cropBox = _this.cropper.cropBox
            cropBox.querySelector('span.cropper-view-box').style.outline =
              'none'
            _this.cropper.disable()
          }
        },
      })
},
//创建一些必要的DOM,用于图片裁剪
createElement() {
//初始化图片为空对象
this.preview = null
let str =
'<div><img id="clip_image" src="../assets/img/nobutton.png"></div><button type="button" id="cancel_clip">取消</button></div><button type="button" id="clip_button">确定</button>'
str +=
'<div class="crop_loading"><div class="crop_content"><div class="crop_text">图片修剪中...</div></div></div>'
str +=
'<div class="crop_success"><div class="crop_success_text">上传成功</div></div></div>'
let body = document.getElementsByTagName('body')[0]
this.reagion = document.createElement('div')
this.reagion.id = 'clip_container'
this.reagion.className = 'container'
this.reagion.innerHTML = str
//添加创建好的DOM元素
body.appendChild(this.reagion)
this.preview = document.getElementById('clip_image')
//绑定一些方法
this.initFunction()
},
//初始化一些函数绑定
initFunction() {
let _this = this
this.clickBtn = document.getElementById('clip_button')
this.cancelBtn = document.getElementById('cancel_clip')
//确定事件
this.addEvent(this.clickBtn, 'click', function () {
_this.crop()
})
//取消事件
this.addEvent(this.cancelBtn, 'click', function () {
_this.destoried()
})
//清空input的值
this.addEvent(this.fileObj, 'click', function () {
this.value = ''
})
},
//外部接口,用于input['file']对象change时的调用
clip(e, opt) {
this.fileObj = e.srcElement
let files = e.target.files || e.dataTransfer.files
// if (!files.length) return false //不是图片直接返回
//调用初始化方法
this.initilize(opt)
//获取图片文件资源
this.picValue = files[0]
//调用方法转成url格式
this.originUrl = this.getObjectURL(this.picValue)
//每次替换图片要重新得到新的url
if (this.cropper) {
this.cropper.replace(this.originUrl)
}
},
//图片转码方法
getObjectURL(file) {
let url = null
if (window.createObjectURL != undefined) {
// basic
url = window.createObjectURL(file)
} else if (window.URL != undefined) {
// mozilla(firefox)
url = window.URL.createObjectURL(file)
} else if (window.webkitURL != undefined) {
// webkit or chrome
url = window.webkitURL.createObjectURL(file)
}
return url
},
//点击确定进行裁剪
crop() {
let _this = this
let image = new Image()
let croppedCanvas
let roundedCanvas
// Crop
document.querySelector('.crop_loading').style.display = 'block'
setTimeout(function () {
croppedCanvas = _this.cropper.getCroppedCanvas()
// Round
roundedCanvas = _this.getRoundedCanvas(croppedCanvas)
let imgData = roundedCanvas.toDataURL()
image.src = imgData
//图片上传
_this.postImg(imgData)
}, 20)
},
//获取裁剪图片资源
getRoundedCanvas(sourceCanvas) {
let canvas = document.createElement('canvas')
let context = canvas.getContext('2d')
let width = sourceCanvas.width
let height = sourceCanvas.height
canvas.width = width
canvas.height = height
context.imageSmoothingEnabled = true
context.drawImage(sourceCanvas, 0, 0, width, height)
context.globalCompositeOperation = 'destination-in'
context.beginPath()
context.rect(0, 0, width, height)
context.fill()
return canvas
},
//销毁原来的对象
destoried() {
//移除事件
this.removeEvent(this.clickBtn, 'click', null)
this.removeEvent(this.cancelBtn, 'click', null)
this.removeEvent(this.fileObj, 'click', null)
//移除裁剪框
this.reagion.parentNode.removeChild(this.reagion)
//销毁裁剪对象
this.cropper.destroy()
this.cropper = null
},
//图片上传
postImg(imageData) {
//this.$emit('callback', imageData)
//这边写图片的上传
let _this = this
_this.destoried()
},
//图片旋转
rotateImg(img, direction, canvas) {
//最小与最大旋转方向,图片旋转4次后回到原方向
const min_step = 0
const max_step = 3
if (img == null) return
//img的高度和宽度不能在img元素隐藏后获取,否则会出错
let height = img.height
let width = img.width
let step = 2
if (step == null) {
step = min_step
}
if (direction == 'right') {
step++
//旋转到原位置,即超过最大值
step > max_step && (step = min_step)
} else {
step--
step < min_step && (step = max_step)
}
//旋转角度以弧度值为参数
let degree = (step * 90 * Math.PI) / 180
let ctx = canvas.getContext('2d')
switch (step) {
case 0:
canvas.width = width
canvas.height = height
ctx.drawImage(img, 0, 0)
break
case 1:
canvas.width = height
canvas.height = width
ctx.rotate(degree)
ctx.drawImage(img, 0, -height)
break
case 2:
canvas.width = width
canvas.height = height
ctx.rotate(degree)
ctx.drawImage(img, -width, -height)
break
case 3:
canvas.width = height
canvas.height = width
ctx.rotate(degree)
ctx.drawImage(img, -width, 0)
break
}
},
//添加事件
addEvent(obj, type, fn) {
if (obj.addEventListener) {
obj.addEventListener(type, fn, false)
} else {
obj.attachEvent('on' + type, fn)
}
},
//移除事件
removeEvent(obj, type, fn) {
if (obj.removeEventListener) {
obj.removeEventListener(type, fn, false)
} else {
obj.detachEvent('on' + type, fn)
}
},
},
}
</script>
<style lang="less" scoped>
.button {
width: 325px;
height: 50px;
background: url('../assets/img/button.png');
background-size: 100% 100%;
margin: 20px auto;
position: relative;
}
.nobutton {
width: 325px;
height: 50px;
background: url('../assets/img/nobutton.png');
background-size: 100% 100%;
margin: 20px auto;
position: relative;
}
.upload-img {
position: absolute;
width: 80%;
height: 100%;
top: 0;
left: 0;
opacity: 0;
}
</style>
<style>
#clip_button {
position: absolute;
right: 10%;
bottom: 20px;
width: 80px;
height: 40px;
border: none;
border-radius: 2px;
background: #1aad19;
color: #fff;
}
#cancel_clip {
position: absolute;
left: 10%;
bottom: 20px;
width: 80px;
height: 40px;
border: none;
border-radius: 2px;
color: #fff;
background: #e64340;
}
#cancel_rotate {
position: absolute;
left: 40%;
bottom: 20px;
width: 80px;
height: 40px;
border: none;
border-radius: 2px;
color: #fff;
background: orange;
}
#clip_container.container {
z-index: 99999;
position: fixed;
padding-top: 60px;
left: 0;
top: 0;
right: 0;
bottom: 0;
background: rgba(0, 0, 0, 1);
}
#clip_container.container > div {
position: absolute;
width: 100%;
height: 100%;
top: 50%;
left: 50%;
-webkit-transform: translate(-50%, -50%);
transform: translate(-50%, -50%);
}
#clip_image {
max-width: 100%;
}
.cropper-container {
font-size: 0;
line-height: 0;
position: relative;
-webkit-user-select: none;
-moz-user-select: none;
-ms-user-select: none;
user-select: none;
direction: ltr;
-ms-touch-action: none;
touch-action: none;
}
.crop_loading,
.crop_success {
display: none;
position: fixed;
top: 0;
left: 0;
width: 100%;
height: 100%;
z-index: 9;
}
.crop_loading .crop_content {
position: absolute;
top: 50%;
left: 50%;
text-align: center;
background: #000;
opacity: 0.9;
height: 66px;
width: 140px;
vertical-align: middle;
color: #fff;
padding-top: 20px;
font-size: 16px;
-webkit-border-radius: 3px;
border-radius: 3px;
-webkit-transform: translate(-50%, -50%);
transform: translate(-50%, -50%);
}
.crop_loading .crop_content img {
margin-top: 15px;
margin-bottom: 10px;
}
.crop_success .crop_success_text {
position: absolute;
top: 50%;
left: 50%;
text-align: center;
background: #000;
opacity: 0.9;
width: 120px;
height: 30px;
color: #fff;
line-height: 30px;
font-size: 16px;
-webkit-border-radius: 3px;
border-radius: 3px;
-webkit-transform: translate(-50%, -50%);
transform: translate(-50%, -50%);
}
.cropper-container img {
display: block;
min-width: 0 !important;
max-width: none !important;
min-height: 0 !important;
max-height: none !important;
width: 100%;
height: 100%;
image-orientation: 0deg;
}
.cropper-wrap-box,
.cropper-canvas,
.cropper-drag-box,
.cropper-crop-box,
.cropper-modal {
position: absolute;
top: 0;
right: 0;
bottom: 0;
left: 0;
}
.cropper-wrap-box {
overflow: hidden;
}
.cropper-drag-box {
opacity: 0;
background-color: #fff;
}
.cropper-modal {
opacity: 0.5;
background-color: #000;
}
.cropper-view-box {
display: block;
overflow: hidden;
width: 100%;
height: 100%;
outline: 1px solid #39f;
outline-color: rgba(51, 153, 255, 0.75);
}
.cropper-dashed {
position: absolute;
display: block;
opacity: 0.5;
border: 0 dashed #eee;
}
.cropper-dashed.dashed-h {
top: 33.33333%;
left: 0;
width: 100%;
height: 33.33333%;
border-top-width: 1px;
border-bottom-width: 1px;
}
.cropper-dashed.dashed-v {
top: 0;
left: 33.33333%;
width: 33.33333%;
height: 100%;
border-right-width: 1px;
border-left-width: 1px;
}
.cropper-center {
position: absolute;
top: 50%;
left: 50%;
display: block;
width: 0;
height: 0;
opacity: 0.75;
}
.cropper-center:before,
.cropper-center:after {
position: absolute;
display: block;
content: ' ';
background-color: #eee;
}
.cropper-center:before {
top: 0;
left: -3px;
width: 7px;
height: 1px;
}
.cropper-center:after {
top: -3px;
left: 0;
width: 1px;
height: 7px;
}
.cropper-face,
.cropper-line,
.cropper-point {
position: absolute;
display: block;
width: 100%;
height: 100%;
opacity: 0.1;
}
.cropper-face {
top: 0;
left: 0;
background-color: #fff;
}
.cropper-line {
background-color: #39f;
}
.cropper-line.line-e {
top: 0;
right: -3px;
width: 5px;
cursor: e-resize;
}
.cropper-line.line-n {
top: -3px;
left: 0;
height: 5px;
cursor: n-resize;
}
.cropper-line.line-w {
top: 0;
left: -3px;
width: 5px;
cursor: w-resize;
}
.cropper-line.line-s {
bottom: -3px;
left: 0;
height: 5px;
cursor: s-resize;
}
.cropper-point {
width: 5px;
height: 5px;
opacity: 0.75;
background-color: #39f;
}
.cropper-point.point-e {
top: 50%;
right: -3px;
margin-top: -3px;
cursor: e-resize;
}
.cropper-point.point-n {
top: -3px;
left: 50%;
margin-left: -3px;
cursor: n-resize;
}
.cropper-point.point-w {
top: 50%;
left: -3px;
margin-top: -3px;
cursor: w-resize;
}
.cropper-point.point-s {
bottom: -3px;
left: 50%;
margin-left: -3px;
cursor: s-resize;
}
.cropper-point.point-ne {
top: -3px;
right: -3px;
cursor: ne-resize;
}
.cropper-point.point-nw {
top: -3px;
left: -3px;
cursor: nw-resize;
}
.cropper-point.point-sw {
bottom: -3px;
left: -3px;
cursor: sw-resize;
}
.cropper-point.point-se {
right: -3px;
bottom: -3px;
width: 5px;
height: 5px;
cursor: se-resize;
opacity: 1;
}
@media (min-width: 768px) {
.cropper-point.point-se {
width: 15px;
height: 15px;
}
}
@media (min-width: 992px) {
.cropper-point.point-se {
width: 10px;
height: 10px;
}
}
@media (min-width: 1200px) {
.cropper-point.point-se {
width: 5px;
height: 5px;
opacity: 0.75;
}
}
.cropper-point.point-se:before {
position: absolute;
right: -50%;
bottom: -50%;
display: block;
width: 200%;
height: 200%;
content: ' ';
opacity: 0;
background-color: #39f;
}
.cropper-invisible {
opacity: 0;
}
.cropper-bg {
background-image: url('data:image/png;base64,iVBORw0KGgoAAAANSUhEUgAAABAAAAAQAQMAAAAlPW0iAAAAA3NCSVQICAjb4U/gAAAABlBMVEXMzMzTjRV2AAAACXBIWXMAAArrAAAK6wGCiw1aAAAAHHRFWHRTb2Z0d2FyZQBBZG9iZSBGaXJld29ya3MgQ1M26LyyjAAAABFJREFUCJlj+M/AgBVhF/0PAH6/D/HkDxOGAAAAAElFTkSuQmCC');
}
.cropper-hide {
position: absolute;
display: block;
width: 0;
height: 0;
}
.cropper-hidden {
display: none !important;
}
.cropper-move {
cursor: move;
}
.cropper-crop {
cursor: crosshair;
}
.cropper-disabled .cropper-drag-box,
.cropper-disabled .cropper-face,
.cropper-disabled .cropper-line,
.cropper-disabled .cropper-point {
cursor: not-allowed;
}
</style>
目前这个已经封装好一个组件了,可以拿走在项目中直接调用了。
总结
对于实现一些操作页面的功能来说,canvas是个强大的处理方法,还是要加强对canvas的学习和使用。
本文内容由网友自发贡献,版权归原作者所有,本站不承担相应法律责任。如您发现有涉嫌抄袭侵权的内容,请联系:hwhale#tublm.com(使用前将#替换为@)