Activity UI视图结构
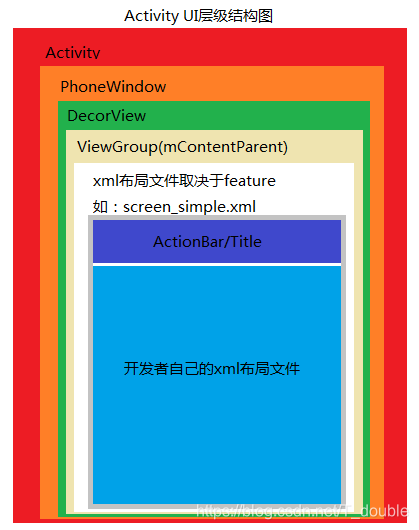
每个Activity都会获得一个窗口,那就是Window,它用于绘制用户的UI界面
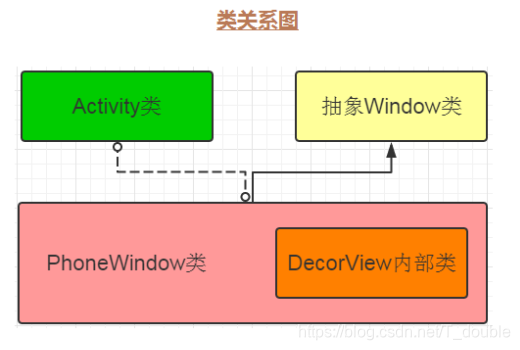
Window是一个抽象类,提供了绘制窗口的一组通用API,PhoneWindow是它的唯一实现类
DecorView是所有应用窗口的根节点。是FrameLayout的子类
PhoneWindow内部实现xml布局文件的加载,容器为根据feature进行加载的对应的layout布局中android:id="@android:id/content"的ViewGroup类型的容器
源码分析
xml布局文件的使用
public class MainActivity extends Activity {
    @Override
    protected void onCreate(@Nullable Bundle savedInstanceState) {
        super.onCreate(savedInstanceState);
        //R.layout.xxx为引入自定义xml布局文件xxx.xml
        setContentView(R.layout.xxx);
    }
	......
}
针对上面setContentView(R.layout.xxx);的使用,作为Android APP开发者来说,深入骨髓的说法已经不为过了,但是就这么一个方法,是怎么生成上图描述的UI层级结构的?
这就是我们今天的核心目标,我们将以源码分析的方式进行深度学习。
setContentView(R.layout.xxx)
/**
 * Set the activity content from a layout resource.  The resource will be
 * inflated, adding all top-level views to the activity.
 * 译文:从布局资源中设置Activity的视图内容,该资源将会被inflated并且把所有的顶层视图添加到Activity中
 * @param layoutResID Resource ID to be inflated.
 *
 * @see #setContentView(android.view.View)
 * @see #setContentView(android.view.View, android.view.ViewGroup.LayoutParams)
 */
public void setContentView(@LayoutRes int layoutResID) {
    getWindow().setContentView(layoutResID);
    initWindowDecorActionBar();//这是一个ActionBar的创建过程,暂不参与本次流程学习
}
getWindow().setContentView(layoutResID);引出了一个Window类
android.view.PhoneWindow
android.view.PhoneWindow:Window(抽象类)的唯一实现类
/**
 * Abstract base class for a top-level window look and behavior policy.  An
 * instance of this class should be used as the top-level view added to the
 * window manager. It provides standard UI policies such as a background, title
 * area, default key processing, etc.
 * 译文:顶层窗口外观和行为策略的抽象基类。这个类的一个实例应该用作添加到窗口管理器的顶级视图。
 *
 * 它提供了标准的UI策略,如背景、标题区域、默认键处理等
 * <p>The only existing implementation of this abstract class is
 * android.view.PhoneWindow, which you should instantiate when needing a
 * Window.
 * 译文:android.view.PhoneWindow是该抽象类的唯一实现类,你在需要一个Window时应该实例
 */
public abstract class Window {
	......
}
根据Window的类注释,针对getWindow().setContentView(layoutResID)的调用,我们应该到PhoneWindow中阅读setContentView方法的实现内容
@Override
public void setContentView(int layoutResID) {
    // Note: FEATURE_CONTENT_TRANSITIONS may be set in the process of installing the window
    // decor, when theme attributes and the like are crystalized. Do not check the feature
    // before this happens.
    if (mContentParent == null) {
        installDecor();
    } else if (!hasFeature(FEATURE_CONTENT_TRANSITIONS)) {
        mContentParent.removeAllViews();
    }

    if (hasFeature(FEATURE_CONTENT_TRANSITIONS)) {//执行动画相关操作
        final Scene newScene = Scene.getSceneForLayout(mContentParent, layoutResID,
                getContext());
        transitionTo(newScene);
    } else {
    	//layoutResID是一个xml布局,它将在这里被添加到mContentParent这个容器中,最后进行View视图的显示
        mLayoutInflater.inflate(layoutResID, mContentParent);
    }
    mContentParent.requestApplyInsets();
    final Callback cb = getCallback();
    if (cb != null && !isDestroyed()) {
        cb.onContentChanged();
    }
    mContentParentExplicitlySet = true;
}
PhoneWindow的实例化过程
在Activity中attach方法内的第 12 行,PhoneWindow以New的方式被实例化成mWindow对象
    final void attach(Context context, ActivityThread aThread,
            Instrumentation instr, IBinder token, int ident,
            Application application, Intent intent, ActivityInfo info,
            CharSequence title, Activity parent, String id,
            NonConfigurationInstances lastNonConfigurationInstances,
            Configuration config, String referrer, IVoiceInteractor voiceInteractor,
            Window window, ActivityConfigCallback activityConfigCallback) {
        attachBaseContext(context);

        mFragments.attachHost(null /*parent*/);
		//PhoneWindow 在这里被实例化出来了
        mWindow = new PhoneWindow(this, window, activityConfigCallback);
        mWindow.setWindowControllerCallback(this);
        mWindow.setCallback(this);
        mWindow.setOnWindowDismissedCallback(this);
        mWindow.getLayoutInflater().setPrivateFactory(this);
        ......
        /*并且在以下代码中,我们可以发现到Activity的相关生命周期的调用*/
        activity.mCalled = false;
        if (r.isPersistable()) {
            mInstrumentation.callActivityOnCreate(activity, r.state, r.persistentState);
        } else {
            mInstrumentation.callActivityOnCreate(activity, r.state);
        }
        if (!activity.mCalled) {
            throw new SuperNotCalledException(
                "Activity " + r.intent.getComponent().toShortString() +
                " did not call through to super.onCreate()");
        }
        r.activity = activity;
        r.stopped = true;
        if (!r.activity.mFinished) {
            activity.performStart();
            r.stopped = false;
        }
        if (!r.activity.mFinished) {
            if (r.isPersistable()) {
                if (r.state != null || r.persistentState != null) {
                    mInstrumentation.callActivityOnRestoreInstanceState(activity, r.state,
                            r.persistentState);
                }
            } else if (r.state != null) {
                mInstrumentation.callActivityOnRestoreInstanceState(activity, r.state);
            }
        }
        if (!r.activity.mFinished) {
            activity.mCalled = false;
            if (r.isPersistable()) {
                mInstrumentation.callActivityOnPostCreate(activity, r.state,
                        r.persistentState);
            } else {
                mInstrumentation.callActivityOnPostCreate(activity, r.state);
            }
            if (!activity.mCalled) {
                throw new SuperNotCalledException(
                    "Activity " + r.intent.getComponent().toShortString() +
                    " did not call through to super.onPostCreate()");
            }
        }
    }
而attach则是在ActivityThread类中的performLaunchActivity被调用
    private Activity performLaunchActivity(ActivityClientRecord r, Intent customIntent) {
        // System.out.println("##### [" + System.currentTimeMillis() + "] ActivityThread.performLaunchActivity(" + r + ")");

        ......
        Activity activity = null;
        ......

        try {
            Application app = r.packageInfo.makeApplication(false, mInstrumentation);

            ......

            if (activity != null) {
                ......
                appContext.setOuterContext(activity);
                //这里调用了Activity的attach方法,实现了PhoneWindow的初始化
                activity.attach(appContext, this, getInstrumentation(), r.token,
                        r.ident, app, r.intent, r.activityInfo, title, r.parent,
                        r.embeddedID, r.lastNonConfigurationInstances, config,
                        r.referrer, r.voiceInteractor, window, r.configCallback);

                ......
            }
            r.paused = true;

            mActivities.put(r.token, r);

        } catch (SuperNotCalledException e) {
            throw e;

        } catch (Exception e) {
            if (!mInstrumentation.onException(activity, e)) {
                throw new RuntimeException(
                    "Unable to start activity " + component
                    + ": " + e.toString(), e);
            }
        }

        return activity;
    }
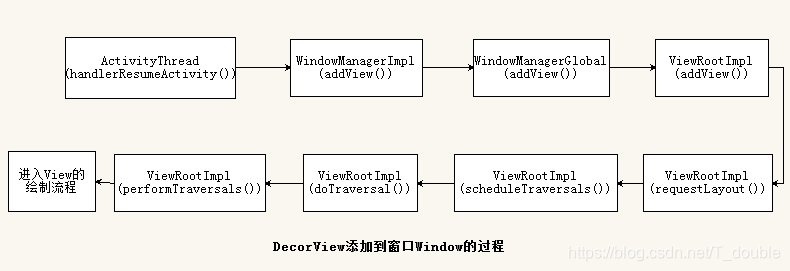
DecorView如何添加到Window窗口
关注点1:requestFeature(int featureId)
// Note: FEATURE_CONTENT_TRANSITIONS may be set in the process of installing the window
// decor, when theme attributes and the like are crystalized. Do not check the feature
// before this happens.
该处是一处备注说明,大致意思为:
当主题属性和类似的东西被具体化时,Window在被加载的过程中可能被设置FEATURE_CONTENT_TRANSITIONS,在此之前不要检测该feature属性
该处也正是说明了为什么我们在使用Window的requestFeature(int featureId)函数必须在setContentView之前才有用,并且在下面还会进一步分析这个条件
关注点2:mContentParent
在第 6 行代码中,我们关注到了if (mContentParent == null)的判空条件,那么mContentParent就应该是一个值得关注的对象,那么它是个什么对象呢
// This is the view in which the window contents are placed. It is either
// mDecor itself, or a child of mDecor where the contents go.
ViewGroup mContentParent;
它是一个ViewGroup容器,并且注释写的很清楚:
这是放置Window内容的视图。它要么是mDecor本身,要么是mDecor的子内容。
接地气一点的意思就是:mContentParent就是用来加载我们想要的xml布局内容的容器
其中注释提及到了mDecor,并且在第 7 行的installDecor();方法内也体现到了mDecor对象
关注点3:mDecor
// This is the top-level view of the window, containing the window decor.
private DecorView mDecor;
/** @hide */
public class DecorView extends FrameLayout implements RootViewSurfaceTaker, WindowCallbacks {
	......
}
对mDecor的分析结果就是:mDecor是Window窗口视图的根节点,它继承了FrameLayout容器
关注点4:FEATURE_CONTENT_TRANSITIONS
FEATURE_CONTENT_TRANSITIONS是Activity的转场动画,就是用来设置动画操作的标志
关注点5:mLayoutInflater.inflate(layoutResID, mContentParent);
layoutResID是一个xml布局,取决于feature值所对应的布局文件,它将在这里被添加到mContentParent这个容器中,最后进行View视图的显示
结合关注点1-5源码分析
installDecor()
if (mContentParent == null) {
    installDecor();
} else if (!hasFeature(FEATURE_CONTENT_TRANSITIONS)) {
    mContentParent.removeAllViews();
}
如果mContentParent != nulll的时候,那么这里会清空容器中的所有View -> mContentParent.removeAllViews();
那么为null的时候,installDecor();初始化了什么内容
private void installDecor() {
    mForceDecorInstall = false;
    if (mDecor == null) {
        mDecor = generateDecor(-1);//实例出一个DecorView对象
        mDecor.setDescendantFocusability(ViewGroup.FOCUS_AFTER_DESCENDANTS);
        mDecor.setIsRootNamespace(true);
        if (!mInvalidatePanelMenuPosted && mInvalidatePanelMenuFeatures != 0) {
            mDecor.postOnAnimation(mInvalidatePanelMenuRunnable);
        }
    } else {
        mDecor.setWindow(this);
    }
    if (mContentParent == null) {
        mContentParent = generateLayout(mDecor);

        // Set up decor part of UI to ignore fitsSystemWindows if appropriate.
        mDecor.makeOptionalFitsSystemWindows();

        final DecorContentParent decorContentParent = (DecorContentParent) mDecor.findViewById(
                R.id.decor_content_parent);

        if (decorContentParent != null) {
            mDecorContentParent = decorContentParent;
            mDecorContentParent.setWindowCallback(getCallback());
            if (mDecorContentParent.getTitle() == null) {
                mDecorContentParent.setWindowTitle(mTitle);
            }

            final int localFeatures = getLocalFeatures();
            for (int i = 0; i < FEATURE_MAX; i++) {
                if ((localFeatures & (1 << i)) != 0) {
                    mDecorContentParent.initFeature(i);
                }
            }

            mDecorContentParent.setUiOptions(mUiOptions);

            if ((mResourcesSetFlags & FLAG_RESOURCE_SET_ICON) != 0 ||
                    (mIconRes != 0 && !mDecorContentParent.hasIcon())) {
                mDecorContentParent.setIcon(mIconRes);
            } else if ((mResourcesSetFlags & FLAG_RESOURCE_SET_ICON) == 0 &&
                    mIconRes == 0 && !mDecorContentParent.hasIcon()) {
                mDecorContentParent.setIcon(
                        getContext().getPackageManager().getDefaultActivityIcon());
                mResourcesSetFlags |= FLAG_RESOURCE_SET_ICON_FALLBACK;
            }
            if ((mResourcesSetFlags & FLAG_RESOURCE_SET_LOGO) != 0 ||
                    (mLogoRes != 0 && !mDecorContentParent.hasLogo())) {
                mDecorContentParent.setLogo(mLogoRes);
            }

            // Invalidate if the panel menu hasn't been created before this.
            // Panel menu invalidation is deferred avoiding application onCreateOptionsMenu
            // being called in the middle of onCreate or similar.
            // A pending invalidation will typically be resolved before the posted message
            // would run normally in order to satisfy instance state restoration.
            PanelFeatureState st = getPanelState(FEATURE_OPTIONS_PANEL, false);
            if (!isDestroyed() && (st == null || st.menu == null) && !mIsStartingWindow) {
                invalidatePanelMenu(FEATURE_ACTION_BAR);
            }
        } else {
            mTitleView = findViewById(R.id.title);
            if (mTitleView != null) {
                if ((getLocalFeatures() & (1 << FEATURE_NO_TITLE)) != 0) {
                    final View titleContainer = findViewById(R.id.title_container);
                    if (titleContainer != null) {
                        titleContainer.setVisibility(View.GONE);
                    } else {
                        mTitleView.setVisibility(View.GONE);
                    }
                    mContentParent.setForeground(null);
                } else {
                    mTitleView.setText(mTitle);
                }
            }
        }

        if (mDecor.getBackground() == null && mBackgroundFallbackResource != 0) {
            mDecor.setBackgroundFallback(mBackgroundFallbackResource);
        }

        // Only inflate or create a new TransitionManager if the caller hasn't
        // already set a custom one.
        if (hasFeature(FEATURE_ACTIVITY_TRANSITIONS)) {
            if (mTransitionManager == null) {
                final int transitionRes = getWindowStyle().getResourceId(
                        R.styleable.Window_windowContentTransitionManager,
                        0);
                if (transitionRes != 0) {
                    final TransitionInflater inflater = TransitionInflater.from(getContext());
                    mTransitionManager = inflater.inflateTransitionManager(transitionRes,
                            mContentParent);
                } else {
                    mTransitionManager = new TransitionManager();
                }
            }

            mEnterTransition = getTransition(mEnterTransition, null,
                    R.styleable.Window_windowEnterTransition);
            mReturnTransition = getTransition(mReturnTransition, USE_DEFAULT_TRANSITION,
                    R.styleable.Window_windowReturnTransition);
            mExitTransition = getTransition(mExitTransition, null,
                    R.styleable.Window_windowExitTransition);
            mReenterTransition = getTransition(mReenterTransition, USE_DEFAULT_TRANSITION,
                    R.styleable.Window_windowReenterTransition);
            mSharedElementEnterTransition = getTransition(mSharedElementEnterTransition, null,
                    R.styleable.Window_windowSharedElementEnterTransition);
            mSharedElementReturnTransition = getTransition(mSharedElementReturnTransition,
                    USE_DEFAULT_TRANSITION,
                    R.styleable.Window_windowSharedElementReturnTransition);
            mSharedElementExitTransition = getTransition(mSharedElementExitTransition, null,
                    R.styleable.Window_windowSharedElementExitTransition);
            mSharedElementReenterTransition = getTransition(mSharedElementReenterTransition,
                    USE_DEFAULT_TRANSITION,
                    R.styleable.Window_windowSharedElementReenterTransition);
            if (mAllowEnterTransitionOverlap == null) {
                mAllowEnterTransitionOverlap = getWindowStyle().getBoolean(
                        R.styleable.Window_windowAllowEnterTransitionOverlap, true);
            }
            if (mAllowReturnTransitionOverlap == null) {
                mAllowReturnTransitionOverlap = getWindowStyle().getBoolean(
                        R.styleable.Window_windowAllowReturnTransitionOverlap, true);
            }
            if (mBackgroundFadeDurationMillis < 0) {
                mBackgroundFadeDurationMillis = getWindowStyle().getInteger(
                        R.styleable.Window_windowTransitionBackgroundFadeDuration,
                        DEFAULT_BACKGROUND_FADE_DURATION_MS);
            }
            if (mSharedElementsUseOverlay == null) {
                mSharedElementsUseOverlay = getWindowStyle().getBoolean(
                        R.styleable.Window_windowSharedElementsUseOverlay, true);
            }
        }
    }
}
mDecor = generateDecor(-1)
- 在
installDecor()中的第 4 行中,mDecor = generateDecor(-1);实例了一个DecorView对象mDecor
    protected DecorView generateDecor(int featureId) {
        // System process doesn't have application context and in that case we need to directly use
        // the context we have. Otherwise we want the application context, so we don't cling to the
        // activity.
        Context context;
        if (mUseDecorContext) {
            Context applicationContext = getContext().getApplicationContext();
            if (applicationContext == null) {
                context = getContext();
            } else {
                context = new DecorContext(applicationContext, getContext().getResources());
                if (mTheme != -1) {
                    context.setTheme(mTheme);
                }
            }
        } else {
            context = getContext();
        }
        return new DecorView(context, featureId, this, getAttributes());//以new的方式实例出了一个DecorView对象
    }
并在installDecor()中的第 14 行中mContentParent = generateLayout(mDecor);把实例出来的mDecor对象带入后实例出了一个mContentParent 容器对象
mContentParent = generateLayout(mDecor)
方法内容总结:
获取有关Window的Style属性,是否浮窗(Floating)类型、主题(windowNoTitle与windowActionBar)、全屏(windowFullscreen)、Window透明情况等
对相关Window的Style属性设置requestFeature、setFlags等信息
根据 int features = getLocalFeatures();取得的features属性值,加载对应的DecorView布局容器(layoutResource)
NOTES:这里也验证了对requestFeature设置的属性,是在这里被使用到的,而这里是在setContentView流程中,所以requestFeature设置就必须在setContentView之前!
返回以features属性对应的DecorView布局容器中用来存放用户自定义的xml布局容器mContentParent对象
protected ViewGroup generateLayout(DecorView decor) {
    // Apply data from current theme.

	//1.加载Window相关的Style属性:当我们在xml中设置一下Style属性之后,就是在这里进行加载
    TypedArray a = getWindowStyle();

    if (false) {
        System.out.println("From style:");
        String s = "Attrs:";
        for (int i = 0; i < R.styleable.Window.length; i++) {
            s = s + " " + Integer.toHexString(R.styleable.Window[i]) + "="
                    + a.getString(i);
        }
        System.out.println(s);
    }
	//2.判断当前 Window 是不是浮窗类型的,比如 Dialog
    mIsFloating = a.getBoolean(R.styleable.Window_windowIsFloating, false);
    int flagsToUpdate = (FLAG_LAYOUT_IN_SCREEN|FLAG_LAYOUT_INSET_DECOR)
            & (~getForcedWindowFlags());
    if (mIsFloating) {
        setLayout(WRAP_CONTENT, WRAP_CONTENT);
        setFlags(0, flagsToUpdate);
    } else {
        setFlags(FLAG_LAYOUT_IN_SCREEN|FLAG_LAYOUT_INSET_DECOR, flagsToUpdate);
    }
	//3.设置 requestFeature、setFlags,处理设置的 Window 的主题Style属性值,并且 windowNoTitle 与 windowActionBar 互斥
    if (a.getBoolean(R.styleable.Window_windowNoTitle, false)) {
        requestFeature(FEATURE_NO_TITLE);
    } else if (a.getBoolean(R.styleable.Window_windowActionBar, false)) {
        // Don't allow an action bar if there is no title.
        requestFeature(FEATURE_ACTION_BAR);
    }

    if (a.getBoolean(R.styleable.Window_windowActionBarOverlay, false)) {
        requestFeature(FEATURE_ACTION_BAR_OVERLAY);
    }

    if (a.getBoolean(R.styleable.Window_windowActionModeOverlay, false)) {
        requestFeature(FEATURE_ACTION_MODE_OVERLAY);
    }

    if (a.getBoolean(R.styleable.Window_windowSwipeToDismiss, false)) {
        requestFeature(FEATURE_SWIPE_TO_DISMISS);
    }

    if (a.getBoolean(R.styleable.Window_windowFullscreen, false)) {
        setFlags(FLAG_FULLSCREEN, FLAG_FULLSCREEN & (~getForcedWindowFlags()));
    }

    if (a.getBoolean(R.styleable.Window_windowTranslucentStatus,
            false)) {
        setFlags(FLAG_TRANSLUCENT_STATUS, FLAG_TRANSLUCENT_STATUS
                & (~getForcedWindowFlags()));
    }

    if (a.getBoolean(R.styleable.Window_windowTranslucentNavigation,
            false)) {
        setFlags(FLAG_TRANSLUCENT_NAVIGATION, FLAG_TRANSLUCENT_NAVIGATION
                & (~getForcedWindowFlags()));
    }

    if (a.getBoolean(R.styleable.Window_windowOverscan, false)) {
        setFlags(FLAG_LAYOUT_IN_OVERSCAN, FLAG_LAYOUT_IN_OVERSCAN&(~getForcedWindowFlags()));
    }

    if (a.getBoolean(R.styleable.Window_windowShowWallpaper, false)) {
        setFlags(FLAG_SHOW_WALLPAPER, FLAG_SHOW_WALLPAPER&(~getForcedWindowFlags()));
    }

    if (a.getBoolean(R.styleable.Window_windowEnableSplitTouch,
            getContext().getApplicationInfo().targetSdkVersion
                    >= android.os.Build.VERSION_CODES.HONEYCOMB)) {
        setFlags(FLAG_SPLIT_TOUCH, FLAG_SPLIT_TOUCH&(~getForcedWindowFlags()));
    }

    a.getValue(R.styleable.Window_windowMinWidthMajor, mMinWidthMajor);
    a.getValue(R.styleable.Window_windowMinWidthMinor, mMinWidthMinor);
    if (DEBUG) Log.d(TAG, "Min width minor: " + mMinWidthMinor.coerceToString()
            + ", major: " + mMinWidthMajor.coerceToString());
    if (a.hasValue(R.styleable.Window_windowFixedWidthMajor)) {
        if (mFixedWidthMajor == null) mFixedWidthMajor = new TypedValue();
        a.getValue(R.styleable.Window_windowFixedWidthMajor,
                mFixedWidthMajor);
    }
    if (a.hasValue(R.styleable.Window_windowFixedWidthMinor)) {
        if (mFixedWidthMinor == null) mFixedWidthMinor = new TypedValue();
        a.getValue(R.styleable.Window_windowFixedWidthMinor,
                mFixedWidthMinor);
    }
    if (a.hasValue(R.styleable.Window_windowFixedHeightMajor)) {
        if (mFixedHeightMajor == null) mFixedHeightMajor = new TypedValue();
        a.getValue(R.styleable.Window_windowFixedHeightMajor,
                mFixedHeightMajor);
    }
    if (a.hasValue(R.styleable.Window_windowFixedHeightMinor)) {
        if (mFixedHeightMinor == null) mFixedHeightMinor = new TypedValue();
        a.getValue(R.styleable.Window_windowFixedHeightMinor,
                mFixedHeightMinor);
    }
    if (a.getBoolean(R.styleable.Window_windowContentTransitions, false)) {
        requestFeature(FEATURE_CONTENT_TRANSITIONS);
    }
    if (a.getBoolean(R.styleable.Window_windowActivityTransitions, false)) {
        requestFeature(FEATURE_ACTIVITY_TRANSITIONS);
    }
	//4.Window 是否透明属性
    mIsTranslucent = a.getBoolean(R.styleable.Window_windowIsTranslucent, false);

    final Context context = getContext();
    final int targetSdk = context.getApplicationInfo().targetSdkVersion;
    final boolean targetPreHoneycomb = targetSdk < android.os.Build.VERSION_CODES.HONEYCOMB;
    final boolean targetPreIcs = targetSdk < android.os.Build.VERSION_CODES.ICE_CREAM_SANDWICH;
    final boolean targetPreL = targetSdk < android.os.Build.VERSION_CODES.LOLLIPOP;
    final boolean targetHcNeedsOptions = context.getResources().getBoolean(
            R.bool.target_honeycomb_needs_options_menu);
    final boolean noActionBar = !hasFeature(FEATURE_ACTION_BAR) || hasFeature(FEATURE_NO_TITLE);

    if (targetPreHoneycomb || (targetPreIcs && targetHcNeedsOptions && noActionBar)) {
        setNeedsMenuKey(WindowManager.LayoutParams.NEEDS_MENU_SET_TRUE);
    } else {
        setNeedsMenuKey(WindowManager.LayoutParams.NEEDS_MENU_SET_FALSE);
    }

    if (!mForcedStatusBarColor) {
        mStatusBarColor = a.getColor(R.styleable.Window_statusBarColor, 0xFF000000);
    }
    if (!mForcedNavigationBarColor) {
        mNavigationBarColor = a.getColor(R.styleable.Window_navigationBarColor, 0xFF000000);
    }

    WindowManager.LayoutParams params = getAttributes();

    // Non-floating windows on high end devices must put up decor beneath the system bars and
    // therefore must know about visibility changes of those.
    if (!mIsFloating && ActivityManager.isHighEndGfx()) {
        if (!targetPreL && a.getBoolean(
                R.styleable.Window_windowDrawsSystemBarBackgrounds,
                false)) {
            setFlags(FLAG_DRAWS_SYSTEM_BAR_BACKGROUNDS,
                    FLAG_DRAWS_SYSTEM_BAR_BACKGROUNDS & ~getForcedWindowFlags());
        }
        if (mDecor.mForceWindowDrawsStatusBarBackground) {
            params.privateFlags |= PRIVATE_FLAG_FORCE_DRAW_STATUS_BAR_BACKGROUND;
        }
    }
    if (a.getBoolean(R.styleable.Window_windowLightStatusBar, false)) {
        decor.setSystemUiVisibility(
                decor.getSystemUiVisibility() | View.SYSTEM_UI_FLAG_LIGHT_STATUS_BAR);
    }

    if (mAlwaysReadCloseOnTouchAttr || getContext().getApplicationInfo().targetSdkVersion
            >= android.os.Build.VERSION_CODES.HONEYCOMB) {
        if (a.getBoolean(
                R.styleable.Window_windowCloseOnTouchOutside,
                false)) {
            setCloseOnTouchOutsideIfNotSet(true);
        }
    }

    if (!hasSoftInputMode()) {
        params.softInputMode = a.getInt(
                R.styleable.Window_windowSoftInputMode,
                params.softInputMode);
    }

    if (a.getBoolean(R.styleable.Window_backgroundDimEnabled,
            mIsFloating)) {
        /* All dialogs should have the window dimmed */
        if ((getForcedWindowFlags()&WindowManager.LayoutParams.FLAG_DIM_BEHIND) == 0) {
            params.flags |= WindowManager.LayoutParams.FLAG_DIM_BEHIND;
        }
        if (!haveDimAmount()) {
            params.dimAmount = a.getFloat(
                    android.R.styleable.Window_backgroundDimAmount, 0.5f);
        }
    }

    if (params.windowAnimations == 0) {
        params.windowAnimations = a.getResourceId(
                R.styleable.Window_windowAnimationStyle, 0);
    }

    // The rest are only done if this window is not embedded; otherwise,
    // the values are inherited from our container.
    if (getContainer() == null) {
        if (mBackgroundDrawable == null) {
            if (mBackgroundResource == 0) {
                mBackgroundResource = a.getResourceId(
                        R.styleable.Window_windowBackground, 0);
            }
            if (mFrameResource == 0) {
                mFrameResource = a.getResourceId(R.styleable.Window_windowFrame, 0);
            }
            mBackgroundFallbackResource = a.getResourceId(
                    R.styleable.Window_windowBackgroundFallback, 0);
            if (false) {
                System.out.println("Background: "
                        + Integer.toHexString(mBackgroundResource) + " Frame: "
                        + Integer.toHexString(mFrameResource));
            }
        }
        if (mLoadElevation) {
            mElevation = a.getDimension(R.styleable.Window_windowElevation, 0);
        }
        mClipToOutline = a.getBoolean(R.styleable.Window_windowClipToOutline, false);
        mTextColor = a.getColor(R.styleable.Window_textColor, Color.TRANSPARENT);
    }

    // Inflate the window decor. 生成对应的 Window decor

    int layoutResource;
    //5.在这里获取设置好的feature属性值,然后根据features值初始化对应的DecorView容器布局,
    //同时说明在调用Window.requestFeature方法时,必须在setContentView之前,
    int features = getLocalFeatures();
    // System.out.println("Features: 0x" + Integer.toHexString(features));
    if ((features & (1 << FEATURE_SWIPE_TO_DISMISS)) != 0) {
        layoutResource = R.layout.screen_swipe_dismiss;
        setCloseOnSwipeEnabled(true);
    } else if ((features & ((1 << FEATURE_LEFT_ICON) | (1 << FEATURE_RIGHT_ICON))) != 0) {
        if (mIsFloating) {
            TypedValue res = new TypedValue();
            getContext().getTheme().resolveAttribute(
                    R.attr.dialogTitleIconsDecorLayout, res, true);
            layoutResource = res.resourceId;
        } else {
            layoutResource = R.layout.screen_title_icons;
        }
        // XXX Remove this once action bar supports these features.
        removeFeature(FEATURE_ACTION_BAR);
        // System.out.println("Title Icons!");
    } else if ((features & ((1 << FEATURE_PROGRESS) | (1 << FEATURE_INDETERMINATE_PROGRESS))) != 0
            && (features & (1 << FEATURE_ACTION_BAR)) == 0) {
        // Special case for a window with only a progress bar (and title).
        // XXX Need to have a no-title version of embedded windows.
        layoutResource = R.layout.screen_progress;
        // System.out.println("Progress!");
    } else if ((features & (1 << FEATURE_CUSTOM_TITLE)) != 0) {
        // Special case for a window with a custom title.
        // If the window is floating, we need a dialog layout
        if (mIsFloating) {
            TypedValue res = new TypedValue();
            getContext().getTheme().resolveAttribute(
                    R.attr.dialogCustomTitleDecorLayout, res, true);
            layoutResource = res.resourceId;
        } else {
            layoutResource = R.layout.screen_custom_title;
        }
        // XXX Remove this once action bar supports these features.
        removeFeature(FEATURE_ACTION_BAR);
    } else if ((features & (1 << FEATURE_NO_TITLE)) == 0) {
        // If no other features and not embedded, only need a title.
        // If the window is floating, we need a dialog layout
        if (mIsFloating) {
            TypedValue res = new TypedValue();
            getContext().getTheme().resolveAttribute(
                    R.attr.dialogTitleDecorLayout, res, true);
            layoutResource = res.resourceId;
        } else if ((features & (1 << FEATURE_ACTION_BAR)) != 0) {
            layoutResource = a.getResourceId(
                    R.styleable.Window_windowActionBarFullscreenDecorLayout,
                    R.layout.screen_action_bar);
        } else {
            layoutResource = R.layout.screen_title;
        }
        // System.out.println("Title!");
    } else if ((features & (1 << FEATURE_ACTION_MODE_OVERLAY)) != 0) {
        layoutResource = R.layout.screen_simple_overlay_action_mode;
    } else {
        // Embedded, so no decoration is needed.
        layoutResource = R.layout.screen_simple;
        // System.out.println("Simple!");
    }

    mDecor.startChanging();
    //加载DecorView布局文件
    mDecor.onResourcesLoaded(mLayoutInflater, layoutResource);
	//实例mDecor布局中id为content的容器:public static final int ID_ANDROID_CONTENT = com.android.internal.R.id.content;
    ViewGroup contentParent = (ViewGroup)findViewById(ID_ANDROID_CONTENT);
    if (contentParent == null) {
        throw new RuntimeException("Window couldn't find content container view");
    }

    if ((features & (1 << FEATURE_INDETERMINATE_PROGRESS)) != 0) {
        ProgressBar progress = getCircularProgressBar(false);
        if (progress != null) {
            progress.setIndeterminate(true);
        }
    }

    if ((features & (1 << FEATURE_SWIPE_TO_DISMISS)) != 0) {
        registerSwipeCallbacks(contentParent);
    }

    // Remaining setup -- of background and title -- that only applies
    // to top-level windows.
    if (getContainer() == null) {
        final Drawable background;
        if (mBackgroundResource != 0) {
            background = getContext().getDrawable(mBackgroundResource);
        } else {
            background = mBackgroundDrawable;
        }
        mDecor.setWindowBackground(background);

        final Drawable frame;
        if (mFrameResource != 0) {
            frame = getContext().getDrawable(mFrameResource);
        } else {
            frame = null;
        }
        mDecor.setWindowFrame(frame);

        mDecor.setElevation(mElevation);
        mDecor.setClipToOutline(mClipToOutline);

        if (mTitle != null) {
            setTitle(mTitle);
        }

        if (mTitleColor == 0) {
            mTitleColor = mTextColor;
        }
        setTitleColor(mTitleColor);
    }

    mDecor.finishChanging();

    return contentParent;
}
到此,基于一开始抛出的Activity UI层级结构图便已清晰的深入剖析。并且得知了最后开发者在setContentView中设置的xml布局文件,最终都是被inflated到mContentParent这个ViewGroup中的。
本文内容由网友自发贡献,版权归原作者所有,本站不承担相应法律责任。如您发现有涉嫌抄袭侵权的内容,请联系:hwhale#tublm.com(使用前将#替换为@)