使用Netty+SpringBoot方式可以快速地开发一套基于UDP协议的服务端程序,同样的也可以开发客户端,一般使用UDP都是使用原生的方式,发送消息后就不管不问,也就是不需要确定消息是否收到,这里使用Netty创建的客户端和服务端倒是能够类似http协议那样请求数据,得到返回数据,实际上得到的就是服务端原路返回的数据。
Demo地址:SpringBoot+Netty实现UDP服务端客户端的源码Demo
这里也使用SpringBoot+Netty创建,pom.xml文件导入依赖包
<?xml version="1.0"?>
<project
	xsi:schemaLocation="http://maven.apache.org/POM/4.0.0 http://maven.apache.org/xsd/maven-4.0.0.xsd"
	xmlns="http://maven.apache.org/POM/4.0.0"
	xmlns:xsi="http://www.w3.org/2001/XMLSchema-instance">
	<modelVersion>4.0.0</modelVersion>

	<groupId>boot.base.udp.client</groupId>
	<artifactId>boot-example-base-udp-client-2.0.5</artifactId>
	<version>0.0.1-SNAPSHOT</version>
	<name>boot-example-base-udp-client-2.0.5</name>
	<url>http://maven.apache.org</url>

	<parent>
		<groupId>org.springframework.boot</groupId>
		<artifactId>spring-boot-starter-parent</artifactId>
		<version>2.0.5.RELEASE</version>
		<relativePath />
	</parent>

	<properties>
		<project.build.sourceEncoding>UTF-8</project.build.sourceEncoding>
		<project.reporting.outputEncoding>UTF-8</project.reporting.outputEncoding>
		<java.version>1.8</java.version>
	</properties>

	<dependencies>

		<!--web模块的启动器 -->
		<dependency>
			<groupId>org.springframework.boot</groupId>
			<artifactId>spring-boot-starter-web</artifactId>
		</dependency>
		<!-- netty依赖 springboot2.x自动导入版本 -->
		<dependency>
			<groupId>io.netty</groupId>
			<artifactId>netty-all</artifactId>
		</dependency>
		<dependency>
			<groupId>io.springfox</groupId>
			<artifactId>springfox-swagger2</artifactId>
			<version>2.9.2</version>
		</dependency>
		<dependency>
			<groupId>com.github.xiaoymin</groupId>
			<artifactId>swagger-bootstrap-ui</artifactId>
			<version>1.9.2</version>
		</dependency>
	</dependencies>
	<build>
		<plugins>
			<!-- 打包成一个可执行jar -->
			<plugin>
				<groupId>org.springframework.boot</groupId>
				<artifactId>spring-boot-maven-plugin</artifactId>
				<executions>
					<execution>
						<goals>
							<goal>repackage</goal>
						</goals>
					</execution>
				</executions>
			</plugin>
		</plugins>
	</build>
</project>
Netty客户端的类,包含main方法(临时测试使用,实际还是使用springBoot的启动类)
package boot.example.udp.client.netty;


import java.net.InetSocketAddress;

import io.netty.bootstrap.Bootstrap;
import io.netty.buffer.Unpooled;
import io.netty.channel.Channel;
import io.netty.channel.ChannelOption;
import io.netty.channel.EventLoopGroup;
import io.netty.channel.nio.NioEventLoopGroup;
import io.netty.channel.socket.DatagramPacket;
import io.netty.channel.socket.nio.NioDatagramChannel;
import io.netty.util.CharsetUtil;

/**
 * 	蚂蚁舞
 */
public class BootNettyUdpClient {

	public void bind(String address, int port, String data) {

		EventLoopGroup eventLoopGroup = new NioEventLoopGroup();
		try {
            Bootstrap clientBootstrap = new Bootstrap();
            clientBootstrap = clientBootstrap.group(eventLoopGroup);
            clientBootstrap = clientBootstrap.channel(NioDatagramChannel.class);
            clientBootstrap = clientBootstrap.option(ChannelOption.SO_BROADCAST, true);
            clientBootstrap = clientBootstrap.handler(new BootNettyUdpClientSimpleChannelInboundHandler());

            Channel channel = clientBootstrap.bind(0).sync().channel();
            channel.writeAndFlush(new DatagramPacket(Unpooled.copiedBuffer(data, CharsetUtil.UTF_8), new InetSocketAddress(address,port))).sync();

            //  与BootNettyUdpClientSimpleChannelInboundHandler中的ctx.channel().id().toString()是一样的值
            System.out.println("channel_id = "+channel.id().toString());

            //  方式一:查询等待超时 单位s  等待服务端原路返回的消息,
            //  在channelRead0(ChannelHandlerContext ctx, DatagramPacket msg)方法中收到消息后可主动关闭channel,此处等待自然释放
            channel.closeFuture().await(10000);

            //	方式二:直接等待服务端原路返回后在channelRead0(ChannelHandlerContext ctx, DatagramPacket msg)方法中收到消息后可主动关闭channe
            //  若服务端没有原路返回消息或者消息未收到将会一直等待,浪费资源
            //channel.closeFuture().sync();

		} catch (Exception e) {
			// TODO: handle exception
		} finally {
			System.out.println("netty client udp close!");
			eventLoopGroup.shutdownGracefully();
		}
	}


	//    测试
	public static void main(String[] args) {

		//  向网段内的所有机器广播UDP消息,这个没试过是不是这个原理
		// new BootNettyUdpClient().bind("255.255.255.255",9999,"I am client");

		// 指定某个套接字地址和发送的内容可以发送消息
		// 该方式也可以封装成一个udp的客户端的send类
		new BootNettyUdpClient().bind("127.0.0.1",9999,"I am client");


	}

}
服务端I/O数据读写处理类
package boot.example.udp.client.netty;


import io.netty.channel.ChannelHandlerContext;
import io.netty.channel.SimpleChannelInboundHandler;
import io.netty.channel.socket.DatagramPacket;
import io.netty.util.CharsetUtil;

/**
 *  蚂蚁舞
 */
public class BootNettyUdpClientSimpleChannelInboundHandler extends SimpleChannelInboundHandler<DatagramPacket> {


	@Override
	protected void channelRead0(ChannelHandlerContext ctx, DatagramPacket msg) throws Exception {
		try {
			String strData = msg.content().toString(CharsetUtil.UTF_8);
			//打印收到的消息
            System.out.println("msg---"+strData);
            // 与BootNettyUdpClient中的channel.id().toString()是一样的值
            System.out.println(ctx.channel().id().toString());
            //	收到服务端原路返回的消息后,不需要再次向服务端发送消息, 可以在这里暴力关闭,也可以在 channelReadComplete(ChannelHandlerContext ctx)内
            //  ctx.close();
		} catch (Exception e) {
			System.out.println(e.toString());
		}
	}

	/**
	 * 	重写方法
	 * 	结构:
	 * 	1.public class BootNettyUdpClientSimpleChannelInboundHandler extends SimpleChannelInboundHandler<DatagramPacket>
	 *
	 * 	2.public abstract class SimpleChannelInboundHandler<I> extends ChannelInboundHandlerAdapter
	 *
	 * 	3.public class ChannelInboundHandlerAdapter extends ChannelHandlerAdapter implements ChannelInboundHandler
	 *
	 * 	ChannelInboundHandlerAdapter类有诸多方法可以重写,可以根据具体需求来写
	 *
	 */

	@Override
	public void channelReadComplete(ChannelHandlerContext ctx) throws Exception {
		super.channelReadComplete(ctx);
		System.out.println("关闭channel");
		ctx.close();
	}

    @Override
    public void exceptionCaught(ChannelHandlerContext ctx, Throwable cause) throws Exception {
        cause.printStackTrace();
        ctx.close();
    }

}
BootNettyUdpClientApplication
package boot.example.udp.client;

import org.springframework.boot.SpringApplication;
import org.springframework.boot.autoconfigure.SpringBootApplication;


/**
 * 蚂蚁舞
 */

@SpringBootApplication
public class BootNettyUdpClientApplication {
    public static void main( String[] args ) {
		SpringApplication app = new SpringApplication(BootNettyUdpClientApplication.class);
		app.run(args);

        System.out.println( "Hello World!" );
    }
}
BootNettyUdpClientController
package boot.example.udp.client.controller;

import boot.example.udp.client.netty.BootNettyUdpClient;
import org.springframework.web.bind.annotation.GetMapping;
import org.springframework.web.bind.annotation.PostMapping;
import org.springframework.web.bind.annotation.RequestParam;
import org.springframework.web.bind.annotation.RestController;

/**
 * 	蚂蚁舞
 */
@RestController
public class BootNettyUdpClientController {

	@GetMapping(value = {"", "/"})
	public String index() {
		return "netty springBoot udp client demo";
	}

	@PostMapping("/sendData")
	public String sendData(@RequestParam(name="content", required = true) String content) {
		if(content != null && content.length() > 0){
			new BootNettyUdpClient().bind("127.0.0.1",9999,content);
			return "success";
		}
		return "fail";
	}


}
SwaggerConfig UI访问配置
package boot.example.udp.client;

import com.google.common.base.Predicates;
import org.springframework.context.annotation.Bean;
import org.springframework.context.annotation.Configuration;
import springfox.documentation.builders.ApiInfoBuilder;
import springfox.documentation.builders.PathSelectors;
import springfox.documentation.builders.RequestHandlerSelectors;
import springfox.documentation.service.ApiInfo;
import springfox.documentation.spi.DocumentationType;
import springfox.documentation.spring.web.plugins.Docket;
import springfox.documentation.swagger2.annotations.EnableSwagger2;

/**
 *  蚂蚁舞
 */
@Configuration
@EnableSwagger2
public class SwaggerConfig {

    @Bean
    public Docket createRestApi(){
        return new Docket(DocumentationType.SWAGGER_2).apiInfo(apiInfo()).select()
                .apis(RequestHandlerSelectors.any()).paths(PathSelectors.any())
                .paths(Predicates.not(PathSelectors.regex("/error.*")))
                .paths(PathSelectors.regex("/.*"))
                .build().apiInfo(apiInfo());
    }

    private ApiInfo apiInfo(){
        return new ApiInfoBuilder()
                .title("netty udp 客户端demo")
                .description("netty udp 客户端接口测试demo")
                .version("0.01")
                .build();
    }

    /**
     * http://localhost:xxxx/doc.html  地址和端口根据实际项目查看
     */


}
代码结构
├─boot-example-base-udp-client-2.0.5
│  │  pom.xml
│  │
│  ├─src
│  │  ├─main
│  │  │  ├─java
│  │  │  │  └─boot
│  │  │  │      └─example
│  │  │  │          └─udp
│  │  │  │              └─client
│  │  │  │                  │  BootNettyUdpClientApplication.java
│  │  │  │                  │  SwaggerConfig.java
│  │  │  │                  │
│  │  │  │                  ├─controller
│  │  │  │                  │      BootNettyUdpClientController.java
│  │  │  │                  │
│  │  │  │                  └─netty
│  │  │  │                          BootNettyUdpClient.java
│  │  │  │                          BootNettyUdpClientSimpleChannelInboundHandler.java
│  │  │  │
│  │  │  └─resources
│  │  │          application.properties
│  │  │
│  │  └─test
│  │      └─java
│  │          └─boot
│  │              └─example
│  │                  └─udp
│  │                      └─client
│  │                              BootNettyUdpClientApplicationTest.java
│  │
UDP客户端代码和UDP服务端代码测试
先启动一个服务端,可以看服务端的博文地址(SpringBoot搭建基于UDP协议的服务端)
再启动一个客户端,启动成功后可以在浏览器访问
服务端
http://localhost:8092/doc.html

客户端
http://localhost:8091/doc.html
我们在客户端发送消息,发送了几条,包含中文

服务端查看发送的数据列表
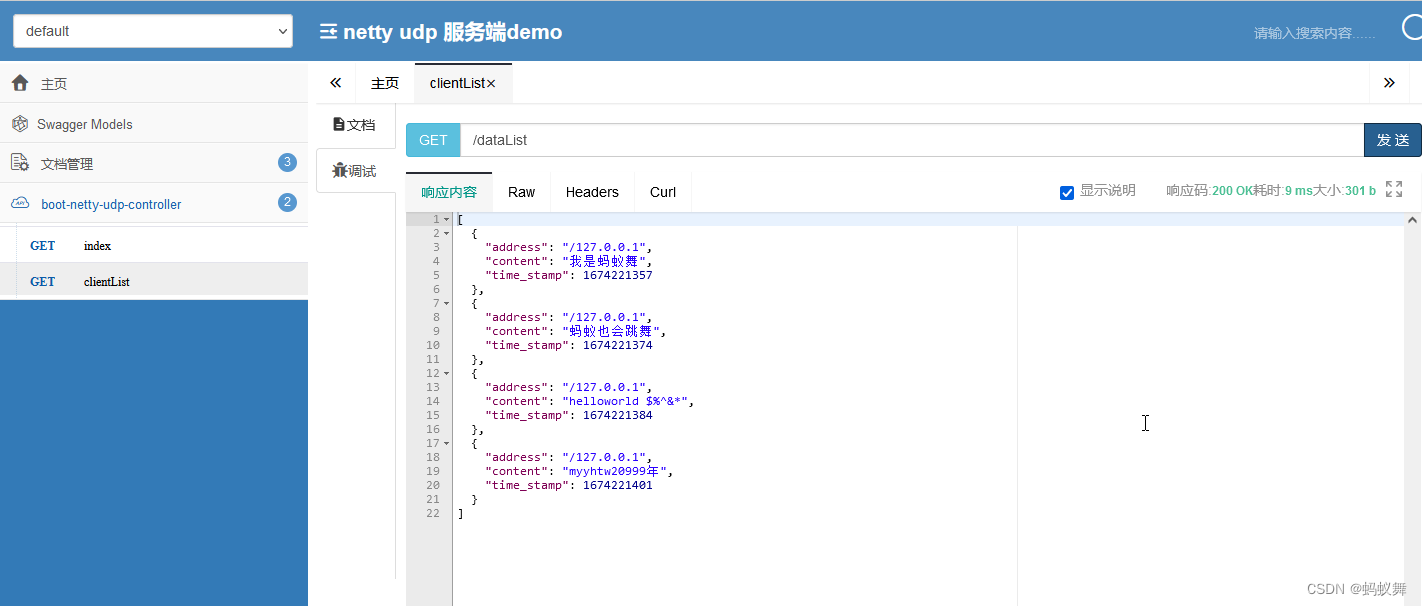
[
  {
    "address": "/127.0.0.1",
    "content": "我是蚂蚁舞",
    "time_stamp": 1674221357
  },
  {
    "address": "/127.0.0.1",
    "content": "蚂蚁也会跳舞",
    "time_stamp": 1674221374
  },
  {
    "address": "/127.0.0.1",
    "content": "helloworld $%^&*",
    "time_stamp": 1674221384
  },
  {
    "address": "/127.0.0.1",
    "content": "myyhtw20999年",
    "time_stamp": 1674221401
  }
]
可以看到自己用程序写的客户端和服务端代码 发送把编码统一后是可以保证中文不乱码的,但是使用一些小工具可能就会出现乱码
在这里每次使用发送都会调用一次
new BootNettyUdpClient().bind("127.0.0.1",9999,"I am client");
有时候在使用udp的时候,一般不需要接收返回数据(如果有接收返回数据,还是建议使用netty的客户端方式,稳定些)
BootNettyUdpClientApplicationTest
package boot.example.udp.client;


import java.io.IOException;
import java.net.DatagramPacket;
import java.net.DatagramSocket;
import java.net.InetSocketAddress;
import java.net.SocketException;
import java.nio.charset.StandardCharsets;

/**
 * 蚂蚁舞
 */
public class BootNettyUdpClientApplicationTest {


    public static void main(String[] args) {
        netUdpSend("netUdp我是蚂蚁舞");
        netUdpSend("蚂蚁也会跳舞");
        netUdpSend("$%^&myw");
    }
    public static void netUdpSend(String data) {
        DatagramSocket ds;
        try {
            ds = new DatagramSocket();
            byte[] bytes = data.getBytes(StandardCharsets.UTF_8);
            DatagramPacket dp = new DatagramPacket(bytes,bytes.length, new InetSocketAddress("127.0.0.1", 9999));
            try {
                ds.send(dp);
                System.out.println("udp send success-" + data);
            } catch (IOException e) {
                System.err.println("udp send fail-" + e);
            }
            ds.close();
        } catch (SocketException e) {
            System.err.println(e.toString());
        }
    }
}
再看看服务端的收到的数据

没有问题的,使用springBoot+Netty搭建UDP客户端和服务端,在某些场景下是可以搭配使用的
本文内容由网友自发贡献,版权归原作者所有,本站不承担相应法律责任。如您发现有涉嫌抄袭侵权的内容,请联系:hwhale#tublm.com(使用前将#替换为@)