jQuery下的瀑布流效果

2023-05-16

使用jQuery制作瀑布流效果,这里需要引入jQuery库。
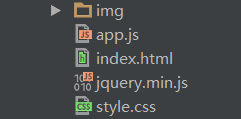
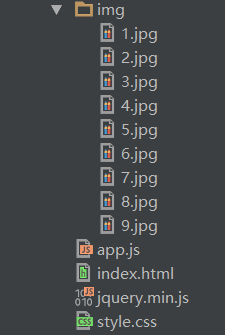
     

index.html

<!DOCTYPE html>
<html lang="en">
<head>
    <meta charset="UTF-8">
    <title>jQuery瀑布流-布局</title>
    <script src="jquery.min.js"></script>
    <script src="app.js"></script>
    <link rel="stylesheet" type="text/css" href="style.css">
</head>
<body>
    <div id="container">
        <div class="box">
            <div class="content">
                <img src="img/1.jpg">
            </div>
        </div>
        <div class="box">
            <div class="content">
                <img src="img/2.jpg">
            </div>
        </div>
        <div class="box">
            <div class="content">
                <img src="img/3.jpg">
            </div>
        </div>
        <div class="box">
            <div class="content">
                <img src="img/4.jpg">
            </div>
        </div>
        <div class="box">
            <div class="content">
                <img src="img/5.jpg">
            </div>
        </div>
        <div class="box">
            <div class="content">
                <img src="img/6.jpg">
            </div>
        </div>
        <div class="box">
            <div class="content">
                <img src="img/7.jpg">
            </div>
        </div>
        <div class="box">
            <div class="content">
                <img src="img/8.jpg">
            </div>
        </div>
        <div class="box">
            <div class="content">
                <img src="img/9.jpg">
            </div>
        </div>

        <div class="box">
            <div class="content">
                <img src="img/1.jpg">
            </div>
        </div>
        <div class="box">
            <div class="content">
                <img src="img/2.jpg">
            </div>
        </div>
        <div class="box">
            <div class="content">
                <img src="img/3.jpg">
            </div>
        </div>
        <div class="box">
            <div class="content">
                <img src="img/4.jpg">
            </div>
        </div>
        <div class="box">
            <div class="content">
                <img src="img/5.jpg">
            </div>
        </div>
        <div class="box">
            <div class="content">
                <img src="img/6.jpg">
            </div>
        </div>
        <div class="box">
            <div class="content">
                <img src="img/7.jpg">
            </div>
        </div>
        <div class="box">
            <div class="content">
                <img src="img/8.jpg">
            </div>
        </div>
        <div class="box">
            <div class="content">
                <img src="img/9.jpg">
            </div>
        </div>


    </div>
</body>
</html>

style.css

* {
    margin: 0;
    padding: 0;
}

#container {
    position: relative;
    margin: 10px auto;
}

.box {
    float: left;
}

.content {
    margin: 10px;
    padding: 10px;
    border: 1px solid #ccc;
    box-shadow: 0 0 5px #ccc;
    border-radius: 5px;
}

.content img {
    width: 190px;
    height: auto;
}

app.js

/**
 * Created by DreamBoy on 2016/1/26.
 */
$(document).ready(function() {
    $(window).on("load", function() {
        /*var test = document.getElementsByClassName("box");
        console.log(test[0]);*/

        imgLocation();

        //模拟网络获取数据
        //json字符串——一种网络传输数据的协议格式
        var imgData = {"data":[{"src":"1.jpg"},{"src":"2.jpg"},{"src":"3.jpg"},
            {"src":"4.jpg"},{"src":"5.jpg"},{"src":"6.jpg"},{"src":"7.jpg"},
            {"src":"8.jpg"},{"src":"9.jpg"}]};

        window.onscroll = function() {
            if(scrollside()) {
                $.each(imgData.data,function(index,value) {
                    var box = $("<div>").addClass("box").appendTo("#container");
                    var content = $("<div>").addClass("content").appendTo(box);

                    //console.log(value);
                    //console.log("./img/"+$(value).attr("src"));

                    $("<img>").attr("src", "./img/"+$(value).attr("src")).appendTo(content);
                });

                imgLocation();
            }
        };

    });
});

function scrollside() {
    var box = $(".box");
    //var lastboxHeight = box.last().get(0).offsetTop + Math.floor(box.last().height() / 2);
    var lastboxHeight = box.last().get(0).offsetTop + box.last().height() / 2;

    //当前document的高度
    var documentHeight = $(window).height();
    //被卷去的内容的高度
    var scrollHeight = $(window).scrollTop();

    /*console.log("$(window).height()" + $(window).height());
    console.log("$(document).height()" + $(document).height());*/

    /*console.log("box.last().get(0).offsetTop: " + box.last().get(0).offsetTop);
    console.log("Math.floor(box.last().height() / 2): " + Math.floor(box.last().height() / 2));
    console.log("lastboxHeight: " + lastboxHeight);
    console.log("scrollHeight: " + scrollHeight);
    console.log("documentHeight: " + documentHeight);
    console.log("scrollHeight + documentHeight: " + (scrollHeight + documentHeight));*/

    return lastboxHeight <= scrollHeight + documentHeight;
}

function imgLocation() {
    var box = $(".box");
    //var boxWidth = box[0].offsetWidth;
    //console.log(boxWidth);
    var boxWidth = box.eq(0).width();
    //计算一行中可以放置多少张图片
    var num = Math.floor($(window).width() / boxWidth);

    //为最外层的容器 container 设置宽度
    var container = $("#container");
    container.width(boxWidth * num);

    var boxArr = [];
    box.each(function(index, value) {
        // index为box中的下标,value是对应下标index的元素对象
        // value 与 box.eq(index) 是不一样的
        // value 是一个元素对象 含有标签、内容、属性等
        // 而 box.eq(index) 是一个jQuery对象
        // $(value) 等价于 box.eq(index)

        //console.log(index + "--" + value); // 0--[object HTMLDivElement]

        //js方式
        //var boxHeight = value.offsetHeight;

        //jQuery方式
        var boxHeight = box.eq(index).height();
        if(index<num) {
            boxArr[index]=boxHeight;
            //console.log(boxHeight);
        } else {
            //当前boxArr数组盒子中最小的高度
            var minBoxHeight = Math.min.apply(null, boxArr);
            //console.log(minBoxHeight);
            var minBoxIndex = $.inArray(minBoxHeight, boxArr);
            //console.log(value);
            //console.log(box.eq(index));

            $(value).css({
                position: "absolute",
                top: minBoxHeight,
                left: box.eq(minBoxIndex).position().left
            });

            boxArr[minBoxIndex] += boxHeight;
        }
    });
}

运行结果如下:


本文内容由网友自发贡献,版权归原作者所有,本站不承担相应法律责任。如您发现有涉嫌抄袭侵权的内容,请联系:hwhale#tublm.com(使用前将#替换为@)

jQuery下的瀑布流效果 的相关文章

随机推荐

  • Android+PHP 使用HttpClient提交POST的请求,使用JSON解析响应

    这里介绍一下如何让自己的Android程序具有联网功能 当然首先要有一台服务器 xff0c 如果只是进行测试的话 xff0c 可以使用局域网代替 xff08 手机连电脑wifi xff09 要求电脑已配置好Apache 43 PHP环境 下
  • Android Google开源库——Volley的简单使用

    介绍一下Android Google开源库 Volley的简单使用 volley 项目地址 https github com smanikandan14 Volley demo JSON xff0c 图像等的异步下载 xff1b 网络请求的
  • Mysql远程登陆及常用命令

    上次我们租用了阿里云的服务器 xff0c 使用windows系统 xff0c 在其服务器上安装了wamp xff0c 对于Mysql数据库这方面的远程登陆知识有些缺欠 Mysql数据库的远程登陆可使我们在自己电脑上连接服务器的数据库 xff
  • 让网页装进Android手机(将html+css+js打包成Android应用)(简单的)

    今晚尝试了一下 xff0c 将自己简单写的网页 xff08 html 43 css 43 js xff09 打包成Android应用装进手机 xff08 当然如果网页做得好的话 xff0c 采用响应式布局 xff0c 即可在手机上完美展示
  • 图像的直方图均衡化和比特平面分层

    xff08 1 xff09 自定义一个函数 xff0c 当输入为一幅图像 EXP3 1 tif 时 xff0c 能输出该图像的直方图 计算输入图像的直方图 getHist function H 61 getHist pho ima 61 i
  • 空间域滤波:图像平滑和锐化

    xff08 1 xff09 自定义一个空间域平滑滤波函数 xff0c 以达到滤除指定类型噪声 如高斯 噪声和椒盐噪声等 的 目的 xff0c 该函数的输入参数包括滤波器类型filter type 如 高斯均值滤波 中值滤波 最大 小值滤波等
  • 图像的频率域高斯低通滤波

    xff08 1 xff09 自定义一个图像的频率域高斯低通滤波处理函数 xff0c 要求该函数的输入参数包括处理前的图像ima和距频率矩形中心的距离D0 截止频率 xff0c 输出参数为滤波处理后的图像im2 自定义的高斯低通滤波器 xff
  • 2021-07-28_Ubuntu18.04如何关闭Xorg图形界面使用tty纯命令跑程序?

    痛点1 xff1a 显卡只有8G xff0c 经常gradient overflow或者CUDA OOM 痛点2 xff1a 主机连接数4k显示器 xff0c 经常系统卡住 xff0c 只有鼠标能动 xff0c 某度知道热心网友说等几分钟试
  • 彩色图像的空间域滤波

    xff08 1 xff09 RGB彩色空间向 HSI 彩色 空间的转换 xff1a 自定义一个函数 xff0c 实现RGB 彩色空间向 HSI 彩色 空间的转换 xff0c 要求该函数的输入参数为RGB彩色图像 xff0c 输出参数为HSI
  • Android中使用Handler造成内存泄露的分析和解决

    转载自 xff1a http www linuxidc com Linux 2013 12 94065 htm 什么是内存泄露 xff1f Java使用有向图机制 xff0c 通过GC自动检查内存中的对象 xff08 什么时候检查由虚拟机决
  • Java中的Scanner类

    转载自 xff1a http bbs itheima com thread 90856 1 1 html http blog sina com cn s blog 7014ad5c01018sov html java util Scanne
  • 第一次了解GitHub,在Windows下使用GitHub

    心血来潮 看了一下关于版本管理工具Git 要使用GitHub xff08 一个程序员的社区网站 xff0c 基于Git用于托管软件库 xff09 xff0c 个人觉得要先理解Git和GitHub 这里有两个参考网站 xff0c 可以做了解
  • CSS中的选择器优先级考虑

    先来看个例子 xff1a css02 html lt DOCTYPE html gt lt html lang 61 34 en 34 gt lt head gt lt meta charset 61 34 UTF 8 34 gt lt t
  • CSS中的定位——position属性

    CSS定位指的是 改变元素在页面中的位置 CSS定位机制 xff1a 普通流 xff1a 元素按照其在HTML中的位置顺序决定排布的过程 xff08 也就是我不对元素进行定位的默认排布 xff09 浮动 绝对布局 CSS定位包含的属性有 x
  • CSS中父div与子div——子div有内容,父div高度却为0?

    我们可能在审查网页元素时 xff0c 会发现这样的一种情况 xff1a 案例 HTMLAndCSS html lt DOCTYPE html gt lt html lang 61 34 en 34 gt lt head gt lt meta
  • JS动画框架及案例

    JS动画效果 xff1a 综合 运动框架 move js 1 简单动画 1 1 速度动画 D01 share html 1 2 透明度动画 D02 opacity html 2 缓冲动画 2 1 缓冲动画 D03 speed html 3
  • Javascript异步编程之setTimeout与setInterval

    转载自 xff1a http www cnblogs com tugenhua0707 p 4083475 html utm source 61 tuicool amp utm medium 61 referral Javascript异步
  • javascript下的瀑布流效果

    以下瀑布流效果增加了本地加载数据的功能 xff0c 实际上加载更多的图片应该通过网络进行获取 xff0c 这里只是进行了本地图片传送的模拟 目录结构如下 xff1a index html lt DOCTYPE html gt lt html
  • 远程共享文件夹读写数据Software caused connection abort: recv failed和 Invalid payload size: 405

    Software caused connection abort recv failed 一般是JAR包版本不对 xff0c 我用得jcifs 1 3 3 jar包错 xff0c 改为jcifs 1 3 17 jar就可以了 span cl
  • jQuery下的瀑布流效果

    使用jQuery制作瀑布流效果 xff0c 这里需要引入jQuery库 index html lt DOCTYPE html gt lt html lang 61 34 en 34 gt lt head gt lt meta charset