目录
为什么要使用AOP?
一、通过注解使用AOP
1.1、需求定义
1.2、需求分析
1.3、需求实现
第1步:添加坐标
第2步:添加配置beans.xml配置文件
第3步:添加一个业务类AccountService
第4步:添加一个切面类
第5步:定义测试类进行测试
1.5、知识点补充
1、切入点表达式的写法-execution函数
2、Spring中的通知
二、案例
2.1、使用AOP记录用户操作日志
需求
实现思路
2.2、使用AOP实现取款短信的发送功能
需求
实现思路
2.3、使用AOP实现程序异常发送email功能
需求
实现思路
2.3、使用AOP实现查看方法执行的时间
需求
实现思路
参考代码
为什么要使用AOP?
AOP是面向对象的补充,当我们需要为多个对象引入一个公共行为,比如日志,操作记录等,就需要在每个对象中引用公共行为,这样程序就产生了大量的重复代码,使用AOP可以完美解决这个问题。
AOP:全称是 Aspect Oriented Programming 即:面向切面编程。简单的说它就是把我们程序重复的代码抽取出来,在需要执行的时候,使用动态代理的技术,在不修改源码的基础上,对我们的已有方法进行增强。
Aop的作用:在程序运行期间,不修改源码对已有方法进行增强。
Aop优势:减少重复代码、提高开发效率、维护方便
AOP的实现方式:使用动态代理技术
一、通过注解使用AOP
1.1、需求定义
完成日志记录功能,当用户进行数据库增、删、改的时候记录操作日志。
1.2、需求分析
在系统调用Service中增、删、改的方法时通过AOP来记录操作日志
1.3、需求实现
第1步:添加坐标
<dependencies>
    <!--spring坐标-->
    <dependency>
        <groupId>org.springframework</groupId>
        <artifactId>spring-context</artifactId>
        <version>5.0.9.RELEASE</version>
    </dependency>
    <!--解析切入点表达式-->
    <dependency>
        <groupId>org.springframework</groupId>
        <artifactId>spring-aspects</artifactId>
        <version>5.0.9.RELEASE</version>
    </dependency>
</dependencies>
第2步:添加配置beans.xml配置文件
使用xml方式配置
开启注解扫描和生成切面代理对象
<?xml version="1.0" encoding="UTF-8"?>
<beans xmlns="http://www.springframework.org/schema/beans"
       xmlns:xsi="http://www.w3.org/2001/XMLSchema-instance"
       xmlns:aop="http://www.springframework.org/schema/aop"
       xmlns:context="http://www.springframework.org/schema/context"
       xsi:schemaLocation="http://www.springframework.org/schema/beans
            http://www.springframework.org/schema/beans/spring-beans.xsd
            http://www.springframework.org/schema/aop
            http://www.springframework.org/aop/spring-aop.xsd http://www.springframework.org/schema/context http://www.springframework.org/schema/context/spring-context.xsd">

    <!-- 开启自动扫描注解-->
    <context:component-scan base-package="demo"/>

    <!--开启AspectJ生成代理对象-->
    <aop:aspectj-autoproxy></aop:aspectj-autoproxy>

</beans>
使用配置类的方式
package demo;

import org.springframework.context.annotation.ComponentScan;
import org.springframework.context.annotation.Configuration;
import org.springframework.context.annotation.EnableAspectJAutoProxy;

@Configuration //设置为配置文件
@ComponentScan({"demo"}) //组件扫描
@EnableAspectJAutoProxy //开启生成切面的代理对象
public class SpringConfig {
}
第3步:添加一个业务类AccountService
package demo;

import org.springframework.stereotype.Service;

@Service
public class PaperService {
    public void publishUpdate(){
        System.out.println("论文已发布");
    }
    public void updatePaper(){
        System.out.println("论文已修改");
    }
    public void deletePaper(){
        System.out.println("论文已删除");
    }
    public void selectList(){

        System.out.println("查询论文");
    }
}
第4步:添加一个切面类
定义切入点表达式和通知类型
package demo;

import org.aspectj.lang.ProceedingJoinPoint;
import org.aspectj.lang.annotation.*;
import org.springframework.stereotype.Component;

@Component
@Aspect //表示这是一个切面类
public class Logger {

    @Pointcut("execution(* demo.*.*(..))")//设置切入点表达式
    private void pott(){}

    /**
     * 前置通知
     * 应用场景:权限控制(权限不足抛出异常)、记录方法调用信息日志
     */
    @Before("pott()")
    public void beforePrintLog(){
        System.out.println("前置通知Logger类中的beforePrintLog方法开始记录日志******");
    }

    /**
     * 后置通知,在异常时不执行
     * 特点:在目标方法运行后返回值后再增强代码逻辑
     * 应用:与业务相关的,如银行在存取款结束后的发送短信消息
     */
    @AfterReturning("pott()")
    public void afterReturningPrintLog() {
        System.out.println("后置通知Logger类中的afterReturningPrintLog方法开始记录日志=========");
    }

    /**
     * 异常通知
     * 作用:目标代码出现异常,通知执行。记录异常日志、通知管理员(短信、邮件)
     * 应用场景:处理异常(一般不可预知),记录日志
     */
    @AfterThrowing("pott()")
    public void afterThrowingPrintLog() {
        System.out.println("异常通知Logger类中的afterThrowingPrintLog方法开始记录日志++++++++++++");
    }

    /**
     * 最终通知,不管异常与否
     * 作用:不管目标方法是否发生异常,最终通知都会执行(类似于finally代码功能)
     * 应用场景:释放资源 (关闭文件、 关闭数据库连接、 网络连接、 释放内存对象 )
     */
    @After("pott()")
    public void afterPrintLog() {
        System.out.println("最终通知Logger类中的afterPrintLog方法开始记录日志&&&&&&&&&&&&&&&&&&");
    }

    /**
     * 环绕通知
     * 特点:目标方法执行前后,都进行增强(控制目标方法执行)
     * 应用:日志、缓存、权限、性能监控、事务管理
     */
    @Around("pott()")
    public Object aroundPrintLog(ProceedingJoinPoint point){
        //定义返回值
        Object result = null;
        try {
            //获得切入点中方法的参数列表
            Object[] args = point.getArgs();
            //调用前置通知
            beforePrintLog();
            //执行切入点的方法
            result = point.proceed(args);
            //调用后置通知
            afterReturningPrintLog();
        } catch (Exception e){
            //调用异常通知
            afterThrowingPrintLog();
        } catch (Throwable throwable) {
            throwable.printStackTrace();
        }
        return result;
    }

}
第5步:定义测试类进行测试
package demo;

import org.springframework.context.ApplicationContext;
import org.springframework.context.annotation.AnnotationConfigApplicationContext;

public class PaperText {
    public static void main(String[] args) {
        ApplicationContext context=new AnnotationConfigApplicationContext(EatConfig.class);
        PaperService paperService= (PaperService) context.getBean("paperService");
        paperService.publishUpdate();
        paperService.updatePaper();
        paperService.deletePaper();
        paperService.selectList();
    }
}
1.5、知识点补充
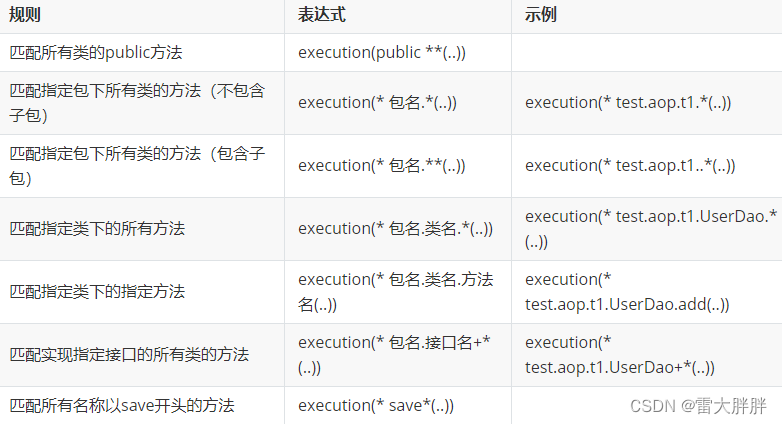
1、切入点表达式的写法-execution函数
关键字:execution(表达式)
表达式:访问修饰符 返回值 包名.包名.包名...类名.方法名
2、Spring中的通知
Spring中一共有5种通知
前置通知(before)、后置通知(returning)、异常通知(throwing)、最终通知(after)、环绕通知(around)

二、案例
2.1、使用AOP记录用户操作日志
需求
1、定义PaperService类,提供发布论文的方法publishPaper、修改论文的方法updatePaper、删除论文的方法deletePaper、查询论文列表的方法selectPaperList
2、要求对论文的发布、修改、删除的操作记录日志,并输出到控制台
实现思路
使用aop的前置通知实现日志的记录功能
2.2、使用AOP实现取款短信的发送功能
需求
1、定义AccountService类,提供取款的方法drawMoney
2、要求在用户取款之后,模拟发送短信给客户(控制台输出”您的账号被取款1000元“)
实现思路
使用AOP的后置通知实现该功能
2.3、使用AOP实现程序异常发送email功能
需求
1、定义UserService类,提供用户注册的方法addUser
2、要求在注册用户的时候模拟一个异常(比如:1/0)
3、要求在程序出现异常之后模拟发送Email给管理员的功能(控制台输出”用户注册功能出现了异常,请及时查看“)
实现思路
使用AOP的异常通知实现该功能
2.3、使用AOP实现查看方法执行的时间
需求
1、定义MyService类,提供计算0-1000累加和的方法doSum
2、要求计算这个方法执行的所用时长(毫秒数)
实现思路
1、使用AOP的环绕通知实现该功能
2、获取当前时间的毫秒数:long timeStap = new Date().getTime();
参考代码
beans.xml
package demo;

import org.springframework.context.annotation.ComponentScan;
import org.springframework.context.annotation.Configuration;
import org.springframework.context.annotation.EnableAspectJAutoProxy;

@Configuration
@ComponentScan({"demo"})
@EnableAspectJAutoProxy
public class SpringConfig {
}
Service
package demo;

import org.springframework.stereotype.Service;

@Service
public class MyService {
    public  void doSum(){
        int sum=0;
        for (int i = 0; i < 101; i++) {
            sum=sum+i;
        }
        System.out.println(sum);
    }
}
MyAspect
package demo;

import org.aspectj.lang.ProceedingJoinPoint;
import org.aspectj.lang.annotation.Around;
import org.aspectj.lang.annotation.Aspect;
import org.aspectj.lang.annotation.Pointcut;
import org.springframework.stereotype.Component;

import java.util.Date;

@Component
@Aspect
public class Myaspect {
    @Pointcut("execution(* demo.MyService.doSum())")
    public void men(){}
    @Around("men()")
    public Object croundSum(ProceedingJoinPoint pro){
        Object result=null;
        try {
            //执行前通知
            long timeStap1=new Date().getTime();
            //执行增强的业务方法
            Object[] arr=pro.getArgs();
            result=pro.proceed(arr);
            //执行后通知
            long timeStap2=new Date().getTime();
            //算出前后的时间差
            long time=timeStap2-timeStap1;
            System.out.println("该方法执行用时"+time+"毫秒");
        } catch (Throwable throwable) {
            throwable.printStackTrace();
        }
        return result;
    }
}
测试类
package demo;

import org.springframework.context.ApplicationContext;
import org.springframework.context.annotation.AnnotationConfigApplicationContext;

public class demoText {
    public static void main(String[] args) {
        ApplicationContext context=new AnnotationConfigApplicationContext(SpringConfig.class);
        MyService  myService= (MyService) context.getBean("myService");
        myService.doSum();

    }
}
本文内容由网友自发贡献,版权归原作者所有,本站不承担相应法律责任。如您发现有涉嫌抄袭侵权的内容,请联系:hwhale#tublm.com(使用前将#替换为@)