夏的热情渐渐退去,秋如期而至,丰收的季节,小编继续着实习之路,走着走着,就走到了购物车,逛过淘宝或者是京东的小伙伴都知道购物车里面的宝贝可不止一件,对于爱购物的姑娘来说,购物车里面的商品恐怕是爆满,添加不进去了,以前逛淘宝的时候,小编没有想过要怎么样实现购物车,就知道在哪儿一个劲儿的逛,但是现在不一样了,小编做为一个开发者,想的就是该如何实现,捣鼓了两天的时间,用listview来实现,已经有模有样了,现在小编就来简单的总结一下实现购物车的心路历程,帮助有需要的小伙伴,欢迎小伙伴们留言交流。
首先,小编简单的介绍一下listview,ListView 控件可使用四种不同视图显示项目。通过此控件,可将项目组成带有或不带有列标头的列,并显示伴随的图标和文本。 可使用 ListView 控件将称作 ListItem 对象的列表条目组织成下列四种不同的视图之一:1.大(标准)图标2.小图标3.列表4.报表 View 属性决定在列表中控件使用何种视图显示项目。还可用 LabelWrap 属性控制列表中与项目关联的标签是否可换行显示。另外,还可管理列表中项目的排序方法和选定项目的外观。今天小编主要和小伙伴们分享一下,如何使用listview实现购物的功能。做过Android的小伙伴都知道一个xml对应一个java类,但是购物车有点不一样,因为她里面的商品有可能不只一件,所以我们需要有两个xml,两个java类,相对应的还需要一个适配器adapter,一个model,下面小编来详细的介绍一下实现购物车的过程。
第一步,写model层,类似我们之前写过的实体层,具体代码如下所示:
/***
 * 说明:购物车的相关信息
 * 作者:丁国华
 * 时间:2015年8月10日 09:41:18
 */
package jczb.shoping.model;

import java.io.Serializable;
import java.util.ArrayList;
import java.util.List;

import android.R.string;

public class shoppingCart implements Serializable {

	    private String proImg;
	    private String ProName;
	    private String shopPrice;
	    private String markPrice;
	    private String proCount;
		public String getProImg() {
			return proImg;
		}
		public void setProImg(String proImg) {
			this.proImg = proImg;
		}
		public String getProName() {
			return ProName;
		}
		public void setProName(String proName) {
			ProName = proName;
		}
		public String getShopPrice() {
			return shopPrice;
		}
		public void setShopPrice(String shopPrice) {
			this.shopPrice = shopPrice;
		}
		public String getMarkPrice() {
			return markPrice;
		}
		public void setMarkPrice(String markPrice) {
			this.markPrice = markPrice;
		}
		public String getProCount() {
			return proCount;
		}
		public void setProCount(String proCount) {
			this.proCount = proCount;
		}

	  }
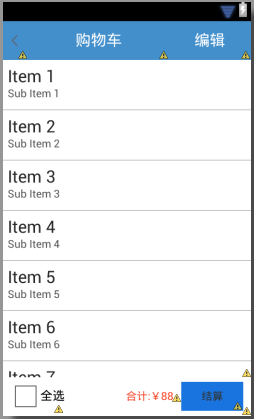
第二步,我们编写xml里面的文件,需要编写两个xml文件,首先我们来编写activity_shoppingcart.xml的文件,代码如下所示:
<?xml version="1.0" encoding="utf-8"?>
<LinearLayout  xmlns:android="http://schemas.android.com/apk/res/android"
    android:layout_width="match_parent"
    android:layout_height="match_parent"
    android:orientation="vertical" >

    <LinearLayout
          android:layout_width="match_parent"
          android:layout_height="50dp"
          android:background="#438FCB"
          android:orientation="horizontal">

          <!-- 尖括号的布局 -->
          <ImageView
               android:layout_width="0dp"
               android:layout_height="match_parent"
               android:layout_weight="1"
               android:padding="8dp"
               android:src="@drawable/tb_icon_actionbar_back" />
         <!-- 购物车的布局 -->
         <TextView
             android:layout_width="0dp"
             android:layout_height="match_parent"
             android:layout_weight="5.49"
             android:gravity="center"
             android:text="购物车"
             android:textColor="#FFFFFF"
             android:textSize="20sp"/>
         <!-- 编辑的布局 -->
         <TextView
             android:layout_width="0dp"
             android:layout_height="match_parent"
             android:layout_weight="3.18"
             android:gravity="center"
             android:text="编辑"
             android:textColor="#FFFFFF"
             android:textSize="20sp" />
    </LinearLayout>
    <!-- listview,购物车里面的东西有可能比较多,需要用listview来进行显示 -->
    <LinearLayout
	            android:layout_width="fill_parent"
	            android:layout_height="wrap_content"
	            android:layout_weight="1"
	            android:orientation="vertical"
	            android:layout_marginTop="0dp">

        <ListView
		     android:id="@+id/cart_shopping_listview"
		     android:layout_width="wrap_content"
		     android:layout_height="wrap_content"
		     android:divider="#808080"
		     android:dividerHeight="0.5dp">
    	</ListView>

    </LinearLayout>

    <LinearLayout
       android:layout_width="match_parent"
       android:layout_height="50dp"
       android:layout_alignParentBottom="true"
       android:orientation="horizontal">
         <!-- 全选的布局 -->
         <CheckBox
             android:layout_width="wrap_content"
             android:layout_height="wrap_content"
             android:layout_marginLeft="10dp"
             android:text="全选"/>
         <!-- 合计的布局 -->
         <TextView
             android:layout_width="0dp"
             android:layout_height="wrap_content"
             android:layout_weight="1"
             android:gravity="right"
             android:paddingRight="10dp"
             android:textColor="#F63A19"
             android:text="合计:¥88"/>
         <!-- 去结算的布局 -->

        <TextView
             android:id="@+id/jiesuan_button"
             android:layout_width="80dp"
             android:layout_height="wrap_content"
             android:layout_marginRight="10dp"
             android:background="@drawable/android_login_color"
             android:gravity="center"
             android:padding="10dp"
             android:text="结算"/>
   </LinearLayout>

</LinearLayout >
我们来看一下xml布局的效果,如下图所示:
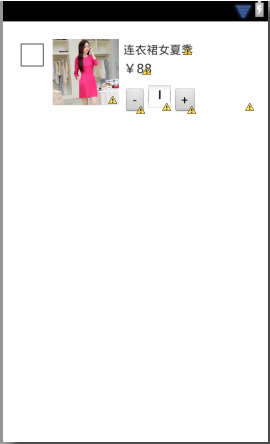
接着我们来布局第二个xml,activity_shoppingcart_item.xml,代码如下所示:
<?xml version="1.0" encoding="utf-8"?>
<LinearLayout xmlns:android="http://schemas.android.com/apk/res/android"
    android:layout_width="match_parent"
    android:layout_height="match_parent"
    android:orientation="vertical" >
    <LinearLayout
       android:layout_width="match_parent"
       android:layout_height="wrap_content"
       android:orientation="horizontal">
         <!-- 小对勾的布局 -->

       <CheckBox
           android:id="@+id/pro_checkbox"
           android:layout_width="wrap_content"
           android:layout_height="wrap_content"
           android:focusable="false"
           android:focusableInTouchMode="false" />

         <!-- 图片布局 -->
         <ImageView
             android:id="@+id/pro_image"
             android:layout_width="80dp"
             android:layout_height="80dp"
             android:layout_margin="5dp"
             android:scaleType="centerCrop"
             android:src="@drawable/detail_show_1"/>
         <!-- 商品名称和价格的布局 -->
         <LinearLayout
             android:layout_width="fill_parent"
             android:layout_height="wrap_content"
             android:orientation="vertical">
             <!-- 商品名称的布局 -->
             <TextView
                 android:id="@+id/pro_name"
                 android:layout_width="wrap_content"
                 android:layout_height="wrap_content"
                 android:layout_marginTop="10dp"
                 android:text="连衣裙女夏季"
                 />
             <!-- 价格的布局 -->

             <LinearLayout
                 android:layout_width="match_parent"
                 android:layout_height="33dp"
                 android:orientation="horizontal" >

		<TextView
			 android:id="@+id/pro_shopPrice"
	                 android:layout_width="wrap_content"
	                 android:layout_height="wrap_content"
	                 android:layout_gravity="bottom"
	                 android:layout_marginTop="10dp"
	                 android:text="¥88"
	                 android:textSize="16sp"/>

			<!-- <TextView
			 android:id="@+id/pro_markPrice"
	                 android:layout_width="wrap_content"
	                 android:layout_height="wrap_content"
	                 android:layout_gravity="bottom"
	                 android:layout_marginTop="10dp"
	                 android:text="¥66"
	                 android:textSize="16sp"/> -->
                </LinearLayout>

             <LinearLayout
                 android:layout_width="150dp"
                 android:layout_height="33dp"
                 android:orientation="horizontal" >
			       <!-- 加号 -->
                  <Button
                      android:id="@+id/pro_add"
                      android:layout_width="wrap_content"
                      android:layout_height="34dp"
                      android:text="+" />

                  <TextView
                     android:id="@+id/pro_count"
	                 android:layout_width="wrap_content"
	                 android:layout_height="wrap_content"
	                 android:layout_gravity="bottom"
	                 android:layout_marginTop="10dp"
	                 android:text="88"
	                 android:textSize="13sp"/>


			         <!-- 减号-->
                    <Button
                      android:id="@+id/pro_reduce"
                      android:layout_width="wrap_content"
                      android:layout_height="34dp"
                      android:layout_marginRight="0dp"
                      android:text="-" />

                 </LinearLayout>
          </LinearLayout>
 </LinearLayout>

</LinearLayout>
布局效果如下所示:
第三步、我们来编写适配器adapter中的代码,即ShoppingCartAdapter,具体代码如下所示:
package jczb.shoping.adapter;

import java.util.List;

import cn.jpush.android.data.r;

import jczb.shoping.adapter.productsListAdapter.ViewHolder;
import jczb.shoping.adapter.productsListAdapter.searchList;
import jczb.shoping.model.productSonSorting_cate;
import jczb.shoping.model.shoppingCart;
import jczb.shoping.model.sonSortigns;
import jczb.shoping.ui.R;
import jczb.shoping.ui.ShoppingCartActivity;
import android.content.Context;
import android.content.Intent;
import android.content.DialogInterface.OnClickListener;
import android.os.Bundle;
import android.view.LayoutInflater;
import android.view.View;
import android.view.ViewGroup;
import android.widget.BaseAdapter;
import android.widget.Button;
import android.widget.CheckBox;
import android.widget.ImageView;
import android.widget.LinearLayout;
import android.widget.TextView;

public class ShoppingCartAdapter extends BaseAdapter {

	private Context mContext;
	private List<shoppingCart> mList;

	public ShoppingCartAdapter(Context mContext,List<shoppingCart> mList) {
		super();
		this.mContext = mContext;
		this.mList = mList;
		}

	@Override
	public int getCount() {
		// TODO Auto-generated method stub
		if (mList==null) {
			return 0;
		}else {
			return this.mList.size();
		}
	}

	@Override
	public Object getItem(int position) {
		// TODO Auto-generated method stub
		if (mList == null) {
			return null;
		} else {
			return this.mList.get(position);
		}
	}

	@Override
	public long getItemId(int position) {
		// TODO Auto-generated method stub
		return position;
	}

	@Override
	public View getView(int position, View convertView, ViewGroup parent) {
		// TODO Auto-generated method stub
		ViewHolder holder = null;
		if (convertView == null) {
			holder = new ViewHolder();
	convertView = LayoutInflater.from(this.mContext).inflate(R.layout.activity_shoppingcart_item, null,true);
			holder.image=(ImageView) convertView.findViewById(R.id.pro_image);
			holder.chose=(CheckBox) convertView.findViewById(R.id.pro_checkbox);
			holder.proName=(TextView) convertView.findViewById(R.id.pro_name);
			holder.proPrice=(TextView)convertView.findViewById(R.id.pro_shopPrice);
			holder.proCount=(TextView) convertView.findViewById(R.id.pro_count);
			convertView.setTag(holder);

		} else {
			holder = (ViewHolder) convertView.getTag();
		}

		if (this.mList != null) {
		    shoppingCart shoppingList=this.mList.get(position);
		    holder.proName.setText(shoppingList.getProName().toString());
		    holder.proPrice.setText(shoppingList.getShopPrice().toString());
		    holder.proCount.setText(shoppingList.getProCount().toString());

		}
		return convertView;
	}

	/*定义item对象*/
	public class ViewHolder {
		ImageView image;
		TextView proName;
		CheckBox chose;
		TextView proPrice;
		TextView proCount;

  }

}
第四步,编写java类里面的代码,我们先来编写ShoppingCartItemActivity.java中的内容,具体代码如下所示:
package jczb.shoping.ui;
import android.app.Activity;
import android.os.Bundle;

public class ShoppingCartItemActivity extends Activity {

	protected void onCreate(Bundle savedInstanceState) {
        super.onCreate(savedInstanceState);
        setContentView(R.layout.activity_shoppingcart_item);

  }
}
第五步,编写ShoppingCartActivity.java里面的内容,如下所示:
package jczb.shoping.ui;

import java.util.HashMap;
import java.util.List;
import java.util.Map;

import jczb.shoping.adapter.ShoppingCartAdapter;
import jczb.shoping.common.AgentApi;
import jczb.shoping.model.shoppingCart;
import jczb.shoping.ui.SearchActivity.ViewHolder;
import jczb.shoping.ui.ShoppingcartActivity2.myThread;

import com.alibaba.fastjson.JSON;

import android.R.string;
import android.app.Activity;
import android.content.Intent;
import android.os.Bundle;
import android.os.Handler;
import android.os.Message;
import android.view.LayoutInflater;
import android.view.View;
import android.view.ViewGroup;
import android.widget.BaseAdapter;
import android.widget.CheckBox;
import android.widget.ImageView;
import android.widget.ListView;
import android.widget.TextView;
import android.widget.Toast;

public class ShoppingCartActivity extends Activity{

	TextView jiesuan,proName,shopPrice,proCount;
	ListView aListView;

	private LayoutInflater layoutInflater;

	private TextView name;

        protected void onCreate(Bundle savedInstanceState) {
        super.onCreate(savedInstanceState);
        setContentView(R.layout.activity_shoppingcart);

        findViewByID();

        /*开始线程*/
       new Thread(new myThread()).start();{

	}


	 /*根据ID找到控件*/
	  public void findViewByID(){
          aListView=(ListView) findViewById(R.id.cart_shopping_listview);
		}
	//开辟线程

		public class myThread implements Runnable {
			public void run() {
				Message msg = new Message();


				try {
					Map<String, String> parmas = new HashMap<String, String>();
					parmas.put("username", "1");
					parmas.put("password", "2");
		String url = "http://192.168.1.110:8080/SchoolShopJson/ShoppingCart.txt";

					// 要发送的数据和访问的地址
					String result = AgentApi.dopost(parmas, url);

 // 如果返回的为空或者初始化时输入的ip地址无效(会返回下面的字符串),说明服务器连接失败!
					if (result == null) {
						// 使用-1代表服务器连接失败
						msg.what = -1;
					} else {
	                    msg.what=1;
	                    msg.obj=result;
					}
				} catch (Exception e) {
					e.printStackTrace();
					// 使用-1代表程序异常
					msg.what = -2;
					msg.obj = e;
				}
				mHandler.sendMessage(msg);

			}
		}

		protected void  initView() {
			// TODO Auto-generated method stub
		}


		 /*子线程-解析数据*/
		 private  Handler mHandler = new Handler(){
	    	public void handleMessage(Message msg) {
				switch (msg.what) {
				case -1:
					Toast.makeText(ShoppingCartActivity.this, "服务器连接失败!",
							Toast.LENGTH_SHORT).show();
					break;
				case -2:
					Toast.makeText(ShoppingCartActivity.this, "哎呀,出错啦...",
							Toast.LENGTH_SHORT).show();
					break;
				case 1:
					String temp = (String)msg.obj;


					//将拿到的json转换为数组
	       List<shoppingCart> ShoppingcartInfo = JSON.parseArray(temp,shoppingCart.class);

		ListView.setAdapter(new ShoppingCartAdapter(ShoppingCartActivity.this, ShoppingcartInfo));
                    break;

				default:
					break;
				}
			}
		};

}
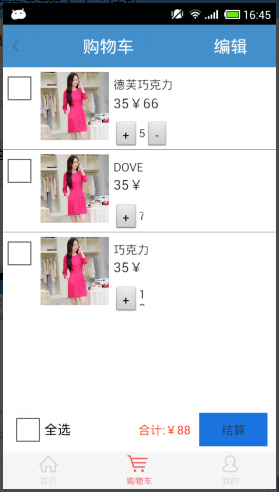
我们来看一下运行的效果,如下所示:
小编寄语:该博文,小编主要简单的介绍了如何实现购物车,使用listview显示多件商品,总的实现思路就是先写model,接着写xml里面,写完xml写adapter适配器里面的内容,最后写java里面的代码。购物车实现了,但是小编到现在还是云里雾里,不过没关系,小编会越挫越勇的,这就是生命的意义,还是那句话对于小编来说,既是挑战更是机遇,因为知识都是相通的,再者来说,在小编的程序人生中,留下最珍贵的记忆,虽然以后小编不一定从事安卓这个行业,代码世界里,很多种事,有的甜蜜,有的温馨,有的婉转成歌,有的绵延不息,在这些故事里,我们唯一的共通之处就是,某年,某月,某个波澜不惊的日子里,曾经很爱很爱你!爱你--这段实习的日子里,安卓带给小编的种种的惊喜。
本文内容由网友自发贡献,版权归原作者所有,本站不承担相应法律责任。如您发现有涉嫌抄袭侵权的内容,请联系:hwhale#tublm.com(使用前将#替换为@)