介绍

Protocol Buffers and gRPC是用于定义通过网络有效通信的微服务的流行技术。许多公司在Go中构建gRPC微服务,发布了他们开发的框架,本文将从gRPC入门开始,一步一步构建一个gRPC服务。
本文的源代码已经上传至Github。
背景
之前在B站看过一个gRPC教学视频,尝试跟着视频做但踩了不少的坑,因此决定自己动手从官方教程开始,完成一个gRPC项目。
开始
环境配置
首先要配置gRPC所需要的一些环境,由于本人使用Go语言进行开发,操作系统为Ubuntu20.04,因此配置gRPC-go的环境步骤很简单。
安装Go
Ubuntu下安装Go需要先下载Go的源码,本人采用的Go版本为1.18.3,源码下载地址为Go语言中文网:go1.18.3.linux-amd64.tar.gz。
下载完毕后,首先检查机器是否存在旧版本的Go,如果存在则删除,然后解压源码到/usr/local。
rm -rf /usr/local/go && tar -C /usr/local -xzf go1.18.3.linux-amd64.tar.gz
添加/usr/local/go/bin到环境变量中,可以在命令行中直接执行:
export PATH=$PATH:/usr/local/go/bin
注意:在命令行中执行上述语句,只会在当前命令行环境下生效,如果关闭命令行后再执行go命令会报错,要解决这个问题,需要将这个语句添加到$HOME/.profile或/etc/profile中,并使用source命令生效
上述步骤完成后,检查Go环境是否安装成功:
go version
输出相应版本号则代表环境配置成功。
go version go1.18.3 linux/amd64
在这里,配置Go的proxy为国内代理,方便之后下载安装package时网速问题,由于安装的Go是1.13及以上的版本,因此直接执行以下命令。
go env -w GO111MODULE=on
go env -w GOPROXY=https://goproxy.cn,direct
安装Protocol buffer compiler
Ubuntu上使用apt或者apt-get安装Protocol buffer compiler,命令如下:
sudo apt install -y protobuf-compiler
检查是否安装成功:
protoc --version
输出相应版本号则代表环境配置成功。
libprotoc 3.6.1
配置Go plugins
在配置Go plugins时,遇到了很多错误。
--go_out: protoc-gen-go: plugins are not supported; use 'protoc --go-grpc_out=...' to generate gRPC
或
protoc-gen-go-grpc: program not found or is not executable
网上的解决方法也不一定奏效,最后还是选择按照官网上的步骤安装对应版本的protoc-gen-go和protoc-gen-go-grpc。
go install google.golang.org/protobuf/cmd/protoc-gen-go@v1.28
go install google.golang.org/grpc/cmd/protoc-gen-go-grpc@v1.2
注意这里都是从goole.golang.org下载的package
更新环境变量,将下面的命令添加到$HOME/.profile或/etc/profile中,source使之生效。
export PATH="$PATH:$(go env GOPATH)/bin"
到此为之,gRPC-go的环境就算配置完成了。
gRPC接口定义
.proto文件
第一步首先定义gRPC服务以及方法请求和响应类型。要定义服务,请在.proto文件中指定命名服务:
service NewService {
  rpc GetHotTopNews(Request) returns (News) {}
}
然后在服务定义中定义RPC方法,指定它们的请求和响应类型。gRPC允许您定义四种服务方法:
- 一个简单的RPC,其中客户端使用存根向服务端发送请求并等待响应返回,就像正常的函数调用一样。
// Obtains the feature at a given position.
rpc GetFeature(Point) returns (Feature) {}
- 服务端流式RPC,客户端向服务端发送请求并获取流以读回一系列消息。客户端从返回的流中读取,直到没有更多消息为止。
// Obtains the Features available within the given Rectangle.  Results are
// streamed rather than returned at once (e.g. in a response message with a
// repeated field), as the rectangle may cover a large area and contain a
// huge number of features.
rpc ListFeatures(Rectangle) returns (stream Feature) {}
- 客户端流式RPC,其中客户端写入一系列消息并将它们发送到服务端,再次使用提供的流。一旦客户端完成了消息的写入,它会等待服务端读取所有消息并返回其响应。可以通过将stream关键字放在请求类型之前来指定客户端流式处理方法。
// Accepts a stream of Points on a route being traversed, returning a
// RouteSummary when traversal is completed.
rpc RecordRoute(stream Point) returns (RouteSummary) {}
- 双向流式RPC,双方使用读写流发送一系列消息。这两个流独立运行,因此客户端和服务端可以按照他们喜欢的任何顺序读取和写入:例如,服务端可以在写入响应之前等待接收所有客户端消息,或者它可以交替读取消息然后写入消息,或其他一些读取和写入的组合,保留每个流中消息的顺序。可以通过在请求和响应之前放置stream关键字来指定这种类型的方法。
// Accepts a stream of RouteNotes sent while a route is being traversed,
// while receiving other RouteNotes (e.g. from other users).
rpc RouteChat(stream RouteNote) returns (stream RouteNote) {}
我们将要实现一个获取热点新闻的gRPC接口,.proto文件包含服务方法中使用的所有请求和响应类型的协议缓冲区消息类型定义。例如,这里是Request消息类型:
message Request {
  string type = 1;
  int64 page = 2;
  int64 size = 3;
  int64 is_filter = 4;
}
以及Response定义:
message Response { repeated New news = 1; }
其中New的结构定义为:
message New {
  string uniquekey = 1;
  string title = 2;
  string date = 3;
  string category = 4;
  string author_name = 5;
  string url = 6;
  string thumbnail_pic_s = 7;
  int64 is_content = 8;
}
最后定义RPC接口:
syntax = "proto3";

```go
在这里插入代码片
option go_package = “./;protobuf”;
package protobuf;
service NewService {
rpc GetHotTopNews(Request) returns (Response) {}
}
注意这里加上了option go_package = "./;protobuf";,说明生成的pb.go的package名称。
### protoc命令
接下来,我们需要从.proto服务定义中生成gRPC客户端和服务端接口。我们使用带有特殊gRPC Go插件的protobuf compiler来执行此操作。
```bash
protoc --go_out=. --go_opt=paths=source_relative --go-grpc_out=. --go-grpc_opt=paths=source_relative protobuf/*.proto
会在.proto文件同级目录下生成以下go文件:
- news.pb.go,其中包含用于填充、序列化和检索请求和响应消息类型的所有协议缓冲区代码
- news_grpc.pb.go,包含:1)客户端使用服务中定义的方法调用的接口类型(或存根);2)服务端要实现的接口类型,也使用服务中定义的方法。
这里我使用VS code进行开发,在编写.proto文件时推荐使用两个插件:
- vscode-proto3:用于识别.proto文件的一些语法
- clang-format:用于格式化.proto文件,需要使用sudo apt install clang-format,并且按照插件说明进行相应配置
Go服务构建
server
服务端需要实现gRPC的接口,首先定义一个结构体:
type Server struct {
	protobuf.UnimplementedNewServiceServer
}
继承了生成的pb.go文件中的UnimplementedNewServiceServer,接着实现接口内的方法:
func (s *Server) GetHotTopNews(ctx context.Context, req *protobuf.Request) (*protobuf.Response, error) {
	ret := srv.RequestPublishAPI()
	return &protobuf.Response{
		News: ret,
	}, nil
}
这样,最基本的gRPC服务就能启动了。
func main() {
s := grpc.NewServer()
protobuf.RegisterNewServiceServer(s, &Server{})
flag.Parse()
lis, err := net.Listen("tcp", fmt.Sprintf(":%d", *port))
if err != nil {
log.Fatalf("failed to listen: %v", err)
}
log.Printf("server listening at %v", lis.Addr())
if err := s.Serve(lis); err != nil {
log.Fatalf("failed to serve: %v", err)
}
}
client
同样的,我们用go编写一个客户端来请求测试gRPC服务是否能工作。
var (
addr = flag.String("addr", "localhost:50051", "the address to connect to")
)
func main() {
flag.Parse()
conn, err := grpc.Dial(*addr, grpc.WithTransportCredentials(insecure.NewCredentials()))
if err != nil {
log.Fatalf("did not connect: %v", err)
}
defer conn.Close()
c := protobuf.NewNewServiceClient(conn)
ctx, cancel := context.WithTimeout(context.Background(), time.Second)
defer cancel()
r, err := c.GetHotTopNews(ctx, &protobuf.Request{})
if err != nil {
log.Fatalf("could not greet: %v", err)
}
for _, v := range r.GetNews() {
fmt.Println(v)
}
}
至此,一个简单的gRPC服务就已经全部完成了,但我们获取热点新闻的接口是伪造的,因此我们加入免费的获取热点新闻API到项目中,让客户端有实际返回,API主要逻辑如下:
type NewService struct {
apiUri string
apiKey string
reqType string
page int
size int
isFilter int
}
func (s *NewService) RequestPublishAPI() []*protobuf.New {
reqUrl := fmt.Sprintf("%s?type=%s&page=%d&page_size=%d&is_filter=%d&key=%s", s.apiUri, s.reqType, s.page, s.size, s.isFilter, s.apiKey)
log.Printf("request url: %s", reqUrl)
method := "GET"
client := &http.Client{}
req, err := http.NewRequest(method, reqUrl, nil)
if err != nil {
panic(err)
}
res, err := client.Do(req)
if err != nil {
panic(err)
}
defer res.Body.Close()
body, err := ioutil.ReadAll(res.Body)
if err != nil {
panic(err)
}
var resp ApiResponse
err = json.Unmarshal(body, &resp)
if err != nil {
panic(err)
}
var ret []*protobuf.New
for _, n := range resp.Result.Data {
isContent, _ := strconv.Atoi(n.IsContent)
ret = append(ret, &protobuf.New{
Uniquekey: n.Uniquekey,
Title: n.Title,
Date: n.Date,
Category: n.Category,
AuthorName: n.AuthorName,
Url: n.Url,
ThumbnailPicS: n.ThumbnailPicS,
IsContent: int64(isContent),
})
}
return ret
}
Test
我们来看一下目前的测试效果,首先启动gRPC服务:
cd cmd/server && go build -o server . && ./server
输出结果如下则表示正常启动。
2022/07/08 22:56:19 server listening at [::]:50051
然后启动客户端来发送gRPC请求:
cd cmd/client && go build -o client . && ./client
可以看到会如同客户端程序逻辑预期,输出了热点新闻:
uniquekey:"e36249942bd61b566293a0f658a70861"  title:"醉酒乘客“遗失”巨额财物,原来竟是……"  date:"2022-07-08 22:28:00"  category:"头条"  author_name:"每日新闻汇"  url:"https://mini.eastday.com/mobile/220708222828059733118.html"  thumbnail_pic_s:"https://dfzximg02.dftoutiao.com/news/20220708/20220708222828_7250d5750196c6ca896094cf9e9b7910_1_mwpm_03201609.jpeg"  is_content:1
uniquekey:"d0b9d2392e764b05be7fc3903ae8cf0e"  title:"上海药房严守防疫阵地,按防疫要求销售发烧感冒药"  date:"2022-07-08 22:28:00"  category:"头条"  author_name:"上观新闻,供稿:人民资讯"  url:"https://mini.eastday.com/mobile/220708222828022564952.html"  thumbnail_pic_s:"https://dfzximg02.dftoutiao.com/news/20220708/20220708222828_59a73fae2c240c9d4dc56877af1cf021_1_mwpm_03201609.jpeg"  is_content:1
uniquekey:"22d3605020cdcd1b3e36389812d9f57f"  title:"新疆有个县城,却迎来了第一座属于自己的机场,看看吧"  date:"2022-07-08 22:27:00"  category:"头条"  author_name:"笑谈社会现象"  url:"https://mini.eastday.com/mobile/220708222748804215251.html"  thumbnail_pic_s:"https://dfzximg02.dftoutiao.com/minimodify/20220708/640x376_62c83ee45b71b_mwpm_03201609.jpeg"  is_content:1
uniquekey:"ee7520b15386bb24835556621135b7c7"  title:"长沙一辆保时捷越野车突发自燃!如何避免夏季车辆“上火”?"  date:"2022-07-08 22:27:00"  category:"头条"  author_name:"长沙晚报,供稿:人民资讯"  url:"https://mini.eastday.com/mobile/220708222722680289302.html"  thumbnail_pic_s:"https://dfzximg02.dftoutiao.com/news/20220708/20220708222722_20a12760617fdaf73ba22cbeaae5a670_1_mwpm_03201609.jpeg"  is_content:1
uniquekey:"5b3346570ca64b911934c9c4c958150f"  title:"知名品牌婴儿水育加盟店人去楼空 宝妈们遭遇退费难"  date:"2022-07-08 22:27:00"  category:"头条"  author_name:"长沙晚报,供稿:人民资讯"  url:"https://mini.eastday.com/mobile/220708222722516745726.html"  thumbnail_pic_s:"https://dfzximg02.dftoutiao.com/news/20220708/20220708222722_476ac09f92bc5047938cbeecdef5a293_1_mwpm_03201609.jpeg"  is_content:1
uniquekey:"4b47df2a78934af1cacaf6fac844579b"  title:"图说│惊险!面包车撞树驾驶员被困,消防员“钳”来解救"  date:"2022-07-08 22:26:00"  category:"头条"  author_name:"文汇报,供稿:人民资讯"  url:"https://mini.eastday.com/mobile/220708222616778303564.html"  thumbnail_pic_s:"https://dfzximg02.dftoutiao.com/news/20220708/20220708222616_07827127554548d4dd870205b517fda5_1_mwpm_03201609.jpeg"  is_content:1
uniquekey:"9beb3c60231daa82a18c03bbad43280c"  title:"6家经营户限期整改!青岛对“雪糕刺客”出手了"  date:"2022-07-08 22:25:00"  category:"头条"  author_name:"半岛都市报,供稿:人民资讯"  url:"https://mini.eastday.com/mobile/220708222514489900651.html"  thumbnail_pic_s:"https://dfzximg02.dftoutiao.com/news/20220708/20220708222514_c973a3b8b0ab7308158acf353cc32afa_1_mwpm_03201609.jpeg"  is_content:1
uniquekey:"0849aacfb2488478bd2a9147ff6d70c2"  title:"大陆台企积极呼应“双碳”战略"  date:"2022-07-08 22:24:00"  category:"头条"  author_name:"新华网,供稿:人民资讯"  url:"https://mini.eastday.com/mobile/220708222407637690082.html"  is_content:1
uniquekey:"d1a5bed91210467f0536fa1a77dfbf3a"  title:"质量问题受关注!上半年四川消委组织受理相关投诉案件10277件"  date:"2022-07-08 22:23:00"  category:"头条"  author_name:"川观新闻,供稿:人民资讯"  url:"https://mini.eastday.com/mobile/220708222331274896200.html"  is_content:1
uniquekey:"98161b2c5703e64a5881a3b1e778a04a"  title:"三河7月9日将在重点区域开展免费核酸检测服务"  date:"2022-07-08 22:20:00"  category:"头条"  author_name:"岛民观察"  url:"https://mini.eastday.com/mobile/220708222048455355795.html"  thumbnail_pic_s:"https://dfzximg02.dftoutiao.com/minimodify/20220708/1080x593_62c83d400941c_mwpm_03201609.jpeg"  is_content:1
可视化展示
gRPC的特性之一就是跨平台跨语言通信,因此我们可以使用一个简单的react工程来做前端的可视化展示。
准备工作
在确保nodejs以及npm命令可以使用后,使用create-react-app来创建react工程
npx create-react-app web
- 现在就像我们之前为Go所做的那样,我们需要为Javascript生成客户端和服务端代码。为此,可以再次使用我们的news.proto 文件。在web/src目录中创建一个名为newspb/protobuf的目录来存储我们生成的文件。但是由于我们的客户端将是浏览器客户端,所以我们将不得不使用grpc-web。
大多数现代浏览器尚未支持HTTP/2。由于gRPC使用HTTP/2,因此需要grpc-web让浏览器客户端与gRPC服务器通信。grpc-web允许HTTP/1与Envoy等代理一起使用,这有助于将HTTP/1转换为HTTP/2。
- 确保已安装protoc-gen-grpc-web插件 → https://github.com/grpc/grpc-web
- 运行以下命令生成相应code
protoc protobuf/*.proto --js_out=import_style=commonjs:./web/src/newspb --grpc-web_out=import_style=commonjs,mode=grpcwebtext:./web/src/newspb
- 在web/src/newspb/protobuf下可以找到生成的news_pb.js和news_grpc_web_pb.js
设置envoy
新建envoy.yaml,配置如下:
admin:
  access_log_path: /tmp/admin_access.log
  address:
    socket_address: { address: 0.0.0.0, port_value: 9000 }

static_resources:
  listeners:
  - name: listener_0
    address:
      socket_address: { address: 0.0.0.0, port_value: 8000 }
    filter_chains:
    - filters:
      - name: envoy.http_connection_manager
        config:
          codec_type: auto
          stat_prefix: ingress_http
          route_config:
            name: local_route
            virtual_hosts:
            - name: local_service
              domains: ["*"]
              routes:
              - match: { prefix: "/" }
                route:
                  cluster: news_service
                  max_grpc_timeout: 0s
              cors:
                allow_origin:
                - "*"
                allow_methods: GET, PUT, DELETE, POST, OPTIONS
                allow_headers: keep-alive,user-agent,cache-control,content-type,content-transfer-encoding,custom-header-1,x-accept-content-transfer-encoding,x-accept-response-streaming,x-user-agent,x-grpc-web,grpc-timeout
                max_age: "1728000"
                expose_headers: custom-header-1,grpc-status,grpc-message
          http_filters:
          - name: envoy.grpc_web
          - name: envoy.cors
          - name: envoy.router
  clusters:
  - name: news_service
    connect_timeout: 50s
    type: logical_dns
    http2_protocol_options: {}
    lb_policy: round_robin
    hosts: [{ socket_address: { address: 172.17.0.1, port_value: 50051 }}]
- 其中,在clusters的配置中,hosts指向后端服务的地址,因此端口号为50051
- envoy.yaml文件中,实质上是在要求Envoy在端口8000上运行一个监听器来监听下游流量。 然后将任何到达它的流量引导到news_service,这是在端口 0051上运行的 gRPC 服务器
完成配置后,新建Dockerfile
FROM envoyproxy/envoy:v1.12.2

COPY ./envoy/envoy.yaml /etc/envoy/envoy.yaml

CMD /usr/local/bin/envoy -c /etc/envoy/envoy.yaml
打包一个docker镜像:
docker build -t grpc-starter-envoy:1.0 .
然后运行:
docker run --network=host grpc-starter-envoy:1.0
这样,我们的envoy代理就设置完成了。
完善react项目
首先添加一些依赖:
npm install grpc-web --save
npm install google-protobuf --save
我们在web/src/App.js中实现react项目的所有逻辑:
import { Request } from "./newspb/protobuf/news_pb";
import { NewServiceClient } from "./newspb/protobuf/news_grpc_web_pb";
首先,分别导入Request和NewServiceClient来发送请求和生成客户端。
var client = new NewServiceClient("http://localhost:8000", null, null);
核心请求逻辑:
var request = new Request();
client.getHotTopNews(request, {}, (error, reply) => {
  if (!error) {
    console.log(reply.getNewsList());
  } else {
    console.log(error);
  }
});
当请求成功时,JavaScript的控制台将会打印出热点新闻列表。我们接着可以加入一些UI框架来美化展示,这里选用最流行的material ui框架集成到项目中。
npm install @mui/material @emotion/react @emotion/styled
在web/src/App.js中添加以下代码:
import React, { useEffect } from "react";
import { Request } from "./newspb/protobuf/news_pb";
import { NewServiceClient } from "./newspb/protobuf/news_grpc_web_pb";
import Box from "@mui/material/Box";
import Container from "@mui/material/Container";
import InputLabel from "@mui/material/InputLabel";
import MenuItem from "@mui/material/MenuItem";
import FormControl from "@mui/material/FormControl";
import Select from "@mui/material/Select";
import TextField from "@mui/material/TextField";
import Grid from "@mui/material/Grid";
import Avatar from "@mui/material/Avatar";
import Typography from "@mui/material/Typography";
import Card from "@mui/material/Card";
import CardHeader from "@mui/material/CardHeader";
import CardMedia from "@mui/material/CardMedia";
import CardContent from "@mui/material/CardContent";
import CardActions from "@mui/material/CardActions";
import Link from "@mui/material/Link";
import { red } from "@mui/material/colors";
import NotFound from "./notfound.gif";

var client = new NewServiceClient("http://localhost:8000", null, null);

function App() {
  const [newsList, setNewsList] = React.useState([]);

  const getHotNews = () => {
    var request = new Request();
    client.getHotTopNews(request, {}, (error, reply) => {
      if (!error) {
        setNewsList(reply.getNewsList());
      } else {
        console.log(error);
      }
    });
  };

  useEffect(() => {
    getHotNews();
  }, []);

  return (
    <Container>
      <Box>
        <FormControl sx={{ m: 1, minWidth: 120 }}>
          <InputLabel htmlFor="type-select">Type</InputLabel>
          <Select defaultValue="top" id="type-select" label="Type">
            <MenuItem value={"top"}>默认</MenuItem>
            <MenuItem value={"guonei"}>国内</MenuItem>
            <MenuItem value={"guoji"}>国际</MenuItem>
            <MenuItem value={"yule"}>娱乐</MenuItem>
            <MenuItem value={"tiyu"}>体育</MenuItem>
            <MenuItem value={"junshi"}>军事</MenuItem>
            <MenuItem value={"keji"}>科技</MenuItem>
            <MenuItem value={"caijing"}>财经</MenuItem>
            <MenuItem value={"youxi"}>游戏</MenuItem>
            <MenuItem value={"qiche"}>汽车</MenuItem>
            <MenuItem value={"jiankang"}>健康</MenuItem>
          </Select>
        </FormControl>
        <FormControl sx={{ m: 1, minWidth: 120 }}>
          <TextField id="page-select" label="Page" variant="outlined" />
        </FormControl>
        <FormControl sx={{ m: 1, minWidth: 120 }}>
          <InputLabel htmlFor="size-select">Size</InputLabel>
          <Select defaultValue="5" id="size-select" label="Size">
            <MenuItem value={5}>5</MenuItem>
            <MenuItem value={10}>10</MenuItem>
            <MenuItem value={20}>20</MenuItem>
            <MenuItem value={30}>30</MenuItem>
          </Select>
        </FormControl>
      </Box>
      <Box>
        <Grid
          container
          spacing={{ xs: 2, md: 3 }}
          columns={{ xs: 4, sm: 8, md: 12 }}
        >
          {newsList.map((value, index) => (
            <Grid item xs={2} sm={4} md={4}>
              <Card>
                <CardHeader
                  avatar={
                    <Avatar sx={{ bgcolor: red[500] }} aria-label="recipe">
                      {value.array[4][0]}
                    </Avatar>
                  }
                  title={value.array[4] + value.array[3]}
                  subheader={value.array[2]}
                />
                {value.array[6] === null ||
                value.array[6] === undefined ||
                value.array[6] === "" ? (
                  <CardMedia
                    component="img"
                    height="194"
                    image={NotFound}
                    alt="News cover"
                  />
                ) : (
                  <CardMedia
                    component="img"
                    height="194"
                    image={value.array[6]}
                    alt="News cover"
                  />
                )}
                <CardContent>
                  <Typography variant="body2" color="text.secondary">
                    {value.array[1]}
                  </Typography>
                </CardContent>
                <CardActions>
                  <Link
                    href={value.array[5]}
                    underline="none"
                    target="_blank"
                    rel="noopener"
                  >
                    原文链接
                  </Link>
                </CardActions>
              </Card>
            </Grid>
          ))}
        </Grid>
      </Box>
    </Container>
  );
}

export default App;
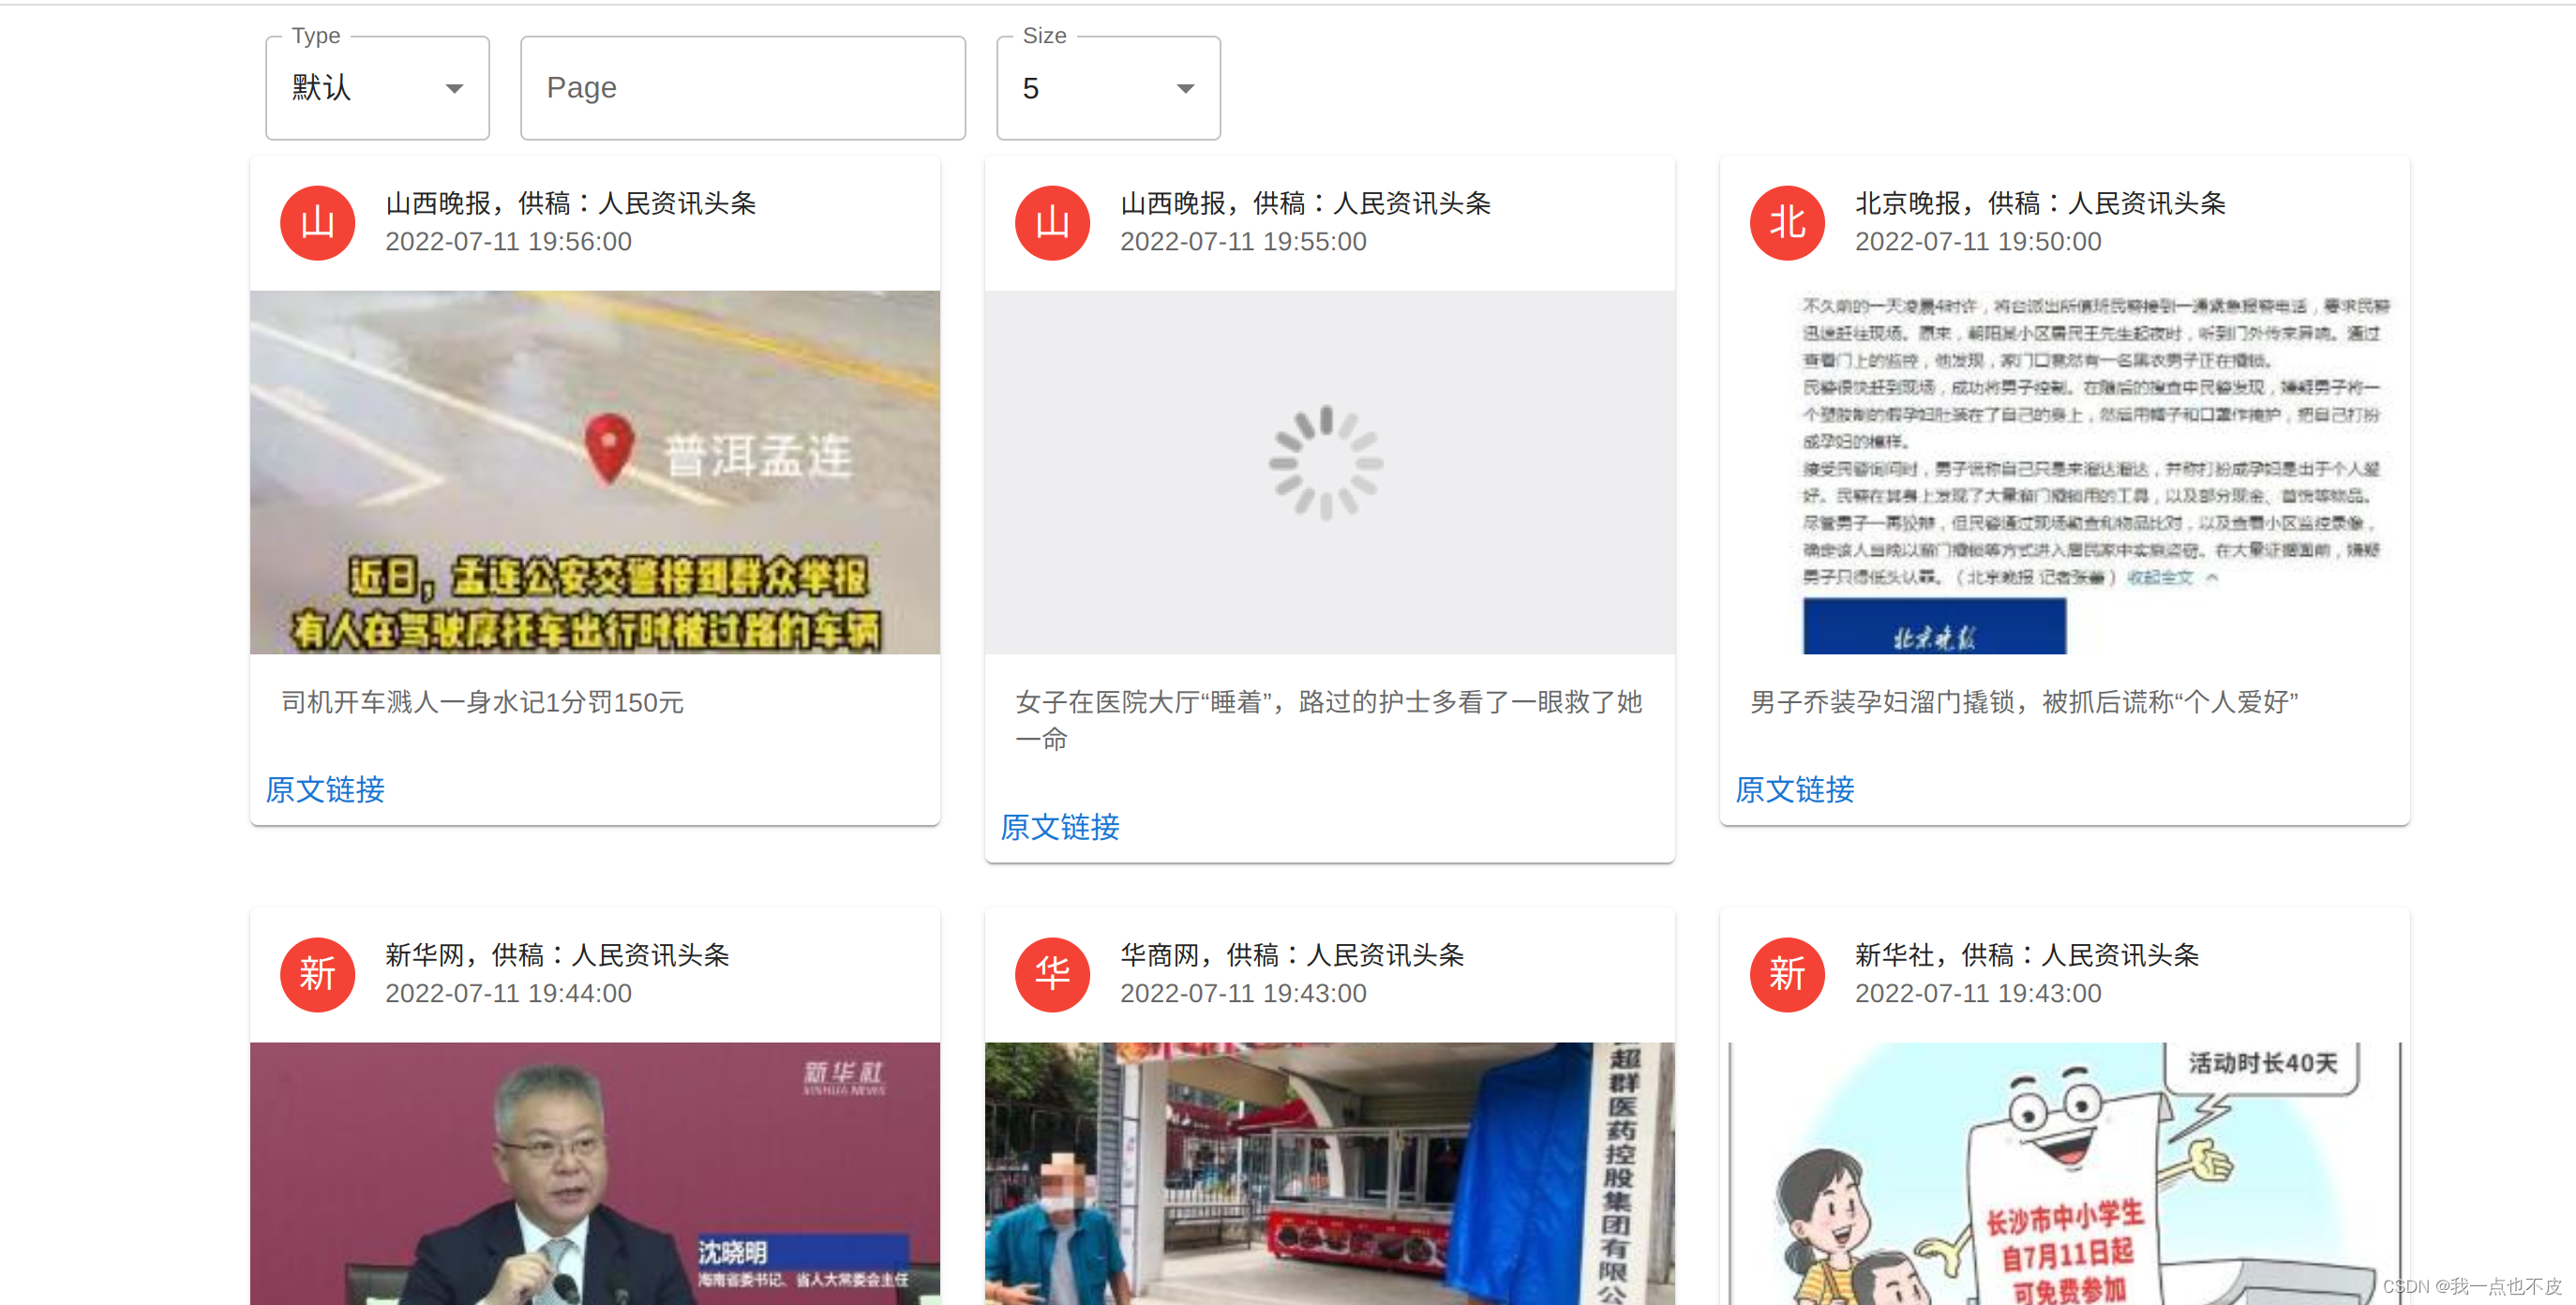
展示效果:
最后解决request参数问题,对服务端的改动如下,首先修改gRPC的server实现方法。
cmd/server/main.go
func (s *Server) GetHotTopNews(ctx context.Context, req *protobuf.Request) (*protobuf.Response, error) {
ret := srv.RequestPublishAPI(req)
return &protobuf.Response{
News: ret,
}, nil
}
修改发送请求到公共API的逻辑:
service/news.go
func (s *NewService) RequestPublishAPI(request *protobuf.Request) []*protobuf.New {
if request.GetType() != "" {
s.reqType = request.GetType()
}
if request.GetPage() != 0 {
s.page = int(request.GetPage())
}
if request.GetSize() != 0 {
s.size = int(request.GetSize())
}
...
}
在web/src/App.js中加入相关事件处理函数。
import React, { useEffect } from "react";
import { Request } from "./newspb/protobuf/news_pb";
import { NewServiceClient } from "./newspb/protobuf/news_grpc_web_pb";
import Box from "@mui/material/Box";
import Container from "@mui/material/Container";
import InputLabel from "@mui/material/InputLabel";
import MenuItem from "@mui/material/MenuItem";
import FormControl from "@mui/material/FormControl";
import Select from "@mui/material/Select";
import TextField from "@mui/material/TextField";
import Grid from "@mui/material/Grid";
import Avatar from "@mui/material/Avatar";
import Typography from "@mui/material/Typography";
import Card from "@mui/material/Card";
import CardHeader from "@mui/material/CardHeader";
import CardMedia from "@mui/material/CardMedia";
import CardContent from "@mui/material/CardContent";
import CardActions from "@mui/material/CardActions";
import Link from "@mui/material/Link";
import { red } from "@mui/material/colors";
import NotFound from "./notfound.gif";

var client = new NewServiceClient("http://localhost:8000", null, null);

function App() {
  const [newsList, setNewsList] = React.useState([]);
  const [type, setType] = React.useState("top");
  const [page, setPage] = React.useState(1);
  const [size, setSize] = React.useState(10);

  const handleTypeChange = (event) => {
    setType(event.target.value);
    console.log(event.target.value);
    getHotNews(event.target.value, page, size);
  };

  const handleSizeChange = (event) => {
    setSize(event.target.value);
    console.log(event.target.value);
    getHotNews(type, page, event.target.value);
  };

  const handlePageChange = (event) => {
    setPage(event.target.value);
    console.log(event.target.value);
    getHotNews(type, event.target.value, size);
  };

  const getHotNews = (type, page, size) => {
    console.log(type, page, size);
    var request = new Request();
    request.setType(type);
    request.setPage(page);
    request.setSize(size);
    client.getHotTopNews(request, {}, (error, reply) => {
      if (!error) {
        setNewsList(reply.getNewsList());
      } else {
        console.log(error);
      }
    });
  };

  useEffect(() => {
    getHotNews(type, page, size);
  }, [type, page, size]);

  return (
    <Container>
      <Box>
        <FormControl sx={{ m: 1, minWidth: 120 }}>
          <InputLabel htmlFor="type-select">Type</InputLabel>
          <Select
            defaultValue="top"
            id="type-select"
            label="Type"
            value={type}
            onChange={handleTypeChange}
          >
            <MenuItem value={"top"}>默认</MenuItem>
            <MenuItem value={"guonei"}>国内</MenuItem>
            <MenuItem value={"guoji"}>国际</MenuItem>
            <MenuItem value={"yule"}>娱乐</MenuItem>
            <MenuItem value={"tiyu"}>体育</MenuItem>
            <MenuItem value={"junshi"}>军事</MenuItem>
            <MenuItem value={"keji"}>科技</MenuItem>
            <MenuItem value={"caijing"}>财经</MenuItem>
            <MenuItem value={"youxi"}>游戏</MenuItem>
            <MenuItem value={"qiche"}>汽车</MenuItem>
            <MenuItem value={"jiankang"}>健康</MenuItem>
          </Select>
        </FormControl>
        <FormControl sx={{ m: 1, minWidth: 120 }}>
          <TextField
            id="page-select"
            label="Page"
            variant="outlined"
            value={page}
            onChange={handlePageChange}
          />
        </FormControl>
        <FormControl sx={{ m: 1, minWidth: 120 }}>
          <InputLabel htmlFor="size-select">Size</InputLabel>
          <Select
            defaultValue="5"
            id="size-select"
            label="Size"
            value={size}
            onChange={handleSizeChange}
          >
            <MenuItem value={5}>5</MenuItem>
            <MenuItem value={10}>10</MenuItem>
            <MenuItem value={20}>20</MenuItem>
            <MenuItem value={30}>30</MenuItem>
          </Select>
        </FormControl>
      </Box>
      <Box>
        <Grid
          container
          spacing={{ xs: 2, md: 3 }}
          columns={{ xs: 4, sm: 8, md: 12 }}
        >
          {newsList.map((value, index) => (
            <Grid item xs={2} sm={4} md={4}>
              <Card>
                <CardHeader
                  avatar={
                    <Avatar sx={{ bgcolor: red[500] }} aria-label="recipe">
                      {value.array[4][0]}
                    </Avatar>
                  }
                  title={value.array[4] + value.array[3]}
                  subheader={value.array[2]}
                />
                {value.array[6] === null ||
                value.array[6] === undefined ||
                value.array[6] === "" ? (
                  <CardMedia
                    component="img"
                    height="194"
                    image={NotFound}
                    alt="News cover"
                  />
                ) : (
                  <CardMedia
                    component="img"
                    height="194"
                    image={value.array[6]}
                    alt="News cover"
                  />
                )}
                <CardContent>
                  <Typography variant="body2" color="text.secondary">
                    {value.array[1]}
                  </Typography>
                </CardContent>
                <CardActions>
                  <Link
                    href={value.array[5]}
                    underline="none"
                    target="_blank"
                    rel="noopener"
                  >
                    原文链接
                  </Link>
                </CardActions>
              </Card>
            </Grid>
          ))}
        </Grid>
      </Box>
    </Container>
  );
}

export default App;
Dockerlize
我们将build三个docker镜像,分别提供go-grpc-server、envoy代理以及react-web服务,因此在项目根目录下新建docker-compose.yaml文件
version: '3'
services:
  proxy:
    build:
      context: ./envoy
      dockerfile: Dockerfile
    ports:
      - "8000:8000"

  go-grpc-server:
    build:
      context: .
      dockerfile: Dockerfile
    ports:
    - "50051:50051"
    depends_on:
      - proxy

  web-client:
    build:
      context: ./web
      dockerfile: Dockerfile
    ports:
      - "3000:80"
    depends_on:
      - go-grpc-server
      - proxy
    tty: true
envoy的Dockerfile之前已经有过介绍,这里将之前的Dockerfile移到envoy目录下,路径稍微修改:
envoy/Dockerfile
FROM envoyproxy/envoy:v1.12.2

COPY ./envoy.yaml /etc/envoy/envoy.yaml

CMD /usr/local/bin/envoy -c /etc/envoy/envoy.yaml
在web目录下新建Dockerfile,提供react-web镜像。
web/Dockerfile
FROM node:16.15.1-alpine as build
WORKDIR /app
ENV PATH /app/node_modules/.bin:$PATH
COPY package.json ./
COPY package-lock.json ./
RUN npm ci --silent
RUN npm install react-scripts@5.0.1 -g --silent
COPY . ./
RUN npm run build

FROM nginx:stable-alpine
COPY --from=build /app/build /usr/share/nginx/html
EXPOSE 80
CMD ["nginx", "-g", "daemon off;"]
最后,在项目根目录下新建Dockerfile,提供gRPC服务。
FROM golang:1.18-alpine

ENV GO111MODULE=on \
    GOPROXY=https://goproxy.cn,direct

WORKDIR $GOPATH/src/github.com/surzia/grpc-starter

COPY . .
RUN go mod download

RUN go build -o server .

EXPOSE 50051

CMD [ "./server" ]
编译docker-compose.yaml为镜像:
docker compose build
运行整个项目
docker compose up -d
项目启动后打开浏览器,输入http://localhost:3000 即可访问
结论
本文从零开始,构建了gRPC服务,采用到的技术栈包含Go+react+gRPC+Docker+envoy。源代码已经上传至Github - surzia/grpc-starter

本文内容由网友自发贡献,版权归原作者所有,本站不承担相应法律责任。如您发现有涉嫌抄袭侵权的内容,请联系:hwhale#tublm.com(使用前将#替换为@)