文章目录
- Nginx源码学习
- 基本数据结构
- 1、字符串结构:ngx_str_t
- 2、类似资源管理的结构:ngx_pool_t
- 3、Nginx数组结构:ngx_array_t
- 4、哈希表结构:
- (1) ngx_hash_t:普通哈希表
- (2) ngx_hash_wildcard_t:通配符域名哈希表
- (3) ngx_hash_combined_t:组合类型哈希表
- (4) ngx_hash_keys_arrays_t:该结构用来预处理key
- 5、响应消息结构:ngx_chain_t
-
- 6、链表结构:ngx_list_t
- 7、双向链表:ngx_queue_t
Nginx源码学习
- Nginx根据自己的特点实现了很多较为高效的数据结构和公共函数,所以在我们在开发的时候应该尽量调用Nginx提供的API
基本数据结构
1、字符串结构:ngx_str_t
-
位置:src/core 下 ngx_string.h 和 ngx_string.c
-
原型:可以看到,Nginx自定义了一个带有长度的字符串结构。这意味着,data所指向的字符串并不是以 “\0” 结束的。
typedef struct {
	size_t      len;
	u_char     *data;
} ngx_str_t;
-
Nginx字符串操作宏:
- 1. 构造常量字符串:
#define ngx_string(str) { sizeof(str) - 1, (u_char *) str }
- 2. 初始化字符串为空字符串:
#define ngx_null_string { 0, NULL }
- 3. 将ngx_str_t设置为text:
#define ngx_str_set(str, text) \
 (str)->len = sizeof(text) - 1; (str)->data = (u_char *) text
- 4. 将ngx_str_t设置为null:
#define ngx_str_null(str) (str)->len = 0; (str)->data = NULL
-
Nginx字符串操作宏的使用:
ngx_str_t str = ngx_string("hello world");
ngx_str_t str1 = ngx_null_string;

ngx_str_t str2, str3;
ngx_str_set(&str2, "hello world");
ngx_str_null(&str3);
-
Nginx字符串操作函数
-
1. 字符串转换:将src的前n个字符转换成小写存放到dst字符串中。str不会改变。
void ngx_strlow(u_char *dst, u_char *src, size_t n);
ngx_strlow(str->data, str->data, str->len);
-
2. 字符串比较:
ngx_strncmp(s1, s2, n);
ngx_strcmp(s1, s2);
ngx_int_t ngx_strcasecmp(u_char *s1, u_char *s2);
ngx_int_t ngx_strncasecmp(u_char *s1, u_char *s2, size_t n);
-
3. 字符串格式化:
u_char * ngx_cdecl ngx_sprintf(u_char *buf, const char *fmt, ...);
u_char * ngx_cdecl ngx_snprintf(u_char *buf, size_t max, const char *fmt, ...);
u_char * ngx_cdecl ngx_slprintf(u_char *buf, u_char *last, const char *fmt, ...);
ngx_str_t str = ngx_string("hello world");
char buffer[1024];
ngx_snprintf(buffer, 1024, "%V", &str);
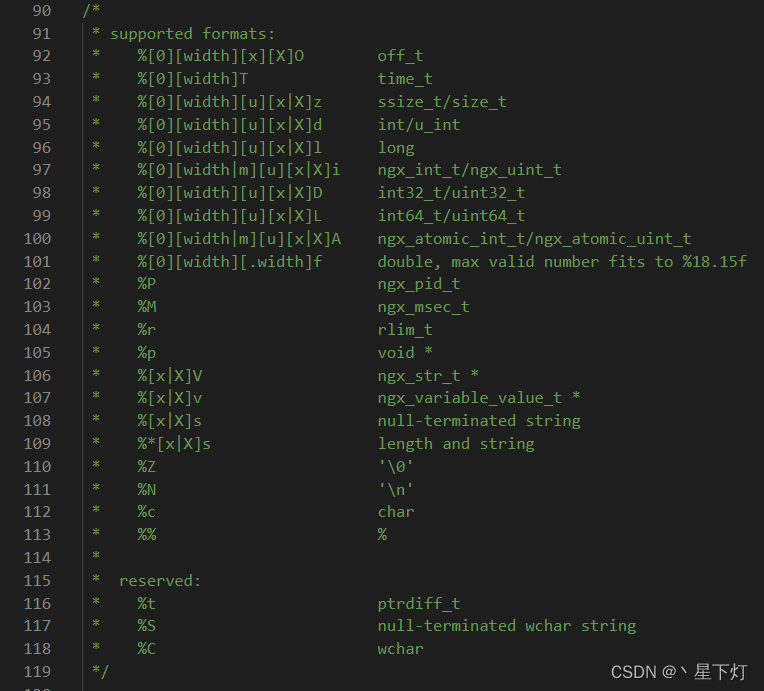
- 关于Nginx中格式化参数在ngx_string.c中有说明
-
4. 字符串BASE64编解码:将结果放到dst中,需要保证dst有足够的空间存放结果。
#define ngx_base64_encoded_length(len) (((len + 2) / 3) * 4)
#define ngx_base64_decoded_length(len) (((len + 3) / 4) * 3)
void ngx_encode_base64(ngx_str_t *dst, ngx_str_t *src);
ngx_int_t ngx_decode_base64(ngx_str_t *dst, ngx_str_t *src);
-
5. 字符串ESCAPE编码:对src按照type方式编码,结果放到dst中。如果dst传NULL可获得结果的空间大小。
#define NGX_ESCAPE_URI 0
#define NGX_ESCAPE_ARGS 1
#define NGX_ESCAPE_HTML 2
#define NGX_ESCAPE_REFRESH 3
#define NGX_ESCAPE_MEMCACHED 4
#define NGX_ESCAPE_MAIL_AUTH 5
uintptr_t ngx_escape_uri(u_char *dst, u_char *src, size_t size, ngx_uint_t type);
#define NGX_UNESCAPE_URI 1
#define NGX_UNESCAPE_REDIRECT 2
void ngx_unescape_uri(u_char **dst, u_char **src, size_t size, ngx_uint_t type);
- 如果type是0,则表示src中的所有字符都要进行转码。如果是NGX_UNESCAPE_URI与NGX_UNESCAPE_REDIRECT,则遇到’?’后就结束了,后面的字符就不管了。而NGX_UNESCAPE_URI与NGX_UNESCAPE_REDIRECT之间的区别是NGX_UNESCAPE_URI对于遇到的需要转码的字符,都会转码,而NGX_UNESCAPE_REDIRECT则只会对非可见字符进行转码。
-
6. 对html标签进行编码:dst传NULL返回结果占用空间大小。
uintptr_t ngx_escape_html(u_char *dst, u_char *src, size_t size);
-
7. 对JSON进行编码:dst传NULL返回结果占用空间大小。
uintptr_t ngx_escape_json(u_char *dst, u_char *src, size_t size);
2、类似资源管理的结构:ngx_pool_t
3、Nginx数组结构:ngx_array_t
4、哈希表结构:
(1) ngx_hash_t:普通哈希表
(2) ngx_hash_wildcard_t:通配符域名哈希表
void *ngx_hash_find_wc_head(ngx_hash_wildcard_t *hwc, u_char *name, size_t len);
void *ngx_hash_find_wc_tail(ngx_hash_wildcard_t *hwc, u_char *name, size_t len);
(3) ngx_hash_combined_t:组合类型哈希表
(4) ngx_hash_keys_arrays_t:该结构用来预处理key
- 位置:src/core 下 ngx_hash.h 和 ngx_hash.c
- 原型:
可以看到在构建一个ngx_hash_wildcard_t的时候,需要对通配符的哪些key进行预处理。
这个处理起来比较麻烦。而当有一组key,这些里面既有无通配符的key,也有包含通配符的key的时候。
我们就需要构建三个hash表,一个包含普通的key的hash表,一个包含前向通配符的hash表,
一个包含后向通配符的hash表(或者也可以把这三个hash表组合成一个ngx_hash_combined_t)。
在这种情况下,为了让大家方便的构造这些hash表,nginx提供给了此辅助类型。
typedef struct {
ngx_uint_t hsize;
ngx_pool_t *pool;
ngx_pool_t *temp_pool;
ngx_array_t keys;
ngx_array_t *keys_hash;
ngx_array_t dns_wc_head;
ngx_array_t *dns_wc_head_hash;
ngx_array_t dns_wc_tail;
ngx_array_t *dns_wc_tail_hash;
} ngx_hash_keys_arrays_t;
- 操作:
- 初始化:
ngx_int_t ngx_hash_keys_array_init(ngx_hash_keys_arrays_t *ha, ngx_uint_t type);
- 添加:有关于这个数据结构的使用,可以参考src/http/ngx_http.c中的ngx_http_server_names函数。
ngx_int_t ngx_hash_add_key(ngx_hash_keys_arrays_t *ha, ngx_str_t *key, void *value, ngx_uint_t flags);
5、响应消息结构:ngx_chain_t
- 位置:src/core 下 ngx_buf.h 和 ngx_buf.c
- 原型:
typedef struct ngx_chain_s ngx_chain_t;
struct ngx_chain_s {
ngx_buf_t *buf;
ngx_chain_t *next;
};
- 操作:
- 1. 创建:
ngx_chain_t *ngx_alloc_chain_link(ngx_pool_t *pool);
- 2. 释放
#define ngx_free_chain(pool, cl)            \
(cl)->next = (pool)->chain;             \
(pool)->chain = (cl)
ngx_buf_t
struct ngx_buf_s {
u_char *pos;
u_char *last;
off_t file_pos;
off_t file_last;
u_char *start;
u_char *end;
ngx_buf_tag_t tag;
ngx_file_t *file;
ngx_buf_t *shadow;
unsigned temporary:1;
unsigned memory:1;
unsigned mmap:1;
unsigned recycled:1;
unsigned in_file:1;
unsigned flush:1;
unsigned sync:1;
unsigned last_buf:1;
unsigned last_in_chain:1;
unsigned last_shadow:1;
unsigned temp_file:1;
int num;
};
- 操作:
- 1. 创建:
#define ngx_alloc_buf(pool) ngx_palloc(pool, sizeof(ngx_buf_t))
#define ngx_calloc_buf(pool) ngx_pcalloc(pool, sizeof(ngx_buf_t))
ngx_buf_t *ngx_create_temp_buf(ngx_pool_t *pool, size_t size);
#define ngx_buf_in_memory(b) ((b)->temporary || (b)->memory || (b)->mmap)
#define ngx_buf_in_memory_only(b) (ngx_buf_in_memory(b) && !(b)->in_file)
#define ngx_buf_special(b) \
(((b)->flush || (b)->last_buf || (b)->sync) \
&& !ngx_buf_in_memory(b) && !(b)->in_file)
#define ngx_buf_sync_only(b) \
((b)->sync && !ngx_buf_in_memory(b) \
&& !(b)->in_file && !(b)->flush && !(b)->last_buf)
#define ngx_buf_size(b) \
(ngx_buf_in_memory(b) ? (off_t) ((b)->last - (b)->pos): \
((b)->file_last - (b)->file_pos))
6、链表结构:ngx_list_t
- 位置:src/core 下 ngx_list.h 和 ngx_list.c
- 原型:
typedef struct {
ngx_list_part_t *last;
ngx_list_part_t part;
size_t size;
ngx_uint_t nalloc;
ngx_pool_t *pool;
} ngx_list_t;
typedef struct ngx_list_part_s ngx_list_part_t;
struct ngx_list_part_s {
void *elts;
ngx_uint_t nelts;
ngx_list_part_t *next;
};
- 操作:
- 1. 创建:
ngx_list_t *ngx_list_create(ngx_pool_t *pool, ngx_uint_t n, size_t size);
static ngx_inline ngx_int_t ngx_list_init(ngx_list_t *list, ngx_pool_t *pool, ngx_uint_t n, size_t size)
- 2. 添加:
void *ngx_list_push(ngx_list_t *list);
7、双向链表:ngx_queue_t
- 位置:src/core 下 ngx_queue.h 和 ngx_queue.c
- 原型:
typedef struct ngx_queue_s  ngx_queue_t;
struct ngx_queue_s {
    ngx_queue_t  *prev;
    ngx_queue_t  *next;
};
- 特点:
- ngx_queue_t只是声明了前向和后向指针。在使用的时候,我们首先需要定义一个哨兵节点(对于后续具体存放数据的节点,我们称之为数据节点)
#define ngx_queue_init(q) \
(q)->prev = q; \
(q)->next = q
ngx_queue_t free;
ngx_queue_init(&free);
typedef struct {
ngx_http_upstream_keepalive_srv_conf_t *conf;
ngx_queue_t queue;
ngx_connection_t *connection;
socklen_t socklen;
u_char sockaddr[NGX_SOCKADDRLEN];
} ngx_http_upstream_keepalive_cache_t;
#define ngx_queue_insert_head(h, x) \
(x)->next = (h)->next; \
(x)->next->prev = x; \
(x)->prev = h; \
(h)->next = x
#define ngx_queue_insert_after ngx_queue_insert_head
#define ngx_queue_insert_tail(h, x) \
(x)->prev = (h)->prev; \
(x)->prev->next = x; \
(x)->next = h; \
(h)->prev = x
ngx_http_upstream_keepalive_cache_t cache;
ngx_queue_insert_head(&free, &cache.queue);
#define ngx_queue_data(q, type, link) \
(type *) ((u_char *) q - offsetof(type, link))
ngx_http_upstream_keepalive_cache_t *cache = ngx_queue_data(q, ngx_http_upstream_keepalive_cache_t, queue);
本文内容由网友自发贡献,版权归原作者所有,本站不承担相应法律责任。如您发现有涉嫌抄袭侵权的内容,请联系:hwhale#tublm.com(使用前将#替换为@)