陈拓 2023/04/15-2023/04/15
1. 简介
在《Arduino Uno开发板+电机驱动扩展版CNC Shield V3.0硬件说明》
https://blog.csdn.net/chentuo2000/article/details/129851439?spm=1001.2014.3001.5502
一文中我们介绍了CNC Shield V3.0的引脚功能以及和Arduino Uno开发板引脚位置的对应关系。
在此基础上,在《D1 R32 – ESP32+Arduino CNC Shield控制步进电机》
https://blog.csdn.net/chentuo2000/article/details/129986246?spm=1001.2014.3001.5502
一文中我们讲述了用ESP32+Arduino CNC Shield通过A4988步进电机驱动模块控制NEMA17步进电机。所给出的例子是Arduino开发环境下的。
本文我们介绍一个ESP-IDF开发环境下的例子。
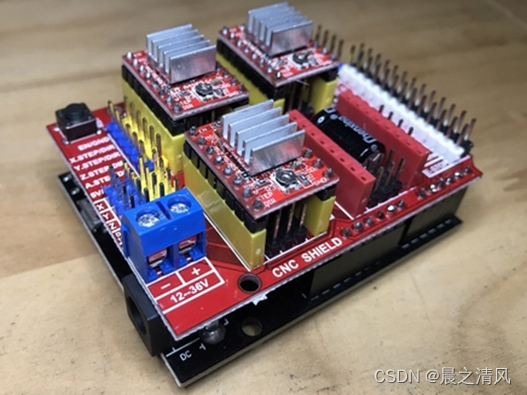
- ESP32开发板 + Arduino CNC Shield V3.00 + A4988组合
2. 软件开发环境
参考《Ubuntu构建ESP32 ESP-IDF开发环境(简约版)》
https://blog.csdn.net/chentuo2000/article/details/128034585?spm=1001.2014.3001.5502
3. 步进电机控制例程
代码来自[https://github.com/arnosolo/esp32-stepmotor]
4. 构建项目
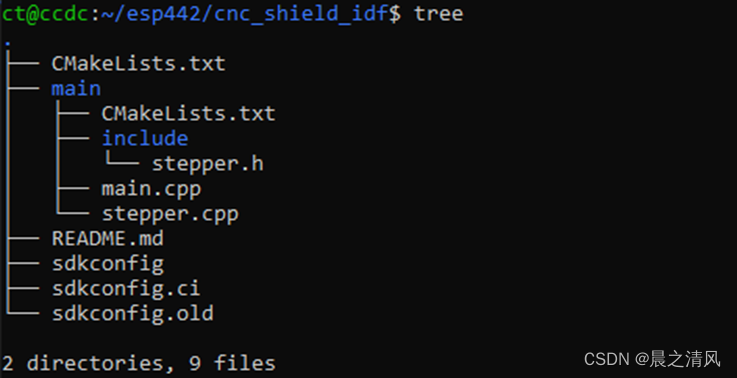
4.1 项目结构
cd ~/esp442/cnc_shield_idf
4.2 配置文件和代码文件
cmake_minimum_required(VERSION 3.5)

include($ENV{IDF_PATH}/tools/cmake/project.cmake)
project(cnc_shield_idf)
idf_component_register(SRCS "main.cpp" "stepper.cpp"
                    INCLUDE_DIRS "include")
- stepper.h、stepper.cpp、main.cpp见附录。
4.3 构建项目
get_idf
idf.py set-target esp32
idf.py menuconfig
1) 将闪存设置为4MB
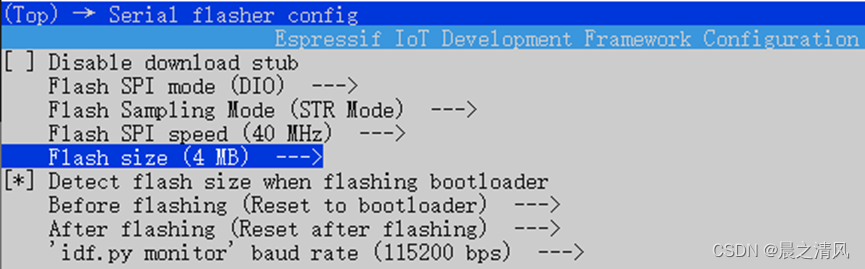
保存,退出。
idf.py build
查看ESP32开发板连接电脑的串口:
ls -l /dev/ttyUSB*

修改串口权限:
sudo chmod 777 /dev/ttyUSB0
烧写:
idf.py -p /dev/ttyUSB0 -b 115200 flash
5. 测试
插上CNC Shield扩展板,接上USB线用于给ESP32供电,接上12V电源给电机供电。
idf.py monitor -p /dev/ttyUSB0
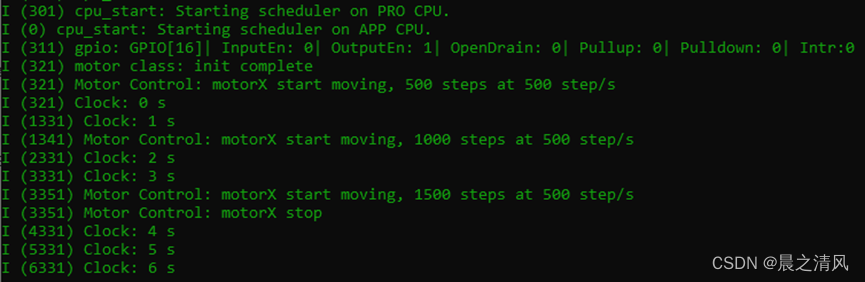 电机顺时针转动几圈。
附:代码
#include <stdio.h>
#include <stdlib.h>
#include "freertos/FreeRTOS.h"
#include "freertos/task.h"
#include "freertos/queue.h"
#include "freertos/timers.h"
#include "driver/gpio.h"
#include "esp_intr_alloc.h"
#include "esp_log.h"
#include "driver/mcpwm.h"
// #include "soc/mcpwm_periph.h"
#include "soc/mcpwm_reg.h"
#include "soc/mcpwm_struct.h"
#include "driver/pcnt.h"

#define STEPMOTOR_NUM 6
#define PCNT_H_LIM_VAL 1000

typedef struct
{
    int unit;        // the PCNT unit that originated an interrupt
    uint32_t status; // information on the event type that caused the interrupt
} pcnt_evt_t;

typedef struct
{
  mcpwm_unit_t mcpwm_unit;
  mcpwm_timer_t mcpwm_timer;
  mcpwm_io_signals_t mcpwm_io_signals;
  pcnt_unit_t pcnt_unit;
  // pcnt_channel_t pcnt_channel;
} stepmotor_config_t;

static stepmotor_config_t motor_config[STEPMOTOR_NUM] = {
    {.mcpwm_unit = MCPWM_UNIT_0,
    .mcpwm_timer = MCPWM_TIMER_0,
    .mcpwm_io_signals = MCPWM0A,
    .pcnt_unit = PCNT_UNIT_0
    },
    {.mcpwm_unit = MCPWM_UNIT_0,
    .mcpwm_timer = MCPWM_TIMER_1,
    .mcpwm_io_signals = MCPWM1A,
    .pcnt_unit = PCNT_UNIT_1
    },
    {.mcpwm_unit = MCPWM_UNIT_0,
    .mcpwm_timer = MCPWM_TIMER_2,
    .mcpwm_io_signals = MCPWM2A,
    .pcnt_unit = PCNT_UNIT_2
    },
    {.mcpwm_unit = MCPWM_UNIT_1,
    .mcpwm_timer = MCPWM_TIMER_0,
    .mcpwm_io_signals = MCPWM0A,
    .pcnt_unit = PCNT_UNIT_3
    },
    {.mcpwm_unit = MCPWM_UNIT_1,
    .mcpwm_timer = MCPWM_TIMER_1,
    .mcpwm_io_signals = MCPWM1A,
    .pcnt_unit = PCNT_UNIT_4
    },
    {.mcpwm_unit = MCPWM_UNIT_1,
    .mcpwm_timer = MCPWM_TIMER_2,
    .mcpwm_io_signals = MCPWM2A,
    .pcnt_unit = PCNT_UNIT_5
    },
};

class Stepmotor
{
private:
public:
  int id;
  int dirPin;
  int stepPin;
  int speed;
  int step;
  bool isReady;

  static xQueueHandle pcnt_evt_queue;
  static bool status[6];

  Stepmotor(int idInput, int dirPinInput, int stepPinInput);
  void init();
  void move(int stepInput, int speedInput);
  void stop();

};
#include <stdio.h>
#include <stdlib.h>
#include "freertos/FreeRTOS.h"
#include "freertos/task.h"
#include "freertos/queue.h"
#include "freertos/timers.h"
#include "driver/gpio.h"
#include "esp_intr_alloc.h"
#include "esp_log.h"
#include "driver/mcpwm.h"
// #include "soc/mcpwm_periph.h"
#include "soc/mcpwm_reg.h"
#include "soc/mcpwm_struct.h"
#include "driver/pcnt.h"
#include "stepper.h"
xQueueHandle Stepmotor::pcnt_evt_queue = xQueueCreate(12, sizeof(pcnt_evt_t));
bool Stepmotor::status[6] = {false, false, false, false, false, false};
static void IRAM_ATTR pcnt_example_intr_handler(void *arg)
{
int pcnt_unit = (int)arg;
pcnt_evt_t evt;
evt.unit = pcnt_unit;
pcnt_get_event_status((pcnt_unit_t)pcnt_unit, &evt.status);
// xQueueSendFromISR(Stepmotor::pcnt_evt_queue, &evt, NULL); // defult way
// int id = pcnt_unit;
Stepmotor::status[pcnt_unit] = true;
mcpwm_stop(motor_config[pcnt_unit].mcpwm_unit, motor_config[pcnt_unit].mcpwm_timer);
}
Stepmotor::Stepmotor(int idInput, int dirPinInput, int stepPinInput)
{
id = idInput;
dirPin = dirPinInput;
stepPin = stepPinInput;
// 1.初始化转动方向引脚
gpio_config_t io_conf = {};
io_conf.pin_bit_mask = 1ULL << dirPin;
io_conf.mode = GPIO_MODE_OUTPUT;
gpio_config(&io_conf);
gpio_set_level((gpio_num_t)dirPin, 1);
// 2.初始化脉冲计数器
pcnt_unit_t unit = motor_config[id].pcnt_unit;
pcnt_config_t pcnt_config;
// Set PCNT input signal and control GPIOs
pcnt_config.pulse_gpio_num = stepPin,
pcnt_config.ctrl_gpio_num = PCNT_PIN_NOT_USED,
pcnt_config.channel = PCNT_CHANNEL_0,
pcnt_config.unit = unit,
// What to do on the positive / negative edge of pulse input?
pcnt_config.pos_mode = PCNT_COUNT_INC, // Count up on the positive edge
pcnt_config.neg_mode = PCNT_COUNT_DIS, // Keep the counter value on the negative edge
// What to do when control input is low or high?
pcnt_config.lctrl_mode = PCNT_MODE_KEEP,
pcnt_config.hctrl_mode = PCNT_MODE_KEEP, // Keep the primary counter mode if high
// Set the maximum and minimum limit values to watch
pcnt_config.counter_h_lim = PCNT_H_LIM_VAL,
// .counter_l_lim = PCNT_L_LIM_VAL,
pcnt_unit_config(&pcnt_config);
/* Configure and enable the input filter */
pcnt_set_filter_value(unit, 100);
pcnt_filter_enable(unit);
pcnt_event_enable(unit, PCNT_EVT_H_LIM);
/* Initialize PCNT's counter */
pcnt_counter_pause(unit);
pcnt_counter_clear(unit);
/* Install interrupt service and add isr callback handler */
pcnt_isr_service_install(0);
pcnt_isr_handler_add(unit, pcnt_example_intr_handler, (void *)unit);
/* Everything is set up, now go to counting */
pcnt_counter_resume(unit);
// 3.生成电机控制脉冲
// 细分为16,所以一圈需要3200步. 每秒800个脉冲,则电机大概4s转一圈
ESP_ERROR_CHECK(mcpwm_gpio_init(motor_config[id].mcpwm_unit, motor_config[id].mcpwm_io_signals, stepPin));
mcpwm_config_t pwm_config;
pwm_config.frequency = 1000; //frequency = 50Hz
pwm_config.cmpr_a = 50; //duty cycle of PWMxA = 50.0%
pwm_config.counter_mode = MCPWM_UP_COUNTER;
pwm_config.duty_mode = MCPWM_DUTY_MODE_0;
ESP_ERROR_CHECK(mcpwm_init(motor_config[id].mcpwm_unit, motor_config[id].mcpwm_timer, &pwm_config));
// 这么搞一下同一个引脚就既能输出pwm,又能读取脉冲数了...
gpio_iomux_in(stepPin, PCNT_SIG_CH0_IN0_IDX);
isReady = true;
Stepmotor::status[id] = isReady;
const char *TAG = "motor class";
ESP_LOGI(TAG, "init complete");
};
/**
* @brief Ask step motor to move
*
* @param stepInput step number, should >= 0. Negative values are converted to positive values
* @param speedInput speed, step/s
*/
void Stepmotor::move(int stepInput, int speedInput)
{
isReady = false;
Stepmotor::status[id] = isReady;
speed = speedInput;
if(stepInput < 0) {
step = -stepInput;
} else {
step = stepInput;
}
if (speed == 0)
{
stop();
}
else
{
if (speed < 0)
{
gpio_set_level((gpio_num_t)dirPin, 0);
speed = -speedInput;
}
else
{
gpio_set_level((gpio_num_t)dirPin, 1);
}
pcnt_unit_t unit = motor_config[id].pcnt_unit;
pcnt_set_event_value(unit, PCNT_EVT_H_LIM, (int16_t)step);
pcnt_event_enable(unit, PCNT_EVT_H_LIM);
pcnt_counter_pause(unit);
pcnt_counter_clear(unit);
pcnt_counter_resume(unit);
mcpwm_set_frequency(motor_config[id].mcpwm_unit, motor_config[id].mcpwm_timer, speed);
mcpwm_start(motor_config[id].mcpwm_unit, motor_config[id].mcpwm_timer);
}
};
void Stepmotor::stop()
{
// isReady = true;
// Stepmotor::status[id] = isReady;
mcpwm_stop(motor_config[id].mcpwm_unit, motor_config[id].mcpwm_timer);
};
#include <stdio.h>
#include <stdlib.h>
#include "freertos/FreeRTOS.h"
#include "freertos/task.h"
#include "freertos/queue.h"
#include "freertos/timers.h"
#include "driver/gpio.h"
#include "esp_intr_alloc.h"
#include "esp_log.h"
#include "stepper.h"

const char *TAG = "Motor Control";

/*********** Tasks ***********/
void clock(void *arg)
{
    const char *TAG = "Clock";
    int cnt = 0;
    while (1)
    {
        ESP_LOGI(TAG, "%d s", cnt);
        cnt++;
        vTaskDelay(1000 / portTICK_RATE_MS);
    }
}

/*********** Main ***********/
extern "C" void app_main(void)
{
    // 1.Create a motor instance
    Stepmotor motorX(0, 16, 26); // id(0~6), dirPin, stepPin

    xTaskCreate(clock, "clock", 2048, NULL, 5, NULL);

    int cnt = 1;
    while (1)
    {
        // 2.Update motor status
        motorX.isReady = Stepmotor::status[motorX.id];

        // 3.Ask the motor move a little
        if (motorX.isReady)
        {
            ESP_LOGI(TAG, "motorX start moving, %d steps at %d step/s", cnt * 500, 500);
            motorX.move(cnt * 500, 500); // stepNum, speed(step/s)
            cnt++;
        }

        if (cnt == 4)
        {
            ESP_LOGI(TAG, "motorX stop");
            motorX.stop();
            cnt++;
        }

        vTaskDelay(10 / portTICK_RATE_MS);
    }
}
本文内容由网友自发贡献,版权归原作者所有,本站不承担相应法律责任。如您发现有涉嫌抄袭侵权的内容,请联系:hwhale#tublm.com(使用前将#替换为@)