模型拟合?
采样一致性的目的:用于排除错误的样本。
基于采样一致性算法的应用主要是对点云进行分割,根据不同设定的几何模型,估计对应的几何模型的参数,在一定允许误差范围内分割出在模型上的点云。
目前PCL中支持的几何模型分割有空间平面、直线、二维或三维圆周、圆球、锥体。
随机采样一致性的另一个应用就是点云的配准对的剔除。
RANSAC随机采样一致性算法简介
RANSAC是一种随机参数估计算法。
- RANSAC从样本中随机抽选出一个样本子集
- 使用最小方差估计算法对这个子集计算模型参数
- 然后计算所有样本与该模型的偏差
- 再使用一个预先设定好的阈值与偏差比较
- 当偏差小于阈值时,该样本点属于模型内样本点(inliers),局内点或内点。
- 否则为模型外样本点(outliers),局外点或外点。
- 记录下当前的inliers的个数,然后重复这一过程。
- 每一次重复,都记录当前最佳的模型参数,所谓最佳:即inliers的个数最多,此时对应的inliers个数为best_ninliers。
- 每次迭代的末尾,都会根据期望的误差率、best_ninliers、总样本个数、当前迭代次数,计算一个迭代结束评判因子,据此决定是否迭代结束。(很像深度学习中的每轮训练几乎一致)。
迭代结束后,最佳模型参数就是最终的模型参数估计值。(跟深度学习一模一样呀。)
RANSAC理论上可以剔除outliers的影响,并得到全局最优的参数估计。但是RANSAC有几个问题:
- 在每次迭代中都要区分inliers和outliers,因此需要事先设定阈值,当模型具有明显的物理意义时,这个阈值还比较容易设定,但是若模型比较抽象时,这个阈值就不那么容易设定了,而且固定阈值不适用于样本动态变化的应用;
- RANSAC的迭代次数是运行期决定的,不能预知迭代的确切次数(当然迭代次数的范围是可以预测的)。
- RANSAC只能从一个特定数据集中估计一个模型,当两个(或者更多个)模型存在时,RANSAC不能找到别的模型。
直线拟合案例:

通过RANSAC之后:得到

局外点是红色,局内点表示为蓝色,蓝色线就是基于RANSAC的结果。适应数据的结果(模型)就是一条线。
LMedS最小中值方差估计算法
LMedS也是一种随机参数估计算法。最小中值方差估计算法
- LMedS也从样本中随机抽选出一个样本子集
- 使用最小方差估计算法对子集计算模型参数
- 然后计算所有样本与该模型的偏差
- (与RANSAC不同)LMedS记录的是:
- 所有样本中,偏差值居中的那个样本的偏差[称为MeD偏差(这也是LMedS中Med的由来)],
- 以及本次计算得到的模型参数。(由于这一变化,LMedS 不需要预先设定阈值 来区分inliers和outliers)。
- 重复前面的过程N次,从N个Med偏差中挑选出最小的一个,其对应的模型参数就是最终的模型参数估计值。
其中迭代次数N是由样本子集中样本的个数(子集个数)、期望的模型误差、事先估计的样本中outliers的比例所决定的。
LMedS理论上也可以剔除outliers的影响,并得到全局最优的参数估计,而且克服了RANSAC的两个缺点(虽然LMedS也需要实现设定样本中outliers的比例,但这个数字比较容易设定)。但是当outliers在样本中所占比例达到或超过50%时,LMedS就无能为力了。这与LMedS每次迭代记录的是Med偏差值有关。
PCL中Sample_consensus模型支持的几何模型
1、SACMODEL_PLANE模型:
- 定义为平面模型,共设置4个参数[normal_x normal_y normal_z d],其中(normal_x,normal_y,normal_z)为Hessian范式中法向量的坐标及常量d值:

- 其中a^2+b^2+c^2=1,d>0,(a,b,c)为平面法矢,d为原点至平面的距离,
从点云中分割提取的内点都处在估计参数对应的平面上或与平面距离在一定范围内。
2、SACMODEL_LINE模型:
- 定义为直线模型,共设置6个参数[point_on_line.x point_on_line.y point_on_line.z line_direction.x line_direction.y line_direction.z],
- 其中(point_on_line.x,point_on_line.y,point_on_line.z)为直线上一点的三维坐标(x0, y0, z0),
- (line_direction.x,line_direction.y,line_direction.z)为直线方向向量(a,b,c),

从点云中分割提取的内点都处在估计参数对应直线上或直线距离在一定范围内。
3、SACMODEL_CIRCLE2D模型:
- 定义为二维圆的圆周模型,共设置3个参数[center.x center.y radius],
- 其中(center.x, center.y)为圆周中心的二维坐标,
- radius为圆周半径,
从点云中分割提取的内点都处在估计参数对应圆周上或距离圆周边线的距离在一定范围内。
4、SACMODEL_SPHERE模型:
- 定义为三维球体的圆周模型,共设置4个参数[center.x center.y center.z radius],
- 其中(center.x, center.y center.z)为球体中心的三维坐标,
- radius为球体半径,
从点云中分割提取的内点都处在估计参数对应球体上或距离球体边线的距离在一定范围内。
5、SACMODEL_CYLINDER模型:
- 定义为圆柱体模型,共设置7个参数[point_on_axis.x point_on_axis.y point_on_axis.z axis_direction.x axis_direction.y axis_direction.z radius],
- 其中(point_on_axis.x,point_on_axis.y,point_on_axis.z)为轴线上点的三维坐标,
- (axis_direction.x,axis_direction.y,axis_direction.z)为轴线方向向量的三维坐标
- radius为圆柱体半径
- (x-x0)^2+(y-y0)^2+(z-z0)^2-r^2=[l(x-x0)+m(y-y0)+n(z-z0)]^2/(l^2+m^2+n^2)。
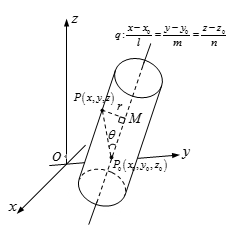
从点云中分割提取的内点都处在估计参数对应圆柱体上或距离圆柱体边线的距离在一定范围内。
6、SACMODEL_CONE模型
定义为圆锥模型,尚未实现
7、SACMODEL_TORUS模型:
定义为圆环面模型,尚未实现
8、SACMODEL_PARALLEL_LINE模型:
定义为有条件限制的直线模型,在规定的最大角度偏差限制下,直线模型与给定轴线平行,其参数设置参见SACMODEL_LINE模型。
9、SACMODEL_PERPENDICULAR_PLANE模型:
定义为有条件限制的平面模型,在规定的最大角度偏差限制下,平面模型与给定轴线垂直,参数设置参见SACMODEL_PLANE模型。
10、SACMODEL_NORMAL_PLANE模型:
定义为有条件限制的平面模型,在规定的最大角度偏差限制下,每一个局内点的法线必须与估计的平面模型的法线平行,参数设置参见SACMODEL_PLANE模型。
11、SACMODEL_PARALLEL_PLANE模型:
定义为有条件限制的平面模型,在规定的最大角度偏差限制下,平面模型与给定的轴线平行,参数设置参见SACMODEL_PLANE模型。
12、SACMODEL_NORMAL_PARALLEL_PLANE模型:
定义为有条件限制的平面模型,在法线约束下,三维平面模型必须与用户设定的轴线平行,参数设置参见SACMODEL_PLANE模型。
PCL中Sample_consensus模块及类
PCL中Sample_consensus库实现了随机采样一致性及其泛化估计算法。
平面、柱面等各种常见几何模型,用不同的估计算法和不同的几何模型自由结合估算点云中隐含的具体几何模型的系数,实现对点云中所处的几何模型的分割。
线、平面、柱面和球面等模型已经在PCL库中实现,平面模型经常被应用到常见的室内平面分割模型提取中,比如墙、地板、桌面,其他模型常应用到根据几何结构检测识别和分割物体中(比如用一个圆柱体模型分割出一个杯子)。
案例一:
RandomSampleConsensus类获得点云的拟合平面模型
首先对两个点云进行定义初始化,并对其中一个点云填充点云数据,作为处理前的原始点云。
其中,大部分点云数据是基于设定的圆球和平面模型计算而得到的坐标值,作为局内点;有五分之一的点云数据是被随机放置的,作为局外点。
接下来,创建一个用于存储点云中局内点的位置的整数型向量,作为点的索引的向量,这里我们使用一个平面或者球面随机估计模型建立随机采样一致性对象,并根据命令行参数分别以点云作为输入,来进行随机参数估计,存储局内点。
最后复制适合模型的局内点到final点云中,然后根据命令行参数在三维窗口中显示原始点云或者估计得到的局内点组成的点云。
#include <iostream>
#include <pcl/console/parse.h>
#include <pcl/filters/extract_indices.h>
#include <pcl/io/pcd_io.h>
#include <pcl/point_types.h>
#include <pcl/sample_consensus/ransac.h>
#include <pcl/sample_consensus/sac_model_plane.h>
#include <pcl/sample_consensus/sac_model_sphere.h>
#include <pcl/visualization/pcl_visualizer.h>
#include <boost/thread/thread.hpp>

boost::shared_ptr<pcl::visualization::PCLVisualizer>
simpleVis(pcl::PointCloud<pcl::PointXYZ>::ConstPtr cloud)
{
    // --------------------------------------------
    // -----Open 3D viewer and add point cloud-----
    // --------------------------------------------
    boost::shared_ptr<pcl::visualization::PCLVisualizer> viewer(new pcl::visualization::PCLVisualizer("3D Viewer"));
    viewer->setBackgroundColor(0, 0, 0);
    viewer->addPointCloud<pcl::PointXYZ>(cloud, "sample cloud");
    viewer->setPointCloudRenderingProperties(pcl::visualization::PCL_VISUALIZER_POINT_SIZE, 3, "sample cloud");
    //viewer->addCoordinateSystem (1.0);
    viewer->initCameraParameters();
    return (viewer);
}

int
main(int argc, char** argv)
{
    srand(time(NULL));
    // initialize PointClouds
    pcl::PointCloud<pcl::PointXYZ>::Ptr cloud(new pcl::PointCloud<pcl::PointXYZ>);
    pcl::PointCloud<pcl::PointXYZ>::Ptr final(new pcl::PointCloud<pcl::PointXYZ>);

    // populate our PointCloud with points
    cloud->width = 5000;
    cloud->height = 1;
    cloud->is_dense = false;
    cloud->points.resize(cloud->width * cloud->height);
    for (size_t i = 0; i < cloud->points.size(); ++i)
    {
        if (pcl::console::find_argument(argc, argv, "-s") >= 0 || pcl::console::find_argument(argc, argv, "-sf") >= 0)
        {
            cloud->points[i].x = rand() / (RAND_MAX + 1.0);
            cloud->points[i].y = rand() / (RAND_MAX + 1.0);
            if (i % 5 == 0)
                cloud->points[i].z = rand() / (RAND_MAX + 1.0);
            else if (i % 2 == 0)
                cloud->points[i].z = sqrt(1 - (cloud->points[i].x * cloud->points[i].x)
                    - (cloud->points[i].y * cloud->points[i].y));
            else
                cloud->points[i].z = -sqrt(1 - (cloud->points[i].x * cloud->points[i].x)
                    - (cloud->points[i].y * cloud->points[i].y));
        }
        else
        {
            cloud->points[i].x = rand() / (RAND_MAX + 1.0);
            cloud->points[i].y = rand() / (RAND_MAX + 1.0);
            if (i % 5 == 0)
                cloud->points[i].z = rand() / (RAND_MAX + 1.0);
            else
                cloud->points[i].z = -1 * (cloud->points[i].x + cloud->points[i].y);
        }
    }

    std::vector<int> inliers;// 存储局内点集合中点的索引向量。

    // created RandomSampleConsensus object and compute the appropriated model
    pcl::SampleConsensusModelSphere<pcl::PointXYZ>::Ptr
        model_s(new pcl::SampleConsensusModelSphere<pcl::PointXYZ>(cloud)); // 针对球模型的对象
    pcl::SampleConsensusModelPlane<pcl::PointXYZ>::Ptr
        model_p(new pcl::SampleConsensusModelPlane<pcl::PointXYZ>(cloud));  // 针对平面模型的对象
    if (pcl::console::find_argument(argc, argv, "-f") >= 0)
    {
        // 随机估算对应的平面模型,并存储估计的局内点。
        pcl::RandomSampleConsensus<pcl::PointXYZ> ransac(model_p);
        ransac.setDistanceThreshold(.01);// 与平面距离小于0.01的点作为局内点考虑
        ransac.computeModel();  // 执行随机参数估计
        ransac.getInliers(inliers);  // 存储估计所得的局内点。
    }
    else if (pcl::console::find_argument(argc, argv, "-sf") >= 0)
    {
        // 随机估算对应的圆球模型,并存储估计的局内点。
        pcl::RandomSampleConsensus<pcl::PointXYZ> ransac(model_s);
        ransac.setDistanceThreshold(.01); // 与球面距离小于0.01的点作为局内点考虑
        ransac.computeModel(); // 执行随机参数估计
        ransac.getInliers(inliers); // 存储估计所得的局内点。
    }

    // copies all inliers of the model computed to another PointCloud
    pcl::copyPointCloud<pcl::PointXYZ>(*cloud, inliers, *final);

    // creates the visualization object and adds either our orignial cloud or all of the inliers
    // depending on the command line arguments specified.
    boost::shared_ptr<pcl::visualization::PCLVisualizer> viewer;
    if (pcl::console::find_argument(argc, argv, "-f") >= 0 || pcl::console::find_argument(argc, argv, "-sf") >= 0)
        viewer = simpleVis(final);
    else
        viewer = simpleVis(cloud);
    while (!viewer->wasStopped())
    {
        viewer->spinOnce(100);
        boost::this_thread::sleep(boost::posix_time::microseconds(100000));
    }
    return 0;
}
两两点云获取设备自动标定
自动标定
应用RANSAC算法实现基于球形靶标的自动标定方法,具体实现流程:
- 坐标系C1和C2分别表示 两个深度摄像头获取的点云数据的 局部坐标。
- 3个在摄像头公共视场中半径不同的小圆球作为标定时待识别标靶物体
- 圆球圆心(Q1, Q2, Q3)空间坐标用来计算坐标系之间的变换矩阵
- 需要在两个深度摄像头获取的点云数据中检测并识别出各个圆球
- 检测识别出3个圆球后,记载两组坐标系中拥有两组对应的3个坐标点
- 这样可以根据变换矩阵求解方程,来估计出变换矩阵了。
- 实现双深度摄像头的标定。
代码梳理:
- 数据获取模块
- 直通滤波模块(ROI切割)
- 平面检测及删除模块(ROI切割)
- 圆球检测模块(检测定位)
- 刚体变换矩阵估计模块
利用支架固定双深度摄像头,从不同的方向采集包含三个小球的场景点云。
数据获取模块
利用PCL中的Grabber接口分别从双深度摄像头采集场景点云。
直通滤波模块(ROI切割)
通过深度摄像头采集得到的原始场景点云通常包含Z轴方向(垂直于摄像头镜面的方向)2m以外的点云数据,而这些点云数据通常不是我们需要的,所以为了提高后续处理的效率,应用VoxelGrid滤波器剔除2m以外的点云数据。
平面检测及删除模块(ROI切割)
获取的直通滤波后的场景有近似于平面形状的地面点云,利用SACSegmentation类检测地面所在的平面点云,并将其删除。利用SACSegmentation类的setModelType函数设置模型类型为平面,并利用setMethodType函数设置方法为“随机采样一致性”。
圆球检测模块(检测定位)
- 删除场景地面点云数据后,
- 创建SACSegmentation对象用于检测圆球,
- 并设置包括检测形状和方法的SACSegmentation类相关参数。
然后利用如下代码循环检测场景内的圆球点云:
- 利用SACSegmentation类使用随机采样一致性检测到一个圆球点云
- 记录该圆球球心后,
- 删除该圆球点云,
- 继续利用采样一致性算法检测
- 直到三个圆球表面点云都检测到
- 记录三个圆球的球心
for (i = 0; i < 3; i++)//循环次数控制球个数
{
	// Segment the largest planar component from the remaining cloud
	pcl::ModelCoefficients coefficients2;

	seg2.setInputCloud(cloud_filtered);
	seg2.segment(*tmpinliers2, coefficients2);
	coefficients_all.push_back(coefficients2);


	if (tmpinliers2->indices.size() == 0)
	{
		std::cout << "Could not estimate a sphere model for the given dataset." << std::endl;
		break;
	}

	// Extract the planar inliers from the input cloud
	pcl::ExtractIndices<pcl::PointXYZRGB> extract2;
	extract2.setInputCloud(cloud_filtered);
	extract2.setIndices(tmpinliers2);
	extract2.setNegative(false);

	// Write the planar inliers to disk
	extract2.filter(*cloud_sphere);
	viewer.showCloud(cloud_sphere);//可视化显示最后一个小球
	std::cout << "PointCloud representing the sphere component: " << cloud_sphere->points.size() << " data points." << std::endl;
	std::cout << coefficients2 << std::endl;//打印各个球的四个参数
	// Remove the planar inliers, extract the rest
	extract2.setNegative(true);
	extract2.filter(*cloud_f2);
	cloud_filtered = cloud_f2;

}
刚体变换矩阵估计模块
- 利用双深度摄像头分别采集包含圆球的场景点云后,经过上述模块的处理,得到了在两个摄像头局部坐标系下三个小球球心的坐标。(Q1,Q2,Q3)。
- 接下来基于三组对应点,利用TransformationFromCorrespondences类估计变换矩阵。
- 利用transformationFromCorr类的add函数添加对应点,
- 利用getTransformation函数获取变换矩阵结果,
- 实现双深度摄像头的标定。
/*
 * www.pclcn.org
 *
 *
 */

#include <fstream>
#include <iostream>
#include <pcl/console/parse.h>
#include <pcl/filters/extract_indices.h>
#include <pcl/io/pcd_io.h>
#include <pcl/sample_consensus/ransac.h>
 //#include <pcl/sample_consensus/sac_model_plane.h>
#include <pcl/sample_consensus/sac_model_sphere.h>
//#include <pcl/visualization/pcl_visualizer.h>
#include <boost/thread/thread.hpp>
#include <pcl/cuda/io/cloud_to_pcl.h>
#include <pcl/cuda/io/disparity_to_cloud.h>
#include <pcl/io/openni_grabber.h>
#include <pcl/point_cloud.h>
#include <pcl/point_types.h>
#include <pcl/cuda/time_cpu.h>
//#include <boost/shared_ptr.hpp>
#include <pcl/visualization/cloud_viewer.h>
#include <pcl/ModelCoefficients.h>
//#include <pcl/point_types.h>
#include <pcl/io/pcd_io.h>
//#include <pcl/filters/extract_indices.h>
#include <pcl/filters/voxel_grid.h>
#include <pcl/features/normal_3d.h>
#include <pcl/kdtree/kdtree.h>
#include <pcl/sample_consensus/method_types.h>
#include <pcl/sample_consensus/model_types.h>
#include <pcl/segmentation/sac_segmentation.h>
#include <pcl/segmentation/extract_clusters.h>
#include<vector>

#include <pcl/common/transforms.h>
#include <pcl/common/transformation_from_correspondences.h>


#include <pcl/filters/passthrough.h>


using pcl::cuda::PointCloudAOS;
using pcl::cuda::Device;

class KinectViewerCuda
{
public:
	KinectViewerCuda(bool downsample) : viewer("KinectGrabber"), downsample_(downsample), global_(false) {}

	void cloud_cb_(const boost::shared_ptr<openni_wrapper::Image>& image, const boost::shared_ptr<openni_wrapper::DepthImage>& depth_image, float constant)
	{
		pcl::PointCloud<pcl::PointXYZRGB>::Ptr final(new pcl::PointCloud<pcl::PointXYZRGB>);
		PointCloudAOS<Device>::Ptr data;
		{
			pcl::cuda::ScopeTimeCPU t("time:");
			d2c.compute<Device>(depth_image, image, constant, data, downsample_);
		}

		pcl::PointCloud<pcl::PointXYZRGB>::Ptr output(new pcl::PointCloud<pcl::PointXYZRGB>);
		pcl::cuda::toPCL(*data, *output);
		cloud_ = output;

		pcl::PointCloud<pcl::PointXYZRGB>::Ptr cloud_filtered0(new pcl::PointCloud<pcl::PointXYZRGB>), cloud_filteredz(new pcl::PointCloud<pcl::PointXYZRGB>), cloud_filteredx(new pcl::PointCloud<pcl::PointXYZRGB>);
		//******************************************* 滤除距离远于2两米的点云,便于后续处理效率和质量
		pcl::PassThrough<pcl::PointXYZRGB> pass;
		pass.setInputCloud(output);
		pass.setFilterFieldName("z");
		pass.setFilterLimits(0.0, 1.7);
		pass.filter(*cloud_filteredz);
		pass.setInputCloud(cloud_filteredz);
		pass.setFilterFieldName("x");
		pass.setFilterLimits(-0.3, 0.3);
		pass.filter(*cloud_filteredx);
		pass.setInputCloud(cloud_filteredx);
		pass.setFilterFieldName("y");
		pass.setFilterLimits(-0.3, 0.3);
		pass.filter(*cloud_filtered0);
		//*********************************************处理前对点云进行下采样
		pcl::VoxelGrid<pcl::PointXYZRGB> vg;
		pcl::PointCloud<pcl::PointXYZRGB>::Ptr cloud_filtered(new pcl::PointCloud<pcl::PointXYZRGB>);
		vg.setInputCloud(cloud_filtered0);
		vg.setLeafSize(0.001f, 0.001f, 0.001f);
		vg.filter(*cloud_filtered);
		std::cout << "PointCloud after filtering has: " << cloud_filtered->points.size() << " data points." << std::endl; //*
	//cloud_filtered经过下采样处理的点云
  //******************************************检测剔除掉处在平面上的点云*/
		pcl::SACSegmentation<pcl::PointXYZRGB> seg;
		pcl::PointIndices::Ptr tmpinliers(new pcl::PointIndices);
		pcl::ModelCoefficients::Ptr coefficients(new pcl::ModelCoefficients);
		pcl::PointCloud<pcl::PointXYZRGB>::Ptr cloud_plane(new pcl::PointCloud<pcl::PointXYZRGB>());

		seg.setOptimizeCoefficients(true);
		seg.setModelType(pcl::SACMODEL_PLANE);
		seg.setMethodType(pcl::SAC_RANSAC);
		seg.setMaxIterations(100);
		seg.setDistanceThreshold(0.05);
		pcl::PointCloud<pcl::PointXYZRGB>::Ptr  cloud_f(new pcl::PointCloud<pcl::PointXYZRGB>);
		int i = 0, nr_points = (int)cloud_filtered->points.size();
		while (cloud_filtered->points.size() > 0.3 * nr_points)
		{
			// Segment the largest planar component from the remaining cloud
			seg.setInputCloud(cloud_filtered);
			seg.segment(*tmpinliers, *coefficients);
			//std::cout << *coefficients << std::endl;打印平面的四个参数
			if (tmpinliers->indices.size() == 0)
			{
				std::cout << "Could not estimate a planar model for the given dataset." << std::endl;
				break;
			}

			// Extract the planar inliers from the input cloud
			pcl::ExtractIndices<pcl::PointXYZRGB> extract;
			extract.setInputCloud(cloud_filtered);
			extract.setIndices(tmpinliers);
			extract.setNegative(false);

			// Write the planar inliers to disk
			extract.filter(*cloud_plane);
			std::cout << "PointCloud representing the planar component: " << cloud_plane->points.size() << " data points." << std::endl;

			// Remove the planar inliers, extract the rest
			extract.setNegative(true);
			extract.filter(*cloud_f);
			cloud_filtered = cloud_f;
		}

		output = cloud_filtered;
		//******************************************cloud_filtered为去除点云中平面集合的点云
		//******************************************开始检测球面
		//多个球
		pcl::SACSegmentation<pcl::PointXYZRGB> seg2;
		pcl::PointIndices::Ptr tmpinliers2(new pcl::PointIndices);
		std::vector <pcl::ModelCoefficients> coefficients_all;

		pcl::PointCloud<pcl::PointXYZRGB>::Ptr cloud_sphere(new pcl::PointCloud<pcl::PointXYZRGB>());

		seg2.setOptimizeCoefficients(true);
		seg2.setModelType(pcl::SACMODEL_SPHERE);
		seg2.setMethodType(pcl::SAC_RANSAC);
		seg2.setMaxIterations(100);
		seg2.setDistanceThreshold(0.01);
		pcl::PointCloud<pcl::PointXYZRGB>::Ptr  cloud_f2(new pcl::PointCloud<pcl::PointXYZRGB>);
		//**************************************输入全局坐标
		for (i = 0; i < 3; i++)
		{
			if (global_ == false && i == 0)
			{
				std::cout << "\n请依次输入最近的球的球心对应的全局坐标位置x y z之间用空格或回车\n" << std::endl;
				std::cin >> xyz.x;
				std::cin >> xyz.y;
				std::cin >> xyz.z;
				std::cout << "			x=" << xyz.x << "			y=" << xyz.y << "			z=" << xyz.z << std::endl;
				std::cin.clear();
			}//最近的球
			if (global_ == false && i == 1)
			{
				std::cout << "\n请依次输入较远的球的球心对应的全局坐标位置x y z之间用空格或回车\n" << std::endl;
				std::cin >> xyz.x;
				std::cin >> xyz.y;
				std::cin >> xyz.z;
				std::cout << "			x=" << xyz.x << "			y=" << xyz.y << "			z=" << xyz.z << std::endl;
				std::cin.clear();
			}//第二近的球
			if (global_ == false && i == 2)
			{
				std::cout << "\n请依次输入最远的球的球心对应的全局坐标位置x y z之间用空格或回车\n" << std::endl;
				std::cin >> xyz.x;
				std::cin >> xyz.y;
				std::cin >> xyz.z;
				std::cout << "			x=" << xyz.x << "			y=" << xyz.y << "			z=" << xyz.z << std::endl;
				std::cin.clear();
				global_ = true;
			}//最远的球
			xyz_all.push_back(xyz);
		}

		for (i = 0; i < 3; i++)//循环次数控制球个数
		{
			// Segment the largest planar component from the remaining cloud
			pcl::ModelCoefficients coefficients2;

			seg2.setInputCloud(cloud_filtered);
			seg2.segment(*tmpinliers2, coefficients2);
			coefficients_all.push_back(coefficients2);


			if (tmpinliers2->indices.size() == 0)
			{
				std::cout << "Could not estimate a sphere model for the given dataset." << std::endl;
				break;
			}

			// Extract the planar inliers from the input cloud
			pcl::ExtractIndices<pcl::PointXYZRGB> extract2;
			extract2.setInputCloud(cloud_filtered);
			extract2.setIndices(tmpinliers2);
			extract2.setNegative(false);

			// Write the planar inliers to disk
			extract2.filter(*cloud_sphere);
			viewer.showCloud(cloud_sphere);//可视化显示最后一个小球
			std::cout << "PointCloud representing the sphere component: " << cloud_sphere->points.size() << " data points." << std::endl;
			std::cout << coefficients2 << std::endl;//打印各个球的四个参数
			// Remove the planar inliers, extract the rest
			extract2.setNegative(true);
			extract2.filter(*cloud_f2);
			cloud_filtered = cloud_f2;

		}

		// 完成三个球的球心检测,其在局部坐标系内的坐标存储在coefficients_all,输入的全局坐标在xyz_all
	   //****************************************************开始进行变换矩阵估计
		Eigen::Matrix4f transformationCorrespondence;
		pcl::TransformationFromCorrespondences transformationFromCorr;
		for (i = 0; i < coefficients_all.size(); i++)
		{
			Eigen::Vector3f from(coefficients_all.at(i).values[0],
				coefficients_all.at(i).values[1],
				coefficients_all.at(i).values[2]);

			Eigen::Vector3f  to(xyz_all.at(i).x,
				xyz_all.at(i).y,
				xyz_all.at(i).z);

			transformationFromCorr.add(from, to, 1.0);//all the same weight

		}

		transformationCorrespondence = transformationFromCorr.getTransformation().matrix();
		std::cout << "\ntransformation from corresponding points is \n" << transformationCorrespondence << std::endl;

		std::cout << "\n如果您认为标定数据正确,则输入y,则会提示保存数据,否则输入n。\n" << std::endl;
		char userin;
		std::cin.clear();

		std::cin.get(userin);
		if (userin == 'y' || userin == 'Y') {

			std::string filename;
			std::cin.clear();
			std::cout << "\n请输入文件名。\n" << std::endl;
			std::cin >> filename;
			std::ofstream myfile(filename, std::ios::binary);
			myfile.write((char*)transformationCorrespondence.data(), transformationCorrespondence.size() * sizeof(float));
			myfile.close();
		}
		else
		{
			std::cout << "\n程序继续。\n" << std::endl;
		}


	}

	void run(const std::string& device_id)
	{
		pcl::Grabber* interface = new pcl::OpenNIGrabber(device_id);

		boost::function<void(const boost::shared_ptr<openni_wrapper::Image>& image, const boost::shared_ptr<openni_wrapper::DepthImage>& depth_image, float)>
			f = boost::bind(&KinectViewerCuda::cloud_cb_, this, _1, _2, _3);

		boost::signals2::connection c = interface->registerCallback(f);

		interface->start();

		while (true)
		{
			pcl_sleep(1);
		}

		interface->stop();
	}

	pcl::cuda::DisparityToCloud d2c;
	pcl::visualization::CloudViewer viewer;
	boost::mutex mutex_;
	bool downsample_;
	pcl::PointCloud<pcl::PointXYZRGB>::Ptr cloud_;
	bool global_;
	std::vector <pcl::PointXYZ> xyz_all;
	pcl::PointXYZ xyz;
};

int main(int argc, char** argv)
{
	std::string device_id = "#1";

	int downsample = false;
	if (argc >= 2)
	{
		device_id = argv[1];
	}
	if (argc >= 3)
	{
		downsample = atoi(argv[2]);
	}
	KinectViewerCuda v(downsample);
	v.run(device_id);
	std::cout << "/n正常退出/n" << std::endl;
	return 0;
}
检测的精度与效果同圆球材质和采集距离有关,碍于设备的精度,需要反复调整摄像头的角度和圆球的位置以提高获取数据的质量,方可达到良好的检测效果。
本文内容由网友自发贡献,版权归原作者所有,本站不承担相应法律责任。如您发现有涉嫌抄袭侵权的内容,请联系:hwhale#tublm.com(使用前将#替换为@)