【SpringSecurity教程】认证 2.Digest摘要认证

2023-05-16

前言

Digest(摘要) 认证是在请求接口之前要输入账号密码,是在Basic认证传输账号密码的基础上加密

SpringBoot整合Digest

pom.xml

    <dependencies>
        <!-- spring boot security -->
        <dependency>
            <groupId>org.springframework.boot</groupId>
            <artifactId>spring-boot-starter-security</artifactId>
        </dependency>
        <!-- spring boot web -->
        <dependency>
            <groupId>org.springframework.boot</groupId>
            <artifactId>spring-boot-starter-web</artifactId>
        </dependency>
        <!-- spring boot 单元测试依赖 -->
        <dependency>
            <groupId>org.springframework.boot</groupId>
            <artifactId>spring-boot-starter-test</artifactId>
        </dependency>
        <dependency>
            <groupId>org.projectlombok</groupId>
            <artifactId>lombok</artifactId>
        </dependency>
    </dependencies>

启动类

import org.springframework.boot.SpringApplication;
import org.springframework.boot.autoconfigure.SpringBootApplication;

@SpringBootApplication
public class App{
    public static void main(String[] args) {
        SpringApplication.run(App.class, args);
    }
}

控制层

import org.springframework.web.bind.annotation.RequestMapping;
import org.springframework.web.bind.annotation.RestController;

/**
 * test 控制层
 * @author terry
 * @version 1.0
 * @date 2022/6/10 11:26
 */
@RestController
public class TestCtrl {

    @RequestMapping("/test")
    public String test(){
        return "success";
    }
}

Digest 摘要认证基本配置类

import org.springframework.context.annotation.Bean;
import org.springframework.context.annotation.Configuration;
import org.springframework.security.config.annotation.web.builders.HttpSecurity;
import org.springframework.security.config.annotation.web.configuration.EnableWebSecurity;
import org.springframework.security.config.annotation.web.configuration.WebSecurityConfigurerAdapter;
import org.springframework.security.core.GrantedAuthority;
import org.springframework.security.core.authority.SimpleGrantedAuthority;
import org.springframework.security.core.userdetails.User;
import org.springframework.security.core.userdetails.UserDetails;
import org.springframework.security.core.userdetails.UserDetailsService;
import org.springframework.security.core.userdetails.UsernameNotFoundException;
import org.springframework.security.crypto.password.NoOpPasswordEncoder;
import org.springframework.security.web.authentication.www.DigestAuthenticationEntryPoint;
import org.springframework.security.web.authentication.www.DigestAuthenticationFilter;

import java.util.ArrayList;
import java.util.List;

@Configuration
@EnableWebSecurity
public class DigestSecurityConfig extends WebSecurityConfigurerAdapter {

    @Override
    protected void configure(HttpSecurity http) throws Exception {
                http
                .authorizeRequests()
                .anyRequest().authenticated()
                .and()
                .addFilter(digestAuthenticationFilter())
                .exceptionHandling()
                .authenticationEntryPoint(digestAuthenticationEntryPoint());
    }

    @Bean
    public DigestAuthenticationEntryPoint digestAuthenticationEntryPoint() {
        DigestAuthenticationEntryPoint point = new DigestAuthenticationEntryPoint();
        point.setRealmName("terry");
        point.setKey("terry123");
        return point;
    }

    @Bean
    public DigestAuthenticationFilter digestAuthenticationFilter() {
        DigestAuthenticationFilter filter = new DigestAuthenticationFilter();
        filter.setAuthenticationEntryPoint(digestAuthenticationEntryPoint());
        filter.setUserDetailsService(userDetailsService());
        return filter;
    }

    /**
     * 在Spring security 5 之后需要设置密码解析器,
     * 如果不设置会报错,一般情况下会用Md5.本文采用的无密码验证
     * @return
     */
    @Bean
    public static NoOpPasswordEncoder passwordEncoder() {
        return (NoOpPasswordEncoder) NoOpPasswordEncoder.getInstance();
    }

    @Override
    @Bean
    public UserDetailsService userDetailsService() {
        return new UserDetailsService() {
            //用户摘要
            @Override
            public UserDetails loadUserByUsername(String username) throws UsernameNotFoundException {
                //省略从数据库查询过程
                String password = "terry123";
                List<GrantedAuthority> authorities = new ArrayList<>();
                authorities.add(new SimpleGrantedAuthority("auth"));
                return new User(username, password, true, true, true, true, authorities);
            }
        };
    }
}

测试

浏览器访问:http://localhost:8080/test

image-20220610143701592

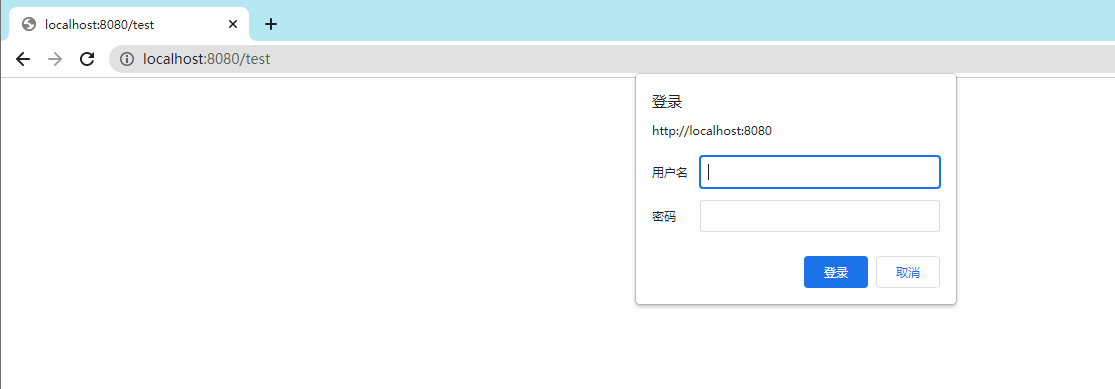
输入用户名:terry,密码:terry123,即可访问接口。

image-20220610175059318

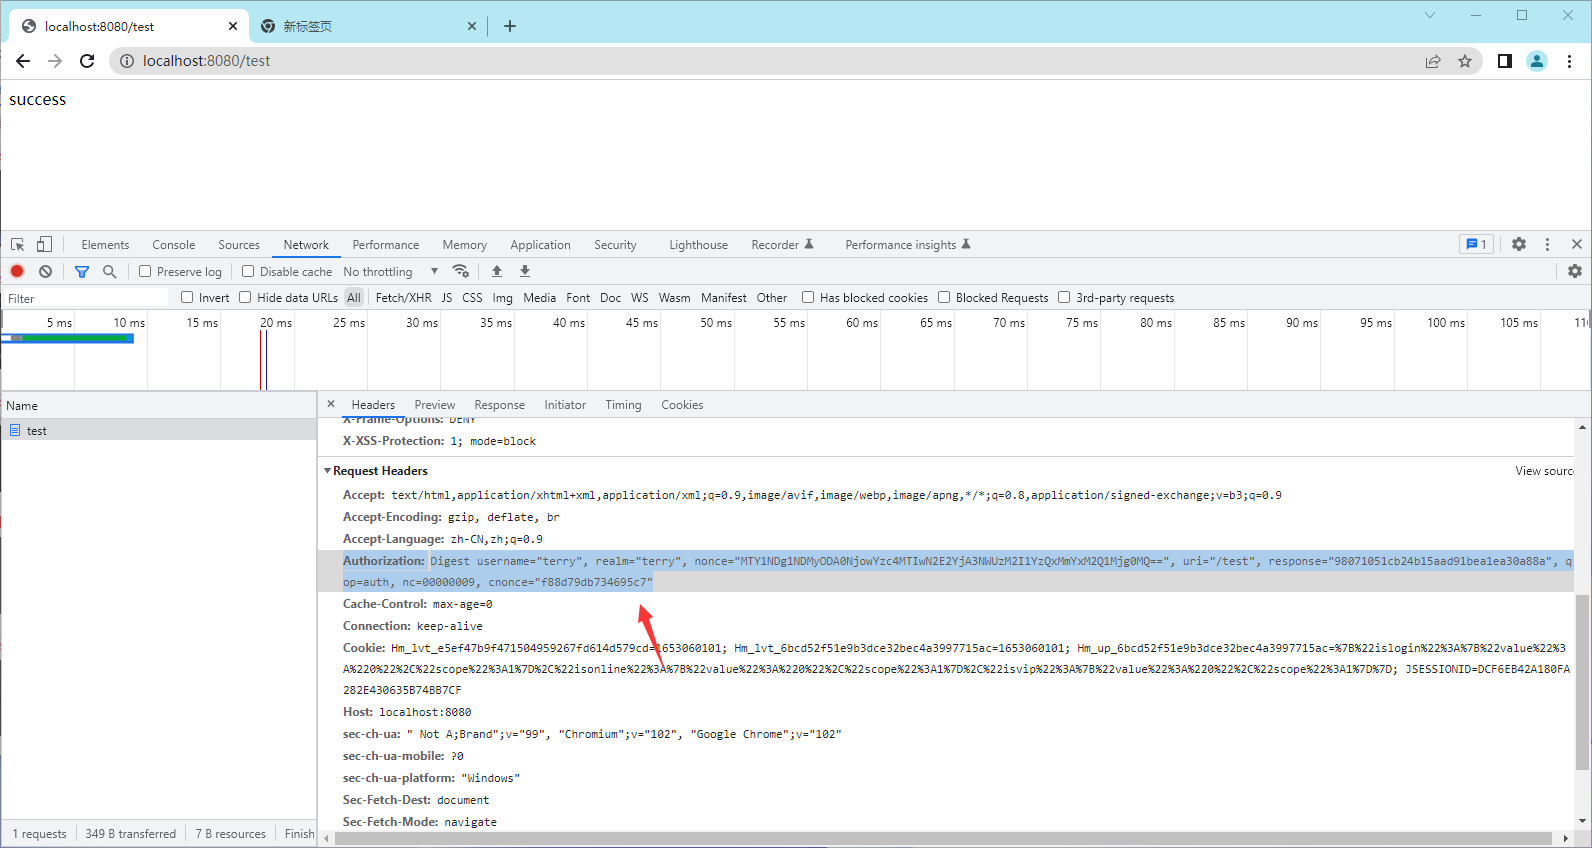
与Basic认证不同的是,Digest认证请求头Authorization中的数据复杂的多。

本文内容由网友自发贡献,版权归原作者所有,本站不承担相应法律责任。如您发现有涉嫌抄袭侵权的内容,请联系:hwhale#tublm.com(使用前将#替换为@)

【SpringSecurity教程】认证 2.Digest摘要认证 的相关文章

随机推荐

  • 载波相位差分定位

    x1f30e 我接触差分定位是通过暑期在南京北斗一段时间的实习 x1f30e 我把 Lambda算法的zip和rar上传到了这里 x1f30e https wwi lanzoui com b01bp70yj x1f30e 再推荐一个gith
  • nRF SPI 与 TWI 操作相关 (BMI088 与 MLX90614 举例)

    SPI0 与 TWI0 的 ID相同 xff0c SPI0 与 TWI0 的 ID相同 编译时有报错 若要避免 xff0c 有两个方法 1 使用不同ID外设 2 使用模拟SPI或模拟IIC nRF SPI 初始化 sdk config h
  • ros(13):ros找不到包报错及解决办法--Config.cmake

    目录 一 基础包 1 1 rospy包 1 2 tf包 1 3 grid map包 1 4 serial 二 专有包 2 1 dynamic reconfigure包 2 2 rosparam handler包 2 3 qt build包
  • stm32 esp8266 ota升级-自建mqtt和文件服务器动态AB面升级

    stm32 esp8266 ota系列文章 xff1a stm32 esp8266 ota 快速搭建web服务器之docker安装openresty stm32 esp8266 ota升级 tcp模拟http stm32 esp8266 o
  • win系统C++的udp通信(接收并发送)详细教程、win下inet_pton和inet_ntop无法使用解决方法

    对UDP编程0基础的可以参考这篇记录博文 我做的是同一个程序中接收指定IP地址和端口号的信息作为输入 xff0c 通过程序的算法进行处理 xff0c 处理后的信息再通过另一个指定IP地址和端口号进行发送 也就是需要做两个udp一个接收数据
  • postman下载与汉化(附直接下载链接)

    想用英文版本的可以直接点击如下链接下载最新版本 官网最新版本 无法汉化 xff1a Download Postman Get Started for Free 如果想要汉化的就不能使用最新版本 xff0c 因为最新版本没有汉化包可以用 汉化
  • Qt 自定义流程图 diagram

    Qt 自定义流程图 diagram 前言程序执行效果程序源码下载图形视图框架成员介绍重写QGraphicsItem程序源码介绍重点代码 前言 本文将对QGraphicsScene QGraphicsView QGraphicsItem这三个
  • 用C语言实现简单的HTTP数据请求

    我的博客 xff1a https blog csdn net qq 37388044我的知乎 xff1a https www zhihu com people bbtganmin联系方式 xff1a 知乎私信 转载或者引用本文内容请注明来源
  • rosserial移植到STM32(CUBEMX+HAL库)

    使用cubemx 43 HAL库将rosserial移植到STM32 rosserial的作用需要实现的功能移植步骤我创建的工程没有积分的可以到github下载 rosserial的作用 使用过ros的话都会了解过ros特殊的通信机制 xf
  • STM32基础(10)串口重定向

    原理 C 语言中 printf 函数默认输出设备是显示器 xff0c 如果要实现在串口或者 LCD 上显示 xff0c 必须重定义标准库函数里调用的与输出设备相关的函数 重定向 xff1a 重写库函数 xff0c 对原函数进行覆盖 xff0
  • pcl_conversions

    CMake Error at opt ros melodic share catkin cmake catkinConfig cmake 83 find package Could not find a package configurat
  • 在 Ubuntu 上安装 Bazel

    在 Ubuntu 上安装 Bazel 链接 https github com bazelbuild bazel 本页面介绍了在 Ubuntu 上安装 Bazel 的选项 此外 xff0c 它还提供指向 Bazel 完成脚本和二进制安装程序的
  • slam算法有哪些

    1 基于激光雷达的SLAM算法 xff1a Hector SLAM Gmapping Cartographer Karto SLAM Horn SLAM等 xff1b 激光雷达传感器作为主要感知设备来进行SLAM Hector SLAM是一
  • ubuntu(15):对‘casadi::MX::MX(casadi::MX const&)’未定义的引用

    catkin build 编译报错 xff0c 找不到CASADI的头文件目录CASADI INCLUDE DIRS或者库文件也达不到CASADI LIBRARIES xff1b 对 casadi MX horzsplit casadi M
  • Cmake修改FetchContent_Declare为本地代码构建

    在构建代码时 xff0c 某些项目可能需要额外下载第三方库 然而 xff0c 由于网络不稳定 xff0c 克隆过程可能会出现问题 在这种情况下 xff0c 您需要手动修改项目配置 xff0c 将其指向已经下载到本地的库文件 Fetch do
  • OTA开源代码

    有许多开源项目可用于实现 OTA xff08 Over The Air xff09 更新 以下是一些流行的开源 OTA 更新项目 xff0c 您可以根据自己的需求和设备类型选择合适的项目 xff1a Mender xff08 适用于嵌入式
  • 摄像头接口标准

    UVC xff08 USB Video Class xff09 xff1a UVC是一种通用的USB摄像头接口标准 xff0c 使得摄像头设备能够与各种操作系统兼容 xff0c 实现即插即用的功能 CSI xff08 Camera Seri
  • win10安装Anaconda、cuda9.0、cudnn、tensorflow-gpu=1.12.0详细步骤

    最近刚想起写自己的博客 xff0c 每天遇到了问题都会阅览博客 xff0c 也想把自己遇到了的一些问题写成文章给博友们参考 xff0c 所以我想从最基础的配置环境开始写起 xff0c 如看到问题也请多多指教 准备工作 Anaconda下载地
  • 【SpringSecurity教程】认证 1.Basic认证

    前言 Basic 认证是在请求接口之前要输入账号密码 xff0c 是简单的Http验证模式 本章主要描述 xff1a SpringBoot如何整合Basic认证 后端Okhttp和前端Vue Axios如何请求Basic认证的接口 Spri
  • 【SpringSecurity教程】认证 2.Digest摘要认证

    前言 Digest xff08 摘要 xff09 认证是在请求接口之前要输入账号密码 xff0c 是在Basic认证传输账号密码的基础上加密 SpringBoot整合Digest pom xml span class token tag s