1. SetPose
为了获得相机坐标系到世界坐标系的旋转矩阵和平移向量以及当前相机光心在世界坐标系下坐标
void Frame::SetPose(cv::Mat Tcw)
{
    mTcw = Tcw.clone();
    UpdatePoseMatrices();
}

void Frame::UpdatePoseMatrices()
{
    mRcw = mTcw.rowRange(0,3).colRange(0,3);
    mRwc = mRcw.t();
    mtcw = mTcw.rowRange(0,3).col(3);
    mOw = -mRcw.t()*mtcw;//基于变换矩阵的逆表示反向的变化
}
mOw: 当前相机光心在世界坐标系下坐标
mTcw: 世界坐标系到相机坐标系的变换矩阵
mRcw: 世界坐标系到相机坐标系的旋转矩阵
mtcw: 世界坐标系到相机坐标系的平移向量
mRwc: 相机坐标系到世界坐标系的旋转矩阵
这个东西其实没必要死记硬背,主要是看后三个字母
(1) T:变换矩阵 R:旋转矩阵 t:平移向量
(2)cw:世界坐标系到相机坐标系 wc:相机坐标系到世界坐标系
从外面的到里面的
2.Frame::GetFeaturesInArea
存在两个重载
vector<size_t> KeyFrame::GetFeaturesInArea(const float &x, const float &y, const float &r) const

vector<size_t> Frame::GetFeaturesInArea(const float &x, const float  &y, const float  &r, const int minLevel, const int maxLevel) const
2.1 关于参数
- mfGridElementWidthInv,mfGridElementHeightInv
#define FRAME_GRID_ROWS 48
#define FRAME_GRID_COLS 64
mfGridElementWidthInv=static_cast<float>(FRAME_GRID_COLS)/(mnMaxX-mnMinX);
mfGridElementHeightInv=static_cast<float>(FRAME_GRID_ROWS)/(mnMaxY-mnMinY);
mnMaxX,mnMinX,mnMaxY,mnMinY:未矫正的图像边界,来自构造函数中的ComputeImageBounds(imGray)(请参考下文)
mfGridElementWidthInv,mfGridElementHeightInv可以理解成(一列(行)由多少个像素组成)的倒数,或者表述为多少列(行)组成一个像素
2.2 代码简单注释
Frame::GetFeaturesInArea返回的以x,y为中心,半径为r的圆形内且金字塔层级在[minLevel, maxLevel]的特征点。
vector<size_t> Frame::GetFeaturesInArea(const float &x, const float  &y, const float  &r, const int minLevel, const int maxLevel) const
{
    vector<size_t> vIndices;
    vIndices.reserve(N);

							//将关键点指定给网格中的单元,以减少投影地图点时的匹配复杂性
    const int nMinCellX = max(0,(int)floor((x-mnMinX-r)*mfGridElementWidthInv));
    if(nMinCellX>=FRAME_GRID_COLS)	    //求出有多少个像素 //乘上即算出有多少col
        return vIndices;

     相似的求得mnMinX,mnMaxY,mnMinY,并进行判别

    for(int ix = nMinCellX; ix<=nMaxCellX; ix++)
    {
        for(int iy = nMinCellY; iy<=nMaxCellY; iy++)
        {
            const vector<size_t> vCell = mGrid[ix][iy];
            if(vCell.empty())		//std::vector<std::size_t> mGrid[FRAME_GRID_COLS][FRAME_GRID_ROWS];
                continue;

            for(size_t j=0, jend=vCell.size(); j<jend; j++)
            {
                const cv::KeyPoint &kpUn = mvKeysUn[vCell[j]];
                if(bCheckLevels)//   (minLevel>0) || (maxLevel>=0)
                {
									判断kpUn是否在在最大最小层级内

                }
							//矫正距离在r的范围内
                const float distx = kpUn.pt.x-x;
                const float disty = kpUn.pt.y-y;
                if(fabs(distx)<r && fabs(disty)<r)
                    vIndices.push_back(vCell[j]);
            }
        }
    }

    return vIndices;
}
2.2.1代码分块浅析
1)kpUn 和mvKeysUn,mGrid[ix][iy]的映射关系
const vector<size_t> vCell = mGrid[ix][iy]
const cv::KeyPoint &kpUn = mvKeysUn[vCell[j]];
mvKeysUn是未矫正(Un:undistorted)的点集,在Frame的构造函数中的UndistortKeyPoints()被生成
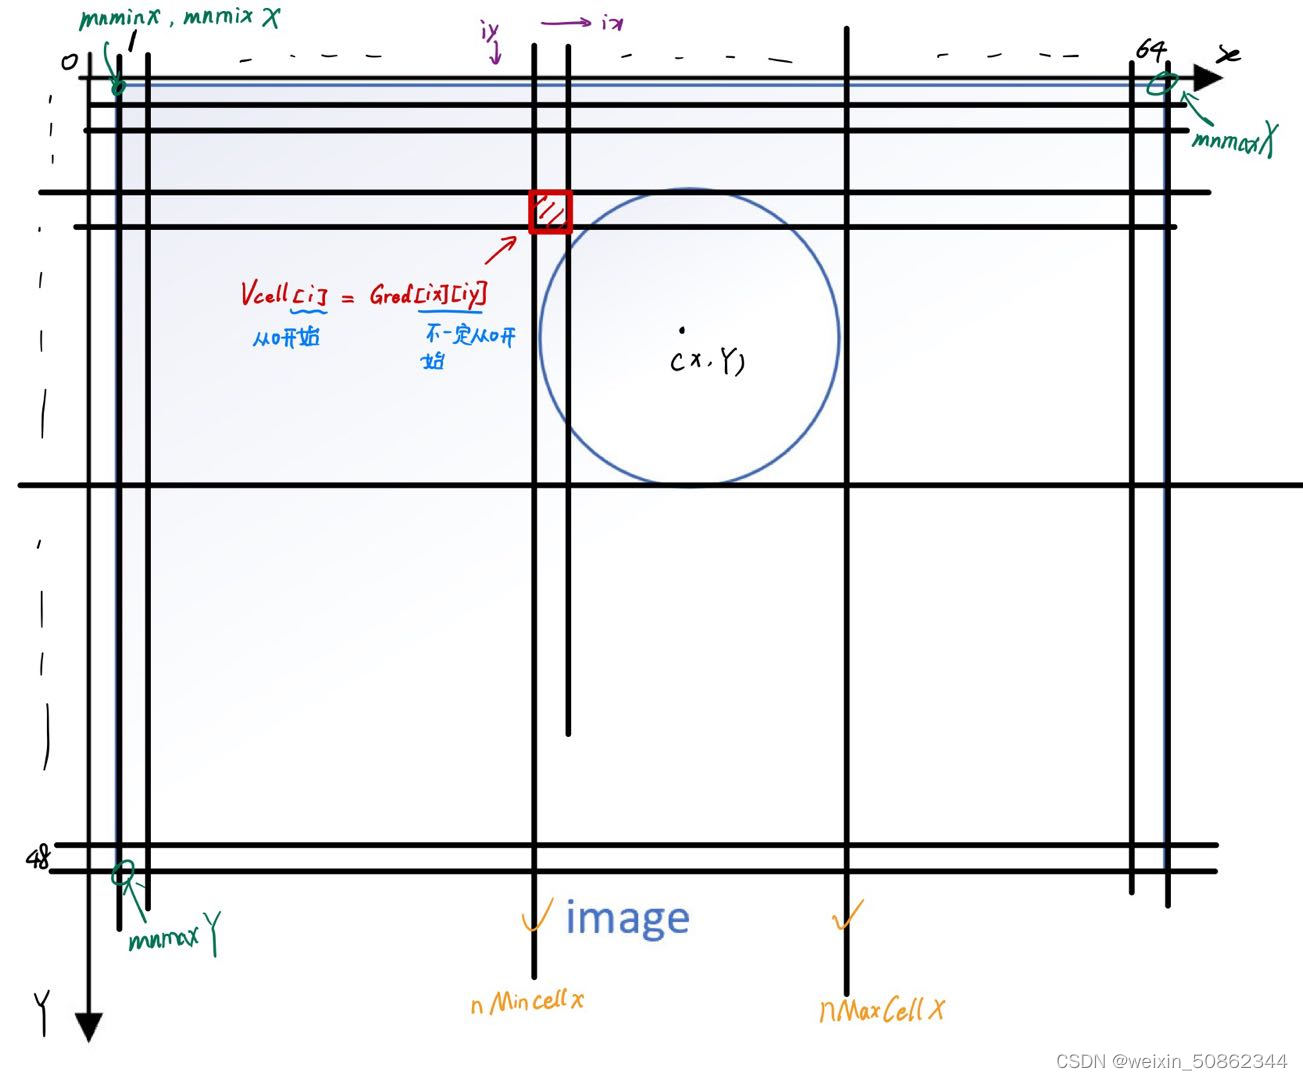
2.4 Frame::GetFeaturesInArea的示意图
画一个映射图(可能名称上有一丢丢问题)
3.Frame构造函数
存在三种构造方式:根据相机类型决定
//双目相机构建Frame
rame::Frame(const cv::Mat &imLeft, const cv::Mat &imRight, const double &timeStamp, ORBextractor* extractorLeft, ORBextractor* extractorRight, ORBVocabulary* voc, cv::Mat &K, cv::Mat &distCoef, const float &bf, const float &thDepth)

//RGB-D相机构建Frame
Frame::Frame(const cv::Mat &imGray, const cv::Mat &imDepth, const double &timeStamp, ORBextractor* extractor,ORBVocabulary* voc, cv::Mat &K, cv::Mat &distCoef, const float &bf, const float &thDepth)

//单目
Frame::Frame(const cv::Mat &imGray, const double &timeStamp, ORBextractor* extractor,ORBVocabulary* voc, cv::Mat &K, cv::Mat &distCoef, const float &bf, const float &thDepth)
着重讲解 单目Frame构造函数,其他仅做对比
3.1 单目Frame构造函数
-
Step 1 帧的ID 自增
-
Step 2 计算图像金字塔的参数 (详见!!!!)
-
Step 3 对这个单目图像进行提取特征点, 第一个参数0-左图, 1-右图
-
Step 4 用OpenCV的矫正函数、内参对提取到的特征点进行矫正
-
Step 5 计算去畸变后图像边界,将特征点分配到网格中。这个过程一般是在第一帧或者是相机标定参数发生变化之后进行
Frame::Frame(const cv::Mat &imGray, const double &timeStamp, ORBextractor* extractor,ORBVocabulary* voc, cv::Mat &K, cv::Mat &distCoef, const float &bf, const float &thDepth)//下面相当于赋值
    :mpORBvocabulary(voc),mpORBextractorLeft(extractor),mpORBextractorRight(static_cast<ORBextractor*>(NULL)),
     mTimeStamp(timeStamp), mK(K.clone()),mDistCoef(distCoef.clone()), mbf(bf), mThDepth(thDepth)
{
    // Frame ID
    mnId=nNextId++;

    // 比例层级信息  Scale Level Info
    mnScaleLevels = mpORBextractorLeft->GetLevels();
    mfScaleFactor = mpORBextractorLeft->GetScaleFactor();
    mfLogScaleFactor = log(mfScaleFactor);
    mvScaleFactors = mpORBextractorLeft->GetScaleFactors();
    mvInvScaleFactors = mpORBextractorLeft->GetInverseScaleFactors();
    mvLevelSigma2 = mpORBextractorLeft->GetScaleSigmaSquares();
    mvInvLevelSigma2 = mpORBextractorLeft->GetInverseScaleSigmaSquares();

    //ORB提取  ORB extraction
    ExtractORB(0,imGray);

    N = mvKeys.size();

    if(mvKeys.empty())
        return;

    UndistortKeyPoints();//矫正图像关键点

    //因为是单目:设置为没有立体信息 Set no stereo information
    mvuRight = vector<float>(N,-1);
    mvDepth = vector<float>(N,-1);

    mvpMapPoints = vector<MapPoint*>(N,static_cast<MapPoint*>(NULL));
    mvbOutlier = vector<bool>(N,false);

    // 这仅在第一帧(或校准更改后)进行 This is done only for the first Frame (or after a change in the calibration)
    if(mbInitialComputations)
    {
        ComputeImageBounds(imGray);//计算图像四角以确定边界

        mfGridElementWidthInv=static_cast<float>(FRAME_GRID_COLS)/static_cast<float>(mnMaxX-mnMinX);//列格子数/宽度
        mfGridElementHeightInv=static_cast<float>(FRAME_GRID_ROWS)/static_cast<float>(mnMaxY-mnMinY);//行格子数/高度

        fx = K.at<float>(0,0);
        fy = K.at<float>(1,1);
        cx = K.at<float>(0,2);
        cy = K.at<float>(1,2);
        invfx = 1.0f/fx;
        invfy = 1.0f/fy;

        mbInitialComputations=false;//开始全局定义为True
    }

    mb = mbf/fx;//得到baseline

    AssignFeaturesToGrid();//将特征点分配到格子中
}
}
3.1.1 ComputeImageBounds(const cv::Mat &imLeft)
这部分代码相对简单,是为了获得畸变矫正后的图像上下左右边界点的位置
void Frame::ComputeImageBounds(const cv::Mat &imLeft)
{
    if(mDistCoef.at<float>(0)!=0.0)//畸变
    {
        cv::Mat mat(4,2,CV_32F);
        mat.at<float>(0,0)=0.0; mat.at<float>(0,1)=0.0;
        mat.at<float>(1,0)=imLeft.cols; mat.at<float>(1,1)=0.0;
        mat.at<float>(2,0)=0.0; mat.at<float>(2,1)=imLeft.rows;
        mat.at<float>(3,0)=imLeft.cols; mat.at<float>(3,1)=imLeft.rows;

        /* mat:二维点集代表需要矫正的点
        	0.0  		0.0
        	imLeft.cols	0.0
        	0.0		imLeft.rows
        	imLeft.cols	imLeft.rows
        */

        // 矫正图像四角Undistort corners
        mat=mat.reshape(2);//C++: Mat Mat::reshape(int cn, int rows=0) const修改通道数
        cv::undistortPoints(mat,mat,mK,mDistCoef,cv::Mat(),mK);//undistortPoints函数仅仅支持两通道
        mat=mat.reshape(1);

        mnMinX = min(mat.at<float>(0,0),mat.at<float>(2,0));
        mnMaxX = max(mat.at<float>(1,0),mat.at<float>(3,0));
        mnMinY = min(mat.at<float>(0,1),mat.at<float>(1,1));
        mnMaxY = max(mat.at<float>(2,1),mat.at<float>(3,1));

    }
    else
    {
        mnMinX = 0.0f;
        mnMaxX = imLeft.cols;
        mnMinY = 0.0f;
        mnMaxY = imLeft.rows;
    }
}
C++: Mat Mat::reshape(int cn, int rows=0) const 在此处是用来修改通道数
//todo:通道要求如opencv文档所示
3.1.2 AssignFeaturesToGrid()
分配特征点到各个网格,加快匹配速度
3.1.3 获得金字塔信息
至于计算金字塔信息的以下内容我会放到ORBextractor中
	 mnScaleLevels = mpORBextractorLeft->GetLevels();
    mfScaleFactor = mpORBextractorLeft->GetScaleFactor();
    mfLogScaleFactor = log(mfScaleFactor);
    mvScaleFactors = mpORBextractorLeft->GetScaleFactors();
    mvInvScaleFactors = mpORBextractorLeft->GetInverseScaleFactors();
    mvLevelSigma2 = mpORBextractorLeft->GetScaleSigmaSquares();
    mvInvLevelSigma2 = mpORBextractorLeft->GetInverseScaleSigmaSquares();
3.1.4UndistortKeyPoints()
对提取到的特征点进行矫正。
void Frame::UndistortKeyPoints()
{
    if(mDistCoef.at<float>(0)==0.0)
    {
        mvKeysUn=mvKeys;
        return;
    }

    //使用关键点填充(N*2)矩阵 Fill matrix with points
    cv::Mat mat(N,2,CV_32F);
    for(int i=0; i<N; i++)
    {
        mat.at<float>(i,0)=mvKeys[i].pt.x;
        mat.at<float>(i,1)=mvKeys[i].pt.y;
    }

    // 矫正坐标点Undistort points
    mat=mat.reshape(2);
    cv::undistortPoints(mat,mat,mK,mDistCoef,cv::Mat(),mK);
    mat=mat.reshape(1);

    //填充矫正后关键点数组 Fill undistorted keypoint vector
    mvKeysUn.resize(N);
    for(int i=0; i<N; i++)
    {
        cv::KeyPoint kp = mvKeys[i];
        kp.pt.x=mat.at<float>(i,0);
        kp.pt.y=mat.at<float>(i,1);
        mvKeysUn[i]=kp;
    }
}
代码相对来说比较简单。
    // 矫正坐标点Undistort points
    mat=mat.reshape(2);
    cv::undistortPoints(mat,mat,mK,mDistCoef,cv::Mat(),mK);
    mat=mat.reshape(1);
3.1.5 ORB extraction
避免看不懂,先简单提一嘴,extractor部分的解析都会放在//todo
ExtractORB(0,imGray);
调用重载的()
void ORBextractor::operator()( InputArray _image, InputArray _mask, vector<KeyPoint>& _keypoints,
                      OutputArray _descriptors)
3.2 三种Frame对比
区别仅仅体现在 (A)ORB extraction (B)stereo information立体信息
- 双目两个摄像头都要进行ORB extraction
    // ORB extraction
    thread threadLeft(&Frame::ExtractORB,this,0,imLeft);
    thread threadRight(&Frame::ExtractORB,this,1,imRight);
    threadLeft.join();
    threadRight.join();
ORB extraction 上,单目和RGB-D基本相同
- 立体信息的获取
双目和RGBD建议是去看看ORB-SLAM2代码详解,很清晰,同时b站有对应的讲解视频。
//todo:下次一定补上代码注释
双目
ComputeStereoMatches();
- step0. 右目图像特征点逐行统计: 将右目图像中每个特征点注册到附近几行上
- step1. 粗匹配,根据特征点描述子和金字塔层级进行粗匹配
- step2. 精匹配: 滑动窗口匹配,根据匹配点周围5✖5窗口寻找精确匹配
- step3. 亚像素插值: 将特征点匹配距离拟合成二次曲线,寻找二次曲线最低点(是一个小数)作为最优匹配点坐标
- step4. 记录特征点的右目和深度信息
- step5. 删除离群点: 匹配距离大于平均匹配距离2.1倍的视为误匹配
RGB-D:
ComputeStereoFromRGBD(imDepth);
对于RGB特征点,根据深度信息构造虚拟右目图像
单目:
mvuRight = vector<float>(N,-1);
mvDepth = vector<float>(N,-1);
单目没有深度信息
函数用途参照表格
| 函数名 |
作用 |
| ComputeImageBounds |
计算图像边界 |
| ComputeImageBounds |
获得畸变矫正后的图像上下左右边界点的位置 |
| AssignFeaturesToGrid |
分配特征点到各个网格 |
| UndistortKeyPoints |
对提取到的特征点进行矫正。 |
|
|
|
|
|
|