Vue研习录(07)——组件基础知识详解及示例分析
版权声明
- 本文原创作者:清风不渡
- 博客地址:https://blog.csdn.net/WXKKang
重拾前端记忆,记录学习笔记,现在进入组件基础知识部分
一、什么是组件
组件允许我们将 UI 划分为独立的、可重用的部分,并且可以对每个部分进行单独的思考。在实际应用中,组件常常被组织成层层嵌套的树状结构。
二、定义组件
Vue单文件组件(又名*.vue文件,缩写为SFC)是一种特殊的文件格式,它允许将Vue组件的模板、逻辑与样式封装在单个文件中
三、加载组件
加载组件需要以下三步:
第一步:引入组件
第二步:挂载组件
第三步:显示组件
示例如下:
新建Vue文件:MyComponents
<template>
    <h3>清风不渡</h3>
</template>

<script>
  export default {
    name : "MyComponents",

  }
</script>

<style>
  h3{
    color: yellowgreen;
  }
</style>
在App.vue中进行加载:
<template>
  <img alt="Vue logo" src="./assets/logo.png">
  <!-- 第三步:显示组件 -->
  <MyComponentsVue/>
  <HelloWorld msg="Welcome to Your Vue.js App"/>
</template>

<script>
import HelloWorld from './components/HelloWorld.vue'
// 第一步:引入组件
import MyComponentsVue from './components/MyComponents.vue';

export default {
  name: 'App',
  components: {
    HelloWorld,
    // 第二步:挂载组件
    MyComponentsVue
  }
}
</script>

<style>
#app {
  font-family: Avenir, Helvetica, Arial, sans-serif;
  -webkit-font-smoothing: antialiased;
  -moz-osx-font-smoothing: grayscale;
  text-align: center;
  color: #2c3e50;
  margin-top: 60px;
}
</style>
结果如下:
被加载的组件可以被重用任意多次
四、scoped属性
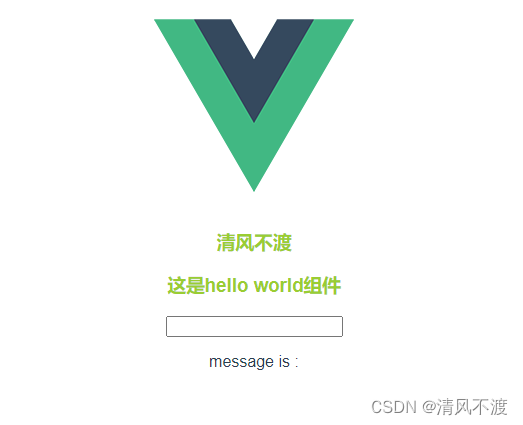
值得注意的是,如果多个组件中含有同样式指向的标签时,他们的显示是相同的,例如:
上方的HelloWorld组件中也有一个h3标签,那么MyComponents组件中的style样式也同样适用于它:
<template>
  <div class="hello">
    <h3>这是hello world组件</h3>
    <input type="text" v-model="message">
    <p>message is : {{ message }}</p>
  </div>
</template>

<script>
export default {
  data() {
    return {
      message: ""
    }
  }
}
</script>

<style>

</style>
结果如下:
如果不需要这样,则需要在<style>中添加scoped属性,使得当前样式只在当前组件中生效,如下:
<template>
    <h3>清风不渡</h3>
</template>

<script>
  export default {
    name : "MyComponents",

  }
</script>

<style scoped>
  h3{
    color: yellowgreen;
  }
</style>
结果如下,非MyComponents组件的样式将不会收到影响:
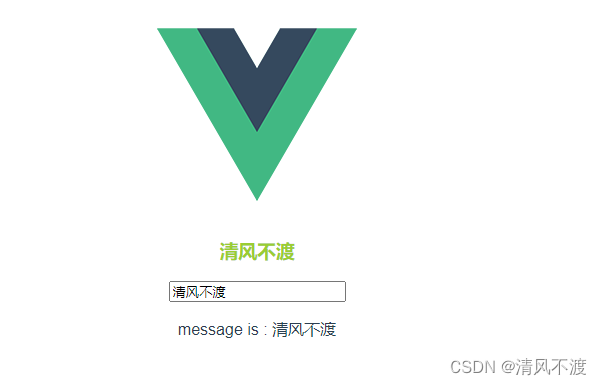
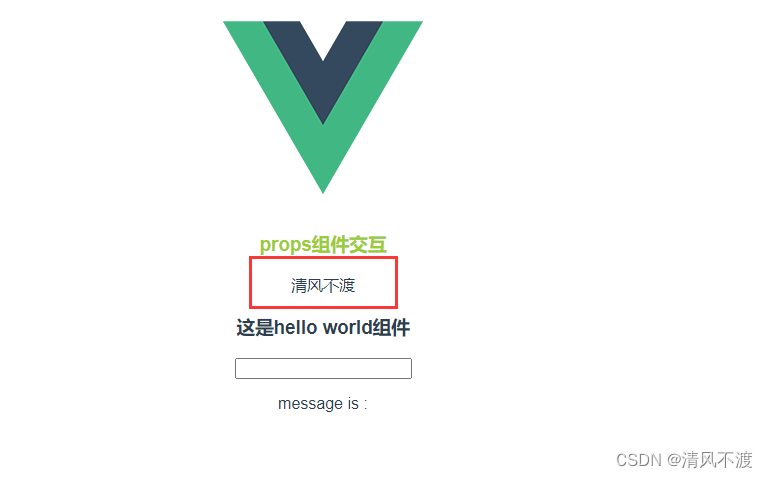
五、props组件交互
组件和组件是需要存在交互的,那么我们可以使用props来在组件上注册一些自定义的attributes,示例如下:
我们在App.vue中声明title,并将其进行传输到MyComponentsVue
<template>
  <img alt="Vue logo" src="./assets/logo.png">
  <!-- 第三步:显示组件 -->
  <MyComponentsVue :title="title"/>
  <HelloWorld msg="Welcome to Your Vue.js App"/>
</template>

<script>
import HelloWorld from './components/HelloWorld.vue'
// 第一步:引入组件
import MyComponentsVue from './components/MyComponents.vue';

export default {
  name: 'App',
  data(){
    return{
      title : "清风不渡"
    }
  },
  components: {
    HelloWorld,
    // 第二步:挂载组件
    MyComponentsVue
  }
}
</script>

<style>
#app {
  font-family: Avenir, Helvetica, Arial, sans-serif;
  -webkit-font-smoothing: antialiased;
  -moz-osx-font-smoothing: grayscale;
  text-align: center;
  color: #2c3e50;
  margin-top: 60px;
}
</style>
在MyComponents.vue中进行接收并显示
<template>
    <h3>props组件交互</h3>
    <p> {{ title }} </p>
</template>

<script>
  export default {
    name : "MyComponents",
    props : {
        title : {
            type : String,
            default : ""
        }
    }
  }
</script>

<style scoped>
  h3{
    color: yellowgreen;
  }
</style>
结果如下:
传递数据的数量以及数据的类型没有限制
数组和对象必须使用函数进行返回
<script>
  export default {
    name : "MyComponents",
    props : {
        title : {
            type : String,
            default : ""
        },
        arrays : {
            type : Array,
            //数组和对象必须使用函数进行返回
            default : function(){
                return []
            }
        }
    }
  }
</script>
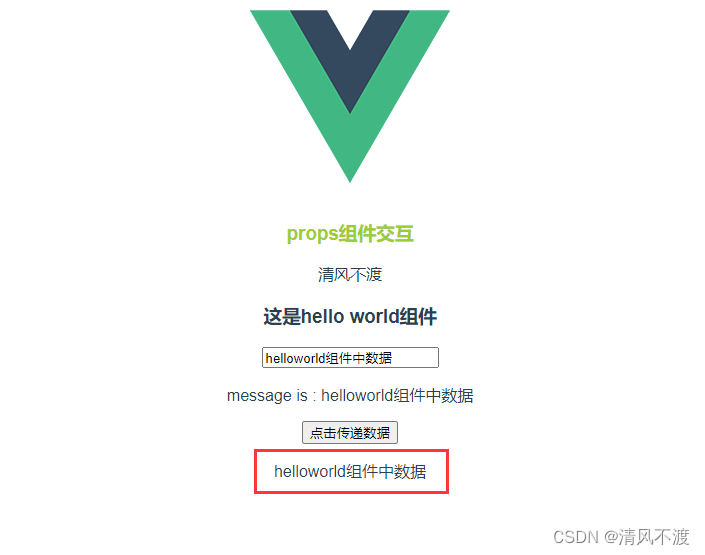
六、自定义事件组件交互
自定义事件可以在组件中反向传递数据,prop可以将数据从父组件传递到子组件中,那么我们可以利用自定义事件实现$emit,示例如下:
这是helloWord组件代码
<template>
  <div class="hello">
    <h3>这是hello world组件</h3>
    <input type="text" v-model="message">
    <p>message is : {{ message }}</p>

    <!-- 自定义事件组件交互-->
    <button @click="sendClickHandle">点击传递数据</button>
  </div>
</template>

<script>
export default {
  data() {
    return {
      message: ""
    }
  },
  props :{
    title :{
      type : String,
      default : ""
    }
  },
  methods:{
    sendClickHandle(){
      // 参数1:字符串,命名建议具有意义
      this.$emit("onEvent",this.message)
    }
  }
}
</script>

<style>

</style>
这是App组件代码
<template>
  <img alt="Vue logo" src="./assets/logo.png">
  <!-- 第三步:显示组件 -->
  <MyComponentsVue :title="title"/>
  <!-- 接收自定义事件传递的数据-->
  <HelloWorld msg="Welcome to Your Vue.js App" @onEvent="getDataHandle"/>
  <p>{{ message }}</p>
</template>

<script>
import HelloWorld from './components/HelloWorld.vue'
// 第一步:引入组件
import MyComponentsVue from './components/MyComponents.vue';

export default {
  name: 'App',
  data(){
    return{
      title : "清风不渡",
      message : ""

    }
  },
  components: {
    HelloWorld,
    // 第二步:挂载组件
    MyComponentsVue
  },
  methods :{
    getDataHandle(data){
       this.message = data;
    }
  }
}
</script>

<style>
#app {
  font-family: Avenir, Helvetica, Arial, sans-serif;
  -webkit-font-smoothing: antialiased;
  -moz-osx-font-smoothing: grayscale;
  text-align: center;
  color: #2c3e50;
  margin-top: 60px;
}
</style>
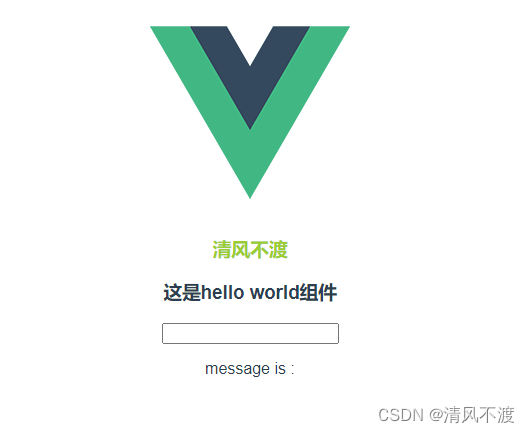
结果如下,点击按钮将helloWorld中的数据传递给App组件,并予以展示:

七、组件生命周期
每个组件在被创建的时候都要经过一系列的初始化过程——例如,需要设置数据监听、编译模板、将实例挂载到DOM并在数据变化时更行DOM等。同时在这个过程中也会运行一下叫做生命周期钩子的函数,这给了用户在不同阶段添加自己的代码的机会,共有以下八个周期。
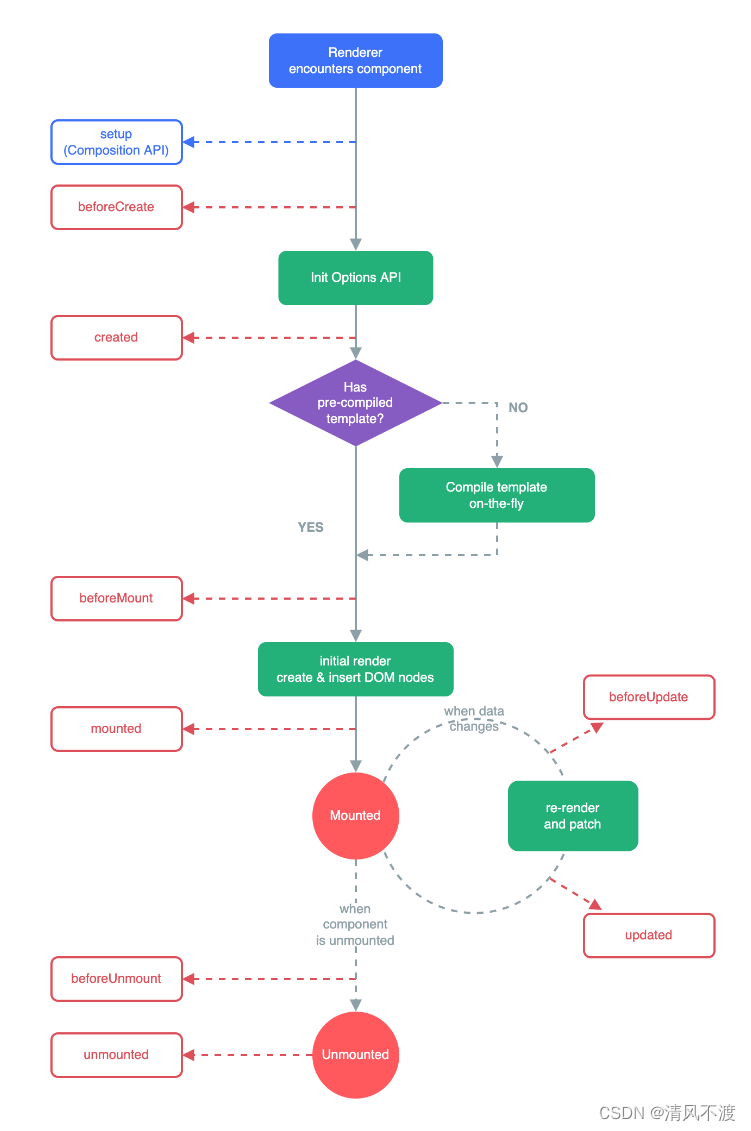
可以区分为以下四个状态:
- 创建时:beforeCreate、created
- 渲染时:beforeMount、mounted
- 更新时:beforeUpdate、updated
- 卸载时:beforeUnmount、unmounted
示例如下:
<template>
  <div class="hello">
    <h3>这是hello world组件</h3>
    <input type="text" v-model="message">
    <p>message is : {{ message }}</p>

    <!-- 自定义事件组件交互-->
    <button @click="sendClickHandle">点击传递数据</button>
  </div>
</template>

<script>
export default {
  data() {
    return {
      message: ""
    }
  },
  props :{
    title :{
      type : String,
      default : ""
    }
  },
  methods:{
    sendClickHandle(){
      // 参数1:字符串,命名建议具有意义
      this.$emit("onEvent",this.message)
    }
  },
  beforeCreate(){
    console.log("beforeCreate:组件创建之前");
  },
  created(){
    console.log("created:组件创建之后");
  },
  beforeMount(){
    console.log("beforeMount:组件渲染之前");
  },
  mounted(){
    console.log("mounted:组件渲染之后");
  },
  beforeUpdate(){
    console.log("beforeUpdate:组件更新之前");
  },
  updated(){
    console.log("updated:组件更新之后");
  },
  beforeUnmount(){
    console.log("beforeUnmount:组件卸载之前");
  },
  unmounted(){
    console.log("unmounted:组件卸载之后");
  }
}
</script>

<style>

</style>
结果如下:
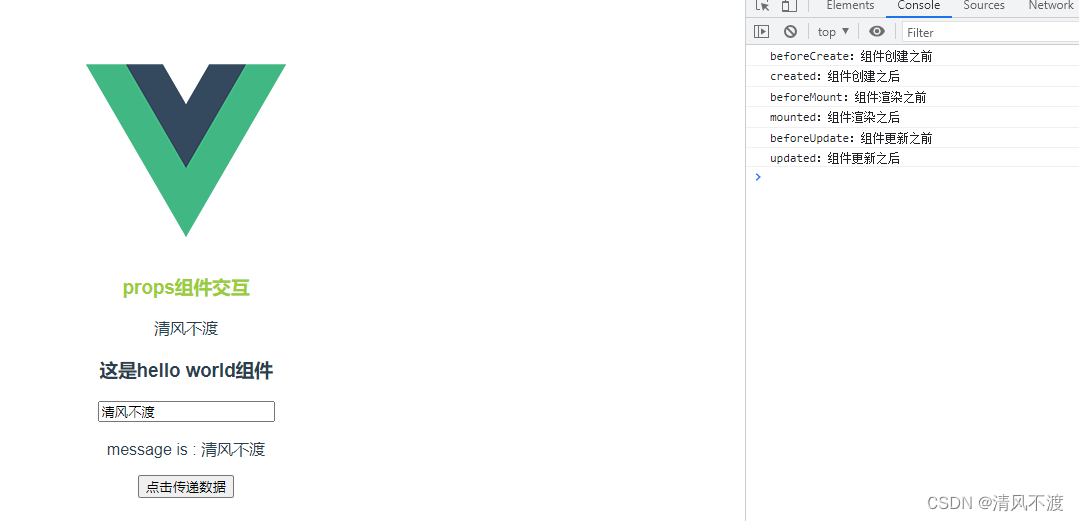
例如:我们可以把网络请求放在组件渲染完成之后,再进行数据请求,把请求到的数据显示在页面上,或者在组件卸载之前将消耗性能的东西进行一个处理