训练完成模型之后,可以对图片进行预测,还可以实现模型结果可视化,查看分割效果。
运行命令如下:
python predict.py \
       --config configs/quick_start/bisenet_optic_disc_512x512_1k.yml \
       --model_path output/iter_1000/model.pdparams \
       --image_path data/optic_disc_seg/JPEGImages/H0003.jpg \
       --save_dir output/result
首先解释一下上面命令的参数含义,
–config指定配置文件,其中包含了模型的名称。
–model_path指定模型路径
–image_path指定输入预测的图片路径
–save_dir指定了输出预测结果保存的路径。
还可以通过以下命令进行多尺度翻转预测。
–aug_pred是否开启增强预测
–scales缩放系数,默认为1.0
–flip_horizontal是否开启水平翻转
–flip_vertical是否开启垂直翻转
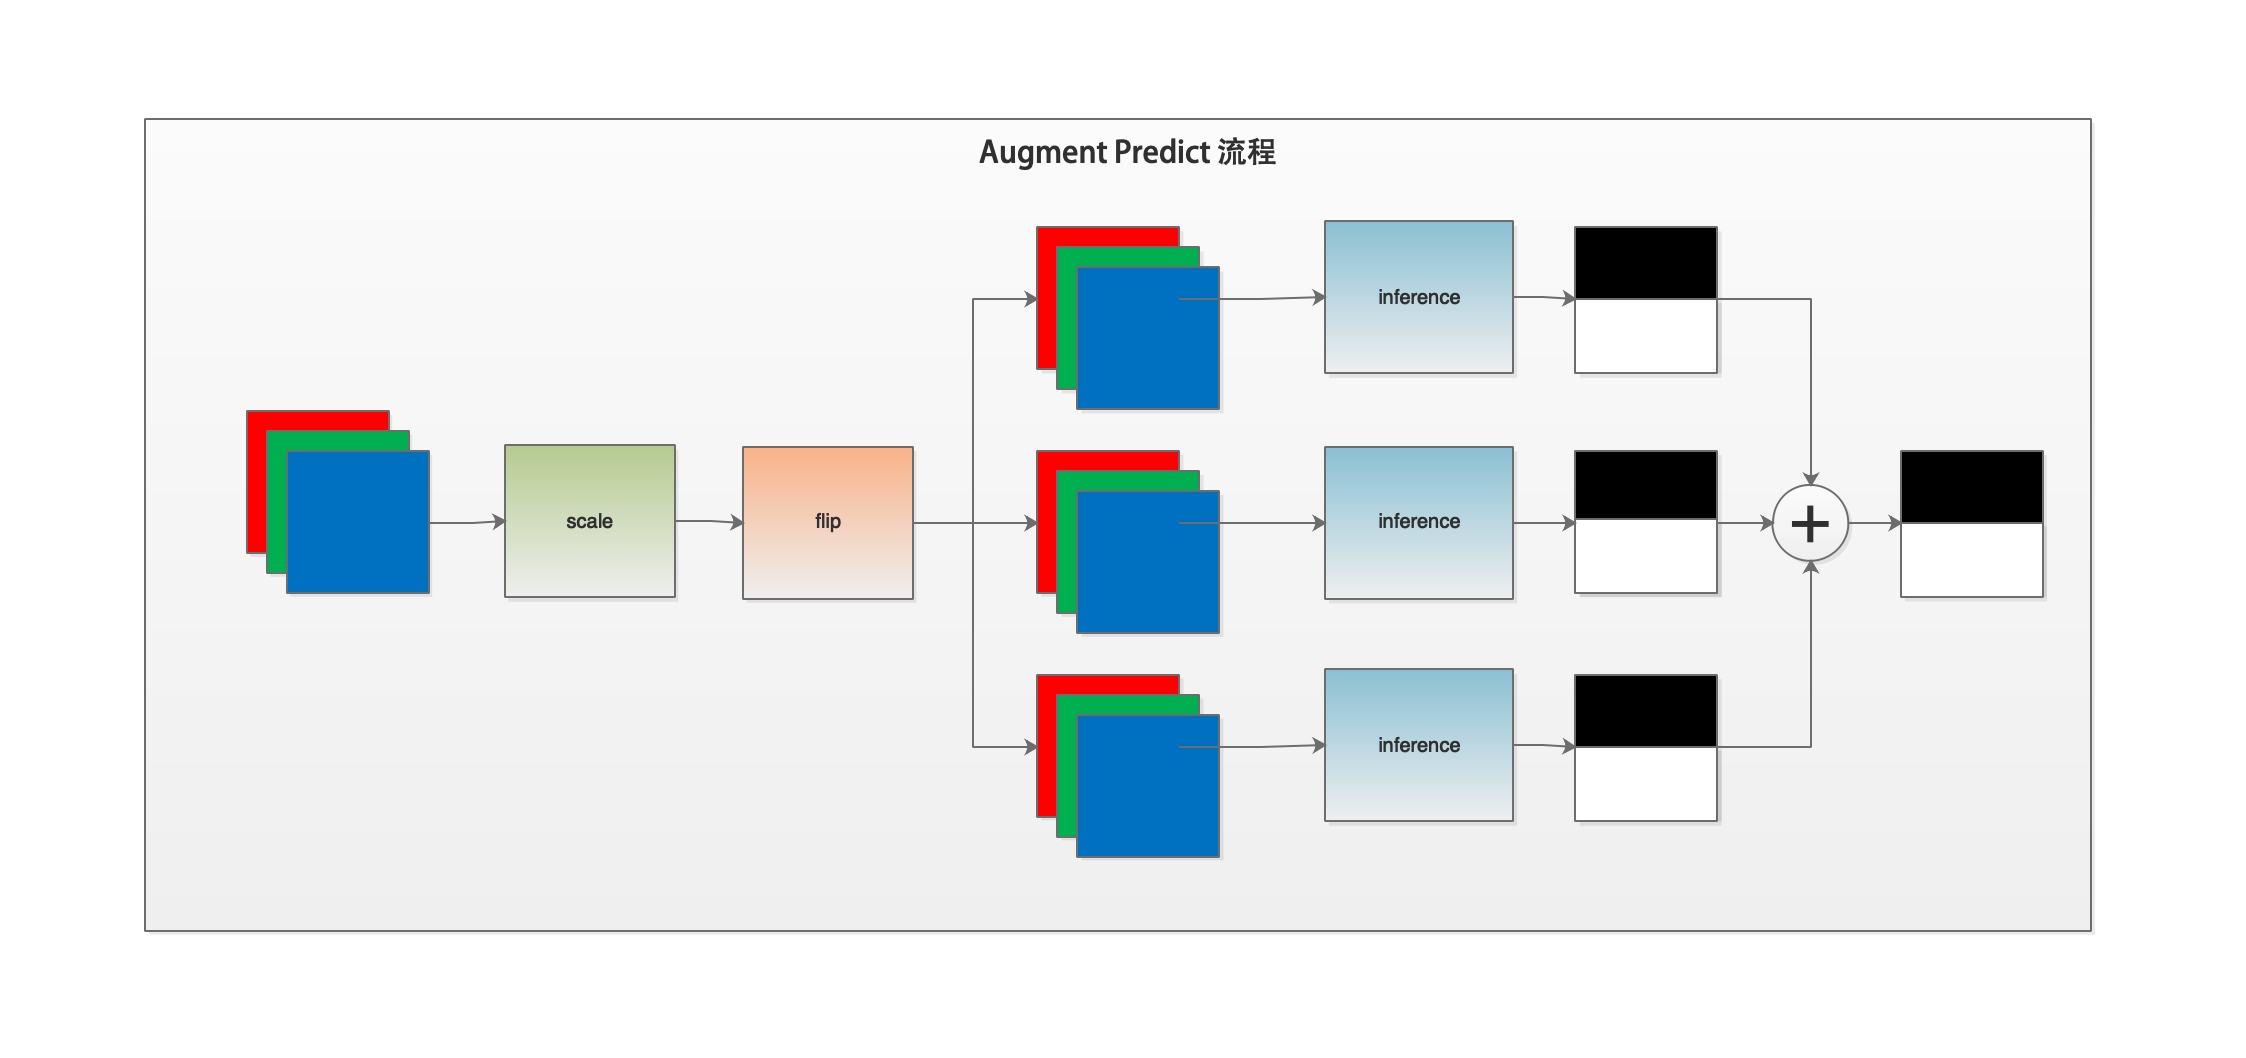
多尺度翻转预测是在普通预测的基础上,对输入图片进行多尺度缩放、水平垂直方向翻转等操作,得出多个预测结果,然后将多个预测结果相加作为最后的输出结果。可以通过下图了解一下预测程序的工作流程。
下面我们解读一下predict.py的代码。
if __name__ == '__main__':
	#解析传入参数
    args = parse_args()
    #执行主体函数
    main(args)
我们通过解读parse_args函数来了解一下predict.py脚本支持的输入参数与val.py基本一致。
def parse_args():
    parser = argparse.ArgumentParser(description='Model prediction')

    # params of prediction
    # 配置文件路径
    parser.add_argument(
        "--config", dest="cfg", help="The config file.", default=None, type=str)
    # 训练好的模型权重路径
    parser.add_argument(
        '--model_path',
        dest='model_path',
        help='The path of model for prediction',
        type=str,
        default=None)
    # 输入的预测图片路径
    parser.add_argument(
        '--image_path',
        dest='image_path',
        help=
        'The path of image, it can be a file or a directory including images',
        type=str,
        default=None)
    #输出的保存预测结果路径
    parser.add_argument(
        '--save_dir',
        dest='save_dir',
        help='The directory for saving the predicted results',
        type=str,
        default='./output/result')

    # augment for prediction
    #是否使用多尺度和翻转增强的方式预测。这种方法会带来精度的提升,推荐使用
    parser.add_argument(
        '--aug_pred',
        dest='aug_pred',
        help='Whether to use mulit-scales and flip augment for prediction',
        action='store_true')
    # 指定缩放系数,1.0为保持尺寸不变,可以指定多个系数,用空格隔开。
    parser.add_argument(
        '--scales',
        dest='scales',
        nargs='+',
        help='Scales for augment',
        type=float,
        default=1.0)
    # 开启图片水平翻转
    parser.add_argument(
        '--flip_horizontal',
        dest='flip_horizontal',
        help='Whether to use flip horizontally augment',
        action='store_true')
    #开启图片垂直翻转
    parser.add_argument(
        '--flip_vertical',
        dest='flip_vertical',
        help='Whether to use flip vertically augment',
        action='store_true')

    # sliding window prediction
    #滑动窗口参数配置,是否开启滑动窗口
    parser.add_argument(
        '--is_slide',
        dest='is_slide',
        help='Whether to prediction by sliding window',
        action='store_true')
    # 滑动窗口尺寸
    parser.add_argument(
        '--crop_size',
        dest='crop_size',
        nargs=2,
        help=
        'The crop size of sliding window, the first is width and the second is height.',
        type=int,
        default=None)
    # 滑动窗口移动的步长,需要指定水平方向和垂直方向两个参数。
    parser.add_argument(
        '--stride',
        dest='stride',
        nargs=2,
        help=
        'The stride of sliding window, the first is width and the second is height.',
        type=int,
        default=None)

    return parser.parse_args()
以上是输入参数的解析。在main函数中,主要使用core/predict.py模块中的predict函数对图片进行预测。
首先看一下predict函数的代码概要。

然后对predict函数进行代码解读。
def predict(model,
            model_path,
            transforms,
            image_list,
            image_dir=None,
            save_dir='output',
            aug_pred=False,
            scales=1.0,
            flip_horizontal=True,
            flip_vertical=False,
            is_slide=False,
            stride=None,
            crop_size=None):
    #加载模型权重
    para_state_dict = paddle.load(model_path)
    model.set_dict(para_state_dict)
    #设置模型为评估模式
    model.eval()

    added_saved_dir = os.path.join(save_dir, 'added_prediction')
    pred_saved_dir = os.path.join(save_dir, 'pseudo_color_prediction')

    logger.info("Start to predict...")
    #设置进度条
    progbar_pred = progbar.Progbar(target=len(image_list), verbose=1)
    #遍历图片列表
    for i, im_path in enumerate(image_list):
    	#读取图像
        im = cv2.imread(im_path)
        #获取图像宽高
        ori_shape = im.shape[:2]
        #对图像进行转换
        im, _ = transforms(im)
        #新增一个维度
        im = im[np.newaxis, ...]
        #将ndarray数据转换为张量
        im = paddle.to_tensor(im)
		#是否开启多尺度翻转预测
        if aug_pred:
            #开启多尺度翻转预测,则对图片进行多尺度翻转预测
            pred = infer.aug_inference(
                model,
                im,
                ori_shape=ori_shape,
                transforms=transforms.transforms,
                scales=scales,
                flip_horizontal=flip_horizontal,
                flip_vertical=flip_vertical,
                is_slide=is_slide,
                stride=stride,
                crop_size=crop_size)
        else:
            #如果没有开启多尺度翻转预测,则对图片进行常规的推理预测操作。
            pred = infer.inference(
                model,
                im,
                ori_shape=ori_shape,
                transforms=transforms.transforms,
                is_slide=is_slide,
                stride=stride,
                crop_size=crop_size)
        #将返回数据去除多余的通道,并转为uint8类型,方便保存为图片
        pred = paddle.squeeze(pred)
        pred = pred.numpy().astype('uint8')

        #获取保存图片的名称
        # get the saved name
        if image_dir is not None:
            im_file = im_path.replace(image_dir, '')
        else:
            im_file = os.path.basename(im_path)
        if im_file[0] == '/':
            im_file = im_file[1:]
		#保存结果
        added_image = utils.visualize.visualize(im_path, pred, weight=0.6)
        added_image_path = os.path.join(added_saved_dir, im_file)
        mkdir(added_image_path)
        cv2.imwrite(added_image_path, added_image)

		# 保存伪色彩预测结果
        # save pseudo color prediction
        pred_mask = utils.visualize.get_pseudo_color_map(pred)
        pred_saved_path = os.path.join(pred_saved_dir,
                                       im_file.rsplit(".")[0] + ".png")
        mkdir(pred_saved_path)
        pred_mask.save(pred_saved_path)

        # pred_im = utils.visualize(im_path, pred, weight=0.0)
        # pred_saved_path = os.path.join(pred_saved_dir, im_file)
        # mkdir(pred_saved_path)
        # cv2.imwrite(pred_saved_path, pred_im)
		#进度条进度加1
        progbar_pred.update(i + 1)
在上述代码中,根据输入参数不同,则调用不同的推理函数,已经在上一节评估代码解读中已经介绍,这里不再重复。
以上就是PaddleSeg当前版本主要代码的全部解读。
本系列文章也会定期与PaddleSeg版本更新保持同步。因本人水平有限,若有错误之处还请谅解。
PaddleSeg仓库地址:https://github.com/PaddlePaddle/PaddleSeg