Coobjc中的元组
底层主要依赖NSPointerArray进行实现,因为NSPointerArray支持插入nil指针,能配合元组中有对象为nil的特性。
比较引人入胜的设计
主要是co_tuple(...)这个宏定义。
co_tuple(...) [[COTuple alloc] initWithObjects:__VA_ARGS__, co_tupleSentinel()]
以__VA_ARGS__作为传参,但是支持nil进行传值。以自定义的全局单例co_tupleSentinel()作为结束标识。这样就可以支持所有类型的外部输入了。
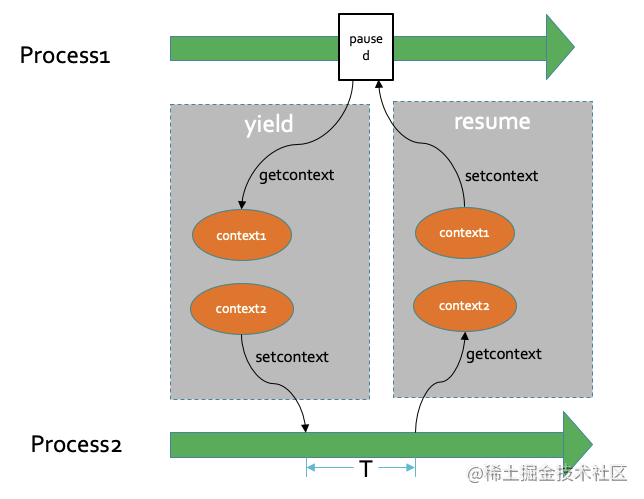
关于协程如何中断和继续
这里涉及到子程序的上下文切换,iOS 系统下,并没有提供直接的触及方式。所以coobjc是通过自己写的汇编,实现了上下文切换。
里面实现了arm64, armv7, x86_64, i386的上下文切换汇编代码,分别对应了64位和32位的真机和模拟器。
上下文切换主要是两个方法:
extern int coroutine_getcontext (coroutine_ucontext_t *__ucp);

extern int coroutine_setcontext (coroutine_ucontext_t *__ucp);
getcontext获取当前的上下文,也就是堆栈信息,setcontext设置当前的上下文。通过这样的方式,在iOS中实现了子程序调用的上下文切换。
coroutine.m 源码解读
这个文件里是关于协程创建、销毁,协程队列,协程调度管理的代码,里面代码量不多,总共只有300多行,皆由c实现。但由于可中断的设计,里面的源码阅读难度陡然上升。但是只要清楚概念,实际也并不会太难理解。
协程队列
协程队列是一条FIFO的队列,数据结构使用的是链表。每次新增一个协程到调度队列中,都通过尾插入的方式;每次从队列中pop出一个要被执行的协程,都是从链表的头取出。对应具体方法是:
// 添加协程到调度器的队列中
void scheduler_queue_push(coroutine_scheduler_t *scheduler, coroutine_t *co);
// 从调度器的协程队列中取出一个协程
coroutine_t *scheduler_queue_pop(coroutine_scheduler_t *scheduler);
协程和调度器的定义
协程
在coobjc里,协程用结构体进行定义,就是一个子程序的调度单位。在用户态里生成和销毁,十分轻量,上下文切换所涉及的资源量也很小,对CPU来说效率更高。
代码上,协程的定义也很精致,涉及到的数据并不多,定义如下:
    struct coroutine {
        coroutine_func entry;                   // Process entry.
        void *userdata;                         // Userdata.
        coroutine_func userdata_dispose;        // Userdata's dispose action.
        void *context;                          // Coroutine's Call stack data.
        void *pre_context;                      // Coroutine's source process's Call stack data.
        int status;                             // Coroutine's running status.
        uint32_t stack_size;                    // Coroutine's stack size
        void *stack_memory;                     // Coroutine's stack memory address.
        void *stack_top;                    // Coroutine's stack top address.
        struct coroutine_scheduler *scheduler;  // The pointer to the scheduler.

        struct coroutine *prev;
        struct coroutine *next;

        void *autoreleasepage;                  // If enable autorelease, the custom autoreleasepage.
        void *chan_alt;                         // If blocking by a channel, record the alt
        bool is_cancelled;                      // The coroutine is cancelled
        int8_t   is_scheduler;                  // The coroutine is a scheduler.
    };
结构体上的数据,可以归纳成几点:
- 带有协程的调用方法入口,带有始终标记着栈顶的指针;
- 带有协程当前对应的上下文 context,以及存储着由于开始协程的运行,而中断的前上下文 pre_context,每次在中断或完成自己的上下文时,调度器会回到写成的pre_context;
- 可以绑定一份用户数据;
- 协程的基本需求信息,开辟的栈内存,栈空间大小;
- 关联当前协程所处队列中的前一个协程与下一个协程;
- 被CSP阻塞时,channel的数据
chan_alt;
- 一些状态位。
由此可以一窥,协程在运行时,具体所需要的数据。
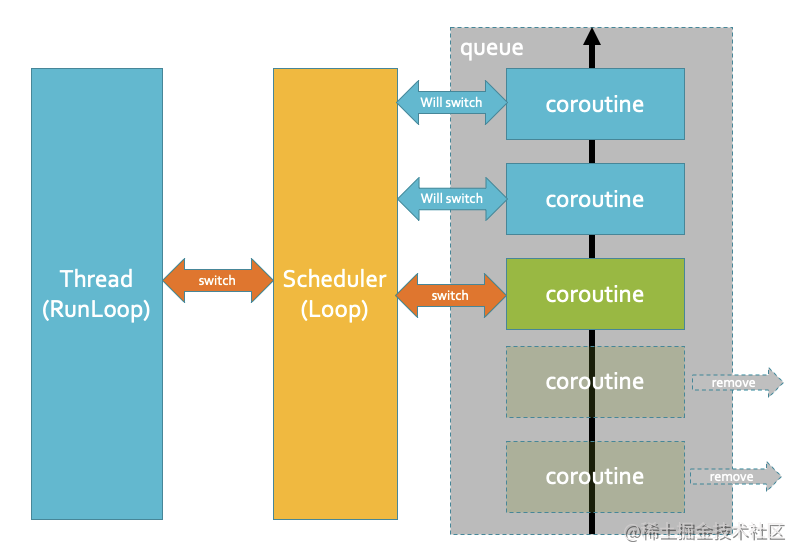
调度器
根据coobjc官方架构介绍文档的表述,协程调度器本身也是一个协程,这个其实从代码上,也能看得出来。
调度器的具体代码,可以放在下一节里说,先来看看调度器具体定义:
     /**
     Define the scheduler.
     One thread own one scheduler, all coroutine run this thread shares it.
     */
    struct coroutine_scheduler {
        coroutine_t         *main_coroutine;
        coroutine_t         *running_coroutine;
        coroutine_list_t     coroutine_queue;
    };
调度器scheduler中一共有三个属性:
-
main_coroutine: 调度器本身的协程,运行于当前线程中,里面的代码就是一个无限loop,不断将协程队列中的协程取出来运行,类似于iOS的NSRunloop;
-
running_coroutine: 当前scheduler正在执行的协程,并非main_coroutine,即是从协程队列中取出来执行的协程。调度器的主协程和调度队列的协程类似于包含关系,大的主协程包含协程队列中的协程;
-
coroutine_queue: 协程队列,一个链表,对应的是添加到当前调度队列中的所有协程。
如官方注释所说,每个线程仅拥有一个调度器,所有在同一线程运行的协程共享同一个调度器。
调度器如何调度协程
调度器创建与获取
coroutine_scheduler_t *coroutine_scheduler_self_create_if_not_exists(void) {

    if (!coroutine_scheduler_key) {
        pthread_key_create(&coroutine_scheduler_key, coroutine_scheduler_free);
    }

    void *schedule = pthread_getspecific(coroutine_scheduler_key);
    if (!schedule) {
        schedule = coroutine_scheduler_new();
        pthread_setspecific(coroutine_scheduler_key, schedule);
    }
    return schedule;
}
方法主要是coroutine_scheduler_self_create_if_not_exists,scheduler结构体通过pthread的接口,存储于线程身上。每次该方法都会去取当前线程绑定的scheduler,如果没有,则创建。
coroutine_scheduler_t *coroutine_scheduler_new(void) {

    coroutine_scheduler_t *scheduler = calloc(1, sizeof(coroutine_scheduler_t));
    coroutine_t *co = coroutine_create((void(*)(void *))coroutine_scheduler_main);
    co->stack_size = 16 * 1024; // scheduler does not need so much stack memory.
    scheduler->main_coroutine = co;
    co->scheduler = scheduler;
    co->is_scheduler = true;
    return scheduler;
}
该方法为创建scheduler的方法,一方面是创建scheduler这个结构体,另一方面是创建了调度器的主协程,并将主协程的入口定义为coroutine_scheduler_main。
// The main entry of the coroutine's scheduler
// The scheduler is just a special coroutine, so we can use yield.
void coroutine_scheduler_main(coroutine_t *scheduler_co) {

    coroutine_scheduler_t *scheduler = scheduler_co->scheduler;
    for (;;) {

        // Pop a coroutine from the scheduler's queue.
        coroutine_t *co = scheduler_queue_pop(scheduler);
        if (co == NULL) {
            // Yield the scheduler, give back cpu to origin thread.
            coroutine_yield(scheduler_co);

            // When some coroutine add to the scheduler's queue,
            // the scheduler will resume again,
            // then will resume here, continue the loop.
            continue;
        }
        // Set scheduler's current running coroutine.
        scheduler->running_coroutine = co;
        // Resume the coroutine
        coroutine_resume_im(co);

        // Set scheduler's current running coroutine to nil.
        scheduler->running_coroutine = nil;

        // if coroutine finished, free coroutine.
        if (co->status == COROUTINE_DEAD) {
            coroutine_close_ifdead(co);
        }
    }
}
这里涉及了协程的两个最重要的方法,中断和继续方法,对应coroutine_yield和coroutine_resume_im,正如前面所说,涉及到子程序的中断的代码,阅读难度都会陡然上升,这类似于编程语言中的goto。我们需要仔细判断,当前子程序中断后,后续的执行会去向何方,下次如何继续地回到中断的地方,才能明白这段代码。
好在这段代码写了很多注释,也解释了很多关键问题。
先撇开yield和resume的代码细节,暂时只需要知道这对方法是用来中断和继续协程用的。我们再从宏观的角度,来理解调度器主函数,究竟做了什么。
- 首先这是一个无限的循环,前面说了,类似NSRunloop,不断从调度器的协程队列中pop出协程来执行,具体执行一个协程,就是通过
coroutine_resume_im函数;
- 如果协程队列空了,就会
yield掉主协程。这时候loop就暂停了,当前线程的执行去哪了,没有了调度器阻塞住线程的执行资源,当前的线程会回到它本身的runloop调用中,如果有输入的block,它就会执行;
- 当下次有新的协程被添加进调度器的队列中,调度器的主协程就会继续,会回到主线程之前
yield的地方。而继续调度器主协程的方法,写在了coroutine_add中,如下;
if (!scheduler->running_coroutine) {
    coroutine_resume_im(co->scheduler->main_coroutine);
}
coroutine_add是将协程添加到调度器队列的主要方法,细节后面再说。
协程的新建、销毁
新建
协程的创建,由coroutine_create方法完成:
coroutine_t *coroutine_create(coroutine_func func) {
    coroutine_t *co = calloc(1, sizeof(coroutine_t));
    co->entry = func;
    co->stack_size = STACK_SIZE;
    co->status = COROUTINE_READY;

    // check debugger is attached, fix queue debugging.
    co_rebind_backtrace();
    return co;
}
协程的创建,主要涉及协程的入口方法,以及协程的栈空间大小,以及协程的初始状态赋值。co_rebind_backtrace();方法主要是为了修复连接调试器时的一些bug,不展开介绍。
#define STACK_SIZE (512*1024)
coobjc 为每个协程分配的栈空间是512KB,默认分配的空间实际上挺多的。但是 coobjc 并不会为每个加入到协程队列中的协程直接开辟栈空间,只有真实运行了的协程(resume过),才会拥有栈的内存。
销毁
协程的销毁主要是释放协程的栈空间、记录的上下文,以及它这个结构体本身,代码并不复杂。
void coroutine_close_ifdead(coroutine_t *co) {
    if (co->status == COROUTINE_DEAD) {
        coroutine_close(co);
    }
}

void coroutine_close(coroutine_t *co) {

    coroutine_setuserdata(co, nil, nil);
    if (co->stack_memory) {
        coroutine_memory_free(co->stack_memory, co->stack_size);
    }
    free(co->context);
    free(co->pre_context);
    free(co);
}
协程的启动、中断与继续执行
这涉及了协程整个运行周期,主要分为以下这些函数与阶段。
添加协程到协程队列
协程的启动从将协程添加到调度器的队列中开始,添加协程主要是调用coroutine_add:
void coroutine_add(coroutine_t *co) {
    if (!co->is_scheduler) {
        coroutine_scheduler_t *scheduler = coroutine_scheduler_self_create_if_not_exists();
        co->scheduler = scheduler;
        if (scheduler->main_coroutine->status == COROUTINE_DEAD) {
            coroutine_close_ifdead(scheduler->main_coroutine);
            coroutine_t *main_co = coroutine_create(coroutine_scheduler_main);
            main_co->is_scheduler = true;
            main_co->scheduler = scheduler;
            scheduler->main_coroutine = main_co;
        }
        scheduler_queue_push(scheduler, co);

        if (!scheduler->running_coroutine) {
            coroutine_resume_im(co->scheduler->main_coroutine);
        }
    }
}
这里主要是几个点:
- 这里面有一些容错代码,只有当协程不是一个调度器时,才能够被添加到协程队列中;如果调度器的主协程已经运行结束了,就重建一个——但这从逻辑上不太可能,因为调度器主协程,前面说到,就是一个死循环;
- 将协程推入到调度器的队列中;
- 如果调度器目前是挂起的状态,则驱动调度器运行(这在前面也提到了,调度器就是在这个方法中正式启动的)。
正式启动/继续一个协程
这个方法就是coroutine_resume_im,上面的函数里,也有调用。其实这个就是正式启动,或者说继续一个协程的核心函数。里面涉及到上下文切换函数的调用。
void coroutine_resume_im(coroutine_t *co) {
    switch (co->status) {
        case COROUTINE_READY:
        {
            co->stack_memory = coroutine_memory_malloc(co->stack_size);
            co->stack_top = co->stack_memory + co->stack_size - 3 * sizeof(void *);
            // get the pre context
            co->pre_context = malloc(sizeof(coroutine_ucontext_t));
            BOOL skip = false;
            coroutine_getcontext(co->pre_context);
            if (skip) {
                // when proccess reenter(resume a coroutine), skip the remain codes, just return to pre func.
                return;
            }
#pragma unused(skip)
            skip = true;

            free(co->context);
            co->context = calloc(1, sizeof(coroutine_ucontext_t));
            coroutine_makecontext(co->context, (IMP)coroutine_main, co, (void *)co->stack_top);
            // setcontext
            coroutine_begin(co->context);

            break;
        }
        case COROUTINE_SUSPEND:
        {
            BOOL skip = false;
            coroutine_getcontext(co->pre_context);
            if (skip) {
                // when proccess reenter(resume a coroutine), skip the remain codes, just return to pre func.
                return;
            }
#pragma unused(skip)
            skip = true;
            // setcontext
            coroutine_setcontext(co->context);

            break;
        }
        default:
            assert(false);
            break;
    }
}
代码也比较长,首先Ready是协程的初始状态,也就是当一个协程从未运行过,它的状态会是Ready,代码也会走进Ready的分支。
而Suspend则是代表,协程曾经运行过,但是被中断了,resume时,也相对简单,就是保存但前的上下文,并且切换到协程之前中断的上下文中。
而首次启动协程,涉及到的内容,相对多一些。也会保存当前的上下文到pre_context指针中,除此外主要是以下几点:
- 初始化协程对应的栈空间,记录栈顶的位置;
- 利用
coroutine_makecontext函数,新建一个程序调用上下文,并且堆栈从coroutine_main开始;
- 利用
coroutine_begin来切换到新建的上下文中,功能其实和coroutine_setcontext是类似。
这里的第二条可能比较难理解,贴出一张调试示意图解释:
也就是当前堆栈的栈顶,从coroutine_main函数开始了,也看不到coroutine_resume_im的踪迹了。
这里这么做的核心原因自然是这样更省栈空间,其次它带来了一些好处。我们在调试我们相关的代码时,不需要再关注协程的中间代码了。
协程的中断
协程的中断,并不是被动行为,而是主动行为。如果协程自己不交出运行权限,实际上调度器永远不会调度到下一个协程。这既是协程自己的特点,也是协程和线程不同的点。
协程和线程一样,会霸占CPU的时间片,但和线程不一样的是,协程不会定时切换。所以只要协程没有主动让渡执行权限,它就会一直运行。所以某种程度上,同一协程队列里的多任务,并不是同时进行的,它们是串行的。
但是它可以在遇到IO阻塞时,主动让渡执行权限。在这种模式下,只要设计得当,协程可以实现经典的生产者消费者模型,也可以解决多线程中的竞态条件问题,并且会比多线程加锁、以及信号量这些方式,高效得多。
在coobjc中,协程的中断是coroutine_yield实现的:
void coroutine_yield(coroutine_t *co)
{
    if (co == NULL) {
        // if null
        co = coroutine_self();
    }
    BOOL skip = false;
    coroutine_getcontext(co->context);
    if (skip) {
        return;
    }
#pragma unused(skip)
    skip = true;
    co->status = COROUTINE_SUSPEND;
    coroutine_setcontext(co->pre_context);
}
依然是通过自己实现的上下文切换汇编代码,来获取当前上下文coroutine_getcontext和设置上下文coroutine_setcontext。