JAX定位
基本用法
jit即时编译加速
-
纯函数:输入全部作为参数,结果全部作为输出。不使用一切外部变量。
-
jax transforms将语句翻译成简单的数据计算流(tracing),追踪数值/变量的变换轨迹
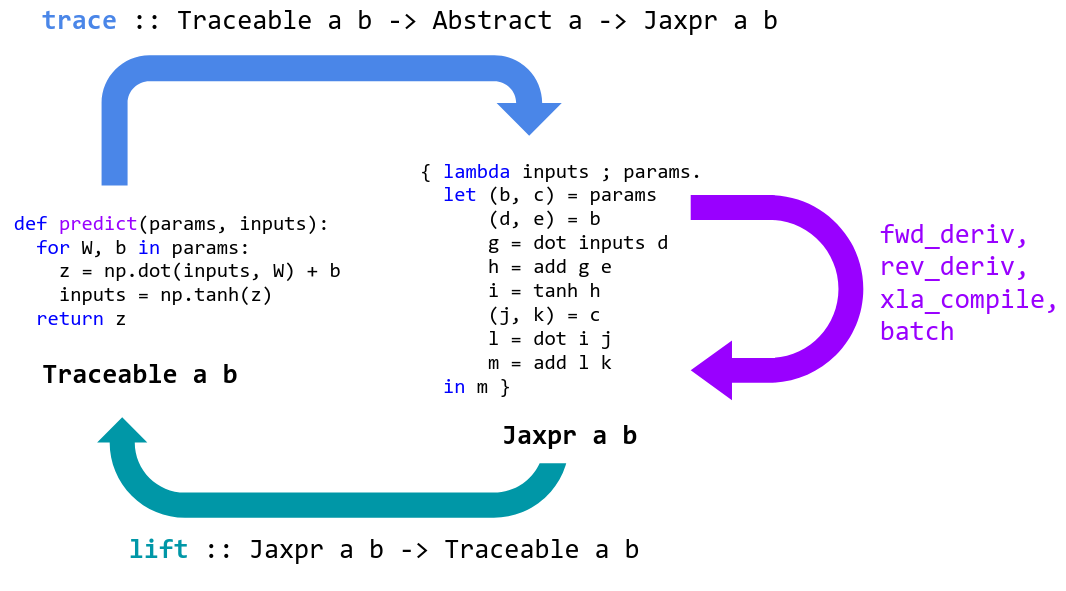
import jax
import jax.numpy as jnp

global_list = []

def f(x):
    global_list.append(x)    #  side-effect
	print(x)    			 #  side-effect
    return 2*x*x+3*x+3

jaxpr = jax.make_jaxpr(f)
jaxpr(3)
# make_jaxpr翻译(转换)后函数:
{ lambda ; a:i32[]. let
    b:i32[] = mul a 2
    c:i32[] = mul b a
    d:i32[] = mul a 3
    e:i32[] = add c d
    f:i32[] = add e 3
  in (f,) }
-
jit将代码直接编译成机器码,静态编译。由谷歌开发的XLA(加速线性代数)编译器完成。
-
会将编译后的代码进行缓存。只有输入变量形状改变,静态参数改变,才会重新编译。
# 举一个调用全局变量的问题:
g = 0

def f(x):
    return x + g

jit_f = jax.jit(f)

print ("First call: ", jit_f(3.))
输出:
First call: 3.0
如果此时将外部变量g改为10,再次运行程序:
g = 10.  # Update the global
jit_f(4.)
输出:
DeviceArray(4., dtype=float32, weak_type=True)
jit_f(jnp.array([4.]))	# 输入参数的shape改变

output:DeviceArray([14.], dtype=float32)
-
不支持分支语句,对循环语句有限制条件,强烈建议使用特定的函数
-
cond
def cond(pred, true_fun, false_fun, operand):
    if pred:
     	 return true_fun(operand)
    else:
     	 return false_fun(operand)
-
while_loop
def while_loop(cond_fun, body_fun, init_val):
    val = init_val
    while cond_fun(val):
      val = body_fun(val)
    return val
-
fori_loop
body_fun有两个参数:i和中间变量
def fori_loop(start, stop, body_fun, init_val):
    val = init_val
    for i in range(start, stop):
      	val = body_fun(i, val)
    return val
-
scan
- f: 双参数状态变化函数
- init: carry的初始值
- xs: 输入的变量
def scan(f, init, xs, length=None):
    if xs is None:
      	xs = [None] * length
    carry = init
	# core:
    ys = []
    for x in xs:
      	carry, y = f(carry, x)
      	ys.append(y)
    return carry, np.stack(ys)
vmap自动向量化,批处理
-
输入一个函数,输出一个函数。
-
自动对参数进行切分。默认对全部数组参数按照最高维进行切分。切分好的切片按照原函数函数分组进行计算,无法分组或分组后无法计算会报错,结果会stack进行堆砌。
from jax import numpy as jnp
from jax import random, jit, grad, vmap

x = jnp.array([[1, 2, 3], [0, 1, 2]]) # 2 * 3
y = jnp.array([[1, 2, 3], [0, 0, 0],[1, 2, 3], [0, 1, 2] ]) # 4 * 3
def fun(a1, a2):
    return (a1 * a2)
vmap_fun = vmap(fun)
print(vmap_fun(x, y))
ValueError: vmap got inconsistent sizes for array axes to be mapped:
arg 0 has shape (2, 3) and axis 0 is to be mapped
arg 1 has shape (4, 3) and axis 0 is to be mapped
so
arg 0 has an axis to be mapped of size 2
arg 1 has an axis to be mapped of size 4
-
in_axes指定输入数组的切片轴。out_axes指定输出函数的堆砌轴。
# 定义函数:
f = lambda x,w : jnp.dot(w,x)

# 定义batch_x, w。
x_batch = jax.random.normal(jax.random.PRNGKey(55), (4, 5, 3))
w = jax.random.normal(jax.random.PRNGKey(42), (100, 5))
batch_a = jax.vmap(f, in_axes=(0,None), out_axes=0)(x_batch, w)

print(batch_a,shape)
==================================
  out:
  (4, 100, 3)
pmap
- 单机多卡
- 和vmap类似。会把切片分散到不同的GPU里进行并行计算。会把用到的参数在每个GPU里复制一份。
- 使用并行结果的时候利用
API去获得不同GPU上的结果。
grad自动微分
-
·输入一个函数,输入一个函数
-
多参数函数,可指定对哪几个参数进行微分。默认只对第一个参数进行微分。
import jax

def f(x, y):
    return 2*x*x + 3*y + 3

x = 10
y = 5

jax.grad(f)(x, y)
jax.grad(f, argnums=(0,1,))(x, y)
输出:返回的是一个元组,可以被索引:
DeviceArray(40., dtype=float32, weak_type=True)

(
DeviceArray(40., dtype=float32, weak_type=True),
DeviceArray(3., dtype=float32, weak_type=True)
)
Pytree
JAX中的pytree指的是使用python容器(比如list、dict、tuple、OrderedDict、None、namedtuple等)储存的树状结构的数据(e.g., lists of lists of dicts)。如果一些数据没有被python容器装起来,那么它就是子叶数据(比如数值、数组、类、字符串),pytree中可以嵌套pytree。
嵌套式的list/dict/tuple结构,常常用来做神经网络的参数。
jnumpy
-
API和Numpy的API几乎完全一样。
import numpy as np

import jax.numpy as np
-
产生随机数的方式不一样。
np.random.seed(seed)
np.random.uniform()	# 0.54881350
np.random.unifrom() # 0.71518936
key = jax.random.PRNGKey(seed)	# key:DeviceArray([0, 0], dtype=uint32)
x = jax.random.uniform(key)	# 0.41845703
x = jax.random.uniform(key) # 0.41845703

key, subkey = jax.random.split(key)
x = jax.random.uniform(subkey) # 0.10546897
key 和 x 之间看似有一种映射关系。
在jax中使用随机数的精髓:永远不用重复使用你的key,善用jax.random.split()函数。
为了兼容jax的并行化、可重复以及可矢量化。
-
数组不可变
# NumPy: mutable arrays
x = np.arange(10)
x[0] = 10
# JAX: immutable arrays
x = jnp.arange(10)
x[0] = 10  # 报错

y = x.at[0].set(10)
new_array = index_update(old_array, index[1, :], 1.)
new_array = index_add(old_array, index[::2, 3:], 7)
允许就地改变变量使得程序分析和转换非常困难。
-
索引超出范围不报错,返回最后一个
jnp.arange(10)[11]
--------------------------------------------
out: DeviceArray(9, dtype=int32)
JAX PyTorch GCN实现对比
1. 导包
import jax
import jax.numpy as np
from jax import lax, random	# 随机数包
from jax.experimental import stax	# 计算模型
from jax.experimental.stax import Relu, LogSoftmax # 激活函数
from jax.nn.initializers import glorot_normal, glorot_uniform, normal, uniform, zeros
import optax	# 优化器
import jax.nn as nn	# nn库
import scipy.sparse as sp
import torch
import torch.nn as nn
import torch.nn.functional as F
import torch.nn.init as init
import torch.optim as optim
import matplotlib.pyplot as plt
2. 定义图卷积
def GraphConvolution(out_dim, bias=False, sparse=False):

    def matmul(A, B, shape):
        if sparse:
            return sp_matmul(A, B, shape)
        else:
            return np.matmul(A, B)

    def init_fun(rng, input_shape):
        output_shape = input_shape[:-1] + (out_dim,)
        k1, k2 = random.split(rng)
        W_init, b_init = glorot_uniform(), zeros
        W = W_init(k1, (input_shape[-1], out_dim))
        if bias:
            b = b_init(k2, (out_dim,))
        else:
            b = None
        return output_shape, (W, b)

    def apply_fun(params, feature, adj):
        W, b = params
        support = np.dot(feature, W)
        out = matmul(adj, support, support.shape[0])
        if bias:
            out += b
        return out

    return init_fun, apply_fun
class GraphConvolution(nn.Module):
	def __init__(self, input_dim, output_dim, use_bias=True):
        """图卷积: L*X*\theta
        Args:
        ----------
        input_dim: int
        节点输入特征的维度
        output_dim: int
        输出特征维度
        use_bias : bool, optional
        是否使用偏置
        """
        super(GraphConvolution, self).__init__()
        self.input_dim = input_dim
        self.output_dim = output_dim
        self.use_bias = use_bias
        self.weight = nn.Parameter(torch.Tensor(input_dim, output_dim))
        if self.use_bias:
        	self.bias = nn.Parameter(torch.Tensor(output_dim))
        else:
        	self.register_parameter('bias', None)
        self.reset_parameters()

    def reset_parameters(self):
        init.kaiming_uniform_(self.weight)
        if self.use_bias:
            init.zeros_(self.bias)

    def forward(self, adjacency, input_feature):
        """邻接矩阵是稀疏矩阵, 因此在计算时使用稀疏矩阵乘法
        Args:
        -------
        adjacency: torch.sparse.FloatTensor
        邻接矩阵
        input_feature: torch.Tensor
        输入特征
        """
        support = torch.mm(input_feature, self.weight)
        output = torch.sparse.mm(adjacency, support)
        if self.use_bias:
            output += self.bias
        retur output
总结: jax没有PyTorch的model类。jax的函数尽可能写成纯函数,不保留内部数据,数据尽可能作为参数,外界传入。
3. 定义神经网络
def GCN(nhid: int, nclass: int, sparse: bool = False):

    gc1_init, gc1_fun = GraphConvolution(nhid, sparse=sparse)
    gc2_init, gc2_fun = GraphConvolution(nclass, sparse=sparse)

    init_funs = [gc1_init, gc2_init]

    def init_fun(rng, input_shape):
        params = []
        for init_fun in init_funs:
            rng, layer_rng = random.split(rng)
            input_shape, param = init_fun(layer_rng, input_shape)
            params.append(param)
        return input_shape, params

    def apply_fun(params, feature, adj, **kwargs):
        rng = kwargs.pop('rng', None)
        k1, k2 = random.split(rng, 2)
        x = gc1_fun(params[0], feature, adj, rng=k1)
        x = nn.relu(x)
        x = gc2_fun(params[1], x, adj, rng=k2)
        x = nn.log_softmax(x)
        return x

    return init_fun, apply_fun
class GcnNet(nn.Module):
    """
    定义一个包含两层GraphConvolution的模型
    """
    def __init__(self, input_dim=1433):
        super(GcnNet, self).__init__()
        self.gcn1 = GraphConvolution(input_dim, 16)
        self.gcn2 = GraphConvolution(16, 7)

    def forward(self, adjacency, feature):
        h = F.relu(self.gcn1(adjacency, feature))
        logits = self.gcn2(adjacency, h)
        return logits
4.训练
-
模型初始化
init_fun, predict_fun = GCN(nhid=hidden, nclass=labels.shape[1],sparse=args.sparse)
_, init_params = init_fun(init_key, input_shape)
# 模型初始化
device = "cuda" if torch.cuda.is_available() else "cpu"
model = GcnNet().to(device)
-
定义损失函数
@jit
def loss(params, batch):
    """
    The idxes of the batch indicate which nodes are used to compute the loss.
    """
    inputs, targets, adj, rng, idx = batch
    preds = predict_fun(params, inputs, adj, rng=rng)
    ce_loss = -np.mean(np.sum(preds[idx] * targets[idx], axis=1))
    l2_loss = 5e-4 * optimizers.l2_norm(params)**2 # tf doesn't use sqrt
    return ce_loss + l2_loss
# 损失函数使用交叉熵
criterion = nn.CrossEntropyLoss().to(device)
-
定义优化器
optimizer = optax.adam(start_learning_rate)
opt_state = optimizer.init(init_params)	# 优化器状态初始化
# 优化器使用Adam
optimizer = optim.Adam(model.parameters(), lr=learning_rate, weight_decay=weight_decay)
-
正(反)向传播
for epoch in range(num_epochs):
    grads = jax.grad(compute_loss)(params, xs, ys)
  	updates, opt_state = optimizer.update(grads, opt_state)		# updates更新参数的方式
  	params = optax.apply_updates(params, updates)
for epoch in range(epochs):
    logits = model(tensor_adjacency, tensor_x) # 前向传播
    loss = criterion(logits, train_y) # 计算损失值
    optimizer.zero_grad()
    loss.backward() # 反向传播计算参数的梯度
    optimizer.step() # 使用优化方法进行梯度更新
jax的前向传播过程其实定义在了损失函数里面。在更新的时候,会调用损失函数求梯度,也就前向传播了。update完成了前向传播,求损失值,求梯度更新参数的过程。
总结: 最大的区别就是jax是面向纯函数编程,PyTorch是面向对象编程。
Neural Network Libraries
-
Flax - Centered on flexibility and clarity.
-
Haiku - Focused on simplicity, created by the authors of Sonnet at DeepMind.
-
Objax - Has an object oriented design similar to PyTorch.
-
Elegy - A High Level API for Deep Learning in JAX. Supports Flax, Haiku, and Optax.
-
Trax - “Batteries included” deep learning library focused on providing solutions for common workloads.
-
Jraph - Lightweight graph neural network library.
-
Neural Tangents - High-level API for specifying neural networks of both finite and infinite width.
-
HuggingFace - Ecosystem of pretrained Transformers for a wide range of natural language tasks (Flax).
-
Equinox - Callable PyTrees and filtered JIT/grad transformations => neural networks in JAX.
参考资料
Google JAX Notebook
JAX 中文教程
JAX官方文档
2022年,我该用JAX吗?GitHub 1.6万星,这个年轻的工具并不完美
Implementing Graph Neural Networks with JAX
《深入浅出图神经网络:GNN原理解析》(刘忠雨 李彦霖 周洋)