什么是区块链
区块链是一种数据结构,也是一个分布式数据库。
从技术上来看:区块是一种记录交易的数据结构,反映了一笔交易的资金流向。系统中已经达成的交易的区块连接在一起形成了一条主链,所有参与计算的节点都记录了主链或主链的一部分。
组成
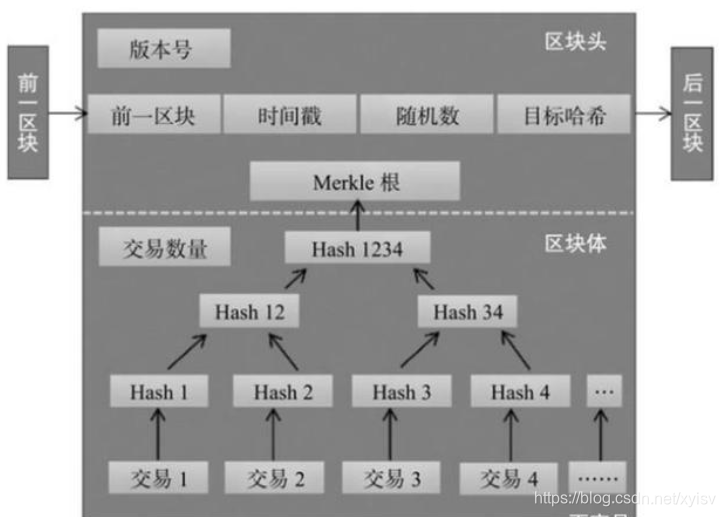
区块头
区块头主要包含的三组元数据分别是:(1)用于连接前面的区块、索引自父区块哈希值的数据;(2)挖矿难度、时间戳、Nonce(随机数,用于工作量证明算法的计数器,也可理解为记录解密该区块相关数学题的答案的值);(3)能够总结并快速归纳校验区块中所有交易数据的Merkle(默克尔)树根数据。当然区块头不仅仅包含这些元数据,还有其他比如:版本号、难度值等。
从这个结构来看,区块链的大部分功能都由区块头实现。
区块主体
区块主体所记录的交易信息是区块所承载的任务数据,具体包括交易双方的私钥、交易的数量、电子货币的数字签名等。
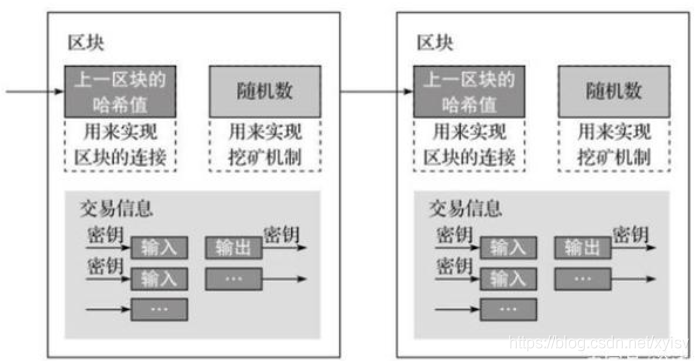
链
比特币系统大约每10分钟会创建一个区块,这个区块包含了这段时间里全网范围内发生的所有交易。每一个区块都保存了上一个区块的哈希值,使得每个区块都能找到其前一个区块,这样就将这些区块连接起来,形成了一个链式的结构。
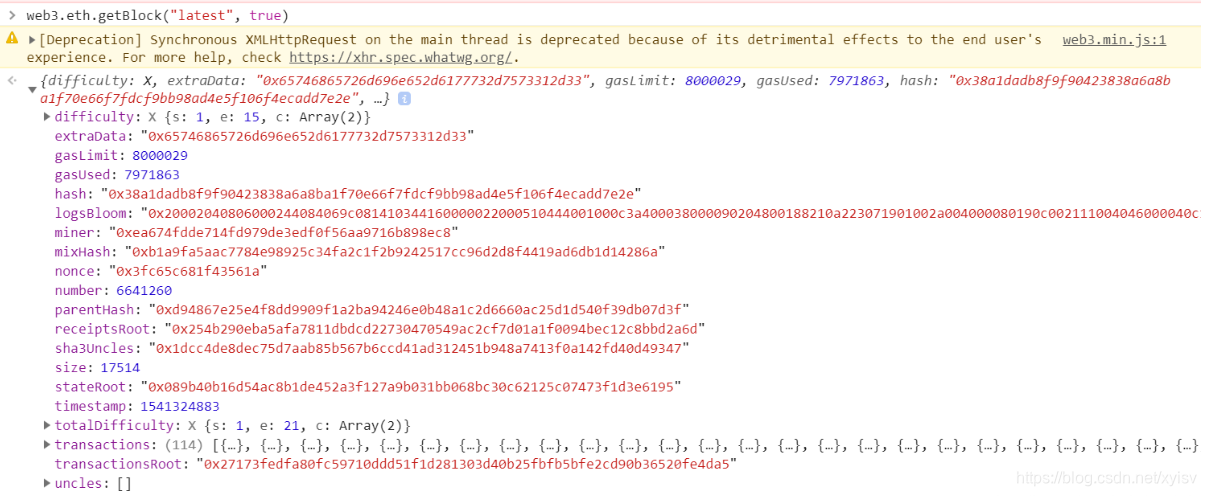
区块字段
- Difficulty 此区块的难度级别
- ExtraData 与此区块相关的附加数据 在区块链早期使用比较多,现在用的很少
- gasLimit 当前区块允许使用的最大gas, gas表示一种计算量, 使用的算力单位
- gasUsed 当前区块已经使用的gas
- Hash 当前区块的哈希值。如果区块没有被确认,这个字段会是null值
- LogsBloom 由日志信息组成的一个Bloom过滤器 (数据结构),区块没被确认- 是值为null
- Miner 取得该区块记账权的矿工
- mixHash 一个Hash值,当与nonce组合时,证明此区块已经执行了足够的计算
- nonce 一个Hash值,当与mixHash组合时,证明此区块已经执行了足够的计算
- Number 当前区块的计数(创世纪块的区块序号为0,对于每个后续区块,区块序号都增加1)
- parentHash 父区块头的Hash值(这也是使得区块变成区块链的原因)
- receiptsRoot 包含此区块所列的所有交易收据的树的根节点Hash值
- Sha3Uncles 数据块的哈希值
- Size 当前区块的字节大小
- stateRoot 区块状态树的根哈希
- Timestamp 区块打包时的unix时间戳
- totalDifficulty 区块链到当前区块的总难度
- Transactions 交易的对象
- transactionsRoot 区块的交易树的根哈希
- Uncles 叔哈希数组 树区块详见 https://blog.csdn.net/weixin_42874184/article/details/81735695
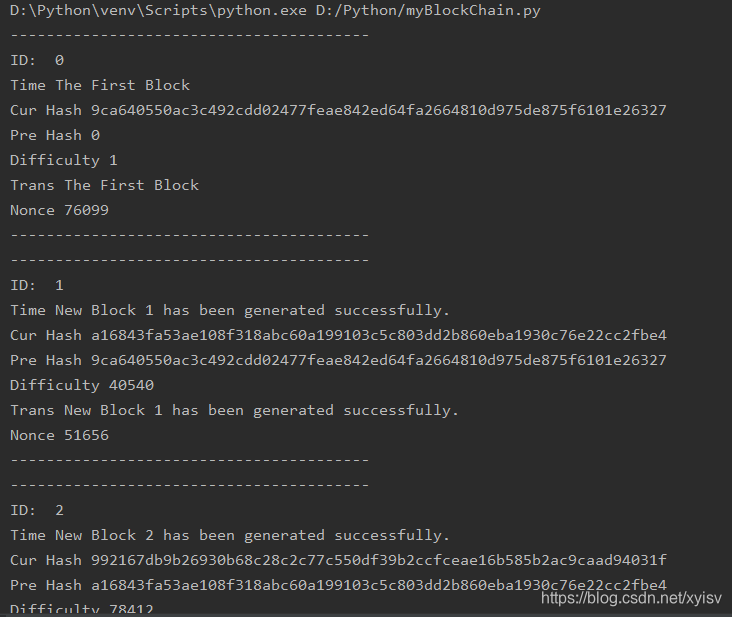
Python实现
实现了工作量证明,难度计算,哈希部分
import hashlib
import datetime
import random

class Block:
    def __init__(self, index, transaction, pre_hash, difficulty, nonce):
        self.index = index
        self._timestamp = datetime.datetime.now()
        self._transaction = transaction
        self._pre_hash = pre_hash
        self._nonce = nonce
        self._difficulty = difficulty
        self.hash = self.gen_hash()

    @property
    def get_hash(self):
        return self.hash

    @property
    def get_index(self):
        return self.index

    @property
    def get_transaction(self):
        return self._transaction

    @property
    def get_difficulty(self):
        return self._difficulty

    @property
    def get_timestamp(self):
        return self._timestamp

    @property
    def get_pre_hash(self):
        return self._pre_hash

    @property
    def get_nonce(self):
        return self._nonce

    def gen_hash(self):
        sha = hashlib.sha256()
        data = str(self.index) + str(self._timestamp) + str(self._transaction) + str(self._pre_hash) + str(self._nonce) + str(self._difficulty)
        sha.update(data.encode("utf8"))
        return sha.hexdigest()


class Blockchain:
    def __init__(self, max_blocks):
        self._chain_list = [Block(0, "The First Block", '0', '1', random.randrange(0, 99999))]
        self._previous_block = self._chain_list[0]
        self._current_block = 1
        self.max_blocks = max_blocks

    @staticmethod
    def create_next_block(self):
        last_block = self._chain_list[self._current_block - 1]
        last_difficulty = last_block.get_difficulty
        this_index = last_block.index + 1
        this_transaction = "New Block " + str(this_index) + " has been generated successfully."
        nonce = random.randrange(0, 99999)
        this_difficulty = self.proof_of_work(nonce)
        pre_hash = last_block.hash
        self._chain_list.append(Block(this_index, this_transaction, pre_hash, this_difficulty, nonce))
        self._current_block += 1

    def last_block(self):
        return self._chain_list[-1]

    def proof_of_work(self, nonce):
        proof = 0
        while self.valid_proof(self, proof, nonce) is False:
            proof += 1
        return proof

    @staticmethod
    def valid_proof(self, proof, nonce):
        guess = f'{proof}{nonce}'.encode()
        guess_hash = hashlib.sha256(guess).hexdigest()
        pattern = "0000"
        return guess_hash[:len(pattern)] == pattern

    def run(self):
        for i in range(self.max_blocks):
            self.create_next_block(self)

    def show_block(self, index):
        print("----------------------------------------")
        print("ID: ", self._chain_list[index].get_index)
        print("Time", self._chain_list[index].get_transaction)
        print("Cur Hash", self._chain_list[index].get_hash)
        print("Pre Hash", self._chain_list[index].get_pre_hash)
        print("Difficulty", self._chain_list[index].get_difficulty)
        print("Trans", self._chain_list[index].get_transaction)
        print("Nonce", self._chain_list[index].get_nonce)
        print("----------------------------------------")


myBlockChain = Blockchain(100)
myBlockChain.run()
for i in range(myBlockChain.max_blocks):
    myBlockChain.show_block(i)
参考文献
https://segmentfault.com/a/1190000014483104
https://blog.csdn.net/qq874455953/article/details/83718022
更多内容访问 omegaxyz.com
网站所有代码采用Apache 2.0授权
网站文章采用知识共享许可协议BY-NC-SA4.0授权
© 2020 • OmegaXYZ-版权所有 转载请注明出处
本文内容由网友自发贡献,版权归原作者所有,本站不承担相应法律责任。如您发现有涉嫌抄袭侵权的内容,请联系:hwhale#tublm.com(使用前将#替换为@)