Android开发 使用BottomNavigationView控件 实现底部导航栏功能
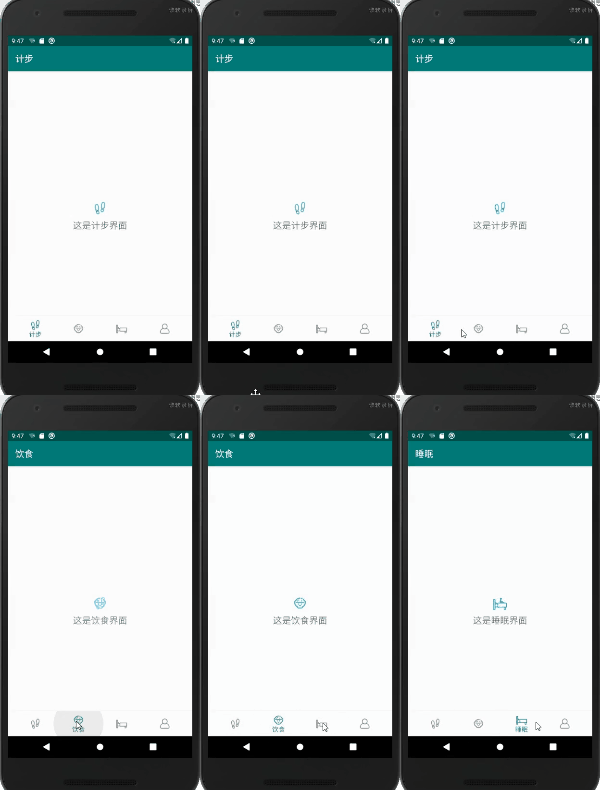
在一次项目中,由于要实现多个功能同时还要更好地利用屏幕的空间,所以使用底部导航栏来实现功能之间的切换,而且这种界面在实际应用中十分的常见,所以这里打算记录一下这个功能实现的过程,话不多说,先上效果图,如果对你有帮助可以继续往下看。
这里使用的是Android Studio 3.5.0版本,Android X进行开发。

在开发前,也通过互联网查询过一些资料,大体上一共有以下三种实现方法:
- RadioGroup + ViewPager
- 带页面跳转功能的底部导航
- BottomNavigationView
但是由于最近版本的更新,我在实现第一种和第二种方法上使用AndroidX兼容以前android.support.v4包和android.support.v7包上总是会出现一些小问题,所以在这里选择了Android Studio本身就带有的使用BottomNavigationView实现的活动界面。如上图所示,实现的效果还是可以的。
首先介绍一下结构,由于这里要实现4个功能:即计步、饮食、睡眠和我的功能,就需要有4个布局文件分别放在layout文件夹中。

一个目录布局文件放在menu(目录)文件下,这里就存放着底部导航栏的功能设计,比如说有几个功能按钮,按钮图标和文字是什么:

一个底部导航栏的布局文件放在navigation(导航)文件夹下,这个文件则对应着功能导航栏下每个按钮指向的文件布局:

由于是4个功能,且功能内使用的是创建回收方便分Fragment来实现的,那么每一个功能将对应一个Fragment,4个文件放置在java文件夹下:

那么接下来再一个一个讲,首先是xml布局文件,这里就以计步功能来讲解,剩下的3个则是同理,直接在对应位置修改内容即可。先上完整代码,这是step_count_layout.xml文件的代码
<?xml version="1.0" encoding="utf-8"?>
<RelativeLayout xmlns:android="http://schemas.android.com/apk/res/android"
    android:layout_width="match_parent"
    android:layout_height="match_parent" >

    <LinearLayout
        android:layout_width="wrap_content"
        android:layout_height="wrap_content"
        android:layout_centerInParent="true"
        android:orientation="vertical" >

        <ImageView
            android:layout_width="wrap_content"
            android:layout_height="wrap_content"
            android:layout_gravity="center_horizontal"
            android:src="@drawable/tab_step_count_press" />

        <TextView
            android:layout_width="wrap_content"
            android:layout_height="wrap_content"
            android:layout_gravity="center_horizontal"
            android:padding="10dp"
            android:text="这是计步界面"
            android:textSize="20sp" />
    </LinearLayout>

</RelativeLayout>
这样写出来,他就只对应了以下布局内容,再写4个这样的布局文件,将ImageView和TextView内的属性进行修改即可。这里的图标则是从阿里的一个免费的图标库中下载的,叫做iconfont,这里不得不说,这个图标库实在是非常好用,可以编辑图标的大小,颜色,分辨率等,非常方便了,哈哈哈,而且还免费下载;

那么具体的功能,以及布局则在后面文章进行展开,这篇博文主要是介绍导航栏的实现,后期只需在对应功能下的布局文件和Fragment文件内,进行功能的添加即可,这里就不赘述了。
完成布局文件后,接下来介绍menu文件夹下的bottom_nav_menu.xml,这个文件就对应了你要实现的功能的导航,先上代码。
<?xml version="1.0" encoding="utf-8"?>
<menu xmlns:android="http://schemas.android.com/apk/res/android">

    <item
        android:id="@+id/navigation_step_count"
        android:icon="@drawable/tab_step_count_default"
        android:title="计步" />

    <item
        android:id="@+id/navigation_diet"
        android:icon="@drawable/tab_diet_default"
        android:title="饮食" />

    <item
        android:id="@+id/navigation_sleep"
        android:icon="@drawable/tab_sleep_default"
        android:title="睡眠" />

    <item
        android:id="@+id/navigation_my"
        android:icon="@drawable/tab_my_default"
        android:title="我的" />
</menu>
项目中一共需要四个功能,那么每个功能就将对应一个item标签,具体的删改则根据你需要的功能来进行,十分的方便。标签内一共有3个属性:id、icon和title。
id就对应了你给此功能起的导航名字;
icon对应了你给这个功能添加的导航图标,图标放在了drawable文件夹内,这里的图标尽量小一点会比较好看
title则对应了用户点击了这个功能的导航按钮后,展示的文字,如下图所示,我点击了“我的”导航按钮,它显示了文字“我的”,而其他未选中的导航功能按键则没有文字显示,这里的文字对应的就是title属性。

接下来介绍的是navigation文件夹下的mobile_navigation.xml,他实现了点击到对应的功能导航按钮时,跳转到对应的布局文件,以及运行相应的fragment。同样先上代码:
<?xml version="1.0" encoding="utf-8"?>
<navigation xmlns:android="http://schemas.android.com/apk/res/android"
    xmlns:app="http://schemas.android.com/apk/res-auto"
    xmlns:tools="http://schemas.android.com/tools"
    android:id="@+id/mobile_navigation"
    app:startDestination="@+id/navigation_step_count">

    <fragment
        android:id="@+id/navigation_step_count"
        android:name="com.example.personal_health_manage.StepCountFragment"
        android:label="计步"
        tools:layout="@layout/step_count_layout" />

    <fragment
        android:id="@+id/navigation_diet"
        android:name="com.example.personal_health_manage.DietFragment"
        android:label="饮食"
        tools:layout="@layout/diet_layout" />

    <fragment
        android:id="@+id/navigation_sleep"
        android:name="com.example.personal_health_manage.SleepFragment"
        android:label="睡眠"
        tools:layout="@layout/sleep_layout" />

    <fragment
        android:id="@+id/navigation_my"
        android:name="com.example.personal_health_manage.MyFragment"
        android:label="我的"
        tools:layout="@layout/my_layout"/>

</navigation>
可以看到,项目中一共4个功能,对应了4个fragment标签,每个fragment标签负责连接对应的布局文件(layout属性)和fragment(name属性), 那么每个功能的具体逻辑以及代码就会展现在每个fragment内。
label属性对应的值会具体展现在每个功能界面内的上边框的标题,如下图所示:

这里对fragment做一下介绍
Fragment是依赖于Activity的,不能独立存在的。
一个Activity里可以有多个Fragment。
一个Fragment可以被多个Activity重用。
Fragment有自己的生命周期,并能接收输入事件。
我们能在Activity运行时动态地添加或删除Fragment。
这段关于fragment的介绍来自:
作者:JYGod丶
链接:https://www.jianshu.com/p/11c8ced79193
来源:简书
先写到这里啦,剩下的内容下次再写。哈哈哈。