一、概述
1、为什么使用多线程
在我们开发系统过程中,经常会处理一些好费时间的任务(如:向数据库中插入上百万数据,将会导致系统等待),这个时候就会自然想到使用多线程。
2、为什么使用Spring来实现多线程
- 使用Spring比使用JDK原生的并发API更简单。(@Async就能解决)。
- 一般的开发环境都会集成Spring框架,Bean也都交给Spring来管理,因此,Spring实现多线程更简单。
3、为什么需要使用异步
传统的调用方式:调用一个服务,需要等待服务调用完成后,才能执行后面的代码,因此,需要等待时间。
使用异步的方式:调用一个服务的同时,继续执行后面的代码,几乎是不需要多少的等待时间。
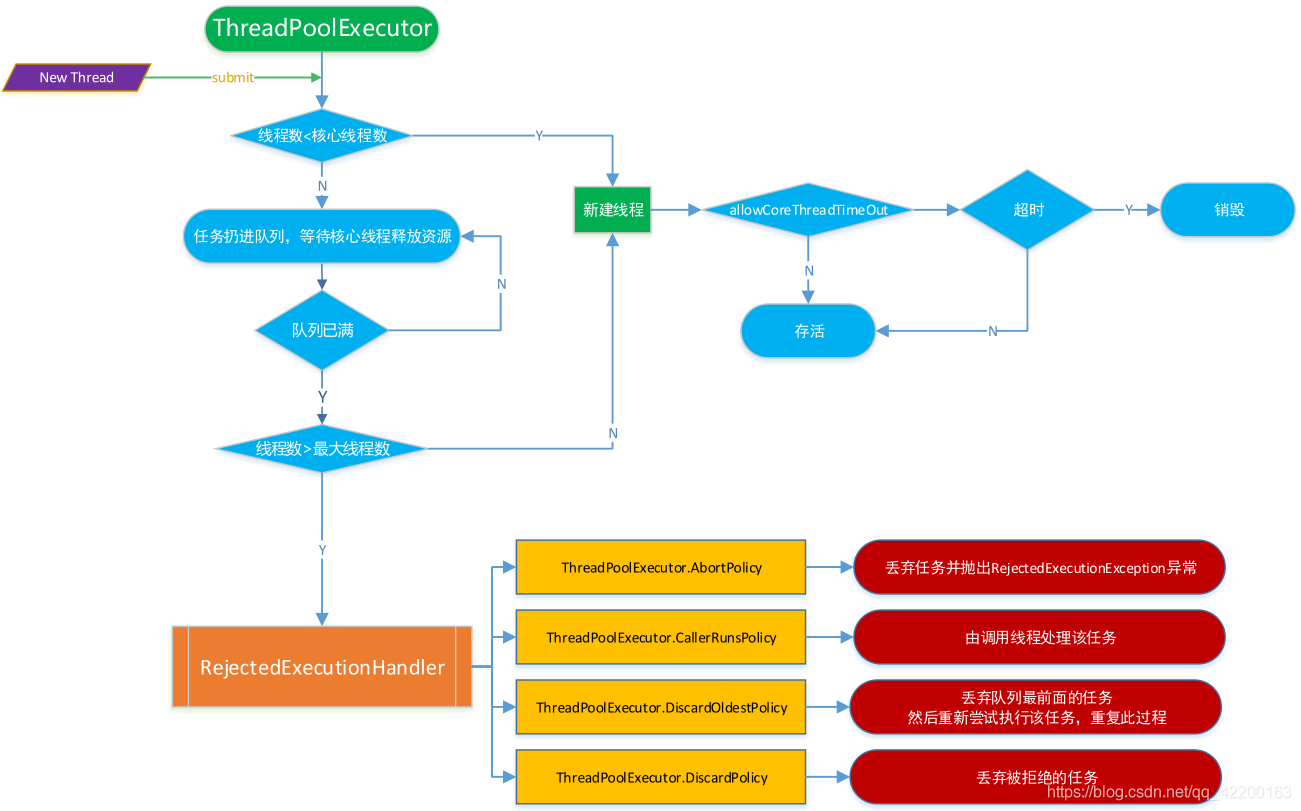
4、线程池ThreadPoolExecutor执行规则如下
二、SpringBoot使用多线程
1、如何使用
在 SpringBoot 中对其进行了简化处理,只需要配置一个类型为 java.util.concurrent.TaskExecutor
或其子类的 bean,并在配置类或直接在程序入口类上声明注解 @EnableAsync。
调用也简单,在由Spring管理的对象的方法上标注注解 @Async,显式调用即可生效。 一般使用 Spring 提供的
ThreadPoolTaskExecutor 类。
2、新增一个配置类,默认情况下使用 SimpleAsyncTaskExecutor
@Configuration
@EnableAsync //启用异步任务
public class ThreadConfig {
    @Bean
    public ThreadPoolTaskExecutor executor(){
        ThreadPoolTaskExecutor executor = new ThreadPoolTaskExecutor();
      	//配置核心线程数
        executor.setCorePoolSize(15);
      	//配置最大线程数
        executor.setMaxPoolSize(30);
      	//配置队列大小
        executor.setQueueCapacity(1000);
      	//线程的名称前缀
        executor.setThreadNamePrefix("Executor-");
      	//线程活跃时间(秒)
        //executor.setKeepAliveSeconds(60);
      	//等待所有任务结束后再关闭线程池
        executor.setWaitForTasksToCompleteOnShutdown(true);
      	//设置拒绝策略
        //executor.setRejectedExecutionHandler(new ThreadPoolExecutor.CallerRunsPolicy());
      	//执行初始化
        executor.initialize();
        return executor;
    }
}
3、使用线程池
//-----------------------接口类--------------------------
public interface UserService{
  	/**
  	 * 执行异步任务
  	 */
  	void writeText();
}
//-----------------------接口实现类----------------------
@Service
public class UserServiceImpl implement UserService{
  	private static Logger logger = LogManager.getLogger(AsyncServiceImpl.class.getName());

    @Async("asyncServiceExecutor")
  	@Over
    public void writeTxt(String fileName){
        logger.info("线程-" + Thread.currentThread().getId() + "在执行写入");
        try {
            File file = new File(fileName);
            List<String> lines = FileUtils.readLines(file);
            File copyFile = new File(fileName + "_copy.txt");
            lines.stream().forEach(string->{
                try {
                    FileUtils.writeStringToFile(copyFile,string,"utf8",true);
                    FileUtils.writeStringToFile(copyFile,"\r\n","utf8",true);
                } catch (IOException e) {
                    logger.info(e.getMessage());
                }
            });
        }catch (Exception e) {
            logger.info(e.getMessage());
        }
    }
}
//-----------------------测试----------------------------
@RunWith(SpringRunner.class)
@SpringBootTest
public class BootApplicationTests {
	@Autowired
	private AsyncService asyncService;

    @Test
    public void write() {
        File file = new File("F://ac_code_1//test.txt");
        try {
            FileUtils.writeStringToFile(file, "ceshi", "utf8");
            FileUtils.writeStringToFile(file, "\r\n", "utf8");
            FileUtils.writeStringToFile(file, "ceshi2", "utf8");
        } catch (IOException e) {
            e.printStackTrace();
        }
    }
}
三、SpringBoot使用多线程批量插入数据
1、新建配置类
@Configuration
public class ThreadConfig {
    @Bean
    public ThreadPoolTaskExecutor executor(){
        ThreadPoolTaskExecutor executor = new ThreadPoolTaskExecutor();
        //配置核心线程数
        executor.setCorePoolSize(15);
        //配置最大线程数
        executor.setMaxPoolSize(30);
        //配置队列大小
        executor.setQueueCapacity(1000);
        //线程的名称前缀
        executor.setThreadNamePrefix("Executor-");
        //等待所有任务结束后再关闭线程池
        executor.setWaitForTasksToCompleteOnShutdown(true);
        //执行初始化
        executor.initialize();
        return executor;
    }
}
2、service接口类
public interface ExchangeCouponInfoService extends IService<ExchangeCodeInfo> {
    /**
     * 批量新增兑换码
     * @param info
     * @return
     */
    boolean addBatchExchangeCode(List<ExchangeCodeInfo> info);
}
3、接口实现类
@Service
public class ExchangeCodeInfoServiceImpl  extends ServiceImpl<ExchangeCodeInfoMapper, ExchangeCodeInfo> implements ExchangeCouponInfoService{
    @Override
    public boolean addBatchExchangeCode(List<ExchangeCodeInfo> info) {
        return saveBatch(info);
    }
}
4、controller类
@RestController
@RequestMapping("/exchangecoupon")
public class ExchangeCouponController {
    @Autowired
    private ExchangeCouponInfoService exchangeCouponInfoService;

  	@Autowired
    private ThreadPoolTaskExecutor executor;

    @PostMapping("/saveExchangeCoupon")
    @BizDigestLog(bizType = "兑换券新增")
    public Results saveExchangeCoupon(@RequestBody ExchangeCouponModelAddReqDto model){
        log.info("兑换券新增入口 -> [{}]",model);
      	//线程异步导入数据库,会异步开始执行新增方法,同时原线程不会等待,继续执行。实现了异步操作。
      	executor.execute(() -> exchangeCouponInfoService.addBatchExchangeCode(model));
        Results results = Results.success(response);
        log.info("兑换券新增出口 -> [{}]",JSON.toJSONString(response));
        return results;
    }
}
转载:小幸运安然 - SpringBoot使用多线程