神经网络/人工神经网络的洋文是Neural Network,这个计算模型在上世纪40年代就出现了,但是直到2011、2012年由于大数据和深度学习的兴起,神经网络才得到广泛应用。
参看wiki神经网络:https://en.wikipedia.org/wiki/Artificial_neural_network
为了更好的理解Neural Network,本帖使用Python实现一个最简单的Feed-forward神经网络,然后使用MNIST数据集进行测试。
MNIST数据集简介
当我们学习新的编程语言时,通常第一个程序就是打印输出著名的“Hello World!”。在深度学习中,MNIST数据集就相当于Hello World。
MNIST是一个简单的计算机视觉数据集,它包含手写数字的图像集:

MNIST数据集下载地址: Yann LeCun,网站貌似被墙。
数据集:
- train-images-idx3-ubyte 训练数据图像 (60,000)
- train-labels-idx1-ubyte 训练数据label
- t10k-images-idx3-ubyte 测试数据图像 (10,000)
- t10k-labels-idx1-ubyte 测试数据label
每张图像是28 * 28像素:

我们的任务是使用上面数据训练一个可以准确识别手写数字的神经网络模型。
使用Python实现神经网络
import numpy as np
import random

class NeuralNet(object):

    # 初始化神经网络,sizes是神经网络的层数和每层神经元个数
    def __init__(self, sizes):
        self.sizes_ = sizes
        self.num_layers_ = len(sizes)  # 层数
        self.w_ = [np.random.randn(y, x) for x, y in zip(sizes[:-1], sizes[1:])]  # w_、b_初始化为正态分布随机数
        self.b_ = [np.random.randn(y, 1) for y in sizes[1:]]
生成正态分布随机数
正态分布或高斯分布是常用的概率分布,参看wikipedia:正态分布。
生成正态分布随机数的方法很多,我选择使用Marsaglia and Bray方法。
使用Python numpy生成正态分布随机数:
>>> import numpy as np
>>> np.random.randn()   # 标准正态分布
>>> 2.5 * np.random.randn() + 3  # 等同于randn(3, 2.5)    np.random.normal(3,2.5)
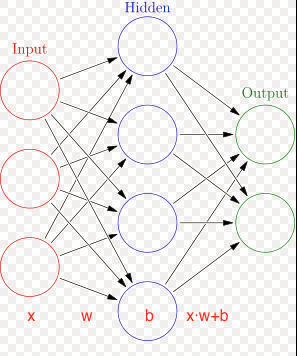
上图网络的构造方法:
net = NeuralNet([3, 4, 2])
print('权重: ', net.w_)
print('biases: ', net.b_)
权重:  [array([[-0.03149996,  3.24885342,  0.89417842],
              [-0.53460464, -1.5079955 ,  1.82663781],
              [-1.65116615,  0.38629484, -0.41583065],
              [-0.01554273,  0.07004582,  0.21980528]]),
       array([[ 0.14899583,  0.51091601,  1.49353662, -0.14707524],
              [ 0.64196923,  1.37387519,  0.92405086,  0.68889039]])]
biases:  [array([[ 0.06612406],
                 [-0.5104788 ],
                 [ 0.62980541],
                 [-0.9225445 ]]),
          array([[-0.26442039],
                 [-0.91214809]])]
定义Sigmoid函数:
    # Sigmoid函数,S型曲线,
    def sigmoid(self, z):
        return 1.0/(1.0+np.exp(-z))
    # Sigmoid函数的导函数
    def sigmoid_prime(self, z):
        return self.sigmoid(z)*(1-self.sigmoid(z))
画出这个函数图像:
import numpy as np
from matplotlib import pyplot

def sigmoid(z):
    return 1.0/(1.0+np.exp(-z))

x  = np.linspace(-8.0,8.0, 2000)
y = sigmoid(x)
pyplot.plot(x,y)
pyplot.show()
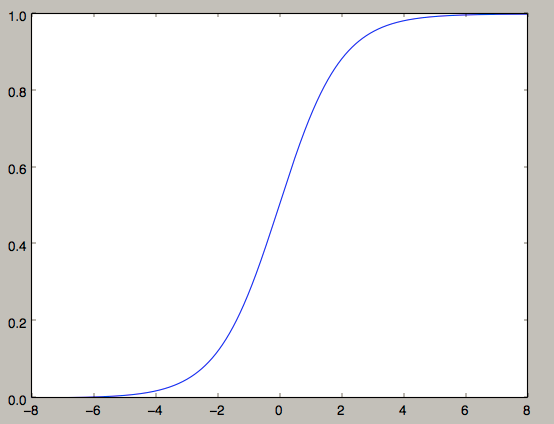
上面使用Sigmoid函数做为神经网络中的激活函数,其作用就是引入非线性。它的优点在于输出范围有限(0, 1),所以数据在传递的过程中不容易发散。可选择的激活函数有很多。
定义feedforward函数:
    # 给神经网络的输入x,输出对应的值
    def feedforward(self, x):
        for b, w in zip(self.b_, self.w_):
            x = self.sigmoid(np.dot(w, x)+b)
        return x
定义随机梯度下降函数,赋予神经网络学习的能力:
    # training_data是训练数据(x, y); epochs是训练次数; mini_batch_size是每次训练样本数; eta是learning rate
    def SGD(self, training_data, epochs, mini_batch_size, eta, test_data=None):
        if test_data:
            n_test = len(test_data)

        n = len(training_data)
        for j in range(epochs):
            random.shuffle(training_data)
            mini_batches = [training_data[k:k+mini_batch_size] for k in range(0, n, mini_batch_size)]
            for mini_batch in mini_batches:
                self.update_mini_batch(mini_batch, eta)
            if test_data:
                print("Epoch {0}: {1} / {2}".format(j, self.evaluate(test_data), n_test))
            else:
                print("Epoch {0} complete".format(j))
   def backprop(self, x, y):
        nabla_b = [np.zeros(b.shape) for b in self.b_]
        nabla_w = [np.zeros(w.shape) for w in self.w_]

        activation = x
        activations = [x]
        zs = []
        for b, w in zip(self.b_, self.w_):
            z = np.dot(w, activation)+b
            zs.append(z)
            activation = self.sigmoid(z)
            activations.append(activation)

        delta = self.cost_derivative(activations[-1], y) * \
            self.sigmoid_prime(zs[-1])
        nabla_b[-1] = delta
        nabla_w[-1] = np.dot(delta, activations[-2].transpose())

        for l in range(2, self.num_layers_):
            z = zs[-l]
            sp = self.sigmoid_prime(z)
            delta = np.dot(self.w_[-l+1].transpose(), delta) * sp
            nabla_b[-l] = delta
            nabla_w[-l] = np.dot(delta, activations[-l-1].transpose())
        return (nabla_b, nabla_w)

    def update_mini_batch(self, mini_batch, eta):
        nabla_b = [np.zeros(b.shape) for b in self.b_]
        nabla_w = [np.zeros(w.shape) for w in self.w_]
        for x, y in mini_batch:
            delta_nabla_b, delta_nabla_w = self.backprop(x, y)
            nabla_b = [nb+dnb for nb, dnb in zip(nabla_b, delta_nabla_b)]
            nabla_w = [nw+dnw for nw, dnw in zip(nabla_w, delta_nabla_w)]
        self.w_ = [w-(eta/len(mini_batch))*nw for w, nw in zip(self.w_, nabla_w)]
        self.b_ = [b-(eta/len(mini_batch))*nb for b, nb in zip(self.b_, nabla_b)]

    def evaluate(self, test_data):
        test_results = [(np.argmax(self.feedforward(x)), y) for (x, y) in test_data]
        return sum(int(x == y) for (x, y) in test_results)

    def cost_derivative(self, output_activations, y):
        return (output_activations-y)
完整代码:
# -*- coding:utf-8 -*-
import numpy as np
import random
import os, struct
from array import array as pyarray
from numpy import append, array, int8, uint8, zeros


class NeuralNet(object):
    # 初始化神经网络,sizes是神经网络的层数和每层神经元个数
    def __init__(self, sizes):
        self.sizes_ = sizes
        self.num_layers_ = len(sizes)  # 层数
        self.w_ = [np.random.randn(y, x) for x, y in zip(sizes[:-1], sizes[1:])]  # w_、b_初始化为正态分布随机数
        self.b_ = [np.random.randn(y, 1) for y in sizes[1:]]

    # Sigmoid函数,S型曲线,
    def sigmoid(self, z):
        return 1.0 / (1.0 + np.exp(-z))

    # Sigmoid函数的导函数
    def sigmoid_prime(self, z):
        return self.sigmoid(z) * (1 - self.sigmoid(z))

    def feedforward(self, x):
        for b, w in zip(self.b_, self.w_):
            x = self.sigmoid(np.dot(w, x) + b)
        return x

    def backprop(self, x, y):
        nabla_b = [np.zeros(b.shape) for b in self.b_]
        nabla_w = [np.zeros(w.shape) for w in self.w_]

        activation = x
        activations = [x]
        zs = []
        for b, w in zip(self.b_, self.w_):
            z = np.dot(w, activation) + b
            zs.append(z)
            activation = self.sigmoid(z)
            activations.append(activation)

        delta = self.cost_derivative(activations[-1], y) * \
                self.sigmoid_prime(zs[-1])
        nabla_b[-1] = delta
        nabla_w[-1] = np.dot(delta, activations[-2].transpose())

        for l in range(2, self.num_layers_):
            z = zs[-l]
            sp = self.sigmoid_prime(z)
            delta = np.dot(self.w_[-l + 1].transpose(), delta) * sp
            nabla_b[-l] = delta
            nabla_w[-l] = np.dot(delta, activations[-l - 1].transpose())
        return (nabla_b, nabla_w)

    def update_mini_batch(self, mini_batch, eta):
        nabla_b = [np.zeros(b.shape) for b in self.b_]
        nabla_w = [np.zeros(w.shape) for w in self.w_]
        for x, y in mini_batch:
            delta_nabla_b, delta_nabla_w = self.backprop(x, y)
            nabla_b = [nb + dnb for nb, dnb in zip(nabla_b, delta_nabla_b)]
            nabla_w = [nw + dnw for nw, dnw in zip(nabla_w, delta_nabla_w)]
        self.w_ = [w - (eta / len(mini_batch)) * nw for w, nw in zip(self.w_, nabla_w)]
        self.b_ = [b - (eta / len(mini_batch)) * nb for b, nb in zip(self.b_, nabla_b)]

    # training_data是训练数据(x, y);epochs是训练次数;mini_batch_size是每次训练样本数;eta是learning rate
    def SGD(self, training_data, epochs, mini_batch_size, eta, test_data=None):
        if test_data:
            n_test = len(test_data)

        n = len(training_data)
        for j in range(epochs):
            random.shuffle(training_data)
            mini_batches = [training_data[k:k + mini_batch_size] for k in range(0, n, mini_batch_size)]
            for mini_batch in mini_batches:
                self.update_mini_batch(mini_batch, eta)
            if test_data:
                print("Epoch {0}: {1} / {2}".format(j, self.evaluate(test_data), n_test))
            else:
                print("Epoch {0} complete".format(j))

    def evaluate(self, test_data):
        test_results = [(np.argmax(self.feedforward(x)), y) for (x, y) in test_data]
        return sum(int(x == y) for (x, y) in test_results)

    def cost_derivative(self, output_activations, y):
        return (output_activations - y)

    # 预测
    def predict(self, data):
        value = self.feedforward(data)
        return value.tolist().index(max(value))

    # 保存训练模型
    def save(self):
        pass  # 把_w和_b保存到文件(pickle)

    def load(self):
        pass


def load_mnist(dataset="training_data", digits=np.arange(10), path="./"):
    if dataset == "training_data":
        fname_image = os.path.join(path+dataset, 'train-images.idx3-ubyte')
        fname_label = os.path.join(path+dataset, 'train-labels.idx1-ubyte')
    elif dataset == "testing_data":
        fname_image = os.path.join(path+dataset, 't10k-images.idx3-ubyte')
        fname_label = os.path.join(path+dataset, 't10k-labels.idx1-ubyte')
    else:
        raise ValueError("dataset must be 'training_data' or 'testing_data'")

    flbl = open(fname_label, 'rb')
    magic_nr, size = struct.unpack(">II", flbl.read(8))
    lbl = pyarray("b", flbl.read())
    flbl.close()

    fimg = open(fname_image, 'rb')
    magic_nr, size, rows, cols = struct.unpack(">IIII", fimg.read(16))
    img = pyarray("B", fimg.read())
    fimg.close()

    ind = [k for k in range(size) if lbl[k] in digits]
    N = len(ind)

    images = zeros((N, rows, cols), dtype=uint8)
    labels = zeros((N, 1), dtype=int8)
    for i in range(len(ind)):
        images[i] = array(img[ind[i] * rows * cols: (ind[i] + 1) * rows * cols]).reshape((rows, cols))
        labels[i] = lbl[ind[i]]

    return images, labels

def load_samples(dataset="training_data"):
    image, label = load_mnist(dataset)

    X = [np.reshape(x, (28 * 28, 1)) for x in image]
    X = [x / 255.0 for x in X]  # 灰度值范围(0-255),转换为(0-1)

    # 5 -> [0,0,0,0,0,1.0,0,0,0];  1 -> [0,1.0,0,0,0,0,0,0,0]
    def vectorized_Y(y):
        e = np.zeros((10, 1))
        e[y] = 1.0
        return e

    if dataset == "training_data":
        Y = [vectorized_Y(y) for y in label]
        pair = list(zip(X, Y))
        return pair
    elif dataset == 'testing_data':
        pair = list(zip(X, label))
        return pair
    else:
        print('Something wrong')


if __name__ == '__main__':
    INPUT = 28 * 28
    OUTPUT = 10
    net = NeuralNet(sizes=[INPUT, 40, OUTPUT])
    train_set = load_samples(dataset='training_data')
    test_set = load_samples(dataset='testing_data')
    net.SGD(train_set, 13, 100, 3.0, test_data=test_set)
    # 准确率
    correct = 0
    for test_feature in test_set:
        if net.predict(test_feature[0]) == test_feature[1][0]:
            correct += 1
    print("准确率: ", correct / len(test_set))
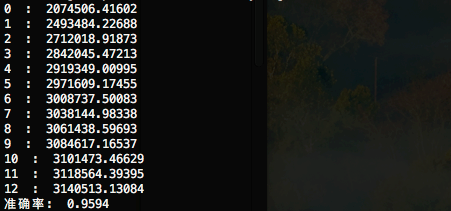
训练大概需要几分钟,执行结果:

你可以对神经元数量、训练次数等参数进行调整,准确率应该能达到96%+;和99.8%还有很大差距
# -*- coding:utf-8 -*-
import tensorflow as tf
import numpy as np
# tensorflow自带了MNIST数据集
from tensorflow.examples.tutorials.mnist import input_data


# 下载mnist数据集
mnist = input_data.read_data_sets('./data', one_hot=True)
# 数字(label)只能是0-9,神经网络使用10个出口节点就可以编码表示0-9;
#  1 -> [0,1.0,0,0,0,0,0,0,0]   one_hot表示只有一个出口节点是hot
#  2 -> [0,0.1,0,0,0,0,0,0,0]
#  5 -> [0,0,0,0,0,1.0,0,0,0]
#  /tmp是macOS的临时目录,重启系统数据丢失; Linux的临时目录也是/tmp

# 定义每个层有多少'神经元''
n_input_layer = 28 * 28  # 输入层
n_layer_1 = 500  # hide layer
n_layer_2 = 1000  # hide layer
n_layer_3 = 300  # hide layer(隐藏层)听着很神秘,其实就是除输入输出层外的中间层
n_output_layer = 10  # 输出层
"""
层数的选择:线性数据使用1层,非线性数据使用2册, 超级非线性使用3+册。层数/神经元 过多会导致过拟合
"""
# 每次使用100条数据进行训练
batch_size = 100

# 定义待训练的神经网络(feedforward)
def neural_network(data):
    # 定义第一层"神经元"的权重和biases
    layer_1_w_b = {'w_': tf.Variable(tf.random_normal([n_input_layer, n_layer_1])),
                   'b_': tf.Variable(tf.random_normal([n_layer_1]))}
    # 定义第二层"神经元"的权重和biases
    layer_2_w_b = {'w_': tf.Variable(tf.random_normal([n_layer_1, n_layer_2])),
                   'b_': tf.Variable(tf.random_normal([n_layer_2]))}
    # 定义第三层"神经元"的权重和biases
    layer_3_w_b = {'w_': tf.Variable(tf.random_normal([n_layer_2, n_layer_3])),
                   'b_': tf.Variable(tf.random_normal([n_layer_3]))}
    # 定义输出层"神经元"的权重和biases
    layer_output_w_b = {'w_': tf.Variable(tf.random_normal([n_layer_3, n_output_layer])),
                        'b_': tf.Variable(tf.random_normal([n_output_layer]))}
    # w·x+b
    layer_1 = tf.add(tf.matmul(data, layer_1_w_b['w_']), layer_1_w_b['b_'])
    layer_1 = tf.nn.relu(layer_1)  # 激活函数
    layer_2 = tf.add(tf.matmul(layer_1, layer_2_w_b['w_']), layer_2_w_b['b_'])
    layer_2 = tf.nn.relu(layer_2)  # 激活函数
    layer_3 = tf.add(tf.matmul(layer_2, layer_3_w_b['w_']), layer_3_w_b['b_'])
    layer_3 = tf.nn.relu(layer_3)  # 激活函数
    layer_output = tf.add(tf.matmul(layer_3, layer_output_w_b['w_']), layer_output_w_b['b_'])

    return layer_output

# 使用数据训练神经网络
def train_neural_network(X, Y):
    predict = neural_network(X)
    cost_func = tf.reduce_mean(tf.nn.softmax_cross_entropy_with_logits_v2(logits=predict,labels=Y))
    optimizer = tf.train.AdamOptimizer(learning_rate=0.001).minimize(loss=cost_func)  # learning rate 默认 0.001

    epochs = 13
    with tf.Session() as session:
        session.run(tf.initialize_all_variables())
        epoch_loss = 0
        for epoch in range(epochs):
            for i in range(int(mnist.train.num_examples / batch_size)):
                x, y = mnist.train.next_batch(batch_size)
                _, c = session.run([optimizer, cost_func], feed_dict={X: x, Y: y})
                epoch_loss += c
            print(epoch, ' : ', epoch_loss)

        # print(predict.eval(feed_dict={X:[features]}))
        correct = tf.equal(tf.argmax(predict, 1), tf.argmax(Y, 1))
        accuracy = tf.reduce_mean(tf.cast(correct, 'float'))
        print('准确率: ', accuracy.eval({X: mnist.test.images, Y: mnist.test.labels}))

X = tf.placeholder('float', [None, 28 * 28])
# [None, 28*28]代表数据数据的高和宽(矩阵),好处是如果数据不符合宽高,tensorflow会报错,不指定也可以。
Y = tf.placeholder('float')
train_neural_network(X, Y)
# -*- coding:utf-8 -*-
from sklearn import svm
import numpy as np
import os,struct
from array import array as pyarray
from numpy import append, array, int8, uint8, zeros
import pickle


def load_mnist(dataset="training_data", digits=np.arange(10), path="./"):
    if dataset == "training_data":
        fname_image = os.path.join(path+dataset, 'train-images.idx3-ubyte')
        fname_label = os.path.join(path+dataset, 'train-labels.idx1-ubyte')
    elif dataset == "testing_data":
        fname_image = os.path.join(path+dataset, 't10k-images.idx3-ubyte')
        fname_label = os.path.join(path+dataset, 't10k-labels.idx1-ubyte')
    else:
        raise ValueError("dataset must be 'training_data' or 'testing_data'")

    flbl = open(fname_label, 'rb')
    magic_nr, size = struct.unpack(">II", flbl.read(8))
    print(magic_nr, size)
    lbl = pyarray("b", flbl.read())
    print('lbl:',lbl)
    flbl.close()

    fimg = open(fname_image, 'rb')
    magic_nr, size, rows, cols = struct.unpack(">IIII", fimg.read(16))
    print(magic_nr, size, rows, cols)
    img = pyarray("B", fimg.read())
    # print('img:',img)
    fimg.close()

    ind = [k for k in range(size) if lbl[k] in digits]
    N = len(ind)

    images = zeros((N, rows, cols), dtype=uint8)
    labels = zeros((N, 1), dtype=int8)
    for i in range(len(ind)):
        images[i] = array(img[ind[i] * rows * cols: (ind[i] + 1) * rows * cols]).reshape((rows, cols))
        labels[i] = lbl[ind[i]]

    return images, labels

def load_samples(dataset="training_data"):
    image, label = load_mnist(dataset)

    # 把28*28二维数据转为一维数据
    X = [np.reshape(x, (28 * 28)) for x in image]
    X = [x / 255.0 for x in X]  # 灰度值范围(0-255),转换为(0-1)
    # print(X.shape)
    pair = list(zip(X, label))
    return pair


if __name__ == '__main__':
    train_set = load_samples(dataset='training_data')
    test_set = load_samples(dataset='testing_data')
    train_X = []
    train_Y = []
    for feature in train_set:
        train_X.append(feature[0])
        train_Y.append(feature[1][0])

    clf = svm.SVR()
    clf.fit(train_X, train_Y)  # 很耗时(我吃完饭回来,还没完,蛋碎... i5 CPU-8G RAM)
    # with open('minst.module', 'wb') as f:
    # pickle.dump(clf, f)
    # with open('minst.module', 'rb') as f:
    #	clf = pickle.load(f)
    test_X = []
    test_Y = []
    for feature in test_set:
        test_X.append(feature[0])
        test_Y.append(feature[1][0])
    # 准确率
    correct = 0
    i = 0
    for feature in test_X:
        predict = clf.predict(np.array(feature).reshape(1, -1))
        if round(float(predict)) == test_Y[i]:
            correct += 1
        i = i + 1
    print("准确率: ", correct / len(test_X))
执行结果:
准确率: 0.4023
来源:http://blog.topspeedsnail.com/archives/10377

