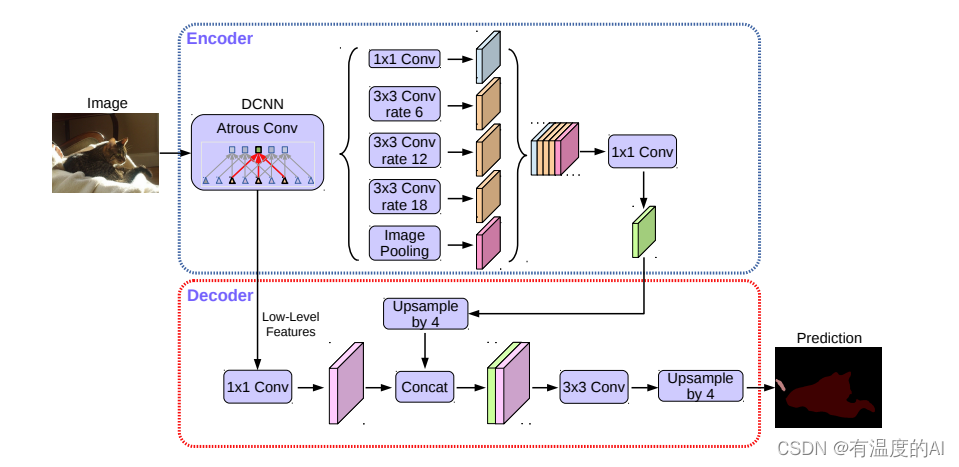
整体结构图
超详细结构图(Mobilenetv2主干)

主干网络搭建
import math
import os

import torch
import torch.nn as nn
import torch.utils.model_zoo as model_zoo

BatchNorm2d = nn.BatchNorm2d

def conv_bn(inp, oup, stride):
    return nn.Sequential(
        nn.Conv2d(inp, oup, 3, stride, 1, bias=False),
        BatchNorm2d(oup),
        nn.ReLU6(inplace=True)
    )

def conv_1x1_bn(inp, oup):
    return nn.Sequential(
        nn.Conv2d(inp, oup, 1, 1, 0, bias=False),
        BatchNorm2d(oup),
        nn.ReLU6(inplace=True)
    )

class InvertedResidual(nn.Module):
    def __init__(self, inp, oup, stride, expand_ratio):
        super(InvertedResidual, self).__init__()
        self.stride = stride
        assert stride in [1, 2]

        hidden_dim = round(inp * expand_ratio)
        self.use_res_connect = self.stride == 1 and inp == oup

        if expand_ratio == 1:
            self.conv = nn.Sequential(
                #--------------------------------------------#
                #   进行3x3的逐层卷积,进行跨特征点的特征提取
                #--------------------------------------------#
                nn.Conv2d(hidden_dim, hidden_dim, 3, stride, 1, groups=hidden_dim, bias=False),
                BatchNorm2d(hidden_dim),
                nn.ReLU6(inplace=True),
                #-----------------------------------#
                #   利用1x1卷积进行通道数的调整
                #-----------------------------------#
                nn.Conv2d(hidden_dim, oup, 1, 1, 0, bias=False),
                BatchNorm2d(oup),
            )
        else:
            self.conv = nn.Sequential(
                #-----------------------------------#
                #   利用1x1卷积进行通道数的上升
                #-----------------------------------#
                nn.Conv2d(inp, hidden_dim, 1, 1, 0, bias=False),
                BatchNorm2d(hidden_dim),
                nn.ReLU6(inplace=True),
                #--------------------------------------------#
                #   进行3x3的逐层卷积,进行跨特征点的特征提取
                #--------------------------------------------#
                nn.Conv2d(hidden_dim, hidden_dim, 3, stride, 1, groups=hidden_dim, bias=False),
                BatchNorm2d(hidden_dim),
                nn.ReLU6(inplace=True),
                #-----------------------------------#
                #   利用1x1卷积进行通道数的下降
                #-----------------------------------#
                nn.Conv2d(hidden_dim, oup, 1, 1, 0, bias=False),
                BatchNorm2d(oup),
            )

    def forward(self, x):
        if self.use_res_connect:
            return x + self.conv(x)
        else:
            return self.conv(x)

class MobileNetV2(nn.Module):
    def __init__(self, n_class=1000, input_size=224, width_mult=1.):
        super(MobileNetV2, self).__init__()
        block = InvertedResidual
        input_channel = 32
        last_channel = 1280
        interverted_residual_setting = [
            # 输入图像大小为512,512,3
            # t, c, n, s
            [1, 16, 1, 1], # 256, 256, 32 -> 256, 256, 16
            [6, 24, 2, 2], # 256, 256, 16 -> 128, 128, 24   2
            [6, 32, 3, 2], # 128, 128, 24 -> 64, 64, 32     4
            [6, 64, 4, 2], # 64, 64, 32 -> 32, 32, 64       7
            [6, 96, 3, 1], # 32, 32, 64 -> 32, 32, 96
            [6, 160, 3, 2], # 32, 32, 96 -> 16, 16, 160     14
            [6, 320, 1, 1], # 16, 16, 160 -> 16, 16, 320
        ]

        assert input_size % 32 == 0
        input_channel = int(input_channel * width_mult)
        self.last_channel = int(last_channel * width_mult) if width_mult > 1.0 else last_channel
        # 512, 512, 3 -> 256, 256, 32
        self.features = [conv_bn(3, input_channel, 2)]

        for t, c, n, s in interverted_residual_setting:
            output_channel = int(c * width_mult)
            for i in range(n):
                if i == 0:
                    self.features.append(block(input_channel, output_channel, s, expand_ratio=t))
                else:
                    self.features.append(block(input_channel, output_channel, 1, expand_ratio=t))
                input_channel = output_channel

        self.features.append(conv_1x1_bn(input_channel, self.last_channel))
        self.features = nn.Sequential(*self.features)

        self.classifier = nn.Sequential(
            nn.Dropout(0.2),
            nn.Linear(self.last_channel, n_class),
        )

        self._initialize_weights()

    def forward(self, x):
        x = self.features(x)
        x = x.mean(3).mean(2)
        x = self.classifier(x)
        return x

    def _initialize_weights(self):
        for m in self.modules():
            if isinstance(m, nn.Conv2d):
                n = m.kernel_size[0] * m.kernel_size[1] * m.out_channels
                m.weight.data.normal_(0, math.sqrt(2. / n))
                if m.bias is not None:
                    m.bias.data.zero_()
            elif isinstance(m, BatchNorm2d):
                m.weight.data.fill_(1)
                m.bias.data.zero_()
            elif isinstance(m, nn.Linear):
                n = m.weight.size(1)
                m.weight.data.normal_(0, 0.01)
                m.bias.data.zero_()


def load_url(url, model_dir='./model_data', map_location=None):
    if not os.path.exists(model_dir):
        os.makedirs(model_dir)
    filename = url.split('/')[-1]
    cached_file = os.path.join(model_dir, filename)
    if os.path.exists(cached_file):
        return torch.load(cached_file, map_location=map_location)
    else:
        return model_zoo.load_url(url,model_dir=model_dir)

def mobilenetv2(pretrained=False, **kwargs):
    model = MobileNetV2(n_class=1000, **kwargs)
    if pretrained:
        model.load_state_dict(load_url('https://github.com/bubbliiiing/deeplabv3-plus-pytorch/releases/download/v1.0/mobilenet_v2.pth.tar'), strict=False)
    return model

if __name__ == "__main__":
    model = mobilenetv2()
    for i, layer in enumerate(model.features):
        print(i, layer)
整体网络搭建
import torch
import torch.nn as nn
import torch.nn.functional as F
from nets.mobilenetv2 import mobilenetv2
from nets.xception import xception

class MobileNetV2(nn.Module):
	def __init__(self, downsample_factor=8, pretrained=True):
		super(MobileNetV2, self).__init__()
		from functools import partial

		model           = mobilenetv2(pretrained)
		self.features   = model.features[:-1]

		self.total_idx  = len(self.features)
		self.down_idx   = [2, 4, 7, 14]

		if downsample_factor == 8:
			for i in range(self.down_idx[-2], self.down_idx[-1]):
				self.features[i].apply(
					partial(self._nostride_dilate, dilate=2)
				)
			for i in range(self.down_idx[-1], self.total_idx):
				self.features[i].apply(
					partial(self._nostride_dilate, dilate=4)
				)
		elif downsample_factor == 16:
			for i in range(self.down_idx[-1], self.total_idx):
				self.features[i].apply(
					partial(self._nostride_dilate, dilate=2)
				)

	def _nostride_dilate(self, m, dilate):
		classname = m.__class__.__name__
		if classname.find('Conv') != -1:
			if m.stride == (2, 2):
				m.stride = (1, 1)
				if m.kernel_size == (3, 3):
					m.dilation = (dilate//2, dilate//2)
					m.padding = (dilate//2, dilate//2)
			else:
				if m.kernel_size == (3, 3):
					m.dilation = (dilate, dilate)
					m.padding = (dilate, dilate)

	def forward(self, x):
		#输出两个有效特征层
		low_level_features = self.features[:4](x) #浅层有效特征层,即interverted_residual_setting中第二行的输出 128,128,24
		x = self.features[4:](low_level_features) #深层有效特征层,即interverted_residual_setting中最后一行的输出 32,32,320
		return low_level_features, x


#-----------------------------------------#
#   ASPP特征提取模块
#   利用不同膨胀率的膨胀卷积进行特征提取
#-----------------------------------------#
class ASPP(nn.Module):
	def __init__(self, dim_in, dim_out, rate=1, bn_mom=0.1):
		super(ASPP, self).__init__()
		self.branch1 = nn.Sequential(
				nn.Conv2d(dim_in, dim_out, 1, 1, padding=0, dilation=rate, bias=True), #dilation=1即没使用膨胀卷积
				nn.BatchNorm2d(dim_out, momentum=bn_mom),
				nn.ReLU(inplace=True), #30,30,256
		)
		self.branch2 = nn.Sequential(
				nn.Conv2d(dim_in, dim_out, 3, 1, padding=6*rate, dilation=6*rate, bias=True), #dilation=6的膨胀卷积
				nn.BatchNorm2d(dim_out, momentum=bn_mom),
				nn.ReLU(inplace=True), #30,30,256
		)
		self.branch3 = nn.Sequential(
				nn.Conv2d(dim_in, dim_out, 3, 1, padding=12*rate, dilation=12*rate, bias=True), #dilation12的膨胀卷积
				nn.BatchNorm2d(dim_out, momentum=bn_mom),
				nn.ReLU(inplace=True), #30,30,256
		)
		self.branch4 = nn.Sequential(
				nn.Conv2d(dim_in, dim_out, 3, 1, padding=18*rate, dilation=18*rate, bias=True), #dilation=18的膨胀卷积
				nn.BatchNorm2d(dim_out, momentum=bn_mom),
				nn.ReLU(inplace=True), #30,30,256
		)
		self.branch5 = nn.Sequential(
				nn.AdaptiveAvgPool2d((1, 1)),
				nn.Conv2d(dim_in, dim_out, 1, 1, 0, bias=True),
				nn.BatchNorm2d(dim_out, momentum=bn_mom),
				nn.ReLU(inplace=True)
		)

		# self.branch5_conv = nn.Conv2d(dim_in, dim_out, 1, 1, 0, bias=True)
		# self.branch5_bn = nn.BatchNorm2d(dim_out, momentum=bn_mom)
		# self.branch5_relu = nn.ReLU(inplace=True)

		self.conv_cat = nn.Sequential(
				nn.Conv2d(dim_out*5, dim_out, 1, 1, padding=0, bias=True),
				nn.BatchNorm2d(dim_out, momentum=bn_mom),
				nn.ReLU(inplace=True), #30,30,256
		)

	def forward(self, x):
		#获取输入特征图的高宽
		[b, c, row, col] = x.size()
		#-----------------------------------------#
		#   一共五个分支
		#-----------------------------------------#
		conv1x1 = self.branch1(x) #30,30,256
		# print("X1.shape", conv1x1.size())
		conv3x3_1 = self.branch2(x) #30,30,256
		# print("X2.shape", conv3x3_1.size())
		conv3x3_2 = self.branch3(x) #30,30,256
		# print("X3.shape", conv3x3_2.size())
		conv3x3_3 = self.branch4(x) #30,30,256
		# print("X4.shape", conv3x3_3.size())
		#-----------------------------------------#
		#   第五个分支,全局平均池化+卷积
		#-----------------------------------------#
		# global_feature = torch.mean(x,2,True)
		# global_feature = torch.mean(global_feature,3,True)
		# global_feature = self.branch5_conv(global_feature)
		# global_feature = self.branch5_bn(global_feature)
		# global_feature = self.branch5_relu(global_feature)
		global_feature = self.branch5(x)
		# print("X5.shape", global_feature.size())
		global_feature = F.interpolate(global_feature, (row, col), None, 'bilinear', True) #30,30,256

		#-----------------------------------------#
		#   将五个分支的内容堆叠起来
		#   然后1x1卷积整合特征。
		#-----------------------------------------#
		feature_cat = torch.cat([conv1x1, conv3x3_1, conv3x3_2, conv3x3_3, global_feature], dim=1) #30,30,256*5
		result = self.conv_cat(feature_cat) #堆叠完后利用1*1卷积对通道数进行调整,30,30,256
		return result

class DeepLab(nn.Module):
	def __init__(self, num_classes, backbone="mobilenet", pretrained=True, downsample_factor=16):
		super(DeepLab, self).__init__()
		if backbone=="xception":
			#----------------------------------#
			#   获得两个特征层
			#   浅层特征    [128,128,256]
			#   主干部分    [30,30,2048]
			#----------------------------------#
			self.backbone = xception(downsample_factor=downsample_factor, pretrained=pretrained)
			in_channels = 2048
			low_level_channels = 256
		elif backbone=="mobilenet":
			#----------------------------------#
			#   获得两个特征层
			#   浅层特征    [128,128,24]
			#   主干部分    [30,30,320]
			#----------------------------------#
			self.backbone = MobileNetV2(downsample_factor=downsample_factor, pretrained=pretrained)
			in_channels = 320
			low_level_channels = 24
		else:
			raise ValueError('Unsupported backbone - `{}`, Use mobilenet, xception.'.format(backbone))

		#-----------------------------------------#
		#   ASPP特征提取模块
		#   利用不同膨胀率的膨胀卷积进行特征提取
		#-----------------------------------------#
		self.aspp = ASPP(dim_in=in_channels, dim_out=256, rate=16//downsample_factor)

		#----------------------------------#
		#   浅层特征边
		#----------------------------------#
		self.shortcut_conv = nn.Sequential(
			nn.Conv2d(low_level_channels, 48, 1),
			nn.BatchNorm2d(48),
			nn.ReLU(inplace=True)
		)

		self.cat_conv = nn.Sequential(
			nn.Conv2d(48+256, 256, 3, stride=1, padding=1),
			nn.BatchNorm2d(256),
			nn.ReLU(inplace=True),
			nn.Dropout(0.5),

			nn.Conv2d(256, 256, 3, stride=1, padding=1),
			nn.BatchNorm2d(256),
			nn.ReLU(inplace=True),

			nn.Dropout(0.1),
		)
		self.cls_conv = nn.Conv2d(256, num_classes, 1, stride=1)

	def forward(self, x): #此处传入的x为原图b,3,512,512
		H, W = x.size(2), x.size(3)
		#-----------------------------------------#
		#   获得两个特征层
		#   low_level_features: 浅层特征-进行卷积处理 128,128,24
		#   x : 主干部分-利用ASPP结构进行加强特征提取 30,30,256
		#-----------------------------------------#
		low_level_features, x = self.backbone(x)
		x = self.aspp(x) #aspp后的输出为
		#浅层特征网络经过一个1*1卷积,128,128,24->128,128,48
		low_level_features = self.shortcut_conv(low_level_features)

		#-----------------------------------------#
		#   将加强特征边上采样
		#   与浅层特征堆叠后利用卷积进行特征提取
		#-----------------------------------------#
		x = F.interpolate(x, size=(low_level_features.size(2), low_level_features.size(3)), mode='bilinear', align_corners=True) #x:128,128,256
		x = self.cat_conv(torch.cat((x, low_level_features), dim=1)) #128,128,256+48->128,128,256
		x = self.cls_conv(x) #128,128,256->128,128,num_classes
		x = F.interpolate(x, size=(H, W), mode='bilinear', align_corners=True) #512,512,num_classes
		return x

# if __name__ == '__main__':
#     # 测试输出尺寸使用
#     aspp = ASPP(320, 256)
#     input = torch.randn(2, 320, 176, 240);print('input_size:', input.size())
#     out = aspp(input)
reference
【DeepLabV3源码讲解(Pytorch)】 https://www.bilibili.com/video/BV1TD4y1c7Wx?share_source=copy_web&vd_source=95705b32f23f70b32dfa1721628d5874