简单回顾一下ButterKnife使用BindView注解初始化View过程:
- 使用注解@BindView(R.id.main_title_view),并将要绑定的id传入
- 调用BufferKnife.bind(this)方法开始绑定
其实最核心的是ButterKnife使用了APT技术,也就是Annotation Processing Tool的简称,翻译成中文就是"注解处理工具":
-
它的作用是在编译阶段处理注解,生成相应的java文件,然后在运行阶段,通过反射调用那些生成的java类中的方法来进行绑定等操作
-
生成的Java文件内容很简单,就是把当前Activity或者View传入进来,然后findViewById找到对应View并给带有注释的那些View赋值,所以使用BindView注解的变量都要声明为public
public final class BindProxy$MainActivity {
  public BindProxy$MainActivity(MainActivity mainactivity) {
    mainactivity.mTitleView = (android.widget.TextView) mainactivity.findViewById(2131165289);
  }
}
- 说简单一点就是以前在Activity的那些findViewBy代码,ButterKnife帮我们通过注解配置的方式,自动转移到生成的这些类里面了
- 所以BufferKnife.bind(this)的作用就是调用那些自动生成的代码
其实我们也可以省去APT生成代码那一步,直接代码运行时解析那些注解,然后通过反射赋值,也不需要固定带注解的变量都是public的,比如下面这样:
private void autoFindViews() {
List<Field> fields = ClassUtil.getAllField(getClass());
for (Field field : fields) {
if (field.isAnnotationPresent(BindView.class)) {
BindView bindView = field.getAnnotation(BindView.class);
int viewId = bindView.value();
if (viewId > 0) {
field.setAccessible(true);
try {
View view = findViewById(viewId);
if (view != null) {
if (field.isAnnotationPresent(BindClick.class)) {
view.setOnClickListener(this);
}
field.set(this, view);
}
} catch (IllegalAccessException e) {
e.printStackTrace();
}
}
}
}
那么为什么还有那么多人用BufferKnife,而不是自己用几行代码反射搞定呢?
这主要还是取舍问题,通过上面我们知道BufferKnife也不是特别完美的:
- 它需要把原来私有变量都变成public,违反了"地米特法则"
- 增加了APT生成类的过程,这意味着项目编译时间变长了
但是如果简单一点使用反射,则会消耗更多的系统资源,比较适合项目还比较小,使用反射对整个项目性能影响不大的情况,而BufferKnife则适合较大项目,在编译时处理好,运行时减少使用反射节提高性能
下面我们使用简单的项目来模拟BufferKnife解析注解绑定View过程
1、创建名叫"annotation"的Java Library类型Module:主要用于存放自定义的注解以及一些常量
-
build.gradle:
apply plugin: 'java-library'

dependencies {
    implementation fileTree(dir: 'libs', include: ['*.jar'])
}

sourceCompatibility = "7"
targetCompatibility = "7"
-
创建一个注解类型的java类:BindView.java
- ElementType.FIELD表示该注解只能用在变量上
- RetentionPolicy.CLASS表示该注解用于编译时解析
@Target(ElementType.FIELD)
@Retention(RetentionPolicy.CLASS)
public @interface BindView {
int value();
}
-
创建一个常量类:Constant.java
public class Constant {
public static final String GENERATE_PACKAGE = "com.agilezhu.annotationkit.generate";
public static final String GENERATE_CLASS_NAME_HEAD = "BindProxy$";
public static final String GENERATE_CLASS_FULL_NAME_HEAD = GENERATE_PACKAGE + "." + GENERATE_CLASS_NAME_HEAD;
}
2、创建名叫"compiler"的Java Library类型Module:主要用于存放解析注解的处理器
-
build.gradle:
apply plugin: 'java-library'
dependencies {
implementation fileTree(dir: 'libs', include: ['*.jar'])
implementation project(':annotation')
annotationProcessor 'com.google.auto.service:auto-service:1.0-rc4'
implementation 'com.google.auto.service:auto-service:1.0-rc4'
implementation 'com.squareup:javapoet:1.8.0'
}
sourceCompatibility = "7"
targetCompatibility = "7"
- auto-service:用于自动注册配置注解处理器processor 类,使用@AutoService(Processor.class)来标记注解处理器类;需要注意的是,不仅要implementation这个auto-service,还要annotationProcessor,因为auto-service里既包含AutoService注解,也包含处理该注解的解释器,少了其中一个都无法正常生成代码
- javapoet:这个主要用来通过调用方法来创建java类,相对于拼接字符串来说更加方便不容易出错
-
接着创建自定义的注解处理器BindProcessor.java:这个类主要用于解析用户标注的注解,然后生成自定义java处理类
@AutoService(Processor.class)
public class BindProcessor extends AbstractProcessor {
private Filer mFiler;
private Elements mElementUtils;
private Messager mMessager;
@Override
public synchronized void init(ProcessingEnvironment processingEnvironment) {
super.init(processingEnvironment);
mFiler = processingEnv.getFiler();
mElementUtils = processingEnv.getElementUtils();
mMessager = processingEnv.getMessager();
}
@Override
public Set<String> getSupportedAnnotationTypes() {
Set<String> types = new LinkedHashSet<>();
types.add(BindView.class.getName());
return types;
}
@Override
public SourceVersion getSupportedSourceVersion() {
return SourceVersion.latest();
}
@Override
public boolean process(Set<? extends TypeElement> set, RoundEnvironment roundEnvironment) {
Set<? extends Element> elements = roundEnvironment.getRootElements();
for (Element element : elements) {
if (!(element instanceof TypeElement)) {
continue;
}
TypeElement typeElement = (TypeElement) element;
String classSimpleName = element.getSimpleName().toString();
String targetClassName = GENERATE_CLASS_NAME_HEAD + element.getSimpleName();
MethodSpec.Builder bindMethodBuilder = MethodSpec.methodBuilder("<init>")
.addModifiers(Modifier.PUBLIC)
.addParameter(ClassName.get(typeElement.asType()), classSimpleName.toLowerCase());
List<? extends Element> members = mElementUtils.getAllMembers(typeElement);
List<Element> annotationMembers = new ArrayList<>();
for (Element member : members) {
BindView bindViewAnnotation = member.getAnnotation(BindView.class);
if (bindViewAnnotation != null) {
annotationMembers.add(member);
String paramName = classSimpleName.toLowerCase();
bindMethodBuilder.addStatement(
String.format(
paramName + ".%s = (%s) " + paramName + ".findViewById(%s)"
, member.getSimpleName()
, ClassName.get(member.asType()).toString()
, bindViewAnnotation.value()));
}
}
if (annotationMembers.isEmpty()) {
continue;
}
TypeSpec bindProxyClass = TypeSpec.classBuilder(targetClassName)
.addModifiers(Modifier.PUBLIC, Modifier.FINAL)
.addMethod(bindMethodBuilder.build())
.build();
JavaFile bindProxyFile = JavaFile
.builder(GENERATE_PACKAGE, bindProxyClass)
.build();
try {
bindProxyFile.writeTo(mFiler);
} catch (Throwable e) {
e.printStackTrace();
}
}
return false;
}
}
- 在init方法中可以通过ProcessingEnvironment获取相关工具类,供后面处理注解时使用
- getSupportedAnnotationTypes:是用来返回我们当前要处理哪些注解,必须重写该方法
- getSupportedSourceVersion:返回当前注解处理器支持的java版本,不重写该方法会出现警告
- process:用于解析注解,并生成对应的java文件
3、创建名叫"library"的Android Library类型Module:主要用于存放运行时调用生成的那些类的方法
-
build.gradle:
apply plugin: 'com.android.library'
apply plugin: 'kotlin-android'
apply plugin: 'kotlin-android-extensions'
android {
compileSdkVersion 28
buildToolsVersion "29.0.2"
defaultConfig {
minSdkVersion 15
targetSdkVersion 28
versionCode 1
versionName "1.0"
testInstrumentationRunner "androidx.test.runner.AndroidJUnitRunner"
consumerProguardFiles 'consumer-rules.pro'
}
buildTypes {
release {
minifyEnabled false
proguardFiles getDefaultProguardFile('proguard-android-optimize.txt'), 'proguard-rules.pro'
}
}
}
dependencies {
implementation fileTree(dir: 'libs', include: ['*.jar'])
implementation "org.jetbrains.kotlin:kotlin-stdlib-jdk7:$kotlin_version"
implementation 'androidx.appcompat:appcompat:1.1.0'
implementation 'androidx.core:core-ktx:1.1.0'
testImplementation 'junit:junit:4.12'
androidTestImplementation 'androidx.test:runner:1.2.0'
androidTestImplementation 'androidx.test.espresso:espresso-core:3.2.0'
api project(':annotation')
}
- api project(‘:annotation’):引入自定义的注解,这里使用api是为了引入当前library的项目可以也可以直接使用到自定义的注解
-
AnnotationKit.kt:通过反射获取生成的类,并调用构造方法,从而绑定当前Activity中的View
class AnnotationKit {
companion object {
private val mCacheConstructor = HashMap<Class<*>, Constructor<*>?>()
fun bind(activity: Activity) {
var constructor = mCacheConstructor[activity.javaClass]
if (constructor == null) {
synchronized(mCacheConstructor) {
if (constructor == null) {
try {
val fullClassName =
GENERATE_CLASS_FULL_NAME_HEAD + activity::class.java.simpleName
val clazz = Class.forName(fullClassName)
constructor = clazz.getConstructor(activity.javaClass)
mCacheConstructor[activity.javaClass] = constructor
} catch (e: Throwable) {
e.printStackTrace()
}
}
}
}
constructor?.newInstance(activity)
}
}
}
4、创建名叫"app"的Android Application类型Module:需要使用自定义的app项目
apply plugin: 'com.android.application'
apply plugin: 'kotlin-android'
apply plugin: 'kotlin-android-extensions'
apply plugin: 'kotlin-kapt'
android {
compileSdkVersion 28
buildToolsVersion "29.0.2"
defaultConfig {
applicationId "com.agilezhu.annotationkit"
minSdkVersion 15
targetSdkVersion 28
versionCode 1
versionName "1.0"
testInstrumentationRunner "androidx.test.runner.AndroidJUnitRunner"
}
buildTypes {
release {
minifyEnabled false
proguardFiles getDefaultProguardFile('proguard-android-optimize.txt'), 'proguard-rules.pro'
}
}
}
dependencies {
implementation fileTree(dir: 'libs', include: ['*.jar'])
implementation"org.jetbrains.kotlin:kotlin-stdlib-jdk7:$kotlin_version"
implementation 'androidx.appcompat:appcompat:1.1.0'
implementation 'androidx.core:core-ktx:1.1.0'
implementation 'androidx.constraintlayout:constraintlayout:1.1.3'
testImplementation 'junit:junit:4.12'
androidTestImplementation 'androidx.test:runner:1.2.0'
androidTestImplementation 'androidx.test.espresso:espresso-core:3.2.0'
implementation project(':library')
kapt project(':compiler')
}
- MainActivity.kt:使用注解@BindView(R.id.main_title_view),并调用AnnotationKit.bind(this)完成绑定操作
class MainActivity : AppCompatActivity() {
@BindView(R.id.main_title_view)
lateinit var mTitleView: TextView
override fun onCreate(savedInstanceState: Bundle?) {
super.onCreate(savedInstanceState)
setContentView(R.layout.activity_main)
AnnotationKit.bind(this)
if (mTitleView != null) {
Toast.makeText(this, "BindView成功", Toast.LENGTH_SHORT).show()
} else {
Toast.makeText(this, "BindView失败", Toast.LENGTH_SHORT).show()
}
}
}
其他问题
- 如果出现以下警告:
[kapt] Incremental annotation processing requested, but support is disabled because the following processors are not incremental: com.agilezhu.compiler.BindProcessor (NON_INCREMENTAL), com.google.auto.service.processor.AutoServiceProcessor (NON_INCREMENTAL).
则在根目录下的gradle.properties文件中添加下面内容就就可以:#apt增量编译,加速编译效果
kapt.incremental.apt=true
- 如果出现编译失败:
Execution failed for task ':lib:common:kaptDebugKotlin'.
> A failure occurred while executing org.jetbrains.kotlin.gradle.internal.KaptWithoutKotlincTask$KaptExecutionWorkAction
   > java.lang.reflect.InvocationTargetException (no error message)
在gradle.properties文件中添加下面这段内容:kapt.incremental.apt = false
kapt.include.compile.classpath=false
kapt.use.worker.api=false
- 如果出现找不到
AbstractProcessor等类的情况,请删除该Module,重新创建Java or Kotlin Library类型项目,即使其他类型Module把build.gradle配置改成一模一样也不行! 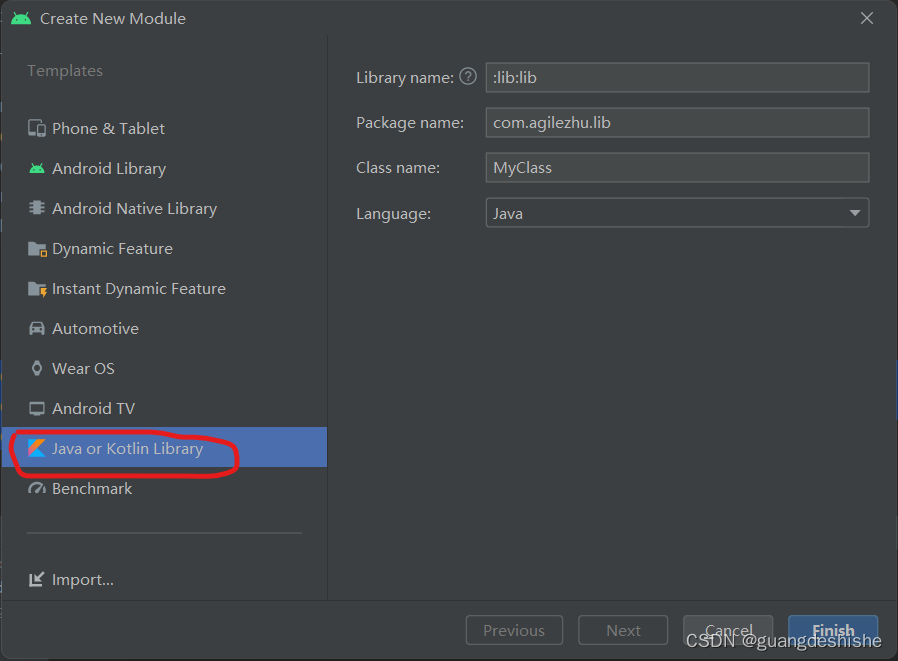
Demo下载地址
本文内容由网友自发贡献,版权归原作者所有,本站不承担相应法律责任。如您发现有涉嫌抄袭侵权的内容,请联系:hwhale#tublm.com(使用前将#替换为@)