import matplotlib.pyplot as plt
import numpy as np
import tensorflow as tf
from six.moves import xrange
import os
from mobileNet import mobilenet
from tf_test import read_and_decode
image_height = 224
image_width = 224
num_channels = 3
batch_size =5
num_classes=5
images, labels = read_and_decode("/home/henson/Desktop/mobile/test.tfrecords",batch_size)
summaries_dir ='/home/henson/Desktop/mobile/mnist_logs'
print(images,"hello")
print(labels)
x = tf.placeholder(tf.float32, shape=[batch_size, image_height, image_width,
num_channels])
y_ = tf.placeholder(tf.float32, shape=[None, 5])
"""
y = tf.placeholder(tf.int32, [None])
y_ = tf.one_hot(y,2,1,0,-1)
y_ = tf.cast(y_, tf.float32)
"""
"""
def reformat(dataset, labels):
dataset = dataset.reshape((-1, image_height, image_width, num_channels)).astype(np.float32)
labels = (np.arange(num_labels) == labels[:, None]).astype(np.float32)
return dataset, labels
train_dataset, train_labels = reformat(image, label)
#test_dataset, test_labels = reformatreformat(img, label)
print(train_dataset.shape, train_labels.shape)
#print(test_dataset.shape, test_labels.shape)
"""
sess = tf.InteractiveSession()
if __name__ == '__main__':
keep_prob = tf.placeholder("float")
logits, end_points = mobilenet(x, num_classes=5, is_training=True, width_multiplier=1)
cross_entropy = tf.reduce_mean(tf.nn.softmax_cross_entropy_with_logits(labels=y_, logits=logits))
train_step = tf.train.AdamOptimizer(1e-4).minimize(cross_entropy)
correct_prediction = tf.equal(tf.argmax(logits, 1), tf.argmax(y_, 1))
tf.summary.scalar('cross_entropy', cross_entropy)
accuracy = tf.reduce_mean(tf.cast(correct_prediction, tf.float32))
tf.summary.scalar('accuracy', accuracy)
merged = tf.summary.merge_all()
print("accuracy shape:", accuracy)
train_writer = tf.summary.FileWriter(summaries_dir + '/train', sess.graph)
test_writer = tf.summary.FileWriter(summaries_dir + '/test')
sess.run(tf.global_variables_initializer())
threads = tf.train.start_queue_runners(sess=sess)
print("new begin!")
for i in range(1000):
if i % 10 == 0:
img_xs, label_xs = sess.run([images, labels])
summary, train_acc = sess.run([merged, accuracy], feed_dict={x: img_xs, y_: label_xs, keep_prob: 0.5})
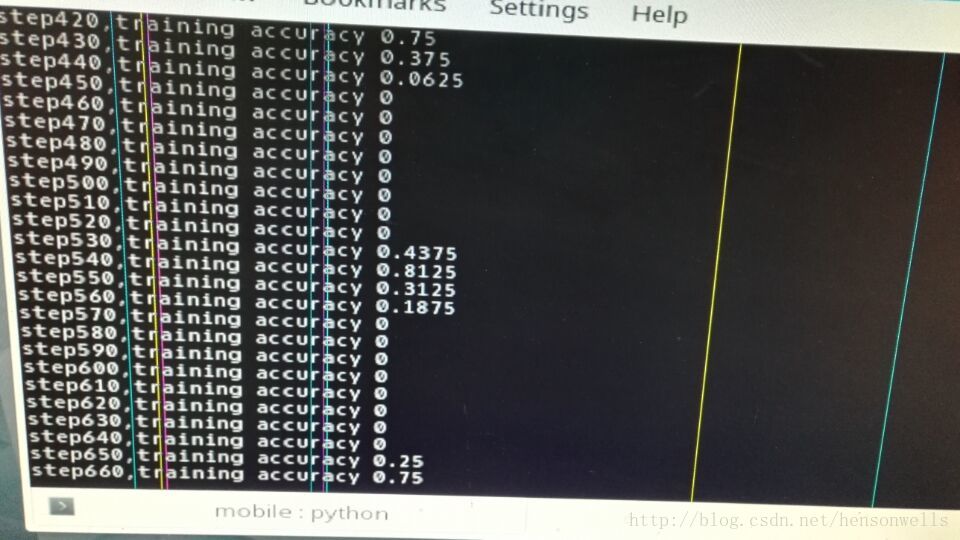
print("step%d,training accuracy %g" % (i, train_acc))
train_writer.add_summary(summary, i)
train_step.run(feed_dict={x: img_xs, y_: label_xs})
train_writer.close()
MobileNet来自:
A tensorflow implementation of Google’s MobileNets: Efficient Convolutional Neural Networks for Mobile Vision Applications
The official implementation is avaliable at tensorflow/model.
The official implementation of object detection is now released, see tensorflow/model/object_detection.
from __future__ import absolute_import
from __future__ import division
from __future__ import print_function
import tensorflow as tf
import tensorflow.contrib.slim as slim
import matplotlib.pyplot as plt
import numpy as np
import tensorflow as tf
from six.moves import xrange
import os
image_height = 224
image_width = 224
num_channels = 3
batch_size=16
sess = tf.InteractiveSession()
def mobilenet(inputs,
num_classes=1000,
is_training=True,
width_multiplier=1,
scope='MobileNet'):
""" MobileNet
More detail, please refer to Google's paper(https://arxiv.org/abs/1704.04861).
Args:
inputs: a tensor of size [batch_size, height, width, channels].
num_classes: number of predicted classes.
is_training: whether or not the model is being trained.
scope: Optional scope for the variables.
Returns:
logits: the pre-softmax activations, a tensor of size
[batch_size, `num_classes`]
end_points: a dictionary from components of the network to the corresponding
activation.
"""
def _depthwise_separable_conv(inputs,
num_pwc_filters,
width_multiplier,
sc,
downsample=False):
""" Helper function to build the depth-wise separable convolution layer.
"""
num_pwc_filters = round(num_pwc_filters * width_multiplier)
_stride = 2 if downsample else 1
depthwise_conv = slim.separable_convolution2d(inputs,
num_outputs=None,
stride=_stride,
depth_multiplier=1,
kernel_size=[3, 3],
scope=sc+'/depthwise_conv')
bn = slim.batch_norm(depthwise_conv, scope=sc+'/dw_batch_norm')
pointwise_conv = slim.convolution2d(bn,
num_pwc_filters,
kernel_size=[1, 1],
scope=sc+'/pointwise_conv')
bn = slim.batch_norm(pointwise_conv, scope=sc+'/pw_batch_norm')
return bn
with tf.variable_scope(scope) as sc:
end_points_collection = sc.name + '_end_points'
with slim.arg_scope([slim.convolution2d, slim.separable_convolution2d],
activation_fn=None,
outputs_collections=[end_points_collection]):
with slim.arg_scope([slim.batch_norm],
is_training=is_training,
activation_fn=tf.nn.relu):
net = slim.convolution2d(inputs, round(32 * width_multiplier), [3, 3], stride=2, padding='SAME', scope='conv_1')
print(net)
net = slim.batch_norm(net, scope='conv_1/batch_norm')
print(net)
net = _depthwise_separable_conv(net, 64, width_multiplier, sc='conv_ds_2')
print(net)
net = _depthwise_separable_conv(net, 128, width_multiplier, downsample=True, sc='conv_ds_3')
print(net)
net = _depthwise_separable_conv(net, 128, width_multiplier, sc='conv_ds_4')
print(net)
net = _depthwise_separable_conv(net, 256, width_multiplier, downsample=True, sc='conv_ds_5')
print(net)
net = _depthwise_separable_conv(net, 256, width_multiplier, sc='conv_ds_6')
print(net)
net = _depthwise_separable_conv(net, 512, width_multiplier, downsample=True, sc='conv_ds_7')
print(net)
net = _depthwise_separable_conv(net, 512, width_multiplier, sc='conv_ds_8')
print(net)
net = _depthwise_separable_conv(net, 512, width_multiplier, sc='conv_ds_9')
print(net)
net = _depthwise_separable_conv(net, 512, width_multiplier, sc='conv_ds_10')
print(net)
net = _depthwise_separable_conv(net, 512, width_multiplier, sc='conv_ds_11')
print(net)
net = _depthwise_separable_conv(net, 512, width_multiplier, sc='conv_ds_12')
print(net)
net = _depthwise_separable_conv(net, 1024, width_multiplier, downsample=True, sc='conv_ds_13')
print(net)
net = _depthwise_separable_conv(net, 1024, width_multiplier, sc='conv_ds_14')
print(net)
net = slim.avg_pool2d(net, [7, 7], scope='avg_pool_15')
print(net)
keep_prob = tf.placeholder(tf.float32)
end_points = slim.utils.convert_collection_to_dict(end_points_collection)
net = tf.squeeze(net, [1, 2], name='SpatialSqueeze')
print(net)
end_points['squeeze'] = net
print(net)
logits = slim.fully_connected(net, num_classes, activation_fn=None, scope='fc_16')
predictions = slim.softmax(logits, scope='Predictions')
end_points['Logits'] = logits
end_points['Predictions'] = predictions
return logits, end_points
mobilenet.default_image_size = 224
def mobilenet_arg_scope(weight_decay=0.0):
"""Defines the default mobilenet argument scope.
Args:
weight_decay: The weight decay to use for regularizing the model.
Returns:
An `arg_scope` to use for the MobileNet model.
"""
with slim.arg_scope(
[slim.convolution2d, slim.separable_convolution2d],
weights_initializer=slim.initializers.xavier_initializer(),
biases_initializer=slim.init_ops.zeros_initializer(),
weights_regularizer=slim.l2_regularizer(weight_decay)) as sc:
return sc
直接导入mobileNet来训练,为什么结果会这样,应该怎么调参?目测是神经网络问题。
本文内容由网友自发贡献,版权归原作者所有,本站不承担相应法律责任。如您发现有涉嫌抄袭侵权的内容,请联系:hwhale#tublm.com(使用前将#替换为@)