1、SpringMVC简介
1.1、什么是MVC
MVC是一种软件架构的思想,将软件按照模型、视图、控制器来划分
M:Model,模型层,指工程中的JavaBean,作用是处理数据
JavaBean分为两类:
V:View,视图层,指工程中的html或jsp等页面,作用是与用户进行交互,展示数据
C:Controller,控制层,指工程中的servlet,作用是接收请求和响应浏览器
MVC的工作流程: 用户通过视图层发送请求到服务器,在服务器中请求被Controller接收,Controller
调用相应的Model层处理请求,处理完毕将结果返回到Controller,Controller再根据请求处理的结果
找到相应的View视图,渲染数据后最终响应给浏览器
1.2、什么是SpringMVC
SpringMVC是Spring的一个后续产品,是Spring的一个子项目
SpringMVC 是 Spring 为表述层开发提供的一整套完备的解决方案。在表述层框架历经 Strust、
WebWork、Strust2 等诸多产品的历代更迭之后,目前业界普遍选择了 SpringMVC 作为 Java EE 项目
表述层开发的首选方案。
注:三层架构分为表述层(或表示层)、业务逻辑层、数据访问层,表述层表示前台页面和后台
servlet
1.3、SpringMVC的特点
处理
2.2、创建maven工程
①添加web模块
②打包方式:war
③引入依赖
<dependencies>
    <!-- SpringMVC -->
    <dependency>
        <groupId>org.springframework</groupId>
        <artifactId>spring-webmvc</artifactId>
        <version>5.3.1</version>
    </dependency>
    <!-- 日志 -->
    <dependency>
        <groupId>ch.qos.logback</groupId>
        <artifactId>logback-classic</artifactId>
        <version>1.2.3</version>
    </dependency>
    <!-- ServletAPI -->
    <dependency>
        <groupId>javax.servlet</groupId>
        <artifactId>javax.servlet-api</artifactId>
        <version>3.1.0</version>
        <scope>provided</scope>
    </dependency>
    <!-- Spring5和Thymeleaf整合包 -->
    <dependency>
        <groupId>org.thymeleaf</groupId>
        <artifactId>thymeleaf-spring5</artifactId>
        <version>3.0.12.RELEASE</version>
    </dependency>
</dependencies>
注:由于 Maven 的传递性,我们不必将所有需要的包全部配置依赖,而是配置最顶端的依赖,其他靠
传递性导入。
2.3、配置web.xml
注册SpringMVC的前端控制器DispatcherServlet
①默认配置方式
此配置作用下,SpringMVC的配置文件默认位于WEB-INF下,默认名称为-
servlet.xml,例如,以下配置所对应SpringMVC的配置文件位于WEB-INF下,文件名为springMVC-
servlet.xml
<!-- 配置SpringMVC的前端控制器,对浏览器发送的请求统一进行处理 -->
<servlet>
    <servlet-name>springMVC</servlet-name>
    <servlet-class>org.springframework.web.servlet.DispatcherServlet</servletclass>
</servlet>
<servlet-mapping>
    <servlet-name>springMVC</servlet-name>
    <!--
        设置springMVC的核心控制器所能处理的请求的请求路径
        /所匹配的请求可以是/login或.html或.js或.css方式的请求路径
        但是/不能匹配.jsp请求路径的请求,因为.DispatcherServlet不能处理jsp的请求
        /* 会匹配全部
	-->
    <url-pattern>/</url-pattern>
</servlet-mapping>
②扩展配置方式
可通过init-param标签设置SpringMVC配置文件的位置和名称,通过load-on-startup标签设置
SpringMVC前端控制器DispatcherServlet的初始化时间==(原本是第一次访问的时候初始化)==
<!-- 配置SpringMVC的前端控制器,对浏览器发送的请求统一进行处理 -->
<servlet>
    <servlet-name>springMVC</servlet-name>
    <servlet-class>org.springframework.web.servlet.DispatcherServlet</servletclass>
    <!-- 通过初始化参数指定SpringMVC配置文件的位置和名称 -->
    <init-param>
        <!-- contextConfigLocation为固定值 -->
        <param-name>contextConfigLocation</param-name>
        <!-- 使用classpath:表示从类路径查找配置文件,例如maven工程中的src/main/resources -->
        <param-value>classpath:springMVC.xml</param-value>
    </init-param>
    <!--
        作为框架的核心组件,在启动过程中有大量的初始化操作要做
        而这些操作放在第一次请求时才执行会严重影响访问速度
        因此需要通过此标签将启动控制DispatcherServlet的初始化时间提前到服务器启动时
	-->
    <load-on-startup>1</load-on-startup>
</servlet>
<servlet-mapping>
    <servlet-name>springMVC</servlet-name>
    <!--
        设置springMVC的核心控制器所能处理的请求的请求路径
        /所匹配的请求可以是/login或.html或.js或.css方式的请求路径
        但是/不能匹配.jsp请求路径的请求
    -->
    <url-pattern>/</url-pattern>
</servlet-mapping>
注:
标签中使用/和/*的区别:
/所匹配的请求可以是/login或.html或.js或.css方式的请求路径,但是/不能匹配.jsp请求路径的请
求
jsp的请求是用tomcat里面配置的jsp-Servlet处理的
因此就可以避免在访问jsp页面时,该请求被DispatcherServlet处理,从而找不到相应的页面
/*则能够匹配所有请求,例如在使用过滤器时,若需要对所有请求进行过滤,就需要使用/*的写
法
2.4、创建请求控制器
由于前端控制器对浏览器发送的请求进行了统一的处理,但是具体的请求有不同的处理过程,因此需要创建处理具体请求的类,即请求控制器
请求控制器中每一个处理请求的方法成为控制器方法
因为SpringMVC的控制器由一个POJO(普通的Java类)担任,因此需要通过@Controller注解将其标识为一个控制层组件,交给Spring的IoC容器管理,此时SpringMVC才能够识别控制器的存在
@Controller
public class HelloController {
}
2.5、创建SpringMVC的配置文件
[!note]
把前缀去掉,后缀去掉就是逻辑视图,比如templates文件夹下index.html的访问只要输入index即可
<!-- 自动扫描包 -->
<context:component-scan base-package="com.atguigu.mvc.controller"/>
<!-- 配置Thymeleaf视图解析器 -->
<bean id="viewResolver"class="org.thymeleaf.spring5.view.ThymeleafViewResolver">
    <property name="order" value="1"/>
    <property name="characterEncoding" value="UTF-8"/>
    <property name="templateEngine">
        <bean class="org.thymeleaf.spring5.SpringTemplateEngine">
            <property name="templateResolver">
                <bean
                      class="org.thymeleaf.spring5.templateresolver.SpringResourceTemplateResolver">
                    <!-- 视图前缀 -->
                    <property name="prefix" value="/WEB-INF/templates/"/>
                    <!-- 视图后缀 -->
                    <property name="suffix" value=".html"/>
                    //模板的模型是html5
                    <property name="templateMode" value="HTML5"/>
                    <property name="characterEncoding" value="UTF-8" />
                </bean>
            </property>
        </bean>
    </property>
</bean>
<!--
    处理静态资源,例如html、js、css、jpg
    若只设置该标签,则只能访问静态资源,其他请求则无法访问
    此时必须设置<mvc:annotation-driven/>解决问题
-->
<mvc:default-servlet-handler/>
<!-- 开启mvc注解驱动 -->
<mvc:annotation-driven>
    <mvc:message-converters>
        <!-- 处理响应中文内容乱码 -->
        <bean
              class="org.springframework.http.converter.StringHttpMessageConverter">
            <property name="defaultCharset" value="UTF-8" />
            <property name="supportedMediaTypes">
                <list>
                    <value>text/html</value>
                    <value>application/json</value>
                </list>
            </property>
        </bean>
    </mvc:message-converters>
</mvc:annotation-driven>
2.6 .配置本地Tomcat
1.选择本地Tomcat
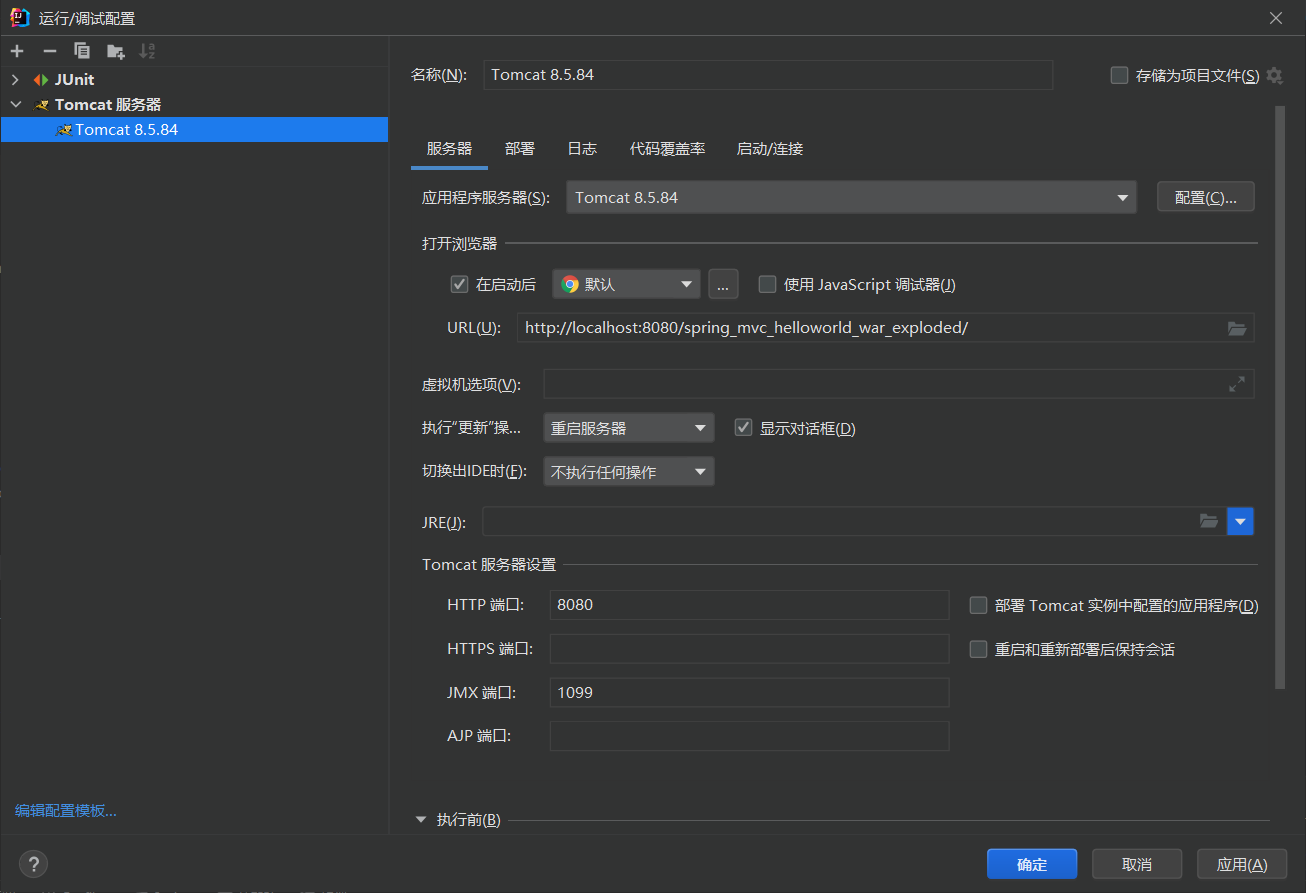
选择
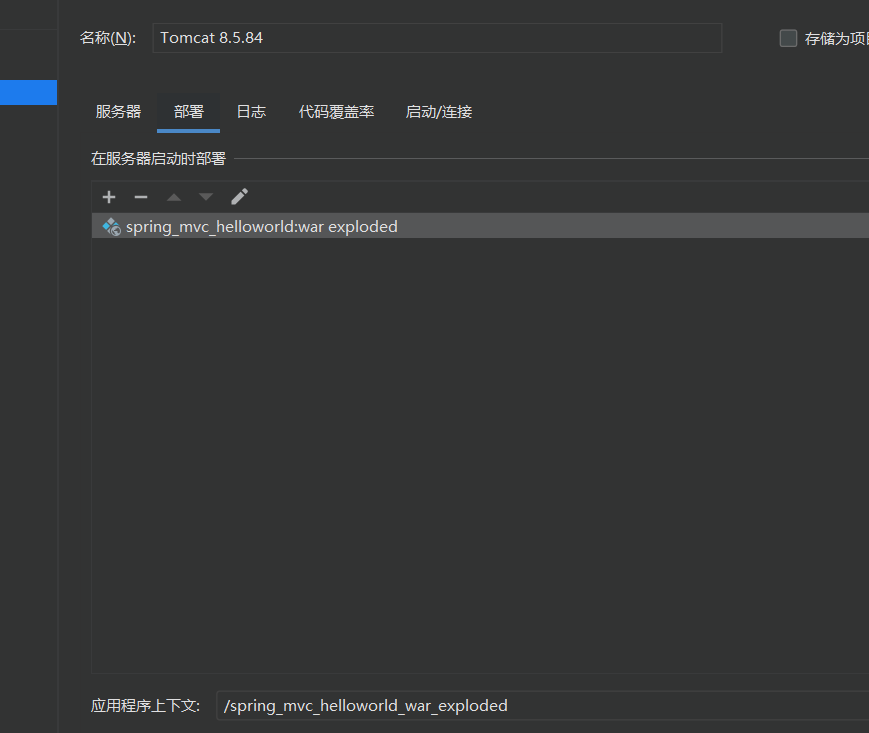
配置上下文路径,通过这个就可以访问工程了
[外链图片转存失败,源站可能有防盗链机制,建议将图片保存下来直接上传(img-JN0YlHm3-1686124823354)(null)]
设置更新按钮和失去焦点事件

2.7、测试HelloWorld
①实现对首页的访问
本身是访问不到WEB-INF下面的内容的,只能通过转发的方式来访问
在请求控制器中创建处理请求的方法
RequestMapping就是请求映射的意思, * 就是把浏览器的请求映射为这个方法,这个方法就是解决请求的,RequestMapping里的路径就是需要处理的请求路径
// @RequestMapping注解:处理请求和控制器方法之间的映射关系
// @RequestMapping注解的value属性可以通过请求地址匹配请求,/表示的当前工程的上下文路径
// localhost:8080/springMVC/
@RequestMapping("/")
public String index() {
    //设置视图名称
    return "index";
}
这个方法返回了一个index字符串,返回的index被视图解析器解析,给这个index添加了前缀和后缀,正好对应WEB-IFN下的的index.html,
②通过超链接跳转到指定页面
在主页index.html中设置超链接
原本访问的路径是localhost:8080/hello
这里的设置会自动配置上下文路径
<!DOCTYPE html>
<html lang="en" xmlns:th="http://www.thymeleaf.org">
    <head>
        <meta charset="UTF-8">
        <title>首页</title>
    </head>
    <body>
        <h1>首页</h1>
        <a th:href="@{/hello}">HelloWorld</a><br/>
    </body>
</html>

在请求控制器中创建处理请求的方法
@RequestMapping("/hello")
public String HelloWorld() {
	return "target";
}
2.7、总结
浏览器发送请求,若请求地址符合前端控制器的url-pattern,该请求就会被前端控制器DispatcherServlet处理。前端控制器会读取SpringMVC的核心配置文件,通过扫描组件找到控制器,
将请求地址和控制器中@RequestMapping注解的value属性值进行匹配,若匹配成功,该注解所标识的控制器方法就是处理请求的方法。处理请求的方法需要返回一个字符串类型的视图名称,该视图名称会被视图解析器解析,加上前缀和后缀组成视图的路径,通过Thymeleaf对视图进行渲染,最终转发到视图所对应页面==(不是重定向)==
3、@RequestMapping注解
3.1、@RequestMapping注解的功能
从注解名称上我们可以看到,@RequestMapping注解的作用就是将请求和处理请求的控制器方法关联起来,建立映射关系。
SpringMVC 接收到指定的请求,就会来找到在映射关系中对应的控制器方法来处理这个请求。
3.2、@RequestMapping注解的位置
@RequestMapping标识一个类:设置映射请求的请求路径的初始信息
@RequestMapping标识一个方法:设置映射请求请求路径的具体信息
@Controller
@RequestMapping("/test")
public class RequestMappingController {
    //此时请求映射所映射的请求的请求路径为:/test/testRequestMapping
    @RequestMapping("/testRequestMapping")
    public String testRequestMapping(){
        return "success";
    }
}
3.3、@RequestMapping注解的value属性
@RequestMapping注解的value属性通过请求的请求地址匹配请求映射
@RequestMapping注解的value属性是一个字符串类型的数组,表示该请求映射能够匹配多个请求地址所对应的请求
@RequestMapping注解的value属性必须设置,至少通过请求地址匹配请求映射
<a th:href="@{/testRequestMapping}">测试@RequestMapping的value属性--
>/testRequestMapping</a><br>
<a th:href="@{/test}">测试@RequestMapping的value属性-->/test</a><br>
@RequestMapping(
    value = {"/testRequestMapping", "/test"}
)
public String testRequestMapping(){
    return "success";
}
3.4、@RequestMapping注解的method属性
@RequestMapping注解的method属性通过请求的请求方式(get或post)匹配请求映射
@RequestMapping注解的method属性是一个RequestMethod类型的数组,表示该请求映射能够匹配多种请求方式的请求
若当前请求的请求地址满足请求映射的value属性,但是请求方式不满足method属性,则浏览器报错
405:Request method ‘POST’ not supported
<a th:href="@{/test}">测试@RequestMapping的value属性-->/test</a><br>
<form th:action="@{/test}" method="post">
	<input type="submit">
</form>
@RequestMapping(
    value = {"/testRequestMapping", "/test"},
    method = {RequestMethod.GET, RequestMethod.POST}
)
public String testRequestMapping(){
    return "success";
}
注:
1、对于处理指定请求方式的控制器方法,SpringMVC中提供了@RequestMapping的派生注解
处理get请求的映射–>@GetMapping
处理post请求的映射–>@PostMapping
处理put请求的映射–>@PutMapping
处理delete请求的映射–>@DeleteMapping
2、常用的请求方式有get,post,put,delete
但是目前浏览器只支持get和post,若在form表单提交时,为method设置了其他请求方式的字符
串(put或delete),则按照默认的请求方式get处理
若要发送put和delete请求,则需要通过spring提供的过滤器HiddenHttpMethodFilter,在
RESTful部分会讲到
3.5、@RequestMapping注解的params属性(了解)
@RequestMapping注解的params属性通过请求的请求参数匹配请求映射
@RequestMapping注解的params属性是一个字符串类型的数组,可以通过四种表达式设置请求参数
和请求映射的匹配关系
“param”:要求请求映射所匹配的请求必须携带param请求参数
“!param”:要求请求映射所匹配的请求必须不能携带param请求参数
“param=value”:要求请求映射所匹配的请求必须携带param请求参数且param=value
“param!=value”:要求请求映射所匹配的请求必须携带param请求参数但是param!=value
<a th:href="@{/test(username='admin',password=123456)">测试@RequestMapping的
params属性-->/test</a><br>
@RequestMapping(
    value = {"/testRequestMapping", "/test"}
    ,method = {RequestMethod.GET, RequestMethod.POST}
    ,params = {"username","password!=123456"}
)
public String testRequestMapping(){
    return "success";
}
注:
若当前请求满足@RequestMapping注解的value和method属性,但是不满足params属性,此时
页面回报错400:Parameter conditions “username, password!=123456” not met for actual
request parameters: username={admin}, password={123456}
3.6、@RequestMapping注解的headers属性(了解)
@RequestMapping注解的headers属性通过请求的请求头信息匹配请求映射
@RequestMapping注解的headers属性是一个字符串类型的数组,可以通过四种表达式设置请求头信
息和请求映射的匹配关系
“header”:要求请求映射所匹配的请求必须携带header请求头信息
“!header”:要求请求映射所匹配的请求必须不能携带header请求头信息
“header=value”:要求请求映射所匹配的请求必须携带header请求头信息且header=value
“header!=value”:要求请求映射所匹配的请求必须携带header请求头信息且header!=value
若当前请求满足@RequestMapping注解的value和method属性,但是不满足headers属性,此时页面
显示404错误,即资源未找到
3.7、SpringMVC支持ant风格的路径
?:表示任意的单个字符
*:表示任意的0个或多个字符
**:表示任意层数的任意目录
注意:在使用时,只能使用//xxx的方式
3.8、SpringMVC支持路径中的占位符(重点)
原始方式:/deleteUser?id=1
rest方式:/user/delete/1
SpringMVC路径中的占位符常用于RESTful风格中,当请求路径中将某些数据通过路径的方式传输到服
务器中,就可以在相应的@RequestMapping注解的value属性中通过占位符{xxx}表示传输的数据,在
通过@PathVariable注解,将占位符所表示的数据赋值给控制器方法的形参
<a th:href="@{/testRest/1/admin}">测试路径中的占位符-->/testRest</a><br>
@RequestMapping("/testRest/{id}/{username}")
public String testRest(@PathVariable("id") String id, @PathVariable("username")
String username){
    System.out.println("id:"+id+",username:"+username);
    return "success";
}
//最终输出的内容为-->id:1,username:admin
4、SpringMVC获取请求参数
4.1、通过ServletAPI获取
将HttpServletRequest作为控制器方法的形参,此时HttpServletRequest类型的参数表示封装了当前请求的请求报文的对象,.DispatcherServlet在调用此方法时自动为其赋值
@RequestMapping("/testParam")
public String testParam(HttpServletRequest request){
    String username = request.getParameter("username");
    String password = request.getParameter("password");
    System.out.println("username:"+username+",password:"+password);
    return "success";
}
4.2、通过控制器方法的形参获取请求参数
在控制器方法的形参位置,设置和请求参数同名的形参,当浏览器发送请求,匹配到请求映射时,在
DispatcherServlet中就会将请求参数赋值给相应的形参
<a th:href="@{/testParam(username='admin',password=123456)}">测试获取请求参数--
>/testParam</a><br>
@RequestMapping("/testParam")
public String testParam(String username, String password){
    System.out.println("username:"+username+",password:"+password);
    return "success";
}
注:
若请求所传输的请求参数中有多个同名的请求参数,此时可以在控制器方法的形参中设置字符串
数组或者字符串类型的形参接收此请求参数
若使用字符串数组类型的形参,此参数的数组中包含了每一个数据
若使用字符串类型的形参,此参数的值为每个数据中间使用逗号拼接的结果
4.3、@RequestParam

将请求参数名和当前方法里面的参数名绑定
@RequestParam是将请求参数和控制器方法的形参创建映射关系
@RequestParam注解一共有三个属性:
value:指定为形参赋值的请求参数的参数名
required:设置是否必须传输此请求参数,默认值为true
若设置为true时,则当前请求必须传输value所指定的请求参数,若没有传输该请求参数,且没有设置defaultValue属性,则页面报错400:

Required String parameter ‘xxx’ is not present;若设置为false,则当前请求不是必须传输value所指定的请求参数,若没有传输,则注解所标识的形参的值为null
defaultValue:不管required属性值为true或false,当value所指定的请求参数没有传输或传输的值为""时,则使用默认值为形参赋值
4.4、@RequestHeader
@RequestHeader是将请求头信息和控制器方法的形参创建映射关系
@RequestHeader注解一共有三个属性:value、required、defaultValue,用法同@RequestParam
4.5、@CookieValue
@CookieValue是将cookie数据和控制器方法的形参创建映射关系
@CookieValue注解一共有三个属性:value、required、defaultValue,用法同@RequestParam
4.6、通过POJO获取请求参数
可以在控制器方法的形参位置设置一个实体类类型的形参,此时若浏览器传输的请求参数的参数名和实体类中的属性名一致,那么请求参数就会为此属性赋值
<form th:action="@{/testpojo}" method="post">
    用户名:<input type="text" name="username"><br>
    密码:<input type="password" name="password"><br>

    <input type="submit">
</form>
@RequestMapping("/testpojo")
public String testPOJO(User user){
    System.out.println(user);
    return "success";
}

4.7、解决获取请求参数的乱码问题
解决获取请求参数的乱码问题,可以使用SpringMVC提供的编码过滤器CharacterEncodingFilter,但是必须在web.xml中进行注册
<!--配置springMVC的编码过滤器-->
<filter>
    <filter-name>CharacterEncodingFilter</filter-name>
    <filter-class>org.springframework.web.filter.CharacterEncodingFilter</filter-class>
    <init-param>
        <param-name>encoding</param-name>
        <param-value>UTF-8</param-value>
    </init-param>
    <init-param>
        <param-name>forceEncoding</param-name>
        <param-value>true</param-value>
    </init-param>
</filter>
<filter-mapping>
    <filter-name>CharacterEncodingFilter</filter-name>
    <url-pattern>/*</url-pattern>
</filter-mapping>
注:
SpringMVC中处理编码的过滤器一定要配置到其他过滤器之前,否则无效
5.1、使用ServletAPI向request域对象共享数据
@RequestMapping("/testServletAPI")
public String testServletAPI(HttpServletRequest request){
    request.setAttribute("testScope", "hello,servletAPI");
    return "success";
}
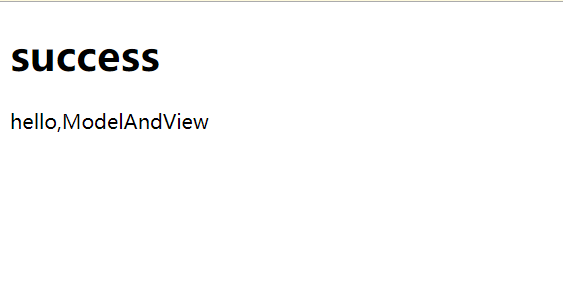
5.2、使用ModelAndView向request域对象共享数据
向域对象共享数据:
1、通过ModelAndview向请求域共享数据
使用ModelAndview时,可以使用其Model功能向请求域共享数据
使用view功能设置逻辑视图,但是控制器方法一定要将vodeLAndview作为方法的返回值
<a th:href="@{/test/mav}"> 测试通过ModelAndview向请求域共享数据</a><br>
@Controller
public class TestScopeController {
    @RequestMapping("/test/mav")
    public ModelAndView testModelAndView() {
        /**
         * ModelAndView有Model和View的功能
         * Model主要用于向请求域共享数据
         * View主要用于设置视图,实现页面跳转
         */
        ModelAndView mav = new ModelAndView();
        //向请求域共享数据
        mav.addObject("testScope", "hello,ModelAndView");
        //设置逻辑视图,实现页面跳转,原本是返回字符串的那个方法
        mav.setViewName("success");
        return mav;
    }
}
读取请求域中的数据
<p th:text="${testScope}"></p>
5.3、使用Model向request域对象共享数据
@RequestMapping("/testModel")
public String testModel(Model model){
    model.addAttribute("testScope", "hello,Model");
    return "success";
}
5.4、使用map向request域对象共享数据
@RequestMapping("/testMap")
public String testMap(Map<String, Object> map){
    map.put("testScope", "hello,Map");
    return "success";
}
5.5、使用ModelMap向request域对象共享数据
@RequestMapping("/testModelMap")
public String testModelMap(ModelMap modelMap){
    modelMap.addAttribute("testScope", "hello,ModelMap");
    return "success";
}
5.7、向session域共享数据
@RequestMapping("/testSession")
public String testSession(HttpSession session){
    session.setAttribute("testSessionScope", "hello,session");
    return "success";
}
5.8、向application域共享数据
介绍
@RequestMapping("/testApplication")
public String testApplication(HttpSession session){
    ServletContext application = session.getServletContext();
    application.setAttribute("testApplicationScope", "hello,application");
    return "success";
}

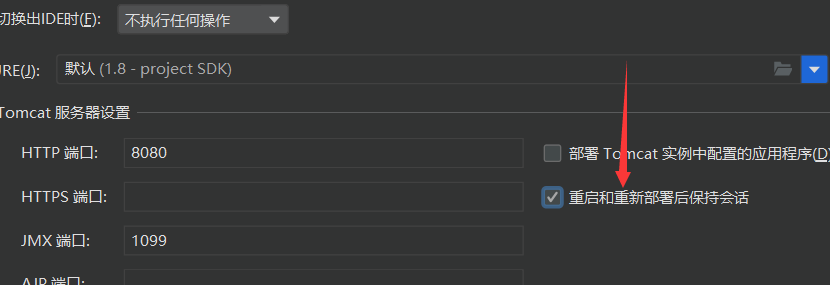
服务器关闭不清空session
6、SpringMVC的视图
SpringMVC中的视图是View接口,视图的作用渲染数据,将模型Model中的数据展示给用户
SpringMVC视图的种类很多,默认有转发视图和重定向视图
当工程引入jstl的依赖,转发视图会自动转换为JstlView
若使用的视图技术为Thymeleaf,在SpringMVC的配置文件中配置了Thymeleaf的视图解析器,由此视图解析器解析之后所得到的是ThymeleafView
6.1、ThymeleafView
当控制器方法中所设置的视图名称没有任何前缀时,此时的视图名称会被SpringMVC配置文件中所配置的视图解析器解析,视图名称==拼接视图前缀和视图
后缀所得到的最终路径,会通过转发的方式==实现跳转
@RequestMapping("/testHello")
public String testHello(){
	return "hello";
}

5.6、Model、ModelMap、Map的关系
Model、ModelMap、Map类型的参数其实本质上都是 BindingAwareModelMap 类型的
public interface Model{}
public class ModelMap extends LinkedHashMap<String, Object> {}
public class ExtendedModelMap extends ModelMap implements Model {}
public class BindingAwareModelMap extends ExtendedModelMap {}
6.2、转发视图
SpringMVC中默认的转发视图是InternalResourceView
SpringMVC中创建转发视图的情况:
当控制器方法中所设置的视图名称以"forward:"为前缀时,创建InternalResourceView视图,此时的视图名称不会被SpringMVC配置文件中所配置的视图解析器解析,而是会将前缀"forward:"去掉,剩余部分作为最终路径通过转发的方式实现跳转
例如"forward:/",“forward:/employee”
@RequestMapping("/test/view/forward")
public String testForward(){
	return "forward:/test/model
";
}

转发的url并不会发生改变

[!note]
用的最多的是ThymeleafView,ThymeleafView会进行解析转发到的页面,要想看到ThymeleafView的语法被解析来进行页面渲染就必须使用ThymeleafView的转发方式
6.3、重定向视图
SpringMVC中默认的重定向视图是RedirectView
当控制器方法中所设置的视图名称以"redirect:"为前缀时,创建RedirectView视图,此时的视图名称不
会被SpringMVC配置文件中所配置的视图解析器解析,而是会将前缀"redirect:"去掉,剩余部分作为最终路径通过重定向的方式实现跳转
例如"redirect:/",“redirect:/employee”
<a th:href="@{/test/view/redict}" >测试重定向视图</a>
@RequestMapping("/test/view/redict")
public String testRedirectView(){
    return "redirect:/test/model";
}

地址变了

注:
重定向视图在解析时,会先将redirect:前缀去掉,然后会判断剩余部分是否以/开头,若是则会自
动拼接上下文路径
一般执行成功的时候用重定向,失败的时候用转发
6.4、视图控制器view-controller
当控制器方法中,仅仅用来实现页面跳转,即只需要设置视图名称时,可以将处理器方法使用view-controller标签进行表示
<!--
    path:设置处理的请求地址
    view-name:设置请求地址所对应的视图名称
-->视图控制器:为当前的请求直接设置视图名称实现页面跳转-

<mvc:view-controller path="/testView" view-name="success"></mvc:view-controller>
注:
当SpringMVC中设置任何一个view-controller时==,其他控制器中的请求映射将全部失效,此时需要在SpringMVC的核心配置文件中设置开启mvc注解驱动的标签==:
<mvc:annotation-driven />
此时RequestMapping里面的请求和视图控制里面的请求都可以获取
7.1、RESTful简介
REST:Representational State Transfer,表现层资源状态转移。
①资源
资源是一种看待服务器的方式,即,将服务器看作是由很多离散的资源组成。每个资源是服务器上一个可命名的抽象概念。因为资源是一个抽象的概念,所以它不仅仅能代表服务器文件系统中的一个文件、数据库中的一张表等等具体的东西,可以将资源设计的要多抽象有多抽象,只要想象力允许而且客户端应用开发者能够理解。与面向对象设计类似,资源是以名词为核心来组织的,首先关注的是名词。一个资源可以由一个或多个URI来标识。URI既是资源的名称,也是资源在Web上的地址。对某个资源感兴趣的客户端应用,可以通过资源的URI与其进行交互。
②资源的表述
资源的表述是一段对于资源在某个特定时刻的状态的描述。可以在客户端-服务器端之间转移(交
换)。资源的表述可以有多种格式,例如HTML/XML/JSON/纯文本/图片/视频/音频等等。资源的表述格式可以通过协商机制来确定。请求-响应方向的表述通常使用不同的格式。
③状态转移
状态转移说的是:在客户端和服务器端之间转移(transfer)代表资源状态的表述。通过转移和操作资
源的表述,来间接实现操作资源的目的。
7.2、RESTful的实现
具体说,就是 HTTP 协议里面,四个表示操作方式的动词:GET、POST、PUT、DELETE。
它们分别对应四种基本操作:GET 用来获取资源,POST 用来新建资源,PUT 用来更新资源,DELETE
用来删除资源。
REST 风格提倡 URL 地址使用统一的风格设计,从前到后各个单词使用斜杠分开,不使用问号键值对方式携带请求参数,而是将要发送给服务器的数据作为 URL 地址的一部分,以保证整体风格的一致性。
| 操作 |
传统方式 |
REST风格 |
| 查询操作 |
getUserById?id=1 |
user/1–>get请求方式 |
| 保存操作 |
saveUser |
user–>post请求方式 |
| 删除操作 |
deleteUser?id=1 |
user/1–>delete请求方式 |
| 更新操作 |
updateUser |
user–>put请求方式 |
7.3、HiddenHttpMethodFilter
由于浏览器只支持发送get和post方式的请求,那么该如何发送put和delete请求呢?
SpringMVC 提供了 HiddenHttpMethodFilter 帮助我们将 POST 请求转换为 DELETE 或 PUT 请求
HiddenHttpMethodFilter 处理put和delete请求的条件:
a>当前请求的请求方式必须为post
b>当前请求必须传输请求参数_method
满足以上条件,HiddenHttpMethodFilter 过滤器就会将当前请求的请求方式转换为请求参数
_method的值,因此请求参数_method的值才是最终的请求方式
在web.xml中注册HiddenHttpMethodFilter
<filter>
    <filter-name>HiddenHttpMethodFilter</filter-name>
    <filter-class>org.springframework.web.filter.HiddenHttpMethodFilter</filterclass>
</filter>
<filter-mapping>
    <filter-name>HiddenHttpMethodFilter</filter-name>
    <url-pattern>/*</url-pattern>
</filter-mapping>
[!note]
注意:浏览器目前只能发送get和post请求
若要发送put和deLete请求,需要在web.xmL中配置一个过滤器iddenHttpMethodFilter配置了过滤器之后,发送的请求要满足两个条件,才能将请求方式转换为put或deLete1,当前请求必须为post
2,当前请求必须传输请求参数_method,_method的值才是最终的请求方式

注:
目前为止,SpringMVC中提供了两个过滤器:CharacterEncodingFilter和
HiddenHttpMethodFilter
在web.xml中注册时,必须先注册CharacterEncodingFilter,再注册HiddenHttpMethodFilter
原因:
- 在 CharacterEncodingFilter 中通过 request.setCharacterEncoding(encoding) 方法设置字
符集的
-
request.setCharacterEncoding(encoding) 方法要求前面不能有任何获取请求参数的操作
-
而 HiddenHttpMethodFilter 恰恰有一个获取请求方式的操作:
-
String paramValue = request.getParameter(this.methodParam);
8、RESTful案例
8.1、准备工作
和传统 CRUD 一样,实现对员工信息的增删改查。
package com.atguigu.mvc.bean;
public class Employee {
    private Integer id;
    private String lastName;
    private String email;
    //1 male, 0 female
    private Integer gender;
    public Integer getId() {
        return id;
    }
    public void setId(Integer id) {
        this.id = id;
    }
    public String getLastName() {
        return lastName;
    }
    public void setLastName(String lastName) {
        this.lastName = lastName;
    }
    public String getEmail() {
        return email;
    }
    public void setEmail(String email) {
        this.email = email;
    }
    public Integer getGender() {
        return gender;
    }
    public void setGender(Integer gender) {
        this.gender = gender;
    }
    public Employee(Integer id, String lastName, String email, Integergender) {
        super();
        this.id = id;
        this.lastName = lastName;
        this.email = email;
        this.gender = gender;
    }
    public Employee() {
    }
}
package com.atguigu.mvc.dao;
import java.util.Collection;
import java.util.HashMap;
import java.util.Map;
import com.atguigu.mvc.bean.Employee;
import org.springframework.stereotype.Repository;
@Repository
public class EmployeeDao {
    private static Map<Integer, Employee> employees = null;
    static{
        employees = new HashMap<Integer, Employee>();
        employees.put(1001, new Employee(1001, "E-AA", "aa@163.com", 1));
        employees.put(1002, new Employee(1002, "E-BB", "bb@163.com", 1));
        employees.put(1003, new Employee(1003, "E-CC", "cc@163.com", 0));
        employees.put(1004, new Employee(1004, "E-DD", "dd@163.com", 0));
        employees.put(1005, new Employee(1005, "E-EE", "ee@163.com", 1));
    }
    private static Integer initId = 1006;
    public void save(Employee employee){
        if(employee.getId() == null){
            employee.setId(initId++);
        }
        employees.put(employee.getId(), employee);
    }
    public Collection<Employee> getAll(){
        return employees.values();
    }
    public Employee get(Integer id){
        return employees.get(id);
    }
    public void delete(Integer id){
        employees.remove(id);
    }
}
8.2、功能清单
| 功能 |
URL 地址
|
请求方式 |
| 访问首页√ |
/ |
GET |
| 查询全部数据√ |
/employee |
GET |
| 删除√ |
/employee/2 |
DELETE |
| 跳转到添加数据页面√ |
/toAdd |
GET |
| 执行保存√ |
/employee |
POST |
| 跳转到更新数据页面√ |
/employee/2 |
GET |
| 执行更新√ |
/employee |
PUT |
8.3、具体功能:访问首页
①配置view-controller
<mvc:view-controller path="/" view-name="index"/>
②创建页面
<!DOCTYPE html>
<html lang="en" xmlns:th="http://www.thymeleaf.org">
    <head>
        <meta charset="UTF-8" >
        <title>Title</title>
    </head>
    <body>
        <h1>首页</h1>
        <a th:href="@{/employee}">访问员工信息</a>
    </body>
</html>
8.4、具体功能:查询所有员工数据
①控制器方法
@Controller
public class EmployeeController {
    @Autowired
    private EmployeeDao employeeDao;

    @RequestMapping(value = "/employee", method = RequestMethod.GET)
    public String getAllEmployee(Model model){
        //获取所有员工信息
        Collection<Employee> all = employeeDao.getAll();
        //将员工信息放在请求域中共享
        model.addAttribute("allEmployee",all);
        return "employee_list";
    }
②创建employee_list.html
<!DOCTYPE html>
<html lang="en" xmlns:th="http://www.thymeleaf.org">
    <head>
        <meta charset="UTF-8">
        <title>Employee Info</title>
        <script type="text/javascript" th:src="@{/static/js/vue.js}"></script>
    </head>
    <body>
        <table border="1" cellpadding="0" cellspacing="0" style="text-align:center;" id="dataTable">
            <tr>
                <th colspan="5">Employee Info</th>
            </tr>
            <tr>
                <th>id</th>
                <th>lastName</th>
                <th>email</th>
                <th>gender</th>
                <th>options(<a th:href="@{/toAdd}">add</a>)</th>
            </tr>
            <tr th:each="employee : ${allEmployee}">
                <td th:text="${employee.id}"></td>
                <td th:text="${employee.lastName}"></td>
                <td th:text="${employee.email}"></td>
                <td th:text="${employee.gender}"></td>
                <td>
                    <a class="deleteA" @click="deleteEmployee"
                       th:href="@{'/employee/'+${employee.id}}">delete</a>
                    <a th:href="@{'/employee/'+${employee.id}}">update</a>
                </td>
            </tr>
        </table>
    </body>
</html>
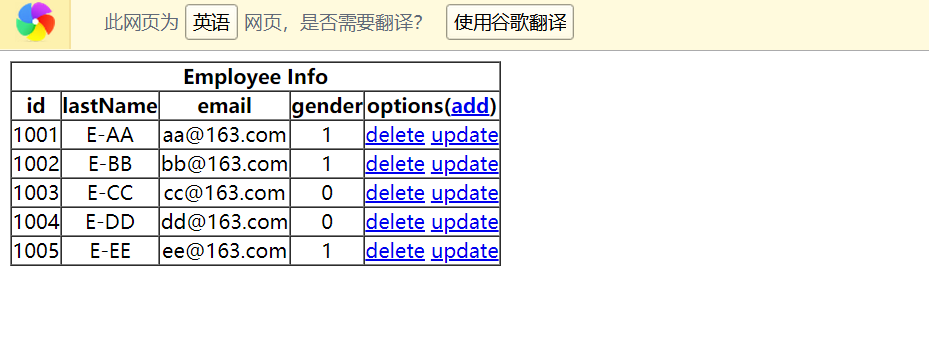
③处理静态资源
我们项目的web.xml是会继承Tomcat的web.xml,我们tomcat原本配置静态资源由一个专门的servlet处理,但是项目的Dispatcherservlet配置为对所有文件生效,但是它又处理不了静态资源,所以会导致css失效
<!--配置默认的servlet处理静态资源,
当前工程的web.xml配置的前端控制器pispatcherservlet的url -pattern是/
tomcat的web.xm儿配置的Defaultservlet的url-pattern也是/
此时,浏览器发送的请求会优先被DispatcherservLet进行处理,但是DispatcherservLet无法处理静态资源若配置了<mvc: default-servlet-handler />,此时浏览器发送的所有请求都会被Defaultservlet处理若配置了<mvc:default-servlet-handler />和<mvc : annotation-driven />
浏览器发送的请求会先被Dispatcherservlet处理,无法处理在交给Defaultservlet处理

-->

<mvc:default-servlet-handler />
<!--开启mvc注解驱动-->
<mvc:annotation-driven />
必须搭配annotation-driven使用,不然全部都会用默认的servlet来处理
8.5、具体功能:删除
[!important]
原本的删除是一个链接,但是我们需要用表达传输delete请求,这时我们就得用到vue来绑定事件,把链接绑定到表单的action里面,而表单提交delete请求需要配置[[springmvc#7.3、HiddenHttpMethodFilter]]
①创建处理delete请求方式的表单
<!-- 作用:通过超链接控制表单的提交,将post请求转换为delete请求 -->
<form id="delete_form" method="post">
    <!-- HiddenHttpMethodFilter要求:必须传输_method请求参数,并且值为最终的请求方式 -->
    <input type="hidden" name="_method" value="delete"/>
</form>
<div id="app">
    <table border="1" cellpadding="0" cellspacing="0" style="text-align:center;" id="dataTable">
        <tr>            <th colspan="5">Employee Info</th>
        </tr>        <tr>            <th>id</th>
            <th>lastName</th>
            <th>email</th>
            <th>gender</th>
            <th>options(<a th:href="@{/toAdd}">add</a>)</th>
        </tr>        <tr th:each="employee : ${allEmployee}">
            <td th:text="${employee.id}"></td>
            <td th:text="${employee.lastName}"></td>
            <td th:text="${employee.email}"></td>
            <td th:text="${employee.gender}"></td>
            <td><a @click="deleteEmployee()" th:href="@{'/employee/'+${employee.id}}">delete</a>
                <a th:href="@{'/employee/'+${employee.id}}">update</a>
            </td>
            </tr>
            </table>
             <form method="post">
        <input type="hidden" name="_method" value="delete">
    </form>
</div>
引入vue.js==,默认的servert需要设置才能使用静态资源==
<script type="text/javascript" th:src="@{/static/js/vue.js}"></script>
删除超链接
<a class="deleteA" @click="deleteEmployee"th:href="@{'/employee/'+${employee.id}}">delete</a>
通过vue处理点击事件
<script type="text/javascript">
    var vue = new Vue({
        el:"#dataTable",
        methods:{
            //event表示当前事件
            deleteEmployee:function (event) {
                //通过id获取表单标签
                var delete_form = document.getElementById("delete_form");
                //将触发事件的超链接的href属性为表单的action属性赋值
                delete_form.action = event.target.href;
                //提交表单
                delete_form.submit();
                //阻止超链接的默认跳转行为
                event.preventDefault();
            }
        }
    });
</script>
③控制器方法
请求方式为delete
@RequestMapping(value = "/employee/{id}", method = RequestMethod.DELETE)
public String deleteEmployee(@PathVariable("id") Integer id){
    employeeDao.delete(id);
    return "redirect:/employee";
}
8.6、具体功能:跳转到添加数据页面
①配置view-controller
<mvc:view-controller path="/toAdd" view-name="employee_add"></mvc:view-controller>
②创建employee_add.html
<!DOCTYPE html>
<html lang="en" xmlns:th="http://www.thymeleaf.org">
    <head>
        <meta charset="UTF-8">
        <title>Add Employee</title>
    </head>
    <body>
        <form th:action="@{/employee}" method="post">
            lastName:<input type="text" name="lastName"><br>
            email:<input type="text" name="email"><br>
            gender:<input type="radio" name="gender" value="1">male
            <input type="radio" name="gender" value="0">female<br>
            <input type="submit" value="add"><br>
        </form>
    </body>
</html>
8.7、具体功能:执行保存
①控制器方法
@RequestMapping(value = "/employee", method = RequestMethod.POST)
public String addEmployee(Employee employee){
    employeeDao.save(employee);
    return "redirect:/employee";
}
8.8、具体功能:跳转到更新数据页面
①修改超链接
不拼接后面的就会当成路径来解析而不是一个表达式的值
<a th:href="@{'/employee/'+${employee.id}}">update</a>
②控制器方法
@RequestMapping(value = "/employee/{id}", method = RequestMethod.GET)
public String getEmployeeById(@PathVariable("id") Integer id, Model model){
    Employee employee = employeeDao.get(id);
    model.addAttribute("employee", employee);
    return "employee_update";
}
③创建employee_update.html
<!DOCTYPE html>
<html lang="en" xmlns:th="http://www.thymeleaf.org">
    <head>
        <meta charset="UTF-8">
        <title>Update Employee</title>
    </head>
    <body>
        <form th:action="@{/employee}" method="post">
            <input type="hidden" name="_method" value="put">
            <input type="hidden" name="id" th:value="${employee.id}">
            lastName:<input type="text" name="lastName" th:value="${employee.lastName}">
            <br>
            email:<input type="text" name="email" th:value="${employee.email}"><br>
            <!--
                th:field="${employee.gender}"可用于单选框或复选框的回显
                若单选框的value和employee.gender的值一致,则添加checked="checked"属性
			-->
            gender:<input type="radio" name="gender" value="1"th:field="${employee.gender}">male
            <input type="radio" name="gender" value="0"th:field="${employee.gender}">female<br>
            <input type="submit" value="update"><br>
        </form>
    </body>
</html>
8.9、具体功能:执行更新
①控制器方法
@RequestMapping(value = "/employee", method = RequestMethod.PUT)
public String updateEmployee(Employee employee){
    employeeDao.save(employee);
    return "redirect:/employee";
}
9、SpringMVC处理ajax请求
回顾
<div id="app">
    <h1>index.html</h1>
    <input type="button" value="测试SpringMVC处理ajax" @click="testAjax()"><br>
    <input type="button" value="使用@RequestBody注解处理json格式的请求参数" @click="testRequestBody()"><br>
    <a th:href="@{/test/ResponseBody}">测试@ResponseBody注解响应浏览器数据</a><br>
    <input type="button" value="使用@ResponseBody注解响应json格式的数据" @click="testResponseBody()"><br>
    <a th:href="@{/test/down}">下载图片</a>
    <form th:action="@{/test/up}" method="post" enctype="multipart/form-data">
        头像:<input type="file" name="photo"><br>
        <input type="submit" value="上传">
    </form>
</div>

<script type="text/javascript" th:src="@{/js/vue.js}"></script>
<script type="text/javascript" th:src="@{/js/axios.min.js}"></script>
<script type="text/javascript">

    /**
     * axios({
           url:"",//请求路径
           method:"",//请求方式
           //以name=value&name=value的方式发送的请求参数
           //不管使用的请求方式是get或post,请求参数都会被拼接到请求地址后
           //此种方式的请求参数可以通过request.getParameter()获取
           params:{},
           //以json格式发送的请求参数
           //请求参数会被保存到请求报文的请求体传输到服务器
           //此种方式的请求参数不可以通过request.getParameter()获取
           data:{}
       }).then(response=>{
           console.log(response.data);
       });
     */

    var vue = new Vue({
        el:"#app",
        methods:{
            testAjax(){
                axios.post(
                    "/SpringMVC/test/ajax?id=1001",
                    {username:"admin",password:"123456"}
                ).then(response=>{
                    console.log(response.data);
                });
            },
            testRequestBody(){
                axios.post(
                    "/SpringMVC/test/RequestBody/json",
                    {username:"admin",password:"123456",age:23,gender:"男"}
                ).then(response=>{
                    console.log(response.data);
                });
            },
            testResponseBody(){
                axios.post("/SpringMVC/test/ResponseBody/json").then(response=>{
                    console.log(response.data);
                });
            }
        }
    });
</script>
data的数据会放在请求体中
[外链图片转存失败,源站可能有防盗链机制,建议将图片保存下来直接上传(img-uY1qWtSc-1686124821306)(null)]
在模型数据中我们经常创建一些json对象,json数组,将这些和页面中的表单进行双向绑定,表单中输入了数据后,data中设置的模型数据就可以获取到这些输入的数据

9.1、@RequestBody
@RequestBody可以获取请求体信息,使用@RequestBody注解标识控制器方法的形参,当前请求的请求体就会为当前注解所标识的形参赋值
<!--此时必须使用post请求方式,因为get请求没有请求体-->
<form th:action="@{/test/RequestBody}" method="post">
    用户名:<input type="text" name="username"><br>
    密码:<input type="password" name="password"><br>
    <input type="submit">
</form>
@RequestMapping("/test/RequestBody")
public String testRequestBody(@RequestBody String requestBody){
    System.out.println("requestBody:"+requestBody);
    return "success";
}
输出结果:
requestBody:username=admin&password=123456
9.2、@RequestBody获取json格式的请求参数
在使用了axios发送ajax请求之后,浏览器发送到服务器的请求参数有两种格式:
1、name=value&name=value…,此时的请求参数可以通过request.getParameter()获取,对应
SpringMVC中,可以直接通过控制器方法的形参获取此类请求参数
2、{key:value,key:value,…},此时无法通过request.getParameter()获取,之前我们使用操作
json的相关jar包gson或jackson处理此类请求参数,可以将其转换为指定的实体类对象或map集
合。在SpringMVC中,直接使用@RequestBody注解标识控制器方法的形参即可将此类请求参数
转换为java对象
使用@RequestBody获取json格式的请求参数的条件:
1、导入jackson的依赖
<dependency>
    <groupId>com.fasterxml.jackson.core</groupId>
    <artifactId>jackson-databind</artifactId>
    <version>2.12.1</version>
</dependency>
2、SpringMVC的配置文件中设置开启mvc的注解驱动
<!--开启mvc的注解驱动-->
<mvc:annotation-driven />
3、在控制器方法的形参位置,设置json格式的请求参数要转换成的java类型(实体类或map)的参
数,并使用@RequestBody注解标识
<input type="button" value="测试@RequestBody获取json格式的请求参数"@click="testRequestBody()"><br>
<script type="text/javascript" th:src="@{/js/vue.js}"></script>
<script type="text/javascript" th:src="@{/js/axios.min.js}"></script>
<script type="text/javascript">
    var vue = new Vue({
        el:"#app",
        methods:{
            testRequestBody(){
                axios.post(
                    "/SpringMVC/test/RequestBody/json",
                    {username:"admin",password:"123456"}
                ).then(response=>{
                    console.log(response.data);
                });
            }
        }
    });
</script>
//将json格式的数据转换为map集合
@RequestMapping("/test/RequestBody/json")
public void testRequestBody(@RequestBody Map<String, Object> map,HttpServletResponse response) throws IOException {
    System.out.println(map);
    //{username=admin, password=123456}
    response.getWriter().print("hello,axios");
}
//将json格式的数据转换为实体类对象
@RequestMapping("/test/RequestBody/json")
public void testRequestBody(@RequestBody User user, HttpServletResponseresponse) throws IOException {
    System.out.println(user);
    //User{id=null, username='admin', password='123456', age=null,gender='null'}
	response.getWriter().print("hello,axios");
}
9.3、@ResponseBody
@ResponseBody用于标识一个控制器方法,可以将该方法的返回值直接作为响应报文的响应体响应到浏览器
@RequestMapping("/testResponseBody")
public String testResponseBody(){
    //此时会跳转到逻辑视图success所对应的页面
    return "success";
}
@RequestMapping("/testResponseBody")
@ResponseBody
public String testResponseBody(){
    //此时响应浏览器数据success
    return "success";
}
9.4、@ResponseBody响应浏览器json数据
服务器处理ajax请求之后,大多数情况都需要向浏览器响应一个java对象,此时必须将java对象转换为
json字符串才可以响应到浏览器,之前我们使用操作json数据的jar包gson或jackson将java对象转换为
json字符串。在SpringMVC中,我们可以直接使用@ResponseBody注解实现此功能
@ResponseBody响应浏览器json数据的条件:
1、导入jackson的依赖
<dependency>
    <groupId>com.fasterxml.jackson.core</groupId>
    <artifactId>jackson-databind</artifactId>
    <version>2.12.1</version>
</dependency>
2、SpringMVC的配置文件中设置开启mvc的注解驱动
<!--开启mvc的注解驱动-->
<mvc:annotation-driven />
3、使用@ResponseBody注解标识控制器方法,在方法中,将需要转换为json字符串并响应到浏览器
的java对象作为控制器方法的返回值,此时SpringMVC就可以将此对象直接转换为json字符串并响应到浏览器
<input type="button" value="测试@ResponseBody响应浏览器json格式的数据"@click="testResponseBody()"><br>
<script type="text/javascript" th:src="@{/js/vue.js}"></script>
<script type="text/javascript" th:src="@{/js/axios.min.js}"></script>
<script type="text/javascript">
    var vue = new Vue({
        el:"#app",
        methods:{
            testResponseBody(){
                axios.post("/SpringMVC/test/ResponseBody/json").then(response=>{
                    console.log(response.data);
                });
            }
        }
    });
</script>
//响应浏览器list集合
@RequestMapping("/test/ResponseBody/json")
@ResponseBody
public List<User> testResponseBody(){
    User user1 = new User(1001,"admin1","123456",23,"男");
    User user2 = new User(1002,"admin2","123456",23,"男");
    User user3 = new User(1003,"admin3","123456",23,"男");
    List<User> list = Arrays.asList(user1, user2, user3);
    return list;
}
//响应浏览器map集合
@RequestMapping("/test/ResponseBody/json")
@ResponseBody
public Map<String, Object> testResponseBody(){
    User user1 = new User(1001,"admin1","123456",23,"男");
    User user2 = new User(1002,"admin2","123456",23,"男");
    User user3 = new User(1003,"admin3","123456",23,"男");
    Map<String, Object> map = new HashMap<>();
    map.put("1001", user1);
    map.put("1002", user2);
    map.put("1003", user3);
    return map;
}
//响应浏览器实体类对象
@RequestMapping("/test/ResponseBody/json")
@ResponseBody
public User testResponseBody(){
    return user;
}

常用的Java对象转换为json的结果:
实体类–>json对象
map–>json对象
list–>json数组(方括号包裹的)
9.5、@RestController注解
@RestController注解是springMVC提供的一个复合注解,标识在控制器的类上,就相当于为类添加了
@Controller注解,并且为其中的每个方法添加了@ResponseBody注解
10、文件上传和下载
10.1、文件下载
ResponseEntity:可以作为控制器方法的返回值,表示响应到浏览器的完整的响感报文
ResponseEntity用于控制器方法的返回值类型,该控制器方法的返回值就是响应到浏览器的响应报文
使用ResponseEntity实现下载文件的功能
真实地址的样子

文件分隔符的表示File.separator

is.available()获取流的字节数
@RequestMapping("/testDown")
public ResponseEntity<byte[]> testResponseEntity(HttpSession session) throws
    IOException {
    //通过session获取ServletContext对象
    ServletContext servletContext = session.getServletContext();
    //获取服务器中文件的真实路径
    String realPath = servletContext.getRealPath("/static/img/1.jpg");
    //创建输入流
    InputStream is = new FileInputStream(realPath);
    //创建字节数组
    byte[] bytes = new byte[is.available()];
    //将流读到字节数组中
    is.read(bytes);
    //创建HttpHeaders对象设置响应头信息
    MultiValueMap<String, String> headers = new HttpHeaders();
    //Content-Disposition设置要下载方式
    //attachment以附件的方式进行下载
    //设置下载文件的名字
    headers.add("Content-Disposition", "attachment;filename=1.jpg");
    //设置响应状态码
    HttpStatus statusCode = HttpStatus.OK;
    //创建ResponseEntity对象
    ResponseEntity<byte[]> responseEntity = new ResponseEntity<>(bytes, headers,statusCode);
    //关闭输入流
    is.close();
    return responseEntity;
}
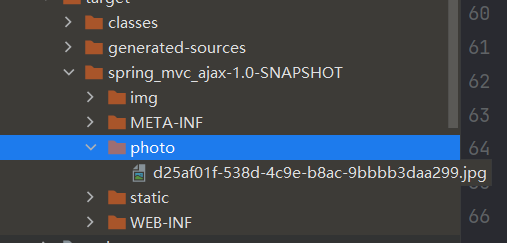
10.2、文件上传
文件上传要求form表单的请求方式必须为post,并且添加属性enctype="multipart/form-data"
SpringMVC中将上传的文件封装到MultipartFile对象中,通过此对象可以获取文件相关信息
上传步骤:
①添加依赖:
<!-- https://mvnrepository.com/artifact/commons-fileupload/commons-fileupload -->
<dependency>
    <groupId>commons-fileupload</groupId>
    <artifactId>commons-fileupload</artifactId>
    <version>1.3.1</version>
</dependency>
②在SpringMVC的配置文件中添加配置:
<!--配置文件上传解析器 id必须配置为固定值,因为springmvc是靠id来获取这个解析器的-->
<!--  单例的情况下,他的实例化过程是在获取ioc容器的时候执行-->
<bean id="multipartResolver"
class="org.springframework.web.multipart.commons.CommonsMultipartResolver">
</bean>
③控制器方法:
@RequestMapping("/testUp")
public String testUp(MultipartFile photo, HttpSession session) throws IOException {
    //获取上传的文件的文件名
    String fileName = photo.getOriginalFilename();
    //处理文件重名问题
    String hzName = fileName.substring(fileName.lastIndexOf("."));
    fileName = UUID.randomUUID().toString() + hzName;
    //获取服务器中photo目录的路径
    ServletContext servletContext = session.getServletContext();
    String photoPath = servletContext.getRealPath("photo");
    File file = new File(photoPath);
    if(!file.exists()){
        file.mkdir();
    }
    String finalPath = photoPath + File.separator + fileName;
    //实现上传功能
    photo.transferTo(new File(finalPath));
    return "success";
}
11、拦截器
过滤器是在浏览器和目标资源之间过滤

11.1、拦截器的配置
SpringMVC中的拦截器用于拦截控制器方法的执行
SpringMVC中的拦截器需要实现HandlerInterceptor
SpringMVC的拦截器必须在SpringMVC的配置文件中进行配置:
<mvc:interceptors>
    <bean class="com.atguigu.interceptor.FirstInterceptor"></bean>
</mvc:interceptors>
<bean class="com.atguigu.interceptor.FirstInterceptor"></bean>
<!-- 以上两种配置方式都是对DispatcherServlet所处理的所有的请求进行拦截 -->
<mvc:interceptors>
    <mvc:interceptor>
       <!-- /*是处理一层目录的请求 /**是所有请求-->
        <mvc:mapping path="/**"/>
        <mvc:exclude-mapping path="/testRequestEntity"/>
        <ref bean="firstInterceptor"></ref>
    </mvc:interceptor>
</mvc:interceptors>

<!--
    以上配置方式可以通过ref或bean标签设置拦截器,通过mvc:mapping设置需要拦截的请求,
    通过mvc:exclude-mapping设置需要排除的请求,即不需要拦截的请求
-->
11.2、拦截器的三个抽象方法
这三个方法不管控制器方法有没有都会执行
SpringMVC中的拦截器有三个抽象方法:
preHandle:控制器方法执行之前执行preHandle(),其boolean类型的返回值表示是否拦截或放行,返回true为放行,即调用控制器方法;返回false表示拦截,即不调用控制器方法
postHandle:控制器方法执行之后执行postHandle()
afterCompletion:处理完视图和模型数据,渲染视图完毕之后执行afterCompletion()
11.3、多个拦截器的执行顺序

①若每个拦截器的preHandle()都返回true
此时多个拦截器的执行顺序和拦截器在SpringMVC的配置文件的配置顺序有关:preHandle()会按照配置的顺序执行,而postHandle()和afterCompletion()会按照配置的反序执行
②若某个拦截器的preHandle()返回了false
preHandle()返回false和它之前的拦截器的preHandle()都会执行,postHandle()都不执行,返回false的拦截器之前的拦截器的afterCompletion()会执行
12、异常处理器
控制器方法执行的过程中如果出现了异常,那么就可以通过springmvc给我们提供的一个接口来处理异常
12.1、基于配置的异常处理
SpringMVC提供了一个处理控制器方法执行过程中所出现的异常的接口:HandlerExceptionResolver
HandlerExceptionResolver接口的实现类有:DefaultHandlerExceptionResolver和
SimpleMappingExceptionResolver
SpringMVC提供了自定义的异常处理器SimpleMappingExceptionResolver,使用方式:
<bean
      class="org.springframework.web.servlet.handler.SimpleMappingExceptionResolver">
    <property name="exceptionMappings">
        <props>
            <!--
                properties的键表示处理器方法执行过程中出现的异常
                properties的值表示若出现指定异常时,设置一个新的视图名称,跳转到指定页面
			-->
            <prop key="java.lang.ArithmeticException">error</prop>
        </props>
    </property>
    <!--
            exceptionAttribute属性设置一个属性名,将出现的异常信息在请求域中进行共享
            这里的ex就是异常信息在请求域中的属性名
        -->
    <property name="exceptionAttribute" value="ex"></property>
</bean>
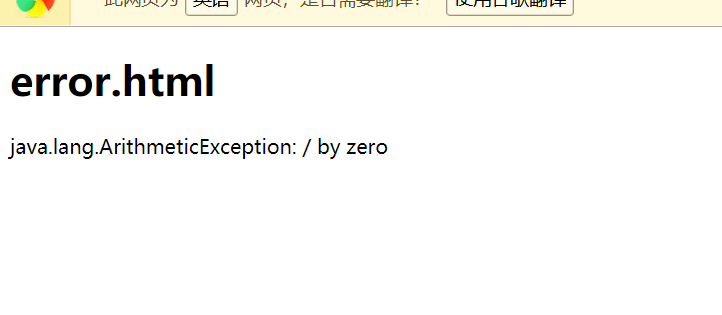
出现了异常就会往我们设置好的页面去跳

获取请求域中共享的异常信息
<p th:text="${ex}"></p>
12.2、基于注解的异常处理
//@ControllerAdvice将当前类标识为异常处理的组件
@ControllerAdvice
public class ExceptionController {
    //@ExceptionHandler用于设置所标识方法处理的异常
    @ExceptionHandler(ArithmeticException.class)
    //ex表示当前请求处理中出现的异常对象
    public String handleArithmeticException(Exception ex, Model model){
        model.addAttribute("ex", ex);
        return "error";
    }
}
13、注解配置SpringMVC
使用配置类和注解代替web.xml和SpringMVC配置文件的功能
13.1、创建初始化类,代替web.xml
在Servlet3.0环境中,容器会在类路径中查找实现javax.servlet.ServletContainerInitializer接口的类,如果找到的话就用它来配置Servlet容器。 Spring提供了这–…+个接口的实现,名为
SpringServletContainerInitializer,这个类反过来又会查找实现WebApplicationInitializer的类并将配置的任务交给它们来完成。Spring3.2引入了一个便利的WebApplicationInitializer基础实现,名为AbstractAnnotationConfigDispatcherServletInitializer,当我们的类扩展了
AbstractAnnotationConfigDispatcherServletInitializer并将其部署到Servlet3.0容器的时候,容器会自动发现它,并用它来配置Servlet上下文。用来代替web.xml
public class WebInit  extends AbstractAnnotationConfigDispatcherServletInitializer {
    //设置一个配置类代替spring配置文件
    @Override
    protected Class<?>[] getRootConfigClasses() {
        return new Class[]{SpringConfig.class};
    }

    @Override
    //设置一个配置类代替springmvc的配置文件
    protected Class<?>[] getServletConfigClasses() {
        return new Class[]{WebConfig.class};
    }

    @Override
    //设置springMVC的前端控制器Dispatcherservlet的url-pattern
    protected String[] getServletMappings() {
        return new String[]{"/"};
    }

    @Override
    //来设置当前的过滤器
    protected Filter[] getServletFilters() {
        //创建编码过滤器
        CharacterEncodingFilter encodingFilter = new CharacterEncodingFilter();
        encodingFilter.setEncoding("UTF-8");
        encodingFilter.setForceRequestEncoding(true);
        //创建处理请求方式的过滤器
        HiddenHttpMethodFilter hiddenHttpMethodFilter = new HiddenHttpMethodFilter();
        return new Filter[]{encodingFilter, hiddenHttpMethodFilter};
    }
}
13.2、创建SpringConfig配置类,代替spring的配置文件
//@Configuration将当前类表示为配置类
@Configuration
public class SpringConfig {
    //ssm整合之后,spring的配置信息写在此类中
}
13.3、创建WebConfig配置类,代替SpringMVC的配置文件
//代替springmvc的配置文件
@Configuration
//扫描主件
@ComponentScan("com.atguigu.controller")
//开启注解驱动
@EnableWebMvc
public class WebConfig implements WebMvcConfigurer {
    //使用默认的servlet处理静态资源
    @Override
    public void configureDefaultServletHandling(DefaultServletHandlerConfigurer configurer) {
        configurer.enable();
    }
    //配置文件上传解析器,@Bean注解可以将标识的方法的返回值作为bean进行管理,bean的id为方法的方法名
    @Bean
    public CommonsMultipartResolver multipartResolver(){
        return new CommonsMultipartResolver();
    }
    //配置拦截器
    @Override
    public void addInterceptors(InterceptorRegistry registry) {
        FirstInterceptor firstInterceptor = new FirstInterceptor();
        registry.addInterceptor(firstInterceptor).addPathPatterns("/**");
    }
    //配置视图控制
    @Override
   public void addViewControllers(ViewControllerRegistry registry) {
      registry.addViewController("/").setViewName("index");
   }
    //配置异常映射
    @Override
   public void configureHandlerExceptionResolvers(List<HandlerExceptionResolver> resolvers) {
      SimpleMappingExceptionResolver exceptionResolver = new SimpleMappingExceptionResolver();
      Properties prop = new Properties();
      prop.setProperty("java.lang.ArithmeticException", "error");
      //设置异常映射
      exceptionResolver.setExceptionMappings(prop);
      //设置共享异常信息的键
      exceptionResolver.setExceptionAttribute("ex");
      resolvers.add(exceptionResolver);
   }
    //配置生成模板解析器
    @Bean
    public ITemplateResolver templateResolver() {
        WebApplicationContext webApplicationContext = ContextLoader.getCurrentWebApplicationContext();
        // ServletContextTemplateResolver需要一个ServletContext作为构造参数,可通过WebApplicationContext 的方法获得
        ServletContextTemplateResolver templateResolver = new
                ServletContextTemplateResolver(webApplicationContext.getServletContext());
        templateResolver.setPrefix("/WEB-INF/templates/");
        templateResolver.setSuffix(".html");
        templateResolver.setCharacterEncoding("UTF-8");
        templateResolver.setTemplateMode(TemplateMode.HTML);
        return templateResolver;
    }
    //生成模板引擎并为模板引擎注入模板解析器(保证参数名和提供这个参数的方法名一致即可)
    @Bean
    public SpringTemplateEngine templateEngine(ITemplateResolver templateResolver) {
        SpringTemplateEngine templateEngine = new SpringTemplateEngine();
        templateEngine.setTemplateResolver(templateResolver);
        return templateEngine;
    }
    //生成视图解析器并未解析器注入模板引擎
    @Bean
    public ViewResolver viewResolver(SpringTemplateEngine templateEngine) {
        ThymeleafViewResolver viewResolver = new ThymeleafViewResolver();
        viewResolver.setCharacterEncoding("UTF-8");
        viewResolver.setTemplateEngine(templateEngine);
        return viewResolver;
    }
}
13.4、测试功能
@RequestMapping("/")
public String index(){
	return "index";
}
14、SpringMVC执行流程
14.1、SpringMVC常用组件
- DispatcherServlet:前端控制器,不需要工程师开发,由框架提供
作用:统一处理请求和响应,整个流程控制的中心,由它调用其它组件处理用户的请求
- HandlerMapping:处理器映射器,不需要工程师开发,由框架提供
作用:根据请求的url、method等信息查找Handler,即控制器方法(通过这个实现把请求匹配控制器方法)
- Handler:处理器,需要工程师开发(就是Controller)
作用:在DispatcherServlet的控制下Handler对具体的用户请求进行处理
- HandlerAdapter:处理器适配器,不需要工程师开发,由框架提供
作用:(通过HandlerMapping匹配控制器方法)通过HandlerAdapter对处理器(控制器方法)进行执行

- ViewResolver:视图解析器,不需要工程师开发,由框架提供
作用:进行视图解析,得到相应的视图,例如:ThymeleafView、InternalResourceView、
RedirectView
作用:将模型数据通过页面展示给用户
14.2、DispatcherServlet初始化过程
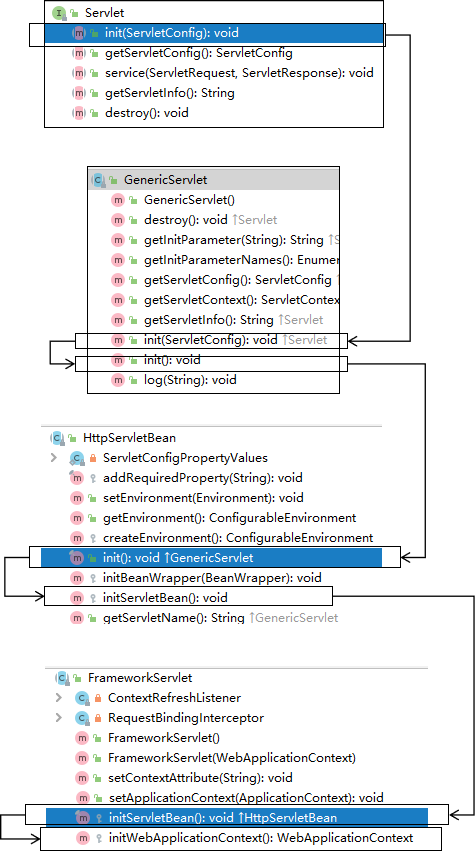
DispatcherServlet 本质上是一个 Servlet,所以天然的遵循 Servlet 的生命周期。所以宏观上是 Servlet生命周期来进行调度。
①初始化WebApplicationContext
所在类:org.springframework.web.servlet.FrameworkServlet
protected WebApplicationContext initWebApplicationContext() {
    WebApplicationContext rootContext = WebApplicationContextUtils.getWebApplicationContext(getServletContext());
    WebApplicationContext wac = null;
    if (this.webApplicationContext != null) {
        // A context instance was injected at construction time -> use it
        wac = this.webApplicationContext;
        if (wac instanceof ConfigurableWebApplicationContext) {
            ConfigurableWebApplicationContext cwac =(ConfigurableWebApplicationContext) wac;
            if (!cwac.isActive()) {
                // The context has not yet been refreshed -> provide services such as
                    // setting the parent context, setting the application context id, etc
                    if (cwac.getParent() == null) {
                        // The context instance was injected without an explicit parent -> set
                            // the root application context (if any; may be null) as the parent
                            cwac.setParent(rootContext);
                    }
                configureAndRefreshWebApplicationContext(cwac);
            }
        }
    }
    if (wac == null) {
        // No context instance was injected at construction time -> see if one
        // has been registered in the servlet context. If one exists, it is assumed
            // that the parent context (if any) has already been set and that the
            // user has performed any initialization such as setting the context id
            wac = findWebApplicationContext();
    }
    if (wac == null) {
        // No context instance is defined for this servlet -> create a local one
        // 创建WebApplicationContext
        wac = createWebApplicationContext(rootContext);
    }
    if (!this.refreshEventReceived) {
        // Either the context is not a ConfigurableApplicationContext with refresh
            // support or the context injected at construction time had already been
            // refreshed -> trigger initial onRefresh manually here.
            synchronized (this.onRefreshMonitor) {
            // 刷新WebApplicationContext
            onRefresh(wac);
        }
    }
    if (this.publishContext) {
        // Publish the context as a servlet context attribute.
        // 将IOC容器在应用域共享
        String attrName = getServletContextAttributeName();
        getServletContext().setAttribute(attrName, wac);
    }
    return wac;
}
②创建WebApplicationContext
所在类:org.springframework.web.servlet.FrameworkServlet
protected WebApplicationContext createWebApplicationContext(@Nullable ApplicationContext parent) {
    Class<?> contextClass = getContextClass();
    if (!ConfigurableWebApplicationContext.class.isAssignableFrom(contextClass))
    {
        throw new ApplicationContextException("Fatal initialization error in servlet with name '" +getServletName() +
                                              "': custom WebApplicationContext class [" + contextClass.getName() +
                                              "] is not of type ConfigurableWebApplicationContext");
    }
    // 通过反射创建 IOC 容器对象
    ConfigurableWebApplicationContext wac = (ConfigurableWebApplicationContext)BeanUtils.instantiateClass(contextClass);
    wac.setEnvironment(getEnvironment());
    // 设置父容器
    wac.setParent(parent);
    String configLocation = getContextConfigLocation();
    if (configLocation != null) {
        wac.setConfigLocation(configLocation);
    }
    configureAndRefreshWebApplicationContext(wac);
    return wac;
}
③DispatcherServlet初始化策略
FrameworkServlet创建WebApplicationContext后,刷新容器,调用onRefresh(wac),此方法在
DispatcherServlet中进行了重写,调用了initStrategies(context)方法,初始化策略,即初始化
DispatcherServlet的各个组件
所在类:org.springframework.web.servlet.DispatcherServlet
protected void initStrategies(ApplicationContext context) {
    initMultipartResolver(context);
    initLocaleResolver(context);
    initThemeResolver(context);
    initHandlerMappings(context);
    initHandlerAdapters(context);
    initHandlerExceptionResolvers(context);
    initRequestToViewNameTranslator(context);
    initViewResolvers(context);
    initFlashMapManager(context);
}
14.3、DispatcherServlet调用组件处理请求
①processRequest()
FrameworkServlet重写HttpServlet中的service()和doXxx(),这些方法中调用了
processRequest(request, response)
所在类:org.springframework.web.servlet.FrameworkServlet
protected final void processRequest(HttpServletRequest request,HttpServletResponse response)throws ServletException, IOException
{
    long startTime = System.currentTimeMillis();
    Throwable failureCause = null;
    LocaleContext previousLocaleContext = LocaleContextHolder.getLocaleContext();
    LocaleContext localeContext = buildLocaleContext(request);
    RequestAttributes previousAttributes = RequestContextHolder.getRequestAttributes();
    ServletRequestAttributes requestAttributes = buildRequestAttributes(request,response, previousAttributes);
    WebAsyncManager asyncManager = WebAsyncUtils.getAsyncManager(request);
    asyncManager.registerCallableInterceptor(FrameworkServlet.class.getName(),new RequestBindingInterceptor());
    initContextHolders(request, localeContext, requestAttributes);
    try {
        // 执行服务,doService()是一个抽象方法,在DispatcherServlet中进行了重写
        doService(request, response);
    }
    catch (ServletException | IOException ex) {
        failureCause = ex;
        throw ex;
    }
    catch (Throwable ex) {
        failureCause = ex;
        throw new NestedServletException("Request processing failed", ex);
    }
    finally {
        resetContextHolders(request, previousLocaleContext, previousAttributes);
        if (requestAttributes != null) {
            requestAttributes.requestCompleted();
        }
        logResult(request, response, failureCause, asyncManager);
        publishRequestHandledEvent(request, response, startTime, failureCause);
    }
}
②doService()
所在类:org.springframework.web.servlet.DispatcherServlet
@Override
protected void doService(HttpServletRequest request, HttpServletResponse response) throws Exception {
	logRequest(request);
    // Keep a snapshot of the request attributes in case of an include,
    // to be able to restore the original attributes after the include.
    Map<String, Object> attributesSnapshot = null;
    if (WebUtils.isIncludeRequest(request)) {
        attributesSnapshot = new HashMap<>();
        Enumeration<?> attrNames = request.getAttributeNames();
        while (attrNames.hasMoreElements()) {
            String attrName = (String) attrNames.nextElement();
            if (this.cleanupAfterInclude || attrName.startsWith(DEFAULT_STRATEGIES_PREFIX)) {
                attributesSnapshot.put(attrName,request.getAttribute(attrName));
            }
        }
    }
    // Make framework objects available to handlers and view objects.
    request.setAttribute(WEB_APPLICATION_CONTEXT_ATTRIBUTE,getWebApplicationContext());
    request.setAttribute(LOCALE_RESOLVER_ATTRIBUTE, this.localeResolver);
    request.setAttribute(THEME_RESOLVER_ATTRIBUTE, this.themeResolver);
    request.setAttribute(THEME_SOURCE_ATTRIBUTE, getThemeSource());
    if (this.flashMapManager != null) {
        FlashMap inputFlashMap = this.flashMapManager.retrieveAndUpdate(request,response);
        if (inputFlashMap != null) {
            request.setAttribute(INPUT_FLASH_MAP_ATTRIBUTE,Collections.unmodifiableMap(inputFlashMap));
        }
        request.setAttribute(OUTPUT_FLASH_MAP_ATTRIBUTE, new FlashMap());
        request.setAttribute(FLASH_MAP_MANAGER_ATTRIBUTE, this.flashMapManager);
    }
    RequestPath requestPath = null;
    if (this.parseRequestPath && !ServletRequestPathUtils.hasParsedRequestPath(request)) {
        requestPath = ServletRequestPathUtils.parseAndCache(request);
    }
    try {
        // 处理请求和响应
        doDispatch(request, response);
    }
    finally {
        if
            (!WebAsyncUtils.getAsyncManager(request).isConcurrentHandlingStarted()) {
            // Restore the original attribute snapshot, in case of an include.
            if (attributesSnapshot != null) {
                restoreAttributesAfterInclude(request, attributesSnapshot);
            }
        }
        if (requestPath != null) {
            ServletRequestPathUtils.clearParsedRequestPath(request);
        }
    }
}
③doDispatch()
所在类:org.springframework.web.servlet.DispatcherServlet
protected void doDispatch(HttpServletRequest request, HttpServletResponse response) throws Exception {
    HttpServletRequest processedRequest = request;
    HandlerExecutionChain mappedHandler = null;
    boolean multipartRequestParsed = false;
    WebAsyncManager asyncManager = WebAsyncUtils.getAsyncManager(request);
    try {
        ModelAndView mv = null;
        Exception dispatchException = null;
        try {
            processedRequest = checkMultipart(request);
            multipartRequestParsed = (processedRequest != request);
            // Determine handler for the current request.
            /*
                mappedHandler:调用链
                包含handler、interceptorList、interceptorIndex
                handler:浏览器发送的请求所匹配的控制器方法
                interceptorList:处理控制器方法的所有拦截器集合
                interceptorIndex:拦截器索引,控制拦截器afterCompletion()的执行
             */
            mappedHandler = getHandler(processedRequest);
            if (mappedHandler == null) {
                noHandlerFound(processedRequest, response);
                return;
            }
            // Determine handler adapter for the current request.
            // 通过控制器方法创建相应的处理器适配器,调用所对应的控制器方法
            HandlerAdapter ha = getHandlerAdapter(mappedHandler.getHandler());
            // Process last-modified header, if supported by the handler.
            String method = request.getMethod();
            boolean isGet = "GET".equals(method);
            if (isGet || "HEAD".equals(method)) {
                long lastModified = ha.getLastModified(request,mappedHandler.getHandler());
                if (new ServletWebRequest(request,response).checkNotModified(lastModified) && isGet) {
                    return;
                }
            }
            // 调用拦截器的preHandle()
            if (!mappedHandler.applyPreHandle(processedRequest, response)) {
                return;
            }
            // Actually invoke the handler.
            // 由处理器适配器调用具体的控制器方法,最终获得ModelAndView对象
            mv = ha.handle(processedRequest, response,mappedHandler.getHandler());
            if (asyncManager.isConcurrentHandlingStarted()) {
                return;
            }
            applyDefaultViewName(processedRequest, mv);
            // 调用拦截器的postHandle()
            mappedHandler.applyPostHandle(processedRequest, response, mv);
        }
        catch (Exception ex) {
            dispatchException = ex;
        }
        catch (Throwable err) {
            // As of 4.3, we're processing Errors thrown from handler methods as well,
            // making them available for @ExceptionHandler methods and otherscenarios.
            dispatchException = new NestedServletException("Handler dispatchfailed", err);
         }
         // 后续处理:处理模型数据和渲染视图
         processDispatchResult(processedRequest, response, mappedHandler, mv,dispatchException);
    }
    catch (Exception ex) {
        triggerAfterCompletion(processedRequest, response, mappedHandler, ex);
    }
    catch (Throwable err) {
        triggerAfterCompletion(processedRequest, response, mappedHandler,new NestedServletException("Handler processingfailed",
                                                                                                    err));
    }
    finally {
        if (asyncManager.isConcurrentHandlingStarted()) {
            // Instead of postHandle and afterCompletion
            if (mappedHandler != null) {
                mappedHandler.applyAfterConcurrentHandlingStarted(processedRequest, response);
             }
         }
        else {
            // Clean up any resources used by a multipart request.
            if (multipartRequestParsed) {
                cleanupMultipart(processedRequest);
            }
        }
    }
}
④processDispatchResult()
private void processDispatchResult(HttpServletRequest request,HttpServletResponse response,@Nullable HandlerExecutionChain
                                   mappedHandler, @Nullable ModelAndView mv,@Nullable Exception exception) throws Exception {
    boolean errorView = false;
    if (exception != null) {
        if (exception instanceof ModelAndViewDefiningException) {
            logger.debug("ModelAndViewDefiningException encountered",exception);
            mv = ((ModelAndViewDefiningException) exception).getModelAndView();
        }
        else {
            Object handler = (mappedHandler != null ? mappedHandler.getHandler(): null);
            mv = processHandlerException(request, response, handler, exception);
            errorView = (mv != null);
        }
    }
    // Did the handler return a view to render?
    if (mv != null && !mv.wasCleared()) {
        // 处理模型数据和渲染视图
        render(mv, request, response);
        if (errorView) {
            WebUtils.clearErrorRequestAttributes(request);
        }
    }
    else {
        if (logger.isTraceEnabled()) {
            logger.trace("No view rendering, null ModelAndView returned.");
        }
    }
    if (WebAsyncUtils.getAsyncManager(request).isConcurrentHandlingStarted()) {
        // Concurrent handling started during a forward
        return;
    }
    if (mappedHandler != null) {
        // Exception (if any) is already handled..
        // 调用拦截器的afterCompletion()
        mappedHandler.triggerAfterCompletion(request, response, null);
    }
}
14.4、SpringMVC的执行流程
\1) 用户向服务器发送请求,请求被SpringMVC 前端控制器 DispatcherServlet捕获。
\2) DispatcherServlet对请求URL进行解析,得到请求资源标识符(URI),判断请求URI对应的映射:
a) 不存在
i. 再判断是否配置了mvc:default-servlet-handler
ii. 如果没配置,则控制台报映射查找不到,客户端展示404错误

[外链图片转存失败,源站可能有防盗链机制,建议将图片保存下来直接上传(img-bScng8YE-1686124822443)(null)]
iii. 如果有配置,则访问目标资源(一般为静态资源,如:JS,CSS,HTML),找不到客户端也会展示404
错误


b) 存在则执行下面的流程
\3) 根据该URI,调用HandlerMapping获得该Handler配置的所有相关的对象(包括Handler对象以及
Handler对象对应的拦截器),最后以HandlerExecutionChain执行链对象的形式返回。
\4) DispatcherServlet 根据获得的Handler,选择一个合适的HandlerAdapter。
\5) 如果成功获得HandlerAdapter,此时将开始执行拦截器的preHandler(…)方法【正向】
\6) 提取Request中的模型数据,填充Handler入参,开始执行Handler(Controller)方法,处理请求。
在填充Handler的入参过程中,根据你的配置,Spring将帮你做一些额外的工作:
a) HttpMessageConveter: 将请求消息(如Json、xml等数据)转换成一个对象,将对象转换为指定
的响应信息
b) 数据转换:对请求消息进行数据转换。如String转换成Integer、Double等
c) 数据格式化:对请求消息进行数据格式化。 如将字符串转换成格式化数字或格式化日期等
d) 数据验证: 验证数据的有效性(长度、格式等),验证结果存储到BindingResult或Error中
\7) Handler执行完成后,向DispatcherServlet 返回一个ModelAndView对象。
\8) 此时将开始执行拦截器的postHandle(…)方法【逆向】。
\9) 根据返回的ModelAndView(此时会判断是否存在异常:如果存在异常,则执行
HandlerExceptionResolver进行异常处理)选择一个适合的ViewResolver进行视图解析,根据Model
和View,来渲染视图。
\10) 渲染视图完毕执行拦截器的afterCompletion(…)方法【逆向】。
\11) 将渲染结果返回给客户端。
15 . 监听器
使用原因
执行顺序:监听器,控制器,Servlet初始化,spring初始化要放在Servlet前面,这样保证在获取springmvc的ioc容器的时候,spring的ioc容器是创建好的,不在过滤器是因为:就好比在过滤器里放一段不需要过滤的代码,不太好

① ContextLoaderListener
Spring提供了监听器ContextLoaderListener,实现ServletContextListener接口,可监听
ServletContext的状态,在web服务器的启动,读取Spring的配置文件,创建Spring的IOC容器。web
应用中必须在web.xml中配置
<listener>
    <!--
        配置Spring的监听器,在服务器启动时加载Spring的配置文件
        Spring配置文件默认位置和名称:/WEB-INF/applicationContext.xml
        可通过上下文参数自定义Spring配置文件的位置和名称
    -->
    <listener-class>org.springframework.web.context.ContextLoaderListener</listener-class>
</listener>
<!--自定义Spring配置文件的位置和名称-->
<context-param>
    <param-name>contextConfigLocation</param-name>
    <param-”value>classpath:spring.xml</param-value>
</context-param>