在这个世界上取得成就的人,都努力去寻找他们想要的机会,如果找不到机会,他们便自己创造机会。你好,我是梦阳辰。期待与你相遇!
文章目录
- 01.spring简介
- 02.IOC理论
- 03.快速入门
- 04.spring的配置
- 05.DI依赖注入
-
- 06.bean的作用域
- 07.Bean的自动装配
-
01.spring简介
Spring框架是一个开放源代码的J2EE应用程序框架,由Rod Johnson发起,是针对bean的生命周期进行管理的轻量级容器(lightweight container)。 Spring解决了开发者在J2EE开发中遇到的许多常见的问题,提供了功能强大IOC、AOP及Web MVC等功能。Spring可以单独应用于构筑应用程序,也可以和Struts、Webwork、Tapestry等众多Web框架组合使用,并且可以与 Swing等桌面应用程序AP组合。因此, Spring不仅仅能应用于JEE应用程序之中,也可以应用于桌面应用程序以及小应用程序之中。Spring框架主要由七部分组成,分别是 Spring Core、 Spring AOP、 Spring ORM、 Spring DAO、Spring Context、 Spring Web和 Spring Web MVC。

Spring框架
Spring框架是由于软件开发的复杂性而创建的。Spring使用的是基本的JavaBean来完成以前只可能由EJB完成的事情。然而,Spring的用途不仅仅限于服务器端的开发。从简单性、可测试性和松耦合性角度而言,绝大部分Java应用都可以从Spring中受益。
◆目的:解决企业应用开发的复杂性
◆功能:使用基本的JavaBean代替EJB,并提供了更多的企业应用功能
◆范围:任何Java应用
Spring是一个轻量级控制反转(IoC)和面向切面(AOP)的容器框架。
Spring的一个最大的目的就是使JAVA EE开发更加容易。同时,Spring之所以与Struts、Hibernate等单层框架不同,是因为Spring致力于提供一个以统一的、高效的方式构造整个应用,并且可以将单层框架以最佳的组合揉和在一起建立一个连贯的体系。
Spring的形成,最初来自Rod Jahnson所著的一本很有影响力的书籍《Expert One-on-One J2EE Design and Development》,就是在这本书中第一次出现了Spring的一些核心思想,该书出版于2002年。另外一本书《Expert One-on-One J2EE Development without EJB》,更进一步阐述了在不使用EJB开发JAVA EE企业级应用的一些设计思想和具体的做法。有时间了可以详细的研读一下。
spring官网
https://spring.io/
spring FrameWork的官方文档
https://docs.spring.io/spring-framework/docs/current/reference/html/
spring FrameWork的API文档
https://docs.spring.io/spring-framework/docs/current/javadoc-api/
GitHub地址:
https://github.com/spring-projects/spring-framework
spring理念:使现有的技术更加容易使用,内容很多,整合了现有的技术框架。
SSH:Struct2+Spring+Hibernate

SSM:SpringMVC+Spring+Mybatis
Features
Core technologies: dependency injection, events, resources, i18n, validation, data binding, type conversion, SpEL, AOP.

Testing: mock objects, TestContext framework, Spring MVC Test, WebTestClient.

Data Access: transactions, DAO support, JDBC, ORM, Marshalling XML.

Spring MVC and Spring WebFlux web frameworks.

Integration: remoting, JMS, JCA, JMX, email, tasks, scheduling, cache.

Languages: Kotlin, Groovy, dynamic languages.
优点:
Spring是一个开源的免费的框架
Spring是一个轻量级的,非入侵式的框架(不对原来项目产生影响)。
控制反转(IOC)
面向切面编程(AOP)
支持事务的处理,对框架整合的支持。
spring是一个轻量级的控制反转(IOC)和面向切面编程(AOP)的框架。
低侵入式设计,代码的污染极低。
独立于各种应用服务器,基于Spring框架的应用,可以真正实现Write Once,Run Anywhere的承诺。
Spring的IoC容器降低了业务对象替换的复杂性,提高了组件之间的解耦。
Spring的AOP支持允许将一些通用任务如安全、事务、日志等进行集中式管理,从而提供了更好的复用。
Spring的ORM和DAO提供了与第三方持久层框架的良好整合,并简化了底层的数据库访问。
Spring的高度开放性,并不强制应用完全依赖于Spring,开发者可自由选用Spring框架的部分或全部
扩展:

现代化的java开发,就是基于spring的开发。
Spring Boot:一个快速开发的脚手架
基于SpringBoot可以快速的开发单个微服务。
约定大于配置。
Spring Cloud:是基于SpringBoot实现的。
现在大多数公司都在使用SpringBoot进行快速开发,学习SpringBoot的前提,需要掌握spring及SpringMVC承上启下。
Maven导包:
导入最大的,其他依赖的自动会导入。
<!-- https://mvnrepository.com/artifact/org.springframework/spring-webmvc -->
<dependency>
    <groupId>org.springframework</groupId>
    <artifactId>spring-webmvc</artifactId>
    <version>5.3.2</version>
</dependency>
跟mybatis整合
<!-- https://mvnrepository.com/artifact/org.springframework/spring-jdbc -->
<dependency>
    <groupId>org.springframework</groupId>
    <artifactId>spring-jdbc</artifactId>
    <version>5.3.2</version>
</dependency>
02.IOC理论
1.UserDao接口
2.UserDaolmpl实现类
3.UserService 业务接口
4.UserServicelmpl 业务实现类

之前实现需求的分析:
程序员主动创建对象,控制权掌握在程序员手里。

使用了set注入后,程序不再具有主动性,而是变成了被动的接收对象。


控制反转loC(Inversion of Control),是一种设计思想,DI(依赖注入)是实现loC的一种方法,也有人认为DI只是loC的另一种说法。没有loC的程序中,我们使用面向对象编程,对象的创建与对象间的依赖关系完全硬编码在程序中,对象的创建由程序自己控制,控制反转后将对象的创建转移给第三方,个人认为所谓控制反转就是:获得依赖对象的方式反转了。
采用XML方式配置Bean的时候,Bean的定义信息是和实现分离的,而采用注解的方式可以把两者合为一体,Bean的定义信息直接以注解的形式定义在实现类中,从而达到了零配置的目的。
控制反转是一种通过描述(XML或注解)并通过第三方去生产或获取特定对象的方式。在Spring中实现控制反转的是loC容器,其实现方法是依赖注入(Dependency Iniection,Dl) 。

这种思想,从本质上解决了问题,程序员不需要取管理对象创建了。系统大的耦合性降低,使得可以更加关注于业务上的实现。
这是IOC的原型。
03.快速入门
Hello 对象是谁创建的?hello 对象是由Spring创建的.Hello 对象的属性是怎么设置的?
hello 对象的属性是由Spring容器设置的,这个过程就叫控制反转:
控制:谁来控制对象的创建,传统应用程序的对象是由程序本身控制创建的,使用Spring后,对象是由Spring来创建的.
反转∶程序本身不创建对象,而变成被动的接收对象.依赖注入:就是利用set方法来进行注入的.
IOC是一种编程思想,由主动的编程变成被动的接收.
可以通过newClassPathXmlApplicationContext去浏览一下底层源码.
OK,到了现在,我们彻底不用再程序中去改动了,要实现不同的操作,只需要在xml配置文件中进行修改,所谓的loC,一句话搞定:对象由Spring来创建,管理,装配!
新建pojo类:
public class HelloSpring {
    private String str;

    public String getStr() {
        return str;
    }

    public void setStr(String str) {
        this.str = str;
    }

    @Override
    public String toString() {
        return "HelloSpring{" +
                "str='" + str + '\'' +
                '}';
    }
}
在resouces下新建beans.xml:
<?xml version="1.0" encoding="UTF-8"?>
<beans xmlns="http://www.springframework.org/schema/beans"
       xmlns:xsi="http://www.w3.org/2001/XMLSchema-instance"
       xsi:schemaLocation="http://www.springframework.org/schema/beans
        https://www.springframework.org/schema/beans/spring-beans.xsd">

    <!--使用Spring来创建对象,在Spring这些都被称为Bean
    bean=对象 new HelloSpring
    id等价于变量名
    class等价于new的对象
    property相当于给对象中的属性设置一个值
    -->
    <bean id="hello" class="com.mengyangchen.pojo.HelloSpring">
        <property name="str" value="Spring"/>
    </bean>


</beans>
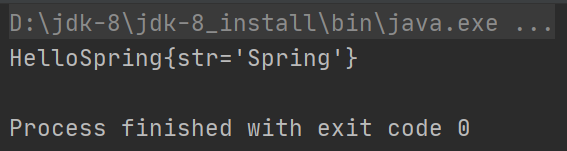
测试:
public class MyTest {
@Test
public void test(){
ApplicationContext context = new ClassPathXmlApplicationContext("beans.xml");
HelloSpring hello = (HelloSpring)context.getBean("hello");
System.out.println(hello.toString());
}
}
结果:
默认采用无参构造创建对象。
若要采用有参的构造方法构造对象
1.下标赋值
您可以使用该index属性来明确指定构造函数参数的索引,如以下示例所示:
<bean id="exampleBean" class="examples.ExampleBean">
    <constructor-arg index="0" value="7500000"/>
    <constructor-arg index="1" value="42"/>
</bean>
2.类型匹配
在上述情况下,如果通过使用type属性显式指定构造函数参数的类型,则容器可以使用简单类型的类型匹配。如下例所示:
如果两个参数都是string:就无法使用。
<bean id="exampleBean" class="examples.ExampleBean">
    <constructor-arg type="int" value="7500000"/>
    <constructor-arg type="java.lang.String" value="42"/>
</bean>
3.直接通过参数名设置【推荐】
您还可以使用构造函数参数名称来消除歧义,如以下示例所示:
<bean id="exampleBean" class="examples.ExampleBean">
    <constructor-arg name="years" value="7500000"/>
    <constructor-arg name="ultimateAnswer" value="42"/>
</bean>

对象在你获取前就已经创建了。
在配置文件加载的时候,容器中管理的对象就已经初始化了。

04.spring的配置
别名
  <bean id="hello" class="com.mengyangchen.pojo.HelloSpring">
        <property name="str" value="Spring"/>
    </bean>
    <!--别名-->
    <alias name="hello" alias="hello11"/>

import
一般用户团队开发,它可以将多个配置文件,导入合并为一个,假如现在项目中有多个人开发,这几个人负责不同的类开发,不同的类需要注册在不同的bean中,我们可以利用import将所有的beans。xml合并为一个总的。
使用的时候使用总的即可。
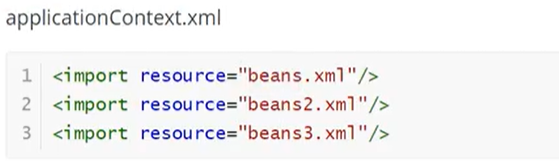
内容相同也会合并。
05.DI依赖注入
依赖注入:set注入
依赖:bean对象的创建依赖于容器。
注入:bean对象中的所有属性,由容器来注入。
实体类:
package com.mengyangchen.pojo;
import java.util.*;
public class Student {
private String name;
private Address address;
private String[] books;
private List<String> hobbys;
private Map<String,String> card;
private Set<String> games;
private Properties info;
private String wife;
public String getName() {
return name;
}
public void setName(String name) {
this.name = name;
}
public Address getAddress() {
return address;
}
public void setAddress(Address address) {
this.address = address;
}
public String[] getBooks() {
return books;
}
public void setBooks(String[] books) {
this.books = books;
}
public List<String> getHobbys() {
return hobbys;
}
public void setHobbys(List<String> hobbys) {
this.hobbys = hobbys;
}
public Map<String, String> getCard() {
return card;
}
public void setCard(Map<String, String> card) {
this.card = card;
}
public Set<String> getGames() {
return games;
}
public void setGames(Set<String> games) {
this.games = games;
}
public Properties getInfo() {
return info;
}
public void setInfo(Properties info) {
this.info = info;
}
public String getWife() {
return wife;
}
public void setWife(String wife) {
this.wife = wife;
}
@Override
public String toString() {
return "Student{" +
"name='" + name + '\'' +
", address=" + address +
", books=" + Arrays.toString(books) +
", hobbys=" + hobbys +
", card=" + card +
", games=" + games +
", info=" + info +
", wife='" + wife + '\'' +
'}';
}
}
package com.mengyangchen.pojo;

public class Address {
    private String address;

    public String getAddress() {
        return address;
    }

    public void setAddress(String address) {
        this.address = address;
    }

    @Override
    public String toString() {
        return "Address{" +
                "address='" + address + '\'' +
                '}';
    }
}
xml文件
<?xml version="1.0" encoding="UTF-8"?>
<beans xmlns="http://www.springframework.org/schema/beans"
       xmlns:xsi="http://www.w3.org/2001/XMLSchema-instance" xmlns:util="http://www.springframework.org/schema/util"
       xsi:schemaLocation="http://www.springframework.org/schema/beans
        https://www.springframework.org/schema/beans/spring-beans.xsd http://www.springframework.org/schema/util https://www.springframework.org/schema/util/spring-util.xsd">

    <!--使用Spring来创建对象,在Spring这些都被称为Bean
    bean=对象 new HelloSpring
    id等价于变量名
    class等价于new的对象
    property相当于给对象中的属性设置一个值
    -->
    <bean id="address" class="com.mengyangchen.pojo.Address">
        <property name="address" value="上海市"/>
    </bean>

    <bean id="student" class="com.mengyangchen.pojo.Student">
        <!--普通值注入-->
        <property name="name" value="梦阳辰"/>

        <!--bean注入-->
        <property name="address" ref="address"/>

        <!--数组注入-->
        <property name="books">
            <array>
                <value>平凡的世界</value>
                <value>追着风筝的人</value>
                <value>活着</value>
            </array>
        </property>

        <!--list注入-->
        <property name="hobbys">
            <list>
                <value>打篮球</value>
                <value>玩游戏</value>
                <value>看电影</value>
            </list>
        </property>

        <!--Map注入-->
        <property name="card">
            <map>
                <entry key="学号" value="2341234"/>
                <entry key="学院" value="计算机学院"/>
                <entry key="班级" value="A1811"/>
            </map>
        </property>

        <!--set注入-->
        <property name="games">
            <set>
                <value>英雄联盟</value>
                <value>王者荣耀</value>
            </set>
        </property>

        <!--null注入-->
        <property name="wife">
            <null/>
        </property>
        <!--Properties注入-->
        <property name="info">
            <props>
                <prop key="学号">2342424</prop>
                <prop key="姓名">梦阳辰</prop>
            </props>
        </property>
    </bean>
</beans>
测试:
@Test
public void test(){
ApplicationContext context = new ClassPathXmlApplicationContext("beans.xml");
Student student = (Student) context.getBean("student");
System.out.println(student.toString());
}
结果:

注入方式:
构造器注入
set方式注入
扩展方式注入。
p/c命名空间注入
具有p-命名空间的XML快捷方式(set注入)
p-namespace允许您使用bean元素的属性(而不是嵌套 元素)来描述协作bean的属性值,或同时使用这两者。
Spring支持带有XML定义的命名空间的可扩展配置格式。beans本章讨论的配置格式在XML Schema文档中定义。但是,p命名空间未在XSD文件中定义,仅存在于Spring的核心中。
<beans xmlns="http://www.springframework.org/schema/beans"
    xmlns:xsi="http://www.w3.org/2001/XMLSchema-instance"
    xmlns:p="http://www.springframework.org/schema/p"
    xsi:schemaLocation="http://www.springframework.org/schema/beans
        https://www.springframework.org/schema/beans/spring-beans.xsd">

    <bean name="classic" class="com.example.ExampleBean">
        <property name="email" value="someone@somewhere.com"/>
    </bean>

    <bean name="p-namespace" class="com.example.ExampleBean"
        p:email="someone@somewhere.com"/>
</beans>
具有c-namespace的XML快捷方式(构造器注入)
与具有p-namespace的XML Shortcut相似,在Spring 3.1中引入的c-namespace允许使用内联属性来配置构造函数参数,而不是嵌套constructor-arg元素。
下面的示例使用c:名称空间执行与 基于构造函数的依赖注入相同的操作
<beans xmlns="http://www.springframework.org/schema/beans"
    xmlns:xsi="http://www.w3.org/2001/XMLSchema-instance"
    xmlns:c="http://www.springframework.org/schema/c"
    xsi:schemaLocation="http://www.springframework.org/schema/beans
        https://www.springframework.org/schema/beans/spring-beans.xsd">

    <bean id="beanTwo" class="x.y.ThingTwo"/>
    <bean id="beanThree" class="x.y.ThingThree"/>

    <!-- traditional declaration with optional argument names -->
    <bean id="beanOne" class="x.y.ThingOne">
        <constructor-arg name="thingTwo" ref="beanTwo"/>
        <constructor-arg name="thingThree" ref="beanThree"/>
        <constructor-arg name="email" value="something@somewhere.com"/>
    </bean>

    <!-- c-namespace declaration with argument names -->
    <bean id="beanOne" class="x.y.ThingOne" c:thingTwo-ref="beanTwo"
        c:thingThree-ref="beanThree" c:email="something@somewhere.com"/>

</beans>
例如:
<?xml version="1.0" encoding="UTF-8"?>
<beans xmlns="http://www.springframework.org/schema/beans"
       xmlns:xsi="http://www.w3.org/2001/XMLSchema-instance" xmlns:util="http://www.springframework.org/schema/util"
       xmlns:p="http://www.springframework.org/schema/p"
       xmlns:c="http://www.springframework.org/schema/c"
       xsi:schemaLocation="http://www.springframework.org/schema/beans
        https://www.springframework.org/schema/beans/spring-beans.xsd http://www.springframework.org/schema/util https://www.springframework.org/schema/util/spring-util.xsd">

    <!--p命名空间注入,可以之间注入属性的值-->
    <bean id="user" class="com.mengyangchen.pojo.User" p:name="梦阳辰" p:age="19"/>
    <!--c命名空间注入-->
    <bean id="user2" class="com.mengyangchen.pojo.User" c:age="18" c:name="阳辰"/>

</beans>
注意点:使用前需要导入xml约束。
xmlns:p="http://www.springframework.org/schema/p"
xmlns:c="http://www.springframework.org/schema/c"

06.bean的作用域

单例模式(singleton)默认机制
换句话说,当您定义一个bean定义并且其作用域为单例时,Spring IoC容器将为该bean定义所定义的对象创建一个实例。该单个实例存储在此类单例bean的高速缓存中,并且对该命名bean的所有后续请求和引用都返回该高速缓存的对象。下图显示了单例作用域的工作方式

<bean id="accountService" class="com.something.DefaultAccountService"/>

<!-- the following is equivalent, though redundant (singleton scope is the default) -->
<bean id="accountService" class="com.something.DefaultAccountService" scope="singleton"/>
原型模式(prototype)
每次对特定bean提出请求时,bean部署的非单一原型范围都会导致创建一个新bean实例。也就是说,该Bean被注入到另一个Bean中,或者您可以通过getBean()容器上的方法调用来请求它。通常,应将原型作用域用于所有有状态Bean,将单例作用域用于无状态Bean。

以下示例将bean定义为XML原型:
<bean id="accountService" class="com.something.DefaultAccountService" scope="prototype"/>
其余的request,session,application,这些只能在web开发中使用到。
07.Bean的自动装配
自动装配是spring满足依赖一种方式!
spring会在上下文中寻找,并自动给bean装配属性。
在spring中有三种装配的方式
1.xml中显示的配置。
2.在java中显示配置。
3.隐式的自动装配**【重要】**。
实体类:
package com.mengyangchen.pojo;

public class Cat {
    public void shout(){
        System.out.println("miao~~");
    }
}
package com.mengyangchen.pojo;

public class Dog {
    public void shout(){
        System.out.println("wang~~");
    }
}
package com.mengyangchen.pojo;

public class People {
    private Cat cat;
    private Dog dog;
    private String name;

    public Cat getCat() {
        return cat;
    }

    public void setCat(Cat cat) {
        this.cat = cat;
    }

    public Dog getDog() {
        return dog;
    }

    public void setDog(Dog dog) {
        this.dog = dog;
    }

    public String getName() {
        return name;
    }

    public void setName(String name) {
        this.name = name;
    }

    @Override
    public String toString() {
        return "People{" +
                "cat=" + cat +
                ", dog=" + dog +
                ", name='" + name + '\'' +
                '}';
    }
}
手动装配:
<?xml version="1.0" encoding="UTF-8"?>
<beans xmlns="http://www.springframework.org/schema/beans"
       xmlns:xsi="http://www.w3.org/2001/XMLSchema-instance"
       xsi:schemaLocation="http://www.springframework.org/schema/beans
        https://www.springframework.org/schema/beans/spring-beans.xsd">

    <bean id="cat" class="com.mengyangchen.pojo.Cat">

    </bean>

    <bean id="dog" class="com.mengyangchen.pojo.Dog">

    </bean>

    <bean id="people" class="com.mengyangchen.pojo.People">
        <property name="name" value="梦阳辰"/>
        <property name="cat" ref="cat"/>
        <property name="dog" ref="dog"/>
    </bean>
</beans>
自动装配:
<?xml version="1.0" encoding="UTF-8"?>
<beans xmlns="http://www.springframework.org/schema/beans"
       xmlns:xsi="http://www.w3.org/2001/XMLSchema-instance"
       xsi:schemaLocation="http://www.springframework.org/schema/beans
        https://www.springframework.org/schema/beans/spring-beans.xsd">

    <bean id="cat" class="com.mengyangchen.pojo.Cat">

    </bean>

    <bean id="dog" class="com.mengyangchen.pojo.Dog">

    </bean>

    <!--byName:会自动在容器上下文中查找,和自己对象set方法后面的值对应的bean Id-->
    <!--byType:会自动在容器上下文中查找,和自己对象类型对应的bean Id-->
    <bean id="people" class="com.mengyangchen.pojo.People" autowire="byName">
        <property name="name" value="梦阳辰"/>
    </bean>
</beans>
小结:byName时,需要保证所有的bean的id唯一,并且这个bean需要和对应那个注入的属性的set方法一致。
使用注解实现自动装配
使用注解须知:
1.导入约束
xmlns:context="http://www.springframework.org/schema/context"
2.配置注解支持
<?xml version="1.0" encoding="UTF-8"?>
<beans xmlns="http://www.springframework.org/schema/beans"
xmlns:xsi="http://www.w3.org/2001/XMLSchema-instance"
xmlns:context="http://www.springframework.org/schema/context"
xsi:schemaLocation="http://www.springframework.org/schema/beans
https://www.springframework.org/schema/beans/spring-beans.xsd
http://www.springframework.org/schema/context
https://www.springframework.org/schema/context/spring-context.xsd">
<context:annotation-config/>
</beans>
测试:
<?xml version="1.0" encoding="UTF-8"?>
<beans xmlns="http://www.springframework.org/schema/beans"
xmlns:xsi="http://www.w3.org/2001/XMLSchema-instance"
xmlns:context="http://www.springframework.org/schema/context"
xsi:schemaLocation="http://www.springframework.org/schema/beans
https://www.springframework.org/schema/beans/spring-beans.xsd
http://www.springframework.org/schema/context
https://www.springframework.org/schema/context/spring-context.xsd">
<context:annotation-config/>
<bean id="cat" class="com.mengyangchen.pojo.Cat"/>
<bean id="dog" class="com.mengyangchen.pojo.Dog"/>
<bean id="people" class="com.mengyangchen.pojo.People"/>
</beans>
@Autowired在属性上使用即可(也可以放在set方法上;可以不需要set方法)
package com.mengyangchen.pojo;

import org.springframework.beans.factory.annotation.Autowired;

public class People {
    @Autowired
    private Cat cat;
    @Autowired
    private Dog dog;
    private String name;

    public Cat getCat() {
        return cat;
    }

    public void setCat(Cat cat) {
        this.cat = cat;
    }

    public Dog getDog() {
        return dog;
    }

    public void setDog(Dog dog) {
        this.dog = dog;
    }

    public String getName() {
        return name;
    }

    public void setName(String name) {
        this.name = name;
    }

    @Override
    public String toString() {
        return "People{" +
                "cat=" + cat +
                ", dog=" + dog +
                ", name='" + name + '\'' +
                '}';
    }
}
使用Autowired我们可以不用编写set方法,前提是这个自动装配的属性在IOC(spring)容器中存在,且符合名字byName。
@Nullable 字段标记了这个注解,说明这个字段可以为null

如果@Autowired自动装配的环境比较复杂,自动装配无法通过一个注解【@Autowired】完成的时候、我们可以使用@Qualifier(value=“xxx”")去配置@Autowired的使用,指定一个唯一的bean对象注入!
也可以用@resource注解,两者的区别:
两者都是用来自动装配
@Autowired默认通过byName方式实现,而且必须要求这个对象存在。
@Resource默认通过byName的方式实现,否则通过byType。
A man’s best friends are his ten fingers。

本文内容由网友自发贡献,版权归原作者所有,本站不承担相应法律责任。如您发现有涉嫌抄袭侵权的内容,请联系:hwhale#tublm.com(使用前将#替换为@)