第一章 Rook安装
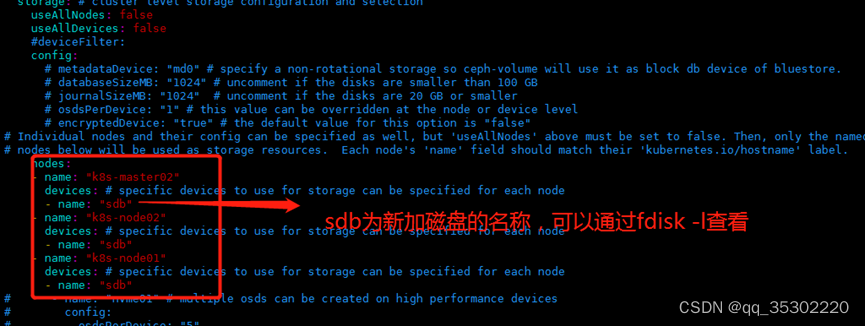
rook的版本大于1.3,不要使用目录创建集群,要使用单独的裸盘进行创建,也就是创建一个新的磁盘,挂载到宿主机,不进行格式化,直接使用即可。对于的磁盘节点配置如下:
做这个实验需要高配置,每个节点配置不能低于2核4G
k8s 1.19以上版本,快照功能需要单独安装snapshot控制器
下载Rook安装文件
下载指定版本Rook
git clone --single-branch --branch v1.6.3 https://github.com/rook/rook.git
配置更改
cd rook/cluster/examples/kubernetes/ceph
修改Rook CSI镜像地址,原本的地址可能是gcr的镜像,但是gcr的镜像无法被国内访问,所以需要同步gcr的镜像到阿里云镜像仓库,文档版本已经完成同步,可以直接修改如下:
vim operator.yaml
将

改为:
ROOK_CSI_REGISTRAR_IMAGE: "registry.cn-beijing.aliyuncs.com/dotbalo/csi-node-driver-registrar:v2.0.1"
ROOK_CSI_RESIZER_IMAGE: "registry.cn-beijing.aliyuncs.com/dotbalo/csi-resizer:v1.0.1"
ROOK_CSI_PROVISIONER_IMAGE: "registry.cn-beijing.aliyuncs.com/dotbalo/csi-provisioner:v2.0.4"
ROOK_CSI_SNAPSHOTTER_IMAGE: "registry.cn-beijing.aliyuncs.com/dotbalo/csi-snapshotter:v4.0.0"
ROOK_CSI_ATTACHER_IMAGE: "registry.cn-beijing.aliyuncs.com/dotbalo/csi-attacher:v3.0.2"
如果是其他版本,需要自行同步,同步方法可以在网上找到相关文章。可以参考https://blog.csdn.net/sinat_35543900/article/details/103290782
还是operator文件,新版本rook默认关闭了自动发现容器的部署,可以找到ROOK_ENABLE_DISCOVERY_DAEMON改成true即可:

部署rook
1.6.3版本的部署步骤如下:
cd cluster/examples/kubernetes/ceph
kubectl create -f crds.yaml -f common.yaml -f operator.yaml
等待operator容器和discover容器启动
[root@k8s-master01 ceph]# kubectl -n rook-ceph get pod
NAME                                  READY   STATUS    RESTARTS   AGE
rook-ceph-operator-65965c66b5-q4529   1/1     Running   0          7m43s
rook-discover-7bjbn                   1/1     Running   0          5m31s
rook-discover-dv4bn                   1/1     Running   0          5m31s
rook-discover-gbln2                   1/1     Running   0          5m31s
rook-discover-hlqrg                   1/1     Running   0          5m31s
rook-discover-np7pb                   1/1     Running   0          5m31s
第二章 创建ceph集群
配置更改
主要更改的是osd节点所在的位置:
cd cluster/examples/kubernetes/ceph
vim cluster.yaml
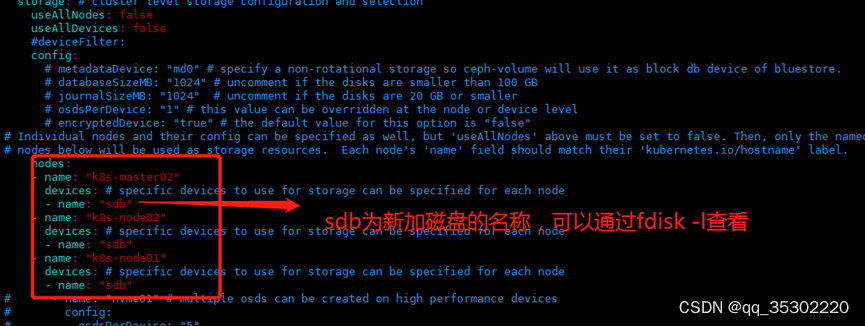
新版必须采用裸盘,即未格式化的磁盘。其中k8s-master02 k8s-node01 node02有新加的一个磁盘,可以通过lsblk -f查看新添加的磁盘名称。建议最少三个节点,否则后面的试验可能会出现问题
创建Ceph集群
kubectl create -f cluster.yaml
创建完成后,可以查看pod的状态:
[root@k8s-master01 ceph]# kubectl -n rook-ceph get pod
NAME                                                    READY   STATUS      RESTARTS   AGE
csi-cephfsplugin-cp2s5                                  3/3     Running     0          27m
csi-cephfsplugin-h4wb5                                  3/3     Running     0          27m
csi-cephfsplugin-jznvn                                  3/3     Running     0          27m
csi-cephfsplugin-k9q28                                  3/3     Running     0          27m
csi-cephfsplugin-provisioner-574976878-f5n7c            6/6     Running     0          27m
csi-cephfsplugin-provisioner-574976878-p7vcx            6/6     Running     0          27m
csi-cephfsplugin-z2645                                  3/3     Running     0          27m
csi-rbdplugin-7fzmv                                     3/3     Running     0          27m
csi-rbdplugin-7xsrp                                     3/3     Running     0          27m
csi-rbdplugin-b9lqh                                     3/3     Running     0          27m
csi-rbdplugin-dx2jk                                     3/3     Running     0          27m
csi-rbdplugin-provisioner-884fb5b55-dm5dl               6/6     Running     0          27m
csi-rbdplugin-provisioner-884fb5b55-z4p49               6/6     Running     0          27m
csi-rbdplugin-x4snv                                     3/3     Running     0          27m
rook-ceph-crashcollector-k8s-master02-f9db7d85d-lltdp   1/1     Running     0          17m
rook-ceph-crashcollector-k8s-node01-747795874c-5cdz6    1/1     Running     0          17m
rook-ceph-crashcollector-k8s-node02-5d4867cfb8-n74wn    1/1     Running     0          17m
rook-ceph-mgr-a-77bf97745c-4hqpp                        1/1     Running     0          17m
rook-ceph-mon-a-6d4444d6bf-jvlxw                        1/1     Running     0          19m
rook-ceph-mon-b-68b66fd889-x28bf                        1/1     Running     0          17m
rook-ceph-mon-c-54bb69686-v8ftf                         1/1     Running     0          17m
rook-ceph-operator-65965c66b5-q4529                     1/1     Running     0          50m
rook-ceph-osd-0-667c867b46-m8nnj                        1/1     Running     0          17m
rook-ceph-osd-1-56784d575b-vm8mc                        1/1     Running     0          17m
rook-ceph-osd-2-74f856bb8c-s2r69                        1/1     Running     0          17m
rook-ceph-osd-prepare-k8s-master02-nf7qn                0/1     Completed   0          16m
rook-ceph-osd-prepare-k8s-node01-jkm6g                  0/1     Completed   0          16m
rook-ceph-osd-prepare-k8s-node02-xr4rt                  0/1     Completed   0          16m
rook-discover-7bjbn                                     1/1     Running     0          48m
rook-discover-dv4bn                                     1/1     Running     0          48m
rook-discover-gbln2                                     1/1     Running     0          48m
rook-discover-hlqrg                                     1/1     Running     0          48m
rook-discover-np7pb                                     1/1     Running     0          48m
需要注意的是,osd-x的容器必须是存在的,且是正常的。如果上述Pod均正常,则认为集群安装成功。
更多配置:https://rook.io/docs/rook/v1.6/ceph-cluster-crd.html
安装ceph snapshot控制器
k8s 1.19版本以上需要单独安装snapshot控制器,才能完成pvc的快照功能,所以在此提前安装下
snapshot控制器的部署在集群安装时的k8s-ha-install项目中,需要切换到1.20.x分支:
cd /root/k8s-ha-install/
git checkout manual-installation-v1.20.x
创建snapshot controller:
kubectl create -f snapshotter/ -n kube-system
[root@k8s-master01 k8s-ha-install]# kubectl  get po -n kube-system -l app=snapshot-controller
NAME                    READY   STATUS    RESTARTS   AGE
snapshot-controller-0   1/1     Running   0          51s
具体文档:https://rook.io/docs/rook/v1.6/ceph-csi-snapshot.html
第三章 安装ceph客户端工具
[root@k8s-master01 k8s-ha-install]# cd /rook/cluster/examples/kubernetes/ceph

[root@k8s-master01 ceph]# kubectl  create -f toolbox.yaml -n rook-ceph
deployment.apps/rook-ceph-tools created
待容器Running后,即可执行相关命令
[root@k8s-master01 ceph]# kubectl get po -n rook-ceph -l app=rook-ceph-tools
NAME READY STATUS RESTARTS AGE
rook-ceph-tools-fc5f9586c-wq72t 1/1 Running 0 38s
[root@k8s-master01 ceph]# kubectl -n rook-ceph exec -it deploy/rook-ceph-tools -- bash
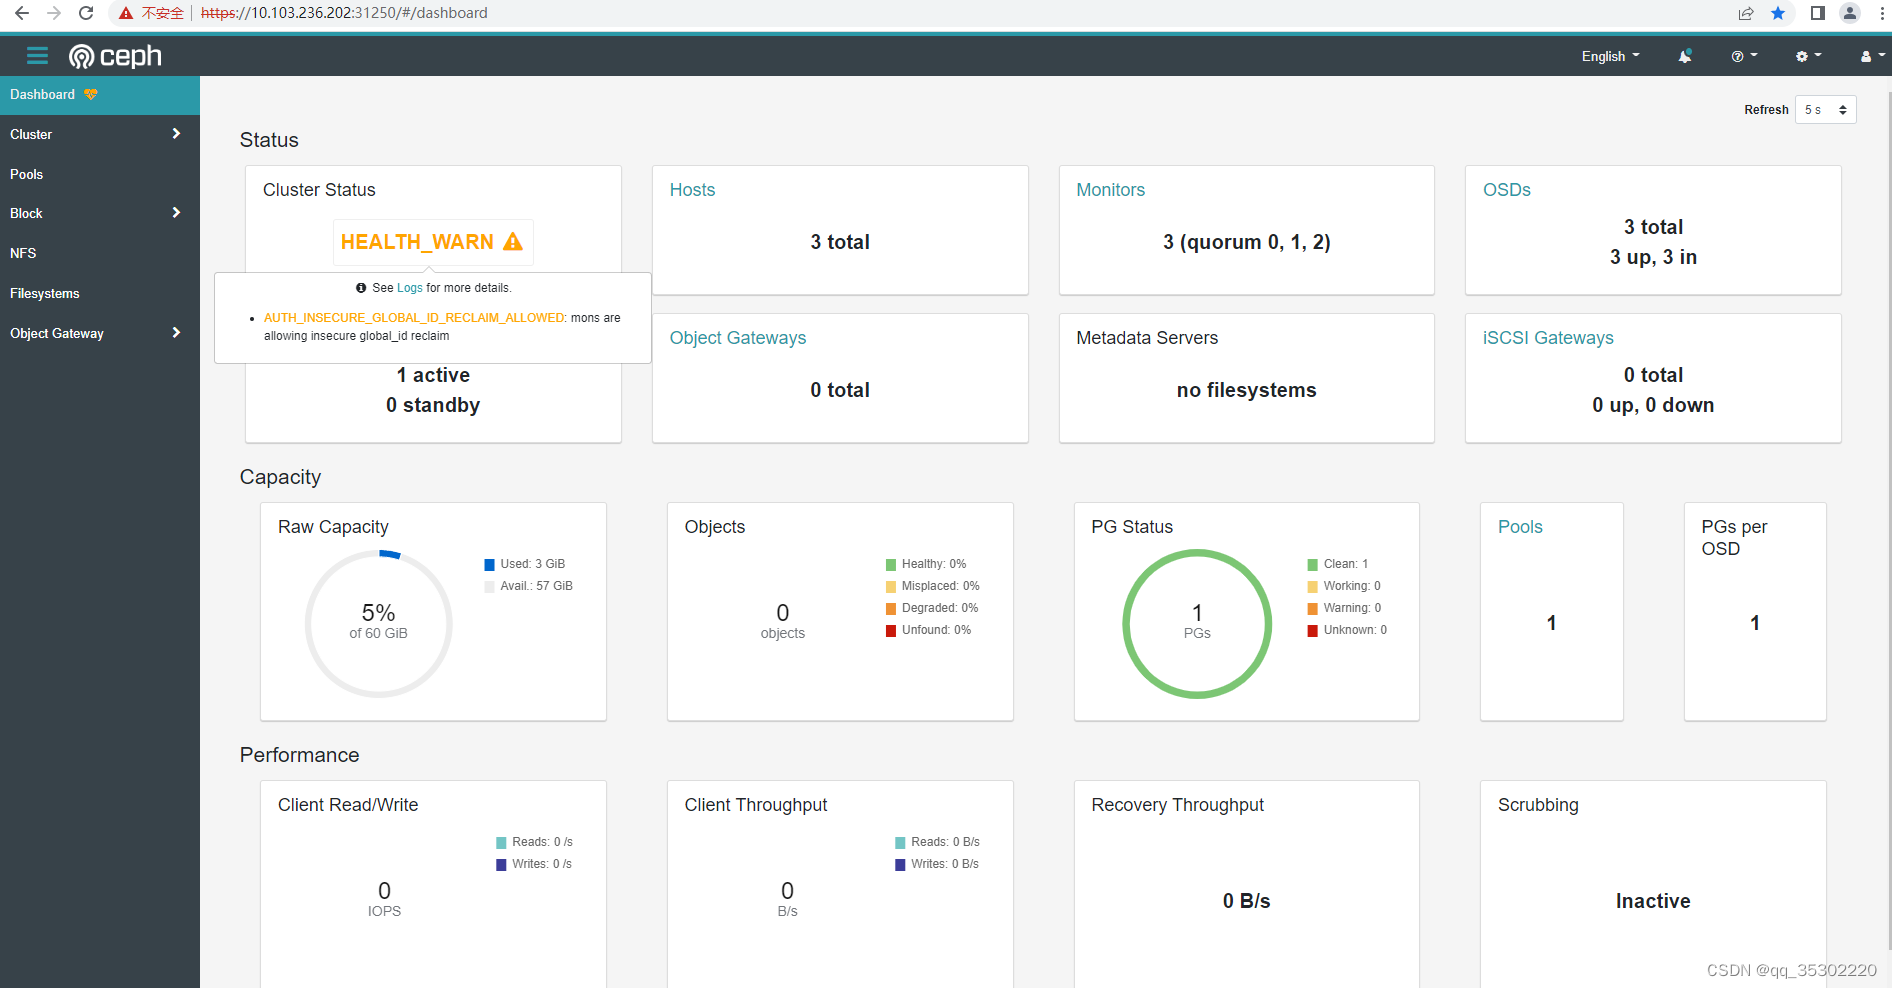
[root@rook-ceph-tools-fc5f9586c-wq72t /]# ceph status
cluster:
id: b23b3611-f332-40a7-bd4b-f555458ce160
health: HEALTH_WARN
mons are allowing insecure global_id reclaim
services:
mon: 3 daemons, quorum a,b,c (age 7m)
mgr: a(active, since 7m)
osd: 3 osds: 3 up (since 7m), 3 in (since 10h)
data:
pools: 1 pools, 1 pgs
objects: 0 objects, 0 B
usage: 3.0 GiB used, 57 GiB / 60 GiB avail
pgs: 1 active+clean
[root@rook-ceph-tools-fc5f9586c-wq72t /]# ceph osd status
ID HOST USED AVAIL WR OPS WR DATA RD OPS RD DATA STATE
0 k8s-node01 1027M 18.9G 0 0 0 0 exists,up
1 k8s-node02 1027M 18.9G 0 0 0 0 exists,up
2 k8s-master02 1027M 18.9G 0 0 0 0 exists,up
[root@rook-ceph-tools-fc5f9586c-wq72t /]# ceph df
--- RAW STORAGE ---
CLASS SIZE AVAIL USED RAW USED %RAW USED
hdd 60 GiB 57 GiB 11 MiB 3.0 GiB 5.02
TOTAL 60 GiB 57 GiB 11 MiB 3.0 GiB 5.02
--- POOLS ---
POOL ID PGS STORED OBJECTS USED %USED MAX AVAIL
device_health_metrics 1 1 0 B 0 0 B 0 18 GiB
第四章 Ceph dashboard
参考官网
The simplest way to expose the service in minikube or similar environment is using the NodePort to open a port on the VM that can be accessed by the host. To create a service with the NodePort, save this yaml as dashboard-external-https.yaml.
The simplest way to expose the service in minikube or similar environment is using the NodePort to open a port on the VM that can be accessed by the host. To create a service with the NodePort, save this yaml as dashboard-external-https.yaml.
在minikube或类似环境中公开服务的最简单方法是使用NodePort在VM上打开主机可以访问的端口。要使用NodePort创建服务,请将此yaml保存为dashboard-external-https.yaml。
apiVersion: v1
kind: Service
metadata:
  name: rook-ceph-mgr-dashboard-external-https
  namespace: rook-ceph
  labels:
    app: rook-ceph-mgr
    rook_cluster: rook-ceph
spec:
  ports:
  - name: dashboard
    port: 8443
    protocol: TCP
    targetPort: 8443
  selector:
    app: rook-ceph-mgr
    rook_cluster: rook-ceph
  sessionAffinity: None
  type: NodePort
创建服务
kubectl create -f dashboard-external-https.yaml
查看服务
[root@k8s-master01 ceph]# kubectl -n rook-ceph get service
NAME                                     TYPE        CLUSTER-IP        EXTERNAL-IP   PORT(S)             AGE
csi-cephfsplugin-metrics                 ClusterIP   192.168.114.108   <none>        8080/TCP,8081/TCP   11h
csi-rbdplugin-metrics                    ClusterIP   192.168.214.223   <none>        8080/TCP,8081/TCP   11h
rook-ceph-mgr                            ClusterIP   192.168.5.9       <none>        9283/TCP            11h
rook-ceph-mgr-dashboard                  ClusterIP   192.168.144.39    <none>        8443/TCP            11h
rook-ceph-mgr-dashboard-external-https   NodePort    192.168.195.164   <none>        8443:31250/TCP      8m53s
rook-ceph-mon-a                          ClusterIP   192.168.71.28     <none>        6789/TCP,3300/TCP   11h
rook-ceph-mon-b                          ClusterIP   192.168.137.117   <none>        6789/TCP,3300/TCP   11h
rook-ceph-mon-c                          ClusterIP   192.168.245.155   <none>        6789/TCP,3300/TCP   11h
访问
账号:admin
密码:通过命令获取
kubectl -n rook-ceph get secret rook-ceph-dashboard-password -o jsonpath="{['data']['password']}" | base64 --decode && echo
通过安装ceph的任意节点ip+端口号进行访问
警告解决:https://docs.ceph.com/en/octopus/rados/operations/health-checks/
ceph -s出现mon is allowing insecure global_id reclaim的解决办法
需要禁用掉不安全的模式,使用如下命令
ceph config set mon auth_allow_insecure_global_id_reclaim false
第五章 ceph块存储的使用
块存储一般用于一个Pod挂载一块存储使用,相当于一个服务器新挂了一个盘,只给一个应用使用。
参考文档
创建StorageClass和ceph的存储池
[root@k8s-master01 ceph]# pwd
/rook/cluster/examples/kubernetes/ceph
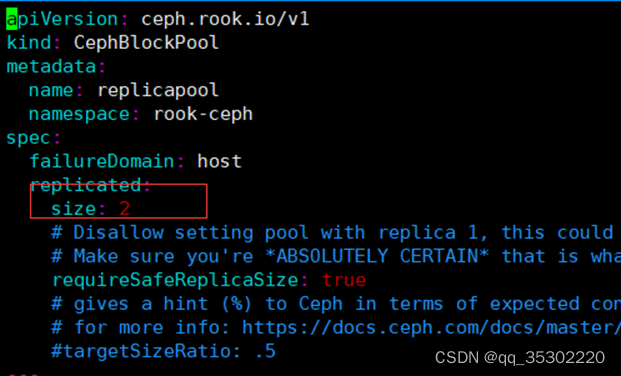
[root@k8s-master01 ceph]# vim csi/rbd/storageclass.yaml
因为是试验环境,所以将副本数设置成了2(不能设置为1),生产环境最少为3,且要小于等于osd的数量
创建StorageClass和存储池:
[root@k8s-master01 ceph]# kubectl  create -f csi/rbd/storageclass.yaml -n rook-ceph
cephblockpool.ceph.rook.io/replicapool created
storageclass.storage.k8s.io/rook-ceph-block created
查看创建的cephblockpool和storageClass
StorageClass没有namespace隔离性
[root@k8s-master01 ceph]# kubectl  get cephblockpool -n rook-ceph
NAME          AGE
replicapool   57s

[root@k8s-master01 ceph]# kubectl  get sc
NAME              PROVISIONER                  RECLAIMPOLICY   VOLUMEBINDINGMODE   ALLOWVOLUMEEXPANSION   AGE
rook-ceph-block   rook-ceph.rbd.csi.ceph.com   Delete          Immediate           true                   74s
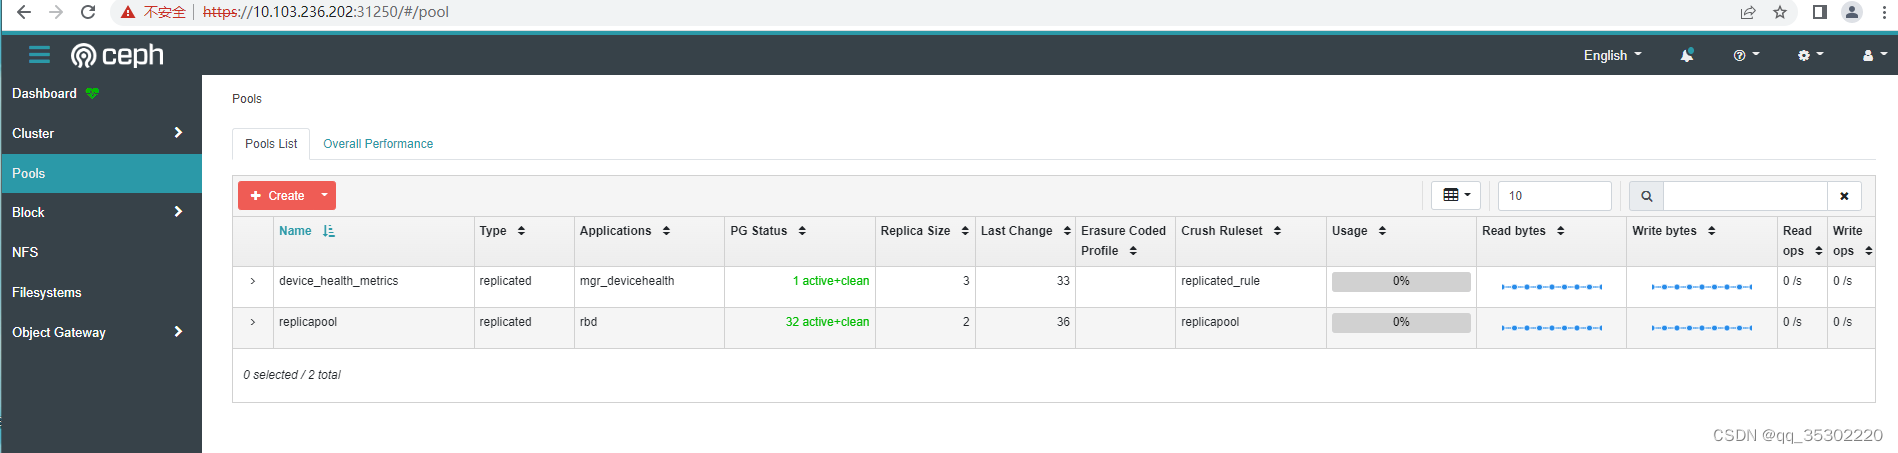
此时可以在ceph dashboard查看到改Pool,如果没有显示说明没有创建成功
挂载测试
创建一个MySQL服务
[root@k8s-master01 ceph]# cd /rook/cluster/examples/kubernetes

[root@k8s-master01 kubernetes]# kubectl create -f mysql.yaml
service/wordpress-mysql created
persistentvolumeclaim/mysql-pv-claim created
deployment.apps/wordpress-mysql created
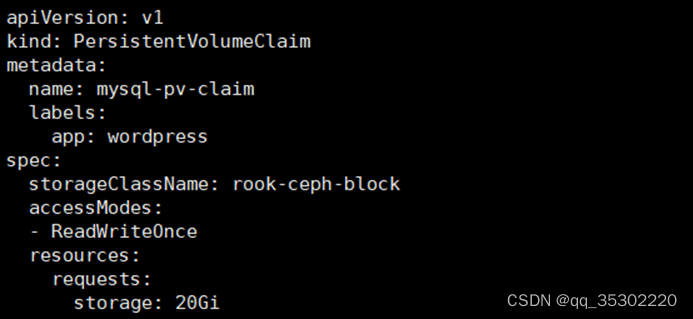
该文件有一段pvc的配置
[root@k8s-master01 kubernetes]# cat mysql.yaml
apiVersion: v1
kind: Service
metadata:
  name: wordpress-mysql
  labels:
    app: wordpress
spec:
  ports:
    - port: 3306
  selector:
    app: wordpress
    tier: mysql
  clusterIP: None
---
apiVersion: v1
kind: PersistentVolumeClaim
metadata:
  name: mysql-pv-claim
  labels:
    app: wordpress
spec:
  storageClassName: rook-ceph-block
  accessModes:
    - ReadWriteOnce
  resources:
    requests:
      storage: 20Gi
---
apiVersion: apps/v1
kind: Deployment
metadata:
  name: wordpress-mysql
  labels:
    app: wordpress
    tier: mysql
spec:
  selector:
    matchLabels:
      app: wordpress
      tier: mysql
  strategy:
    type: Recreate
  template:
    metadata:
      labels:
        app: wordpress
        tier: mysql
    spec:
      containers:
        - image: mysql:5.6
          name: mysql
          env:
            - name: MYSQL_ROOT_PASSWORD
              value: changeme
          ports:
            - containerPort: 3306
              name: mysql
          volumeMounts:
            - name: mysql-persistent-storage
              mountPath: /var/lib/mysql
      volumes:
        - name: mysql-persistent-storage
          persistentVolumeClaim:
            claimName: mysql-pv-claim
pvc会连接刚才创建的storageClass,然后动态创建pv,然后连接到ceph创建对应的存储,
之后创建pvc只需要指定storageClassName为刚才创建的StorageClass名称即可连接到rook的ceph。
如果是statefulset,只需要将volumeTemplateClaim里面的Claim名称改为StorageClass名称即可动态创建Pod
其中MySQL deployment的volumes配置挂载了该pvc:
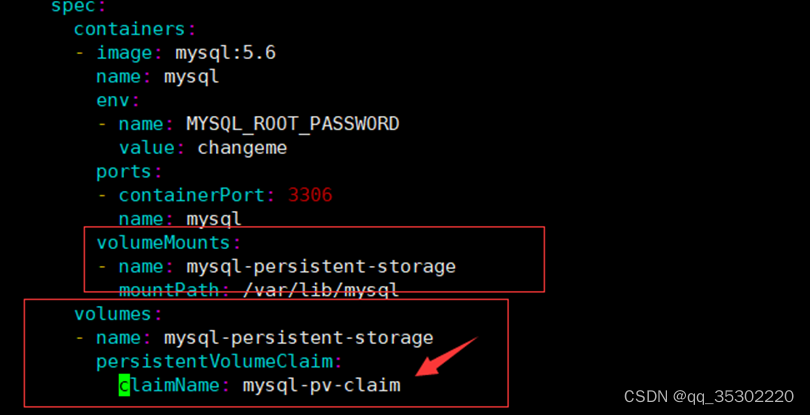
claimName为pvc的名称
因为MySQL的数据不能多个MySQL实例连接同一个存储,所以一般只能用块存储。相当于新加了一块盘给MySQL使用。
创建完成后可以查看创建的pvc和pv
[root@k8s-master01 kubernetes]# kubectl get pvc
NAME             STATUS   VOLUME                                     CAPACITY   ACCESS MODES   STORAGECLASS      AGE
mysql-pv-claim   Bound    pvc-7d7668d8-8d51-4456-aa2e-bedc18c251fd   20Gi       RWO            rook-ceph-block   39m

[root@k8s-master01 kubernetes]# kubectl get pv
NAME                                       CAPACITY   ACCESS MODES   RECLAIM POLICY   STATUS   CLAIM                    STORAGECLASS      REASON   AGE
pvc-7d7668d8-8d51-4456-aa2e-bedc18c251fd   20Gi       RWO            Delete           Bound    default/mysql-pv-claim   rook-ceph-block            39m
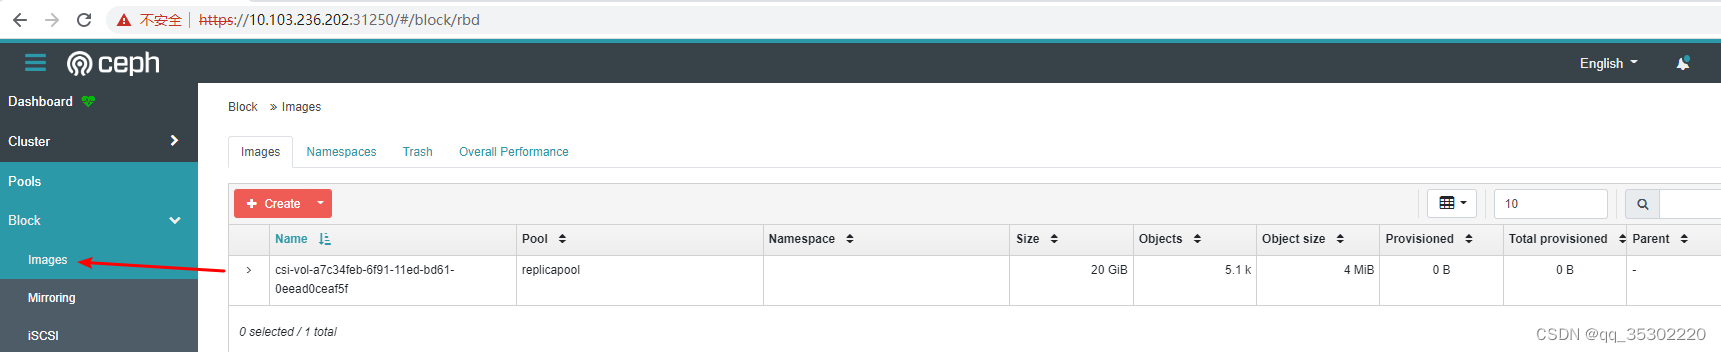
此时在ceph dashboard上面也可以查看到对应的image
StatefulSet · volumeClaimTemplates
apiVersion: v1
kind: Service
metadata:
  name: nginx
  labels:
    app: nginx
spec:
  ports:
  - port: 80
    name: web
  clusterIP: None
  selector:
    app: nginx
---
apiVersion: apps/v1
kind: StatefulSet
metadata:
  name: web
spec:
  selector:
    matchLabels:
      app: nginx # has to match .spec.template.metadata.labels
  serviceName: "nginx"
  replicas: 3 # by default is 1
  template:
    metadata:
      labels:
        app: nginx # has to match .spec.selector.matchLabels
    spec:
      terminationGracePeriodSeconds: 10
      containers:
      - name: nginx
        image: nginx
        ports:
        - containerPort: 80
          name: web
        volumeMounts:
        - name: www
          mountPath: /usr/share/nginx/html
  volumeClaimTemplates:
  - metadata:
      name: www
    spec:
      accessModes: [ "ReadWriteOnce" ]
      storageClassName: "rook-ceph-block"
      resources:
        requests:
          storage: 1Gi
第六章 共享文件系统的使用
共享文件系统一般用于多个Pod共享一个存储
官方文档
创建共享类型的文件系统
[root@k8s-master01 kubernetes]# cd /rook/cluster/examples/kubernetes/ceph

[root@k8s-master01 ceph]# cat filesystem.yaml
#################################################################################################################
# Create a filesystem with settings with replication enabled for a production environment.
# A minimum of 3 OSDs on different nodes are required in this example.
#  kubectl create -f filesystem.yaml
#################################################################################################################

apiVersion: ceph.rook.io/v1
kind: CephFilesystem
metadata:
  name: myfs
  namespace: rook-ceph # namespace:cluster
spec:
  # The metadata pool spec. Must use replication.
  metadataPool:
    replicated:
      size: 3
      requireSafeReplicaSize: true
    parameters:
      # Inline compression mode for the data pool
      # Further reference: https://docs.ceph.com/docs/nautilus/rados/configuration/bluestore-config-ref/#inline-compression
      compression_mode:
        none
        # gives a hint (%) to Ceph in terms of expected consumption of the total cluster capacity of a given pool
      # for more info: https://docs.ceph.com/docs/master/rados/operations/placement-groups/#specifying-expected-pool-size
      #target_size_ratio: ".5"
  # The list of data pool specs. Can use replication or erasure coding.
  dataPools:
    - failureDomain: host
      replicated:
        size: 3
        # Disallow setting pool with replica 1, this could lead to data loss without recovery.
        # Make sure you're *ABSOLUTELY CERTAIN* that is what you want
        requireSafeReplicaSize: true
      parameters:
        # Inline compression mode for the data pool
        # Further reference: https://docs.ceph.com/docs/nautilus/rados/configuration/bluestore-config-ref/#inline-compression
        compression_mode:
          none
          # gives a hint (%) to Ceph in terms of expected consumption of the total cluster capacity of a given pool
        # for more info: https://docs.ceph.com/docs/master/rados/operations/placement-groups/#specifying-expected-pool-size
        #target_size_ratio: ".5"
  # Whether to preserve filesystem after CephFilesystem CRD deletion
  preserveFilesystemOnDelete: true
  # The metadata service (mds) configuration
  metadataServer:
    # The number of active MDS instances
    activeCount: 1
    # Whether each active MDS instance will have an active standby with a warm metadata cache for faster failover.
    # If false, standbys will be available, but will not have a warm cache.
    activeStandby: true
    # The affinity rules to apply to the mds deployment
    placement:
      #  nodeAffinity:
      #    requiredDuringSchedulingIgnoredDuringExecution:
      #      nodeSelectorTerms:
      #      - matchExpressions:
      #        - key: role
      #          operator: In
      #          values:
      #          - mds-node
      #  topologySpreadConstraints:
      #  tolerations:
      #  - key: mds-node
      #    operator: Exists
      #  podAffinity:
      podAntiAffinity:
        requiredDuringSchedulingIgnoredDuringExecution:
          - labelSelector:
              matchExpressions:
                - key: app
                  operator: In
                  values:
                    - rook-ceph-mds
            # topologyKey: kubernetes.io/hostname will place MDS across different hosts
            topologyKey: kubernetes.io/hostname
        preferredDuringSchedulingIgnoredDuringExecution:
          - weight: 100
            podAffinityTerm:
              labelSelector:
                matchExpressions:
                  - key: app
                    operator: In
                    values:
                      - rook-ceph-mds
              # topologyKey: */zone can be used to spread MDS across different AZ
              # Use <topologyKey: failure-domain.beta.kubernetes.io/zone> in k8s cluster if your cluster is v1.16 or lower
              # Use <topologyKey: topology.kubernetes.io/zone>  in k8s cluster is v1.17 or upper
              topologyKey: topology.kubernetes.io/zone
    # A key/value list of annotations
    annotations:
    #  key: value
    # A key/value list of labels
    labels:
    #  key: value
    resources:
    # The requests and limits set here, allow the filesystem MDS Pod(s) to use half of one CPU core and 1 gigabyte of memory
    #  limits:
    #    cpu: "500m"
    #    memory: "1024Mi"
    #  requests:
    #    cpu: "500m"
    #    memory: "1024Mi"
    # priorityClassName: my-priority-class
  mirroring:
    enabled: false

[root@k8s-master01 ceph]# kubectl  create -f filesystem.yaml
cephfilesystem.ceph.rook.io/myfs created
创建完成后会启动mds容器,需要等待启动后才可进行创建pv
[root@k8s-master01 ceph]# kubectl -n rook-ceph get pod -l app=rook-ceph-mds
NAME                                    READY   STATUS    RESTARTS   AGE
rook-ceph-mds-myfs-a-5c4fbfb9bd-xfhpw   1/1     Running   0          33s
rook-ceph-mds-myfs-b-678b4976d6-d8f9p   1/1     Running   0          32s
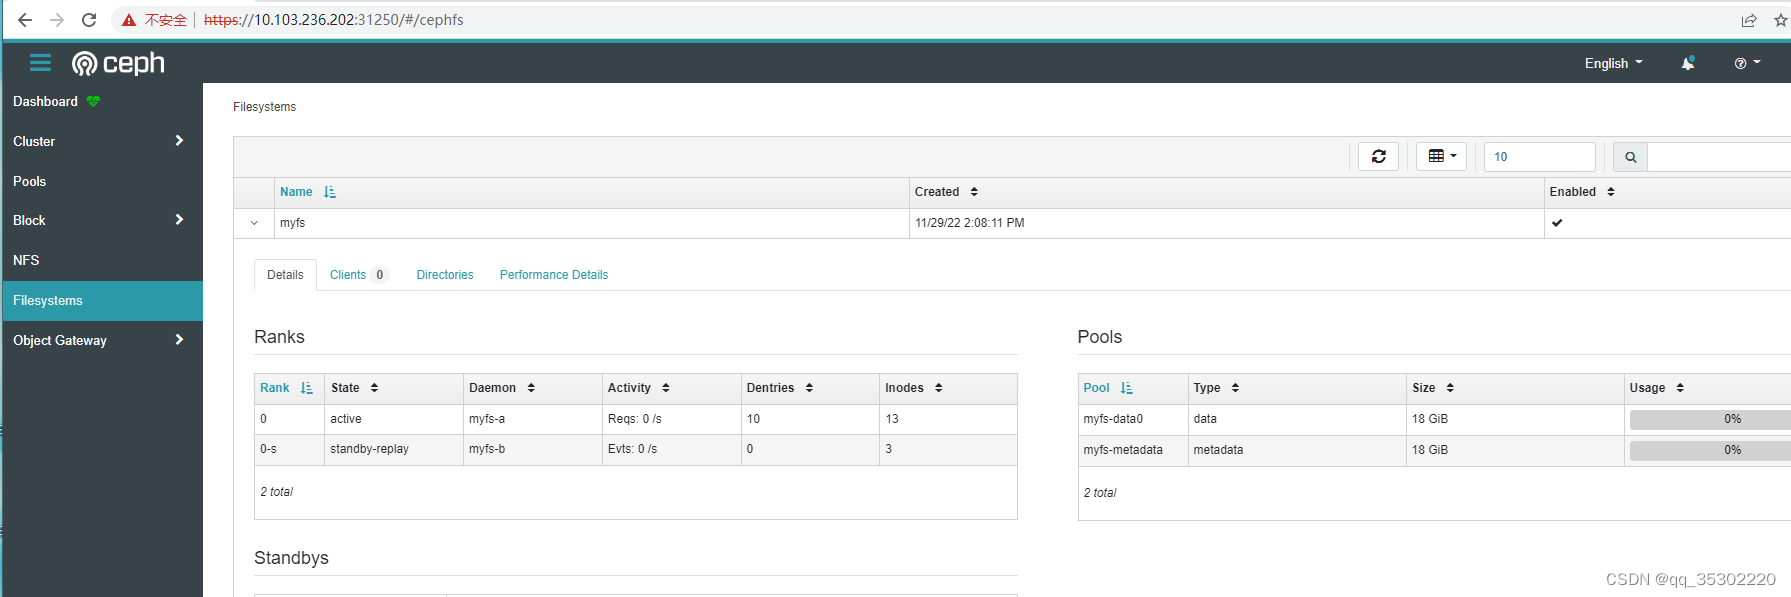
也可以在ceph dashboard上面查看状态
创建共享类型文件系统的StorageClass
[root@k8s-master01 ceph]# cd /rook/cluster/examples/kubernetes/ceph/csi/cephfs
[root@k8s-master01 cephfs]# cat storageclass.yaml
apiVersion: storage.k8s.io/v1
kind: StorageClass
metadata:
name: rook-cephfs
provisioner: rook-ceph.cephfs.csi.ceph.com # driver:namespace:operator
parameters:
# clusterID is the namespace where operator is deployed.
clusterID: rook-ceph # namespace:cluster
# CephFS filesystem name into which the volume shall be created
fsName: myfs
# Ceph pool into which the volume shall be created
# Required for provisionVolume: "true"
pool: myfs-data0
# The secrets contain Ceph admin credentials. These are generated automatically by the operator
# in the same namespace as the cluster.
csi.storage.k8s.io/provisioner-secret-name: rook-csi-cephfs-provisioner
csi.storage.k8s.io/provisioner-secret-namespace: rook-ceph # namespace:cluster
csi.storage.k8s.io/controller-expand-secret-name: rook-csi-cephfs-provisioner
csi.storage.k8s.io/controller-expand-secret-namespace: rook-ceph # namespace:cluster
csi.storage.k8s.io/node-stage-secret-name: rook-csi-cephfs-node
csi.storage.k8s.io/node-stage-secret-namespace: rook-ceph # namespace:cluster
# (optional) The driver can use either ceph-fuse (fuse) or ceph kernel client (kernel)
# If omitted, default volume mounter will be used - this is determined by probing for ceph-fuse
# or by setting the default mounter explicitly via --volumemounter command-line argument.
# mounter: kernel
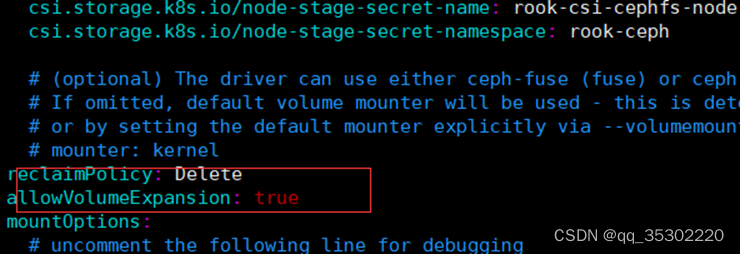
reclaimPolicy: Delete
allowVolumeExpansion: true
mountOptions:
# uncomment the following line for debugging
#- debug
[root@k8s-master01 cephfs]# kubectl create -f storageclass.yaml
storageclass.storage.k8s.io/rook-cephfs created
之后将pvc的storageClassName设置成rook-cephfs即可创建共享文件类型的存储,类似于NFS,可以给多个Pod共享数据。
挂载测试
[root@k8s-master01 cephfs]# pwd
/rook/cluster/examples/kubernetes/ceph/csi/cephfs

[root@k8s-master01 cephfs]# ls
kube-registry.yaml  pod.yaml  pvc-clone.yaml  pvc-restore.yaml  pvc.yaml  snapshotclass.yaml  snapshot.yaml  storageclass.yaml

[root@k8s-master01 cephfs]# cat kube-registry.yaml
apiVersion: v1
kind: PersistentVolumeClaim
metadata:
  name: cephfs-pvc
  namespace: kube-system
spec:
  accessModes:
    - ReadWriteMany
  resources:
    requests:
      storage: 1Gi
  storageClassName: rook-cephfs
---
apiVersion: apps/v1
kind: Deployment
metadata:
  name: kube-registry
  namespace: kube-system
  labels:
    k8s-app: kube-registry
    kubernetes.io/cluster-service: "true"
spec:
  replicas: 3
  selector:
    matchLabels:
      k8s-app: kube-registry
  template:
    metadata:
      labels:
        k8s-app: kube-registry
        kubernetes.io/cluster-service: "true"
    spec:
      containers:
        - name: registry
          image: registry:2
          imagePullPolicy: Always
          resources:
            limits:
              cpu: 100m
              memory: 100Mi
          env:
            # Configuration reference: https://docs.docker.com/registry/configuration/
            - name: REGISTRY_HTTP_ADDR
              value: :5000
            - name: REGISTRY_HTTP_SECRET
              value: "Ple4seCh4ngeThisN0tAVerySecretV4lue"
            - name: REGISTRY_STORAGE_FILESYSTEM_ROOTDIRECTORY
              value: /var/lib/registry
          volumeMounts:
            - name: image-store
              mountPath: /var/lib/registry
          ports:
            - containerPort: 5000
              name: registry
              protocol: TCP
          livenessProbe:
            httpGet:
              path: /
              port: registry
          readinessProbe:
            httpGet:
              path: /
              port: registry
      volumes:
        - name: image-store
          persistentVolumeClaim:
            claimName: cephfs-pvc
            readOnly: false

[root@k8s-master01 cephfs]# kubectl create -f kube-registry.yaml
persistentvolumeclaim/cephfs-pvc created
deployment.apps/kube-registry created
查看创建的pvc和pod
[root@k8s-master01 cephfs]# kubectl get po -n kube-system -l k8s-app=kube-registry
NAME                             READY   STATUS              RESTARTS   AGE
kube-registry-5d6d8877f7-ngp2x   1/1     Running             0          34s
kube-registry-5d6d8877f7-q7l8p   0/1     ContainerCreating   0          34s
kube-registry-5d6d8877f7-qmtqv   0/1     ContainerCreating   0          34s

[root@k8s-master01 cephfs]# kubectl  get pvc -n kube-system
NAME         STATUS   VOLUME                                     CAPACITY   ACCESS MODES   STORAGECLASS   AGE
cephfs-pvc   Bound    pvc-6b08e697-354f-473d-9423-459e154e3d46   1Gi        RWX            rook-cephfs    58s
- 注意claimName为pvc的名称。
- 此时一共创建了三个Pod,这三个Pod共用了一个存储,挂载到了/var/lib/registry,该目录三个容器共享数据。
Nginx挂载测试
apiVersion: v1
kind: Service
metadata:
  name: nginx
  labels:
    app: nginx
spec:
  ports:
  - port: 80
    name: web
  selector:
    app: nginx
  type: ClusterIP
---
kind: PersistentVolumeClaim
apiVersion: v1
metadata:
  name: nginx-share-pvc
spec:
  storageClassName: rook-cephfs
  accessModes:
    - ReadWriteMany
  resources:
    requests:
      storage: 1Gi
---
apiVersion: apps/v1
kind: Deployment
metadata:
  name: web
spec:
  selector:
    matchLabels:
      app: nginx # has to match .spec.template.metadata.labels
  replicas: 3 # by default is 1
  template:
    metadata:
      labels:
        app: nginx # has to match .spec.selector.matchLabels
    spec:
      containers:
      - name: nginx
        image: nginx
        imagePullPolicy: IfNotPresent
        ports:
        - containerPort: 80
          name: web
        volumeMounts:
        - name: www
          mountPath: /usr/share/nginx/html
      volumes:
        - name: www
          persistentVolumeClaim:
            claimName: nginx-share-pvc
第七章 PVC扩容
文件共享类型的PVC扩容需要k8s 1.15+
块存储类型的PVC扩容需要k8s 1.16+
PVC扩容需要开启ExpandCSIVolumes,新版本的k8s已经默认打开了这个功能,可以查看自己的k8s版本是否已经默认打开了该功能:
[root@k8s-master01 cephfs]# kube-apiserver -h |grep ExpandCSIVolumes
                                                       ExpandCSIVolumes=true|false (BETA - default=true)
如果default为true就不需要打开此功能,如果default为false,需要开启该功能。
扩容文件共享型PVC
找到刚才创建的文件共享型StorageClass,将allowVolumeExpansion设置为true(新版rook默认为true,如果不为true更改后执行kubectl replace即可):
找到第六章创建的pvc:
[root@k8s-master01 cephfs]# kubectl get pvc -n kube-system
NAME STATUS VOLUME CAPACITY ACCESS MODES STORAGECLASS AGE
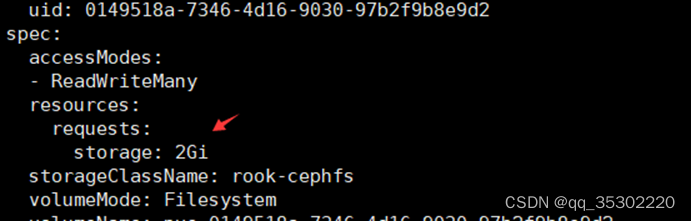
cephfs-pvc Bound pvc-0149518a-7346-4d16-9030-97b2f9b8e9d2 1Gi RWX rook-cephfs 44m
[root@k8s-master01 cephfs]# kubectl edit pvc cephfs-pvc -n kube-system
将大小修改为2Gi,之前是1Gi
保存退出:
[root@k8s-master01 cephfs]# kubectl  edit pvc cephfs-pvc -n kube-system
persistentvolumeclaim/cephfs-pvc edited
查看PV和PVC的大小:
[root@k8s-master01 cephfs]# kubectl  get pvc -n kube-system
NAME         STATUS   VOLUME                                     CAPACITY   ACCESS MODES   STORAGECLASS   AGE
cephfs-pvc   Bound    pvc-0149518a-7346-4d16-9030-97b2f9b8e9d2   2Gi        RWX            rook-cephfs    46m
[root@k8s-master01 cephfs]# kubectl  get pv
NAME                                       CAPACITY   ACCESS MODES   RECLAIM POLICY   STATUS   CLAIM                    STORAGECLASS      REASON   AGE
pvc-0149518a-7346-4d16-9030-97b2f9b8e9d2   2Gi        RWX            Delete           Bound    kube-system/cephfs-pvc   rook-cephfs                47m
pvc-fd8b9860-c0d4-4797-8e1d-1fab880bc9fc   2Gi        RWO            Delete           Bound    default/mysql-pv-claim   rook-ceph-block            64m
查看容器内是否已经完成扩容:
[root@k8s-master01 cephfs]# kubectl  exec -ti kube-registry-66d4c7bf47-46bpq -n kube-system -- df -Th | grep "/var/lib/registry"
                     ceph            2.0G         0      2.0G   0% /var/lib/registry
同样的步骤可以扩容到3G:

扩容块存储
扩容步骤类似,找到第五章创建PVC,直接edit即可
[root@k8s-master01 cephfs]# kubectl edit pvc mysql-pv-claim
persistentvolumeclaim/mysql-pv-claim edited
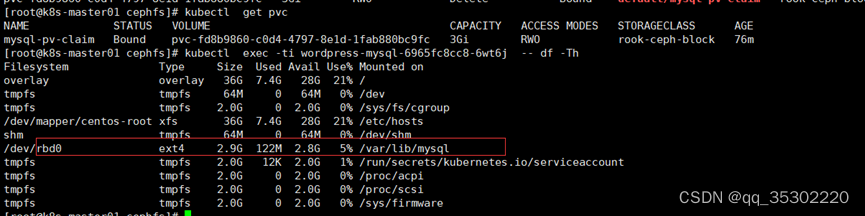
[root@k8s-master01 cephfs]# kubectl get pvc
NAME STATUS VOLUME CAPACITY ACCESS MODES STORAGECLASS AGE
mysql-pv-claim Bound pvc-fd8b9860-c0d4-4797-8e1d-1fab880bc9fc 2Gi RWO rook-ceph-block 70m
可以看到此时pvc并没有扩容,但是pv已经扩容:
[root@k8s-master01 cephfs]# kubectl  get pv  | grep  default/mysql-pv-claim
pvc-fd8b9860-c0d4-4797-8e1d-1fab880bc9fc   3Gi        RWO            Delete           Bound    default/mysql-pv-claim   rook-ceph-block            75m
也可以看到ceph dashboard的image也完成了扩容,但是pvc和pod里面的状态会有延迟,大概等待5-10分钟后,即可完成扩容:
第八章 PVC快照
注意:PVC快照功能需要k8s 1.17+
块存储快照
创建snapshotClass
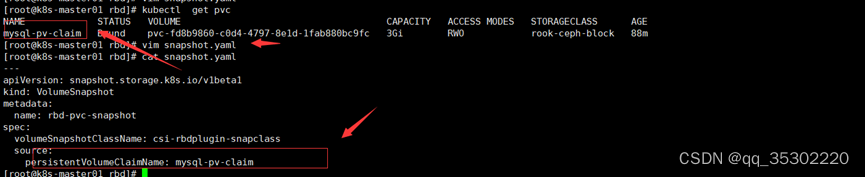
[root@k8s-master01 rbd]# pwd
/rook/cluster/examples/kubernetes/ceph/csi/rbd
[root@k8s-master01 rbd]# kubectl create -f snapshotclass.yaml
volumesnapshotclass.snapshot.storage.k8s.io/csi-rbdplugin-snapclass created
创建快照
首先在之前创建的MySQL容器里创建一个文件夹,并创建一个文件
[root@k8s-master01 rbd]# kubectl  get po
NAME                               READY   STATUS    RESTARTS   AGE
nginx-6799fc88d8-m5gj5             1/1     Running   1          3d4h
wordpress-mysql-6965fc8cc8-6wt6j   1/1     Running   0          86m

[root@k8s-master01 rbd]# kubectl  exec -ti wordpress-mysql-6965fc8cc8-6wt6j   -- bash

root@wordpress-mysql-6965fc8cc8-6wt6j:/# ls
bin  boot  dev	docker-entrypoint-initdb.d  entrypoint.sh  etc	home  lib  lib64  media  mnt  opt  proc  root  run  sbin  srv  sys  tmp  usr  var

root@wordpress-mysql-6965fc8cc8-6wt6j:/# cd /var/lib/mysql

root@wordpress-mysql-6965fc8cc8-6wt6j:/var/lib/mysql# ls
auto.cnf  ib_logfile0  ib_logfile1  ibdata1  lost+found  mysql	performance_schema

root@wordpress-mysql-6965fc8cc8-6wt6j:/var/lib/mysql# mkdir test_snapshot

root@wordpress-mysql-6965fc8cc8-6wt6j:/var/lib/mysql# ls
auto.cnf  ib_logfile0  ib_logfile1  ibdata1  lost+found  mysql	performance_schema  test_snapshot

root@wordpress-mysql-6965fc8cc8-6wt6j:/var/lib/mysql# echo "test for snapshot" > test_snapshot/1.txt

root@wordpress-mysql-6965fc8cc8-6wt6j:/var/lib/mysql# cat test_snapshot/1.txt
test for snapshot
修改snapshot.yaml文件的source pvc为创建的MySQL pvc:
创建快照及查看状态:
[root@k8s-master01 rbd]# kubectl  create -f snapshot.yaml
volumesnapshot.snapshot.storage.k8s.io/rbd-pvc-snapshot created

[root@k8s-master01 rbd]# kubectl get volumesnapshotclass
NAME                      DRIVER                       DELETIONPOLICY   AGE
csi-rbdplugin-snapclass   rook-ceph.rbd.csi.ceph.com   Delete           8m37s

[root@k8s-master01 rbd]# kubectl get volumesnapshot
NAME               READYTOUSE   SOURCEPVC        SOURCESNAPSHOTCONTENT   RESTORESIZE   SNAPSHOTCLASS             SNAPSHOTCONTENT                                    CREATIONTIME   AGE
rbd-pvc-snapshot   true         mysql-pv-claim                           3Gi           csi-rbdplugin-snapclass   snapcontent-715c2841-d1ba-493a-9eb9-52178df3c2e6   <invalid>      <invalid>
指定快照创建PVC
如果想要创建一个具有某个数据的PVC,可以从某个快照恢复:
[root@k8s-master01 rbd]# cat pvc-restore.yaml
---
apiVersion: v1
kind: PersistentVolumeClaim
metadata:
  name: rbd-pvc-restore
spec:
  storageClassName: rook-ceph-block
  dataSource:
    name: rbd-pvc-snapshot
    kind: VolumeSnapshot
    apiGroup: snapshot.storage.k8s.io
  accessModes:
    - ReadWriteOnce
  resources:
    requests:
      storage: 3Gi

[root@k8s-master01 rbd]# kubectl create -f pvc-restore.yaml
persistentvolumeclaim/rbd-pvc-restore created
注意:dataSource为快照名称,storageClassName为新建pvc的storageClass,storage的大小不能低于原pvc的大小。
[root@k8s-master01 rbd]# kubectl create -f pvc-restore.yaml
persistentvolumeclaim/rbd-pvc-restore created
[root@k8s-master01 rbd]# kubectl get pvc
NAME              STATUS   VOLUME                                     CAPACITY   ACCESS MODES   STORAGECLASS      AGE
mysql-pv-claim    Bound    pvc-fd8b9860-c0d4-4797-8e1d-1fab880bc9fc   3Gi        RWO            rook-ceph-block   95m
rbd-pvc-restore   Bound    pvc-d86a7535-2331-4fef-ae93-c570c8d3f9e7   3Gi        RWO            rook-ceph-block   2s
数据校验
创建一个容器,挂载该PVC,查看是否含有之前的文件:
[root@k8s-master01 rbd]# cat restore-check-snapshot-rbd.yaml
---
apiVersion: apps/v1
kind: Deployment
metadata:
  name: check-snapshot-restore
spec:
  selector:
    matchLabels:
      app: check
  strategy:
    type: Recreate
  template:
    metadata:
      labels:
        app: check
    spec:
      containers:
      - image: alpine:3.8
        name: check
        command:
        - sh
        - -c
        - sleep 36000
        volumeMounts:
        - name: check-mysql-persistent-storage
          mountPath: /mnt
      volumes:
      - name: check-mysql-persistent-storage
        persistentVolumeClaim:
          claimName: rbd-pvc-restore

[root@k8s-master01 rbd]# kubectl  create -f restore-check-snapshot-rbd.yaml
deployment.apps/check-snapshot-restore created
查看数据是否存在
[root@k8s-master01 rbd]# kubectl  get po
NAME                                      READY   STATUS    RESTARTS   AGE
check-snapshot-restore-64b85c5f88-zvr62   1/1     Running   0          97s
nginx-6799fc88d8-m5gj5                    1/1     Running   1          3d5h
wordpress-mysql-6965fc8cc8-6wt6j          1/1     Running   0          104m

[root@k8s-master01 rbd]# kubectl  exec -ti check-snapshot-restore-64b85c5f88-zvr62  -- ls
bin    etc    lib    mnt    root   sbin   sys    usr
dev    home   media  proc   run    srv    tmp    var

[root@k8s-master01 rbd]# kubectl  exec -ti check-snapshot-restore-64b85c5f88-zvr62  -- ls /mnt
auto.cnf            ibdata1             performance_schema
ib_logfile0         lost+found          test_snapshot
ib_logfile1         mysql

[root@k8s-master01 rbd]# kubectl  exec -ti check-snapshot-restore-64b85c5f88-zvr62  -- ls /mnt/test_snapshot
1.txt
[root@k8s-master01 rbd]# kubectl  exec -ti check-snapshot-restore-64b85c5f88-zvr62  -- cat /mnt/test_snapshot/1.txt
test for snapshot
测试无误后清理数据(snapshotclass可以不删除,后期创建rbd快照直接用该snapshotclass即可):
[root@k8s-master01 rbd]# kubectl  delete -f restore-check-snapshot-rbd.yaml -f pvc-restore.yaml -f snapshot.yaml
deployment.apps "check-snapshot-restore" deleted
persistentvolumeclaim "rbd-pvc-restore" deleted
volumesnapshot.snapshot.storage.k8s.io "rbd-pvc-snapshot" deleted
文件共享类型快照
操作步骤和块存储类型无区别,可以参考:官网
第九章 PVC克隆
[root@k8s-master01 rbd]# pwd
/root/rook/cluster/examples/kubernetes/ceph/csi/rbd

[root@k8s-master01 rbd]# cat pvc-clone.yaml
---
apiVersion: v1
kind: PersistentVolumeClaim
metadata:
  name: rbd-pvc-clone
spec:
  storageClassName: rook-ceph-block
  dataSource:
    name: mysql-pv-claim
    kind: PersistentVolumeClaim
  accessModes:
    - ReadWriteOnce
  resources:
    requests:
      storage: 3Gi

[root@k8s-master01 rbd]# kubectl create -f pvc-clone.yaml
persistentvolumeclaim/rbd-pvc-clone created

[root@k8s-master01 rbd]# kubectl  get pvc
NAME             STATUS   VOLUME                                     CAPACITY   ACCESS MODES   STORAGECLASS      AGE
mysql-pv-claim   Bound    pvc-fd8b9860-c0d4-4797-8e1d-1fab880bc9fc   3Gi        RWO            rook-ceph-block   110m
rbd-pvc-clone    Bound    pvc-6dda14c9-9d98-41e6-9d92-9d4ea382c614   3Gi        RWO            rook-ceph-block   4s
需要注意的是pvc-clone.yaml的dataSource的name是被克隆的pvc名称,在此是mysql-pv-claim,storageClassName为新建pvc的storageClass名称,storage不能小于之前pvc的大小。
第十章 测试数据清理
如果Rook要继续使用,可以只清理创建的deploy、pod、pvc即可。之后可以直接投入使用
数据清理步骤:
-
首先清理挂载了PVC和Pod,可能需要清理单独创建的Pod和Deployment或者是其他的高级资源
-
之后清理PVC,清理掉所有通过ceph StorageClass创建的PVC后,最好检查下PV是否被清理
-
之后清理快照:kubectl delete volumesnapshot XXXXXXXX
-
之后清理创建的Pool,包括块存储和文件存储
a) kubectl delete -n rook-ceph cephblockpool replicapool
b) kubectl delete -n rook-ceph cephfilesystem myfs
-
清理StorageClass:kubectl delete sc rook-ceph-block rook-cephfs
-
清理Ceph集群:kubectl -n rook-ceph delete cephcluster rook-ceph
-
删除Rook资源:
a) kubectl delete -f operator.yaml
b) kubectl delete -f common.yaml
c) kubectl delete -f crds.yaml
-
如果卡住需要参考Rook的troubleshooting
a) https://rook.io/docs/rook/v1.6/ceph-teardown.html#troubleshooting
for CRD in $(kubectl get crd -n rook-ceph | awk '/ceph.rook.io/ {print $1}'); do kubectl get -n rook-ceph "$CRD" -o name | xargs -I {} kubectl patch {} --type merge -p '{"metadata":{"finalizers": [null]}}' -n rook-ceph; done
- 清理数据目录和磁盘
参考链接:https://rook.io/docs/rook/v1.6/ceph-teardown.html