这篇文章主要是自己研究如何对底部菜单进行布局,并简单的实现点击不同"按钮"实现图片切换和背景切换的功能,最后通过PopupWindows实现弹出菜单,点击不同按钮能实现不同方法,相当于美图秀秀编辑图片的功能吧!它并没有涉及到Fragment碎片切换页面的功能,因为页面始终显示被处理的图片.这是我初学Android的一篇基础性文章和在线思想笔记,网上有很多更优秀的demo,不过也希望对大家有用~
首先介绍两种方法实现底部菜单点击不同图标显示选中状态的效果.
(可参考简短文章:Android_UI_点击按钮切换背景效果实现)
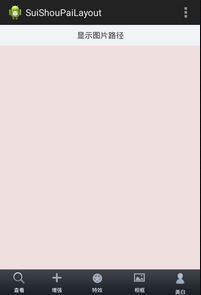
一. 底部菜单 第一种方法
它显示的效果如下图所示,其中底部菜单布局采用多个LinearLayout进行,点击不同"按钮"可以改变其背景图片.
首先介绍它的activity_main.xml布局:
1.它采用3个RelativeLayout相对布局进行,分别对应标题路径、中间显示图片和底部的菜单栏;
2.底部菜单栏由5个LinearLayout水平布局组成,每一个LinearLayout都由ImageView和TextView组成.
代码如下:
<RelativeLayout xmlns:android="http://schemas.android.com/apk/res/android"
    xmlns:tools="http://schemas.android.com/tools"
    android:id="@+id/container"
    android:layout_width="match_parent"
    android:layout_height="match_parent"
    tools:context="com.example.touchimagetest.MainActivity"
    tools:ignore="MergeRootFrame" >
     <!-- 顶部路径 -->
    <RelativeLayout
        android:id="@+id/MyLayout_top"
        android:orientation="horizontal"
        android:layout_width="fill_parent"
        android:layout_height="40dp"
        android:layout_alignParentTop="true"
        android:gravity="center">
        <TextView
	        android:id="@+id/textView1"
	        android:layout_width="wrap_content"
	        android:layout_height="wrap_content"
	        android:textSize="15sp"
	        android:text="显示图片操作" />
    </RelativeLayout>
    <!-- 底部按钮 -->
    <RelativeLayout
        android:id="@+id/MyLayout_bottom"
        android:orientation="horizontal"
        android:layout_width="fill_parent"
        android:layout_height="50dp"
        android:layout_alignParentBottom="true"
        android:background="@drawable/image_toolbar_bg"
        android:gravity="center">
	    <LinearLayout
	        android:layout_width="match_parent"
	    	android:layout_height="match_parent"
	    	android:orientation="horizontal"
	    	android:layout_alignParentBottom="true" >

	        <LinearLayout
                android:id="@+id/layout_watch"
                android:layout_width="wrap_content"
                android:layout_height="wrap_content"
                android:layout_weight="1"
                android:gravity="center"
    			android:orientation="vertical" >
                <ImageView
                    android:id="@+id/image_watch"
                    android:layout_width="wrap_content"
                    android:layout_height="wrap_content"
                   	android:padding="3dp"
                    android:src="@drawable/tab_watch_btn" />
                <TextView
                    android:id="@+id/textview_watch"
                    android:layout_width="wrap_content"
                    android:layout_height="wrap_content"
                    android:text="查看"
                    android:textColor="#ffffff"
                    android:textSize="10sp" />
            </LinearLayout>

	        <LinearLayout
                android:id="@+id/layout_increase"
                android:layout_width="wrap_content"
                android:layout_height="wrap_content"
                android:layout_weight="1"
                android:gravity="center"
    			android:orientation="vertical" >
                <ImageView
                    android:id="@+id/image_increase"
                    android:layout_width="wrap_content"
                    android:layout_height="wrap_content"
                   	android:padding="3dp"
                    android:src="@drawable/tab_increase_btn" />
                <TextView
                    android:id="@+id/textview_increase"
                    android:layout_width="wrap_content"
                    android:layout_height="wrap_content"
                    android:text="增强"
                    android:textColor="#ffffff"
                    android:textSize="10sp" />
            </LinearLayout>

	        <LinearLayout
                android:id="@+id/layout_effect"
                android:layout_width="wrap_content"
                android:layout_height="wrap_content"
                android:layout_weight="1"
                android:gravity="center"
    			android:orientation="vertical" >
                <ImageView
                    android:id="@+id/image_effect"
                    android:layout_width="wrap_content"
                    android:layout_height="wrap_content"
                   	android:padding="3dp"
                    android:src="@drawable/tab_effect_btn" />
                <TextView
                    android:id="@+id/textview_effect"
                    android:layout_width="wrap_content"
                    android:layout_height="wrap_content"
                    android:text="特效"
                    android:textColor="#ffffff"
                    android:textSize="10sp" />
            </LinearLayout>

	        <LinearLayout
                android:id="@+id/layout_frame"
                android:layout_width="wrap_content"
                android:layout_height="wrap_content"
                android:layout_weight="1"
                android:gravity="center"
    			android:orientation="vertical" >
                <ImageView
                    android:id="@+id/image_frame"
                    android:layout_width="wrap_content"
                    android:layout_height="wrap_content"
                   	android:padding="3dp"
                    android:src="@drawable/tab_frame_btn" />
                <TextView
                    android:id="@+id/textview_frame"
                    android:layout_width="wrap_content"
                    android:layout_height="wrap_content"
                    android:text="相框"
                    android:textColor="#ffffff"
                    android:textSize="10sp" />
            </LinearLayout>

	        <LinearLayout
                android:id="@+id/layout_person"
                android:layout_width="wrap_content"
                android:layout_height="wrap_content"
                android:layout_weight="1"
                android:gravity="center"
    			android:orientation="vertical" >
                <ImageView
                    android:id="@+id/image_person"
                    android:layout_width="wrap_content"
                    android:layout_height="wrap_content"
                   	android:padding="3dp"
                    android:src="@drawable/tab_person_btn" />
                <TextView
                    android:id="@+id/textview_person"
                    android:layout_width="wrap_content"
                    android:layout_height="wrap_content"
                    android:text="美白"
                    android:textColor="#ffffff"
                    android:textSize="10sp" />
            </LinearLayout>

 		</LinearLayout>
	</RelativeLayout>
	<!-- 显示图片 -->
    <RelativeLayout
        android:id="@+id/Content_Layout"
        android:orientation="horizontal"
        android:layout_width="fill_parent"
        android:layout_height="fill_parent"
        android:layout_above="@id/MyLayout_bottom"
        android:layout_below="@id/MyLayout_top"
        android:background="#EFDFDF"
        android:gravity="center">
        <ImageView
	        android:id="@+id/imageView1"
	        android:layout_width="fill_parent"
	        android:layout_height="fill_parent"
	        android:layout_gravity="center_horizontal"
			android:scaleType="matrix" />
    </RelativeLayout>
</RelativeLayout>
此时你需要注意的是为每个LinearLayout中ImageView指定src时并不是原图片,而是drawable中的xml文件,如<ImageView android:id="@+id/image_watch".. />.
同时每个drawable中的xml文件对应每个相应的按钮,上图中effect(效果)、increase(增强)、frame(相框)、watch(查看)、person(美白).其中每个格式基本如下,如tab_watch_btn.xml:
<?xml version="1.0" encoding="utf-8"?>
<selector xmlns:android="http://schemas.android.com/apk/res/android" >
    <item android:drawable="@drawable/image_icon_watch_sel" android:state_selected="true"/>
    <item android:drawable="@drawable/image_icon_watch_sel" android:state_pressed="true"/>
    <item android:drawable="@drawable/image_icon_watch_nor"/>
</selector>
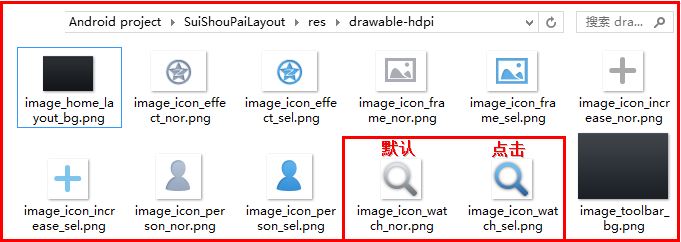
其中state_selected表示"选中"状态,state_pressed表示"点击"效果,而最后的<item android:drawable="@drawable/image_icon_watch_nor"/> 表示默认情况显示图片,原图片如下:
同时设置选中状态"按钮"的背景加黑效果,在drawable中添加selector_tab_background.xml文件:
<?xml version="1.0" encoding="utf-8"?>
<selector xmlns:android="http://schemas.android.com/apk/res/android" >
	<item android:drawable="@drawable/image_home_layout_bg" android:state_pressed="true"/>
    <item android:drawable="@drawable/image_home_layout_bg" android:state_selected="true"/>
</selector>
然后在MainActivity.java中添加自定义变量,主要是LinearLayout(点击它响应事件)和ImageView(切换图标).
//自定义变量
private LinearLayout layoutWatch;             //查看图片
private LinearLayout layoutIncrease;           //增强图片
private LinearLayout layoutEffect;               //图片特效
private LinearLayout layoutFrame;              //图片边框
private LinearLayout layoutPerson;             //图片美白

private ImageView imageWatch;
private ImageView imageIncrease;
private ImageView imageEffect;
private ImageView imageFrame;
private ImageView imagePerson;
然后添加代码如下,该种方法需要在点击按钮中设置其他LinearLayout图标状态为未选择状态,否则会出现点击按钮的效果(即:点击就切换图标一次,我们需要的是点击就状态长显).
//创建活动
@Override
protected void onCreate(Bundle savedInstanceState) {
    super.onCreate(savedInstanceState);
    setContentView(R.layout.activity_main);
    //布局
    layoutWatch = (LinearLayout) findViewById(R.id.layout_watch);
    layoutIncrease = (LinearLayout) findViewById(R.id.layout_increase);
    layoutEffect = (LinearLayout) findViewById(R.id.layout_effect);
    layoutFrame = (LinearLayout) findViewById(R.id.layout_frame);
    layoutPerson = (LinearLayout) findViewById(R.id.layout_person);
    //图标
    imageWatch = (ImageView) findViewById(R.id.image_watch);
    imageIncrease = (ImageView) findViewById(R.id.image_increase);
    imageEffect = (ImageView) findViewById(R.id.image_effect);
    imageFrame = (ImageView) findViewById(R.id.image_frame);
    imagePerson = (ImageView) findViewById(R.id.image_person);
    //初始化布局
    initView();

    //按钮一 监听事件 查看图片
    layoutWatch.setOnClickListener( new OnClickListener() {
    	@Override
    	public void onClick(View v) {
            //设置背景图片加深
    		Toast.makeText(MainActivity.this, "点击按钮1", Toast.LENGTH_SHORT).show();
    		layoutWatch.setBackgroundResource(R.drawable.selector_tab_background);
    		//设置图标选中情况
    		layoutWatch.setSelected(true);
    		layoutIncrease.setSelected(false);
    		layoutEffect.setSelected(false);
    		layoutFrame.setSelected(false);
    		layoutPerson.setSelected(false);
    	}
    });
    //按钮二 监听事件增强图片
    layoutIncrease = (LinearLayout) findViewById(R.id.layout_increase);
    layoutIncrease.setOnClickListener( new OnClickListener() {
    	@Override
    	public void onClick(View v) {
    		layoutIncrease.setBackgroundResource(R.drawable.selector_tab_background);
    		//设置图标选中情况
    		layoutWatch.setSelected(false);
    		layoutIncrease.setSelected(true);
    		layoutEffect.setSelected(false);
    		layoutFrame.setSelected(false);
    		layoutPerson.setSelected(false);
    	}
    });
    //按钮三 监听事件图片特效
    layoutEffect = (LinearLayout) findViewById(R.id.layout_effect);
    layoutEffect.setOnClickListener( new OnClickListener() {
    	@Override
    	public void onClick(View v) {
    		//设置背景图片
    		layoutEffect.setBackgroundResource(R.drawable.selector_tab_background);
    		//设置图标选中情况
    		layoutWatch.setSelected(false);
    		layoutIncrease.setSelected(false);
    		layoutEffect.setSelected(true);
    		layoutFrame.setSelected(false);
    		layoutPerson.setSelected(false);
    	}
    });
    //按钮四 监听事件图片相框
    layoutFrame = (LinearLayout) findViewById(R.id.layout_frame);
    layoutFrame.setOnClickListener( new OnClickListener() {
    	@Override
    	public void onClick(View v) {
    		//设置背景图片
    		layoutFrame.setBackgroundResource(R.drawable.selector_tab_background);
    		//设置图标选中情况
    		layoutWatch.setSelected(false);
    		layoutIncrease.setSelected(false);
    		layoutEffect.setSelected(false);
    		layoutFrame.setSelected(true);
    		layoutPerson.setSelected(false);

    	}
    });
  	//按钮五 监听事件图片美白
    layoutPerson = (LinearLayout) findViewById(R.id.layout_person);
    layoutPerson.setOnClickListener( new OnClickListener() {
    	@Override
    	public void onClick(View v) {
    		//设置背景图片
    		layoutPerson.setBackgroundResource(R.drawable.selector_tab_background);
    		//设置图标选中情况
    		layoutWatch.setSelected(false);
    		layoutIncrease.setSelected(false);
    		layoutEffect.setSelected(false);
    		layoutFrame.setSelected(false);
    		layoutPerson.setSelected(true);

    	}
    });
}

//初始化布局
private void initView()
{
	imageWatch.setImageResource(R.drawable.tab_watch_btn);
	imageIncrease.setImageResource(R.drawable.tab_increase_btn);
	imageEffect.setImageResource(R.drawable.tab_effect_btn);
	imageFrame.setImageResource(R.drawable.tab_frame_btn);
	imagePerson.setImageResource(R.drawable.tab_person_btn);
}
二. 底部菜单 第二种方法
其中activity_main.xml中布局与第一个相同,不同的是在xml中就指定drawable-hdpi中原图片名,因为它不在调用drawable如tab_watch_btn.xml文件,而使用代码直接操作.其中5个LinearLayout一个如下所示:
<LinearLayout
         android:id="@+id/layout_watch"
         android:layout_width="wrap_content"
         android:layout_height="wrap_content"
         android:layout_weight="1"
         android:gravity="center"
		 android:orientation="vertical" >
         <ImageView
             android:id="@+id/image_watch"
             android:layout_width="wrap_content"
             android:layout_height="wrap_content"
            	android:padding="3dp"
             android:src="@drawable/image_icon_watch_nor" />
         <TextView
             android:id="@+id/textview_watch"
             android:layout_width="wrap_content"
             android:layout_height="wrap_content"
             android:text="查看"
             android:textColor="#ffffff"
             android:textSize="10sp" />
</LinearLayout>
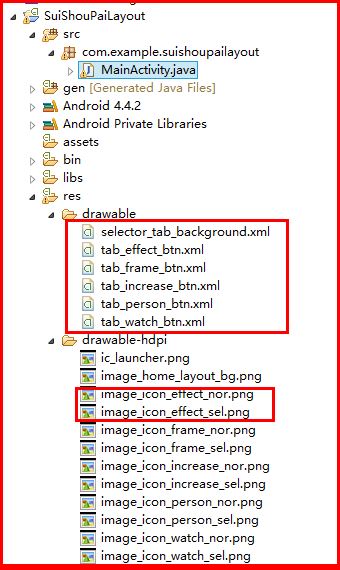
此时它的文件夹结构如下图,drawble没有设置背景加深和加载图标的xml文件:
同时5个LinearLayout(查看、增强、特效、相框、美白)设置触屏响应事件:
layoutWatch.setOnTouchListener(new OnTouchListener() {
	@Override
    public boolean onTouch(View v, MotionEvent event) {
        if(event.getAction() == MotionEvent.ACTION_DOWN) {
            //按下背景图片
        	layoutWatch.setBackgroundResource(R.drawable.image_home_layout_bg);
        	layoutIncrease.setBackgroundResource(R.drawable.image_home_layout_no);
        	layoutEffect.setBackgroundResource(R.drawable.image_home_layout_no);
        	layoutFrame.setBackgroundResource(R.drawable.image_home_layout_no);
        	layoutPerson.setBackgroundResource(R.drawable.image_home_layout_no);
        	//设置按钮图片
        	imageWatch.setImageDrawable(getResources().getDrawable(R.drawable.image_icon_watch_sel));
        	imageIncrease.setImageDrawable(getResources().getDrawable(R.drawable.image_icon_increase_nor));
        	imageEffect.setImageDrawable(getResources().getDrawable(R.drawable.image_icon_effect_nor));
        	imageFrame.setImageDrawable(getResources().getDrawable(R.drawable.image_icon_frame_nor));
        	imagePerson.setImageDrawable(getResources().getDrawable(R.drawable.image_icon_person_nor));
        }
        return false;
	}
});
需要注意的是网上下面这段代码仅实现点击一下图片变换的效果,而如果想要实现长显需要如我上面的所示.还见到一个使用Radio实现该效果,当点击一次时判断是否选中并显示相应图片.而使用FragmentTabHost实现同样效果,我不知其原理~
bottomReturnBtn.setOnTouchListener(new OnTouchListener() {
      //这段代码仅仅实现点击一次改变图标功能
    public boolean onTouch(View v, MotionEvent event) {
        Button upStepBtn = (Button) v;
        if(event.getAction() == MotionEvent.ACTION_DOWN){
            upStepBtn.setBackgroundResource(R.drawable.bottom_sub_order_btn);
        }else if(event.getAction() == MotionEvent.ACTION_UP){
            upStepBtn.setBackgroundResource(R.drawable.bottom_return_check);
            finish();
        }
        return false;
    }
});
三. PopupWindow实现弹出菜单
首先,为PopupWindow设置动画效果,在res文件夹下添加文件夹anim,然后添加anim_entry.xml文件:
<?xml version="1.0" encoding="utf-8"?>
<set xmlns:android="http://schemas.android.com/apk/res/android">
    <translate
        android:fromXDelta="0"
        android:toXDelta="0"
        android:fromYDelta="120"
        android:toYDelta="0"
        android:duration="500" />
</set>
它是出现效果:从菜单栏底部向上弹出,同时添加anim_exit.xml:
<?xml version="1.0" encoding="UTF-8"?>
<set xmlns:android="http://schemas.android.com/apk/res/android" >
    <!-- 透明度消失 -->
    <alpha
        android:fromAlpha="1.0"
        android:toAlpha="0.0"
        android:duration="200" />
</set>
最后在res/values文件夹styles.xml中添加动画效果,通过调用name="AnimationPreview"可以实现动画:
<!-- 定义popupwindows动画效果 -->
 <style name="AnimationPreview">
     <item name="android:windowEnterAnimation">@anim/anim_entry</item>
     <item name="android:windowExitAnimation">@anim/anim_exit</item>
 </style>
然后你需要自定义弹出PopupWindow的布局xml文件,如popup_effect.xml:
<?xml version="1.0" encoding="utf-8"?>
<RelativeLayout xmlns:android="http://schemas.android.com/apk/res/android"
    android:layout_width="wrap_content"
    android:layout_height="wrap_content" >

    <LinearLayout
        android:layout_width="fill_parent"
        android:layout_height="wrap_content"
        android:layout_alignParentBottom="true"
        android:background="@drawable/image_button_bg_left"
        android:orientation="vertical" >
        <LinearLayout
            android:layout_width="wrap_content"
            android:layout_height="wrap_content"
            android:layout_gravity="center_horizontal"
            android:layout_marginTop="5dp"
            android:orientation="horizontal" >

            <LinearLayout
                android:id="@+id/layout_effect_hj"
                android:layout_width="wrap_content"
                android:layout_height="wrap_content"
                android:layout_margin="2dp"
                android:layout_weight="1"
                android:orientation="vertical" >
                <ImageView
                    android:layout_width="wrap_content"
                    android:layout_height="wrap_content"
                    android:layout_gravity="center_horizontal"
                    android:layout_marginTop="1.0dip"
                    android:src="@drawable/image_effect_hj" />
                <TextView
                    android:layout_width="wrap_content"
                    android:layout_height="wrap_content"
                    android:layout_gravity="center_horizontal"
                    android:layout_marginTop="1.0dip"
                    android:shadowColor="#ff000000"
                    android:shadowDx="1.0"
                    android:shadowDy="1.0"
                    android:shadowRadius="1.0"
                    android:text="怀旧"
                    android:textColor="#ffffffff"
                    android:textSize="13.0dip" />
            </LinearLayout>

            <LinearLayout
                android:id="@+id/layout_effect_fd"
                android:layout_width="wrap_content"
                android:layout_height="wrap_content"
                android:layout_margin="2dp"
                android:layout_weight="1"
                android:orientation="vertical" >
                <ImageView
                    android:layout_width="wrap_content"
                    android:layout_height="wrap_content"
                    android:layout_gravity="center_horizontal"
                    android:layout_marginTop="1.0dip"
                    android:src="@drawable/image_effect_fd" />
                <TextView
                    android:layout_width="wrap_content"
                    android:layout_height="wrap_content"
                    android:layout_gravity="center_horizontal"
                    android:layout_marginTop="1.0dip"
                    android:shadowColor="#ff000000"
                    android:shadowDx="1.0"
                    android:shadowDy="1.0"
                    android:shadowRadius="1.0"
                    android:text="浮雕"
                    android:textColor="#ffffffff"
                    android:textSize="13.0dip" />
            </LinearLayout>

            <LinearLayout
                android:id="@+id/layout_effect_gz"
                android:layout_width="wrap_content"
                android:layout_height="wrap_content"
                android:layout_margin="2dp"
                android:layout_weight="1"
                android:orientation="vertical" >
                <ImageView
                    android:layout_width="wrap_content"
                    android:layout_height="wrap_content"
                    android:layout_gravity="center_horizontal"
                    android:layout_marginTop="1.0dip"
                    android:src="@drawable/image_effect_gz" />
                <TextView
                    android:layout_width="wrap_content"
                    android:layout_height="wrap_content"
                    android:layout_gravity="center_horizontal"
                    android:layout_marginTop="1.0dip"
                    android:shadowColor="#ff000000"
                    android:shadowDx="1.0"
                    android:shadowDy="1.0"
                    android:shadowRadius="1.0"
                    android:text="光照"
                    android:textColor="#ffffffff"
                    android:textSize="13.0dip" />
            </LinearLayout>

            <LinearLayout
                android:id="@+id/layout_effect_sm"
                android:layout_width="wrap_content"
                android:layout_height="wrap_content"
                android:layout_margin="2dp"
                android:layout_weight="1"
                android:orientation="vertical" >
                <ImageView
                    android:layout_width="wrap_content"
                    android:layout_height="wrap_content"
                    android:layout_gravity="center_horizontal"
                    android:layout_marginTop="1.0dip"
                    android:src="@drawable/image_effect_sm" />
                <TextView
                    android:layout_width="wrap_content"
                    android:layout_height="wrap_content"
                    android:layout_gravity="center_horizontal"
                    android:layout_marginTop="1.0dip"
                    android:shadowColor="#ff000000"
                    android:shadowDx="1.0"
                    android:shadowDy="1.0"
                    android:shadowRadius="1.0"
                    android:text="素描"
                    android:textColor="#ffffffff"
                    android:textSize="13.0dip" />
            </LinearLayout>

            <LinearLayout
                android:id="@+id/layout_effect"
                android:layout_width="wrap_content"
                android:layout_height="wrap_content"
                android:layout_margin="2dp"
                android:layout_weight="1"
                android:orientation="vertical" >
                <ImageView
                    android:layout_width="wrap_content"
                    android:layout_height="wrap_content"
                    android:layout_gravity="center_horizontal"
                    android:layout_marginTop="1.0dip"
                    android:src="@drawable/image_effect" />
                <TextView
                    android:layout_width="wrap_content"
                    android:layout_height="wrap_content"
                    android:layout_gravity="center_horizontal"
                    android:layout_marginTop="1.0dip"
                    android:shadowColor="#ff000000"
                    android:shadowDx="1.0"
                    android:shadowDy="1.0"
                    android:shadowRadius="1.0"
                    android:text="锐化"
                    android:textColor="#ffffffff"
                    android:textSize="13.0dip" />
            </LinearLayout>

        </LinearLayout>
    </LinearLayout>
</RelativeLayout>
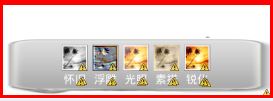
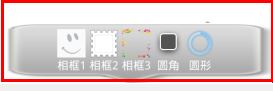
它的在Xml中Graphical Layout显示效果如下图所示:
 添加5个自定义变量:
//弹出按钮
private PopupWindow popupWindow1;
private PopupWindow popupWindow2;
private PopupWindow popupWindow3;
private PopupWindow popupWindow4;
private PopupWindow popupWindow5;
然后当点击"相框"布局LinearLayout时,添加代码如下(其他类似):
//按钮四 监听事件图片相框
layoutFrame.setOnClickListener( new OnClickListener() {
	@Override
	public void onClick(View v) {
		//载入PopupWindow
		if (popupWindow4 != null&&popupWindow4.isShowing()) {
            popupWindow4.dismiss();
            return;
        } else {
            initmPopupWindowView(4);   //number=4
            int[] location = new int[2];
            v.getLocationOnScreen(location);
            Toast.makeText(MainActivity.this, ""+location[0], Toast.LENGTH_SHORT).show();
            popupWindow4.showAtLocation(v, Gravity.NO_GRAVITY, location[0], location[1]-popupWindow4.getHeight());
        }
	}
});
其中initmPopupWindowView(int number)为自定义函数,参数对应的是点击LinearLayout的序号,点击"按钮"4即传入数字4:
public void initmPopupWindowView(int number) {
    	View customView = null;
        // 获取自定义布局文件
    	if(number==1) { //查看
    		customView = getLayoutInflater().inflate(R.layout.popup_watch, null, false);
    		// 创建PopupWindow实例  (250,180)分别是宽度和高度
            popupWindow1 = new PopupWindow(customView, 250, 280);
            // 设置动画效果 [R.style.AnimationFade 是自己事先定义好的]
            popupWindow1.setAnimationStyle(R.style.AnimationPreview);
            // 自定义view添加触摸事件
            customView.setOnTouchListener(new OnTouchListener() {
                @Override
                public boolean onTouch(View v, MotionEvent event) {
                    if (popupWindow1 != null && popupWindow1.isShowing()) {
                        popupWindow1.dismiss();
                        popupWindow1 = null;
                    }
                    return false;
                }
            });
    	}
    	 if(number==2) { //增强
         	customView = getLayoutInflater().inflate(R.layout.popup_increase, null, false);
         	popupWindow2 = new PopupWindow(customView, 450, 150);
         	// 使其聚集 要想监听菜单里控件的事件就必须要调用此方法
             popupWindow2.setFocusable(true);
             // 设置允许在外点击消失
             popupWindow2.setOutsideTouchable(true);
             popupWindow2.setAnimationStyle(R.style.AnimationPreview);
             // 自定义view添加触摸事件
             customView.setOnTouchListener(new OnTouchListener() {
                 @Override
                 public boolean onTouch(View v, MotionEvent event) {
                     if (popupWindow2 != null && popupWindow2.isShowing()) {
                         popupWindow2.dismiss();
                         popupWindow2 = null;
                     }
                     return false;
                 }
             });
         }
        if(number==3) { //效果
        	customView = getLayoutInflater().inflate(R.layout.popup_effect, null, false);
        	popupWindow3 = new PopupWindow(customView, 450, 150);
        	// 使其聚集 要想监听菜单里控件的事件就必须要调用此方法
            popupWindow3.setFocusable(true);
            // 设置允许在外点击消失
            popupWindow3.setOutsideTouchable(true);
            popupWindow3.setAnimationStyle(R.style.AnimationPreview);
            // 自定义view添加触摸事件
            customView.setOnTouchListener(new OnTouchListener() {
                @Override
                public boolean onTouch(View v, MotionEvent event) {
                    if (popupWindow3 != null && popupWindow3.isShowing()) {
                        popupWindow3.dismiss();
                        popupWindow3 = null;
                    }
                    return false;
                }
            });
        }
        if(number==4) {
        	customView = getLayoutInflater().inflate(R.layout.popup_frame, null, false);
        	popupWindow4 = new PopupWindow(customView, 450, 150);
        	// 使其聚集 要想监听菜单里控件的事件就必须要调用此方法
            popupWindow4.setFocusable(true);
            popupWindow4.setAnimationStyle(R.style.AnimationPreview);
            // 自定义view添加触摸事件
            customView.setOnTouchListener(new OnTouchListener() {
                @Override
                public boolean onTouch(View v, MotionEvent event) {
                    if (popupWindow4 != null && popupWindow4.isShowing()) {
                        popupWindow4.dismiss();
                        popupWindow4 = null;
                    }
                    return false;
                }
            });
        }
        if(number==5) {
        	customView = getLayoutInflater().inflate(R.layout.popup_frame, null, false);
        	popupWindow5 = new PopupWindow(customView, 450, 150);
        	// 使其聚集 要想监听菜单里控件的事件就必须要调用此方法
            popupWindow5.setFocusable(true);
            popupWindow5.setAnimationStyle(R.style.AnimationPreview);
            // 自定义view添加触摸事件
            customView.setOnTouchListener(new OnTouchListener() {
                @Override
                public boolean onTouch(View v, MotionEvent event) {
                    if (popupWindow5 != null && popupWindow5.isShowing()) {
                        popupWindow5.dismiss();
                        popupWindow5 = null;
                    }
                    return false;
                }
            });
        } //end if
    }
四. PopupWindow实现点击效果
做到这里,你就能实现点击底部菜单实现弹出PopupWindows效果,但显然是不足的.怎样通过点击弹出PopupWindow中的按钮实现做不同的事情呢?下面讲解,你只需要添加下面的代码即可实现"特效"效果.
代码如下,你可以自定义函数实现不同效果功能(结合前面几篇文章,我的美图秀秀基本完成):
if(number==3) { //效果
	customView = getLayoutInflater().inflate(R.layout.popup_effect, null, false);
	popupWindow3 = new PopupWindow(customView, 450, 150);
	// 使其聚集 要想监听菜单里控件的事件就必须要调用此方法
    popupWindow3.setFocusable(true);
    // 设置允许在外点击消失
    popupWindow3.setOutsideTouchable(true);
    popupWindow3.setAnimationStyle(R.style.AnimationPreview);
    // 自定义view添加触摸事件
    customView.setOnTouchListener(new OnTouchListener() {
        @Override
        public boolean onTouch(View v, MotionEvent event) {
            if (popupWindow3 != null && popupWindow3.isShowing()) {
                popupWindow3.dismiss();
                popupWindow3 = null;
            }
            return false;
        }
    });
    //判断点击子菜单不同按钮实现不同功能
    LinearLayout layoutEffect1 = (LinearLayout) customView.findViewById(R.id.layout_effect_hj);
    layoutEffect1.setOnClickListener(new OnClickListener() {
    	@Override
    	public void onClick(View v) {
    		Toast.makeText(MainActivity.this, "效果-怀旧", Toast.LENGTH_SHORT).show();
    	}
    });
    LinearLayout layoutEffect2 = (LinearLayout) customView.findViewById(R.id.layout_effect_fd);
    layoutEffect2.setOnClickListener(new OnClickListener() {
    	@Override
    	public void onClick(View v) {
    		Toast.makeText(MainActivity.this, "效果-浮雕", Toast.LENGTH_SHORT).show();
    	}
    });
    LinearLayout layoutEffect3 = (LinearLayout) customView.findViewById(R.id.layout_effect_gz);
    layoutEffect3.setOnClickListener(new OnClickListener() {
    	@Override
    	public void onClick(View v) {
    		Toast.makeText(MainActivity.this, "效果-光照", Toast.LENGTH_SHORT).show();
    	}
    });
    LinearLayout layoutEffect4 = (LinearLayout) customView.findViewById(R.id.layout_effect_sm);
    layoutEffect4.setOnClickListener(new OnClickListener() {
    	@Override
    	public void onClick(View v) {
    		Toast.makeText(MainActivity.this, "效果-素描", Toast.LENGTH_SHORT).show();
    		//打开图片
    		OpenImage();
    	}
    });
    LinearLayout layoutEffect5 = (LinearLayout) customView.findViewById(R.id.layout_effect);
    layoutEffect5.setOnClickListener(new OnClickListener() {
    	@Override
    	public void onClick(View v) {
    		Toast.makeText(MainActivity.this, "效果-锐化", Toast.LENGTH_SHORT).show();
    	}
    });
}
五. 总结