下面是使用 opencv-camera,实时处理区域内人脸检测 android 推理 demo。
首先是整合 opcv-camera 进去:
为了方便直接将整个 opencv-android-sdk 全部导入:
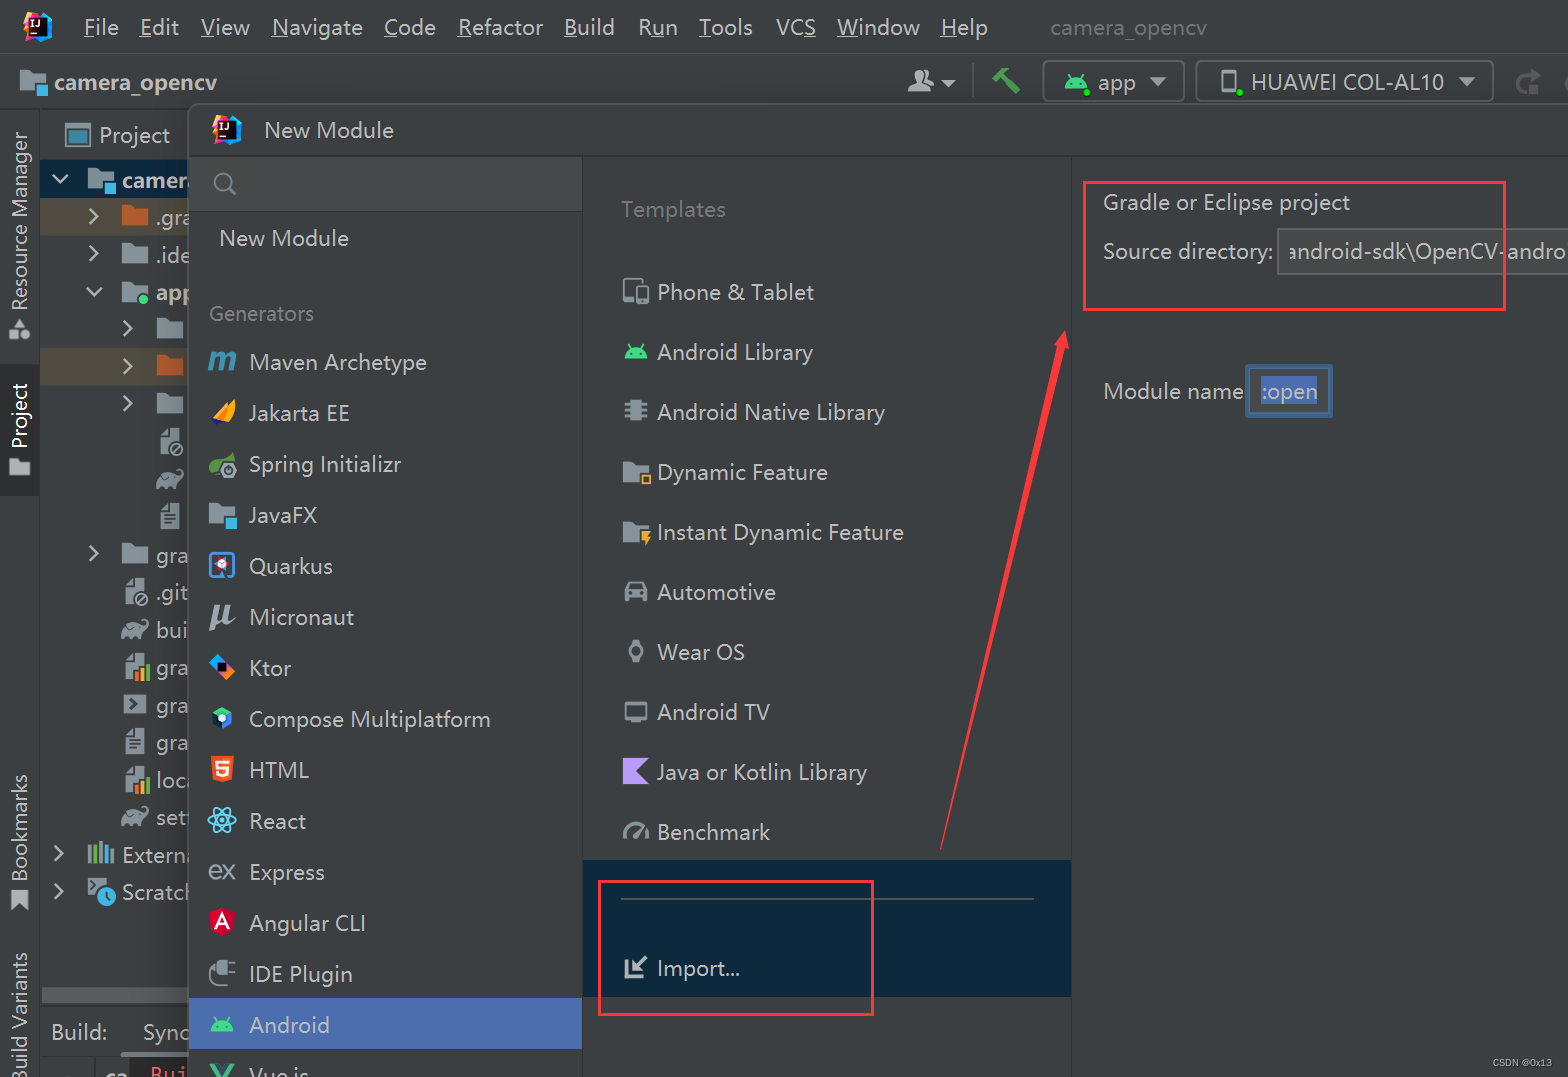
然后在原来的项目模块app中添加 opencv的 java 相关依赖,主要添加红色两行:
app/build.grandle
dependencies {
    implementation fileTree(dir: 'libs', include: ['*.jar'])
    implementation 'androidx.appcompat:appcompat:1.4.1'
    implementation 'com.google.android.material:material:1.5.0'
    implementation 'androidx.constraintlayout:constraintlayout:2.1.3'
    testImplementation 'junit:junit:4.13.2'
    androidTestImplementation 'androidx.test.ext:junit:1.1.3'
    androidTestImplementation 'androidx.test.espresso:espresso-core:3.4.0'
    implementation project(':opencvsdk')
}
最后在项目中要使用opencv的地方加载jni库,可以添加到 MainActivity 中:
System.loadLibrary("opencv_java4"); 或者 OpenCVLoader.initDebug();
要使用 opencv-camera,MainActivity 继承 CameraActivity,然后在回调函数中获取每一帧进行处理,比如下面对每一帧添加识别区域边框:
    // 获取每一帧回调数据
    private CameraBridgeViewBase.CvCameraViewListener2 cameraViewListener2 = new CameraBridgeViewBase.CvCameraViewListener2() {
        @Override
        public void onCameraViewStarted(int width, int height) {
            System.out.println("开始预览 width="+width+",height="+height);
            // 预览界面长宽分别是识别区域的两倍,识别区域正中间正常形区域
            int detection_x1 = (win_w - OnnxUtil.w)/2;
            int detection_x2 = (win_w - OnnxUtil.w)/2 + OnnxUtil.w;
            int detection_y1 = (win_h - OnnxUtil.h)/2;
            int detection_y2 = (win_h - OnnxUtil.h)/2 + OnnxUtil.h;;
            // 缓存识别区域两个点
            detection_p1 = new Point(detection_x1,detection_y1);
            detection_p2 = new Point(detection_x2,detection_y2);
            detection_box_color = new Scalar(255, 0, 0);
            detection_box_tickness = 1;
        }
        @Override
        public void onCameraViewStopped() {}
        @Override
        public Mat onCameraFrame(CameraBridgeViewBase.CvCameraViewFrame frame) {

            // 获取 cv::Mat
            Mat mat = frame.rgba();

            // 标注识别区域
            Imgproc.rectangle(mat, detection_p1, detection_p2,detection_box_color,detection_box_tickness);
            Imgproc.putText(mat,"RecArea",detection_p1,Imgproc.FONT_HERSHEY_SIMPLEX,0.5,detection_box_color);

            // 推理并标注
            OnnxUtil.inference(mat,detection_p1,detection_p2);

            return mat;
        }
    };
在界面中开启预览:
    // 开启预览
    private BaseLoaderCallback baseLoaderCallback = new BaseLoaderCallback(this) {
        @Override
        public void onManagerConnected(int status) {
            switch (status) {
                case LoaderCallbackInterface.SUCCESS: {
                    if (camera2View != null) {
                        // 设置前置还是后置摄像头 0后置 1前置
                        camera2View.setCameraIndex(cameraId);
                        // 注册每一帧回调
                        camera2View.setCvCameraViewListener(cameraViewListener2);
                        // 显示/关闭 帧率  disableFpsMeter/enableFpsMeter
                        // 要修改字体和颜色直接修改 FpsMeter 类即可
                        camera2View.enableFpsMeter();
                        // 设置视图宽高和模型一致减少resize操作,模型输入一般尺寸不大,这样相机渲染fps会更高
                        camera2View.setMaxFrameSize(win_w,win_h);
                        // 开启
                        camera2View.enableView();
                    }
                }
                break;
                default:
                    super.onManagerConnected(status);
                    break;
            }
        }
    };
下面是全部推理 MainActivity 代码:
package com.example.camera_opencv;


import android.content.pm.ActivityInfo;
import android.os.Bundle;
import android.view.WindowManager;
import com.example.camera_opencv.databinding.ActivityMainBinding;
import org.opencv.android.*;
import org.opencv.core.Mat;
import org.opencv.core.Point;
import org.opencv.core.Scalar;
import org.opencv.imgproc.Imgproc;

import java.util.Arrays;
import java.util.List;

public class MainActivity extends CameraActivity{

    // 动态库
    static {
        // 我们自己的jni
        System.loadLibrary("camera_opencv");
        // 新加的 opencv 的jni
        System.loadLibrary("opencv_java4");
    }

    private ActivityMainBinding binding;

    // 预览界面
    private JavaCamera2View camera2View;

    // 相机编号 0后置 1前置
    private int cameraId = 1;

    // 设置预览界面宽高,在次宽高基础上限制识别区域
    private int win_w = 320;
    private int win_h = 240;

    // 识别区域两个点
    private Point detection_p1;
    private Point detection_p2;
    private Scalar detection_box_color;
    private int detection_box_tickness;

    @Override
    protected void onCreate(Bundle savedInstanceState) {

        super.onCreate(savedInstanceState);
        binding = ActivityMainBinding.inflate(getLayoutInflater());
        setContentView(binding.getRoot());

        // 加载模型
        OnnxUtil.loadModule(getAssets());

        // 强制横屏
        setRequestedOrientation(ActivityInfo.SCREEN_ORIENTATION_LANDSCAPE);
        // 隐藏上方状态栏
        getWindow().setFlags(WindowManager.LayoutParams.FLAG_FULLSCREEN, WindowManager.LayoutParams.FLAG_FULLSCREEN);
        // 预览界面
        camera2View = findViewById(R.id.camera_view);
    }

    @Override
    protected List<? extends CameraBridgeViewBase> getCameraViewList() {
        return Arrays.asList(camera2View);
    }


    @Override
    public void onPause() {
        super.onPause();
        if (camera2View != null) {
            // 关闭预览
            camera2View.disableView();
        }
    }

    @Override
    public void onResume() {
        super.onResume();
        if (OpenCVLoader.initDebug()) {
            baseLoaderCallback.onManagerConnected(LoaderCallbackInterface.SUCCESS);
        } else {
            OpenCVLoader.initAsync(OpenCVLoader.OPENCV_VERSION, this, baseLoaderCallback);
        }
    }

    // 获取每一帧回调数据
    private CameraBridgeViewBase.CvCameraViewListener2 cameraViewListener2 = new CameraBridgeViewBase.CvCameraViewListener2() {
        @Override
        public void onCameraViewStarted(int width, int height) {
            System.out.println("开始预览 width="+width+",height="+height);
            // 预览界面长宽分别是识别区域的两倍,识别区域正中间正常形区域
            int detection_x1 = (win_w - OnnxUtil.w)/2;
            int detection_x2 = (win_w - OnnxUtil.w)/2 + OnnxUtil.w;
            int detection_y1 = (win_h - OnnxUtil.h)/2;
            int detection_y2 = (win_h - OnnxUtil.h)/2 + OnnxUtil.h;;
            // 缓存识别区域两个点
            detection_p1 = new Point(detection_x1,detection_y1);
            detection_p2 = new Point(detection_x2,detection_y2);
            detection_box_color = new Scalar(255, 0, 0);
            detection_box_tickness = 1;
        }
        @Override
        public void onCameraViewStopped() {}
        @Override
        public Mat onCameraFrame(CameraBridgeViewBase.CvCameraViewFrame frame) {

            // 获取 cv::Mat
            Mat mat = frame.rgba();

            // 标注识别区域
            Imgproc.rectangle(mat, detection_p1, detection_p2,detection_box_color,detection_box_tickness);
            Imgproc.putText(mat,"RecArea",detection_p1,Imgproc.FONT_HERSHEY_SIMPLEX,0.5,detection_box_color);

            // 推理并标注
            OnnxUtil.inference(mat,detection_p1,detection_p2);

            return mat;
        }
    };

    // 开启预览
    private BaseLoaderCallback baseLoaderCallback = new BaseLoaderCallback(this) {
        @Override
        public void onManagerConnected(int status) {
            switch (status) {
                case LoaderCallbackInterface.SUCCESS: {
                    if (camera2View != null) {
                        // 设置前置还是后置摄像头 0后置 1前置
                        camera2View.setCameraIndex(cameraId);
                        // 注册每一帧回调
                        camera2View.setCvCameraViewListener(cameraViewListener2);
                        // 显示/关闭 帧率  disableFpsMeter/enableFpsMeter
                        // 要修改字体和颜色直接修改 FpsMeter 类即可
                        camera2View.enableFpsMeter();
                        // 设置视图宽高和模型一致减少resize操作,模型输入一般尺寸不大,这样相机渲染fps会更高
                        camera2View.setMaxFrameSize(win_w,win_h);
                        // 开启
                        camera2View.enableView();
                    }
                }
                break;
                default:
                    super.onManagerConnected(status);
                    break;
            }
        }
    };

}
onnx 模型加载和推理代码:
使用的微软onnx推理框架:
implementation 'com.microsoft.onnxruntime:onnxruntime-android:latest.release'
implementation 'com.microsoft.onnxruntime:onnxruntime-extensions-android:latest.release'
package com.example.camera_opencv;

import ai.onnxruntime.*;
import android.content.res.AssetManager;
import org.opencv.core.*;
import org.opencv.imgproc.Imgproc;

import java.io.ByteArrayOutputStream;
import java.io.InputStream;
import java.nio.FloatBuffer;
import java.util.*;

public class OnnxUtil {

    // onnxruntime 环境
    public static OrtEnvironment env;
    public static OrtSession session;

    // 模型输入
    public static int w = 0;
    public static int h = 0;
    public static int c = 3;

    // 标注颜色
    public static Scalar green = new Scalar(0, 255, 0);
    public static int tickness = 1;

    // 模型加载
    public static void loadModule(AssetManager assetManager){

        // 模型最大输入是 640*640,为了提高帧率这里选择 160*160
        w = 160;
        h = 160;
        c = 3;

        try {

            InputStream inputStream = assetManager.open("scrfd_500m_bnkps.onnx");
            ByteArrayOutputStream buffer = new ByteArrayOutputStream();
            int nRead;
            byte[] data = new byte[1024];
            while ((nRead = inputStream.read(data, 0, data.length)) != -1) {
                buffer.write(data, 0, nRead);
            }
            buffer.flush();
            byte[] module = buffer.toByteArray();
            System.out.println("开始加载模型");
            env = OrtEnvironment.getEnvironment();
            session = env.createSession(module, new OrtSession.SessionOptions());
            session.getInputInfo().entrySet().stream().forEach(n -> {
                String inputName = n.getKey();
                NodeInfo inputInfo = n.getValue();
                long[] shape = ((TensorInfo) inputInfo.getInfo()).getShape();
                String javaType = ((TensorInfo) inputInfo.getInfo()).type.toString();
                System.out.println("模型输入:  "+inputName + " -> " + Arrays.toString(shape) + " -> " + javaType);
            });
            session.getOutputInfo().entrySet().stream().forEach(n -> {
                String outputName = n.getKey();
                NodeInfo outputInfo = n.getValue();
                long[] shape = ((TensorInfo) outputInfo.getInfo()).getShape();
                String javaType = ((TensorInfo) outputInfo.getInfo()).type.toString();
                System.out.println("模型输出:  "+outputName + " -> " + Arrays.toString(shape) + " -> " + javaType);
            });
        } catch (Exception e) {
            e.printStackTrace();
        }

    }


    // 模型推理,输入原始图片和识别区域两个点
    public static void inference(Mat mat,Point detection_p1,Point detection_p2){

        int px = Double.valueOf(detection_p1.x).intValue();
        int py = Double.valueOf(detection_p1.y).intValue();

        // 提取rgb(chw存储)并做归一化,也就是 rrrrr bbbbb ggggg
        float[] chw = new float[c*h*w];
        // 像素点索引
        int pi = 0;
        for(int j=0 ; j<h ; j++){
            for(int i=0 ; i<w ; i++){
                // 第j行,第i列,根据识别区域p1得到xy坐标的偏移,直接加就行
                double[] rgb = mat.get(j+py,i+px);
                // 缓存到 chw 中,mat 是 rgba 数据对应的下标 2103
                chw[pi] = (float)(rgb[2]/255);//r
                chw[pi + w * h * 1 ] = (float)(rgb[1]/255);//G
                chw[pi + w * h * 2 ] = (float)(rgb[0]/255);//b
                pi ++;
            }
        }

        // 创建张量并进行推理
        try {

            // ---------模型[2]输入-----------
            // input.1 -> [1, 3, -1, -1] -> FLOAT
            // ---------模型[2]输出-----------
            // 447 -> [12800, 1] -> FLOAT
            // 473 -> [3200, 1] -> FLOAT
            // 499 -> [800, 1] -> FLOAT
            // 450 -> [12800, 4] -> FLOAT
            // 476 -> [3200, 4] -> FLOAT
            // 502 -> [800, 4] -> FLOAT
            // 453 -> [12800, 10] -> FLOAT
            // 479 -> [3200, 10] -> FLOAT
            // 505 -> [800, 10] -> FLOAT
            OnnxTensor tensor = OnnxTensor.createTensor(env, FloatBuffer.wrap(chw), new long[]{1,c,h,w});
            OrtSession.Result out = session.run(Collections.singletonMap("input.1", tensor));

            // 打印输入张量shape
            long[] shape = tensor.getInfo().getShape();

            // 置信度阈值和iou阈值
            float score_thres = 0.5f;
            float iou_thres = 0.7f;

            // 因为这里没有进行缩放,直接将检测区域的 160*160 输入模型
            float imgScale = 1.0f;

            // 检测步长
            List<float[]> temp = new ArrayList<>();
            int[] net_stride = new int[]{8, 16, 32};
            for(int index = 0;index < net_stride.length;index++){
                int stride = net_stride[index];
                float[][] scores = (float[][]) out.get(index).getValue();
                float[][] boxes = (float[][]) out.get(index + 3).getValue();
                float[][] points = (float[][]) out.get(index + 6).getValue();
                int ws = (int) Math.ceil(1.0f * shape[3] / stride);
                // 人脸框的个数
                int count = scores.length;
                for(int i=0;i<count;i++){
                    float score = scores[i][0];// 分数
                    if(score >= score_thres){
                        int anchorIndex = i / 2;
                        int rowNum = anchorIndex / ws;
                        int colNum = anchorIndex % ws;
                        //计算人脸框,坐标缩放到原始图片中
                        float anchorX = colNum * net_stride[index];
                        float anchorY = rowNum * net_stride[index];
                        float x1 = (anchorX - boxes[i][0] * net_stride[index])  * imgScale;
                        float y1 = (anchorY - boxes[i][1] * net_stride[index])  * imgScale;
                        float x2 = (anchorX + boxes[i][2] * net_stride[index])  * imgScale;
                        float y2 = (anchorY + boxes[i][3] * net_stride[index])  * imgScale;
                        // 关键点集合
                        float [] point = points[i];
                        // 5个关键点,坐标缩放到原始图片中
                        float pointX_1 = (point[0] * net_stride[index] + anchorX)  * imgScale;
                        float pointY_1 = (point[1] * net_stride[index] + anchorY)  * imgScale;
                        float pointX_2 = (point[2] * net_stride[index] + anchorX)  * imgScale;
                        float pointY_2 = (point[3] * net_stride[index] + anchorY)  * imgScale;
                        float pointX_3 = (point[4] * net_stride[index] + anchorX)  * imgScale;
                        float pointY_3 = (point[5] * net_stride[index] + anchorY)  * imgScale;
                        float pointX_4 = (point[6] * net_stride[index] + anchorX)  * imgScale;
                        float pointY_4 = (point[7] * net_stride[index] + anchorY)  * imgScale;
                        float pointX_5 = (point[8] * net_stride[index] + anchorX)  * imgScale;
                        float pointY_5 = (point[8] * net_stride[index] + anchorY)  * imgScale;
                        // 保存到tmp中,注意x1y1x2y2不能超出 w*h
                        temp.add(new float[]{
                                score,
                                x1>w?w:x1,
                                y1>h?h:y1,
                                x2>w?w:x2,
                                y2>h?h:y2,
                                pointX_1,pointY_1,
                                pointX_2,pointY_2,
                                pointX_3,pointY_3,
                                pointX_4,pointY_4,
                                pointX_5,pointY_5
                        });
                    }
                }
            }

            // nms
            ArrayList<float[]> datas_after_nms = new ArrayList<>();
            while (!temp.isEmpty()){
                float[] max = temp.get(0);
                datas_after_nms.add(max);
                Iterator<float[]> it = temp.iterator();
                while (it.hasNext()) {
                    // nsm阈值
                    float[] obj = it.next();
                    // x1y1x2y2 是 1234
                    double iou = calculateIoU(max,obj);
                    if (iou > iou_thres) {
                        it.remove();
                    }
                }
            }

            // 标注
            datas_after_nms.stream().forEach(n->{

                // 画边框和关键点需要添加偏移
                int x1 = Float.valueOf(n[1]).intValue() + px;
                int y1 = Float.valueOf(n[2]).intValue() + py;
                int x2 = Float.valueOf(n[3]).intValue() + px;
                int y2 = Float.valueOf(n[4]).intValue() + py;
                Imgproc.rectangle(mat, new Point(x1, y1), new Point(x2, y2), green, tickness);

                float point1_x = Float.valueOf(n[5]).intValue() + px;// 关键点1
                float point1_y = Float.valueOf(n[6]).intValue() + py;//
                float point2_x = Float.valueOf(n[7]).intValue() + px;// 关键点2
                float point2_y = Float.valueOf(n[8]).intValue() + py;//
                float point3_x = Float.valueOf(n[9]).intValue() + px;// 关键点3
                float point3_y = Float.valueOf(n[10]).intValue() + py;//

                Imgproc.circle(mat, new Point(point1_x, point1_y), 1, green, 2);
                Imgproc.circle(mat, new Point(point2_x, point2_y), 1, green, 2);
                Imgproc.circle(mat, new Point(point3_x, point3_y), 1, green, 2);

            });

        }
        catch (Exception e){
            e.printStackTrace();
        }
    }


    // 计算两个框的交并比
    private static double calculateIoU(float[] box1, float[] box2) {
        //  getXYXY() 返回 xmin-0 ymin-1 xmax-2 ymax-3
        double x1 = Math.max(box1[1], box2[1]);
        double y1 = Math.max(box1[2], box2[2]);
        double x2 = Math.min(box1[3], box2[3]);
        double y2 = Math.min(box1[4], box2[4]);
        double intersectionArea = Math.max(0, x2 - x1 + 1) * Math.max(0, y2 - y1 + 1);
        double box1Area = (box1[3] - box1[1] + 1) * (box1[4] - box1[2] + 1);
        double box2Area = (box2[3] - box2[1] + 1) * (box2[4] - box2[2] + 1);
        double unionArea = box1Area + box2Area - intersectionArea;
        return intersectionArea / unionArea;
    }

}
项目详细代码:
https://github.com/TangYuFan/deeplearn-mobile