前几天项目开发中需要用kotlin做一个类似Android原生settings的页面,只不过ui相较preference自带的控件有些变化,特别是ListPreference的数据更新问题,困扰了好久,网上也只有只言片语聊到这个,所以记录下心得。
使用PreferenceFragment最主要的好处有两点:
- 实现了Material Design,页面设计更简洁操作方便。
- 能够自动将用户设置的状态或值存入SharedPreference中。
1. 如何在代码中使用preferenceFragment
首先,需要在values目录下创建一个xml目录用来保存prefernce的ui资源:pref_test.xml
具体代码如下:
<?xml version="1.0" encoding="utf-8"?>
<androidx.preference.PreferenceScreen android:title="Settings"
    xmlns:android="http://schemas.android.com/apk/res/android"
    xmlns:app="http://schemas.android.com/apk/res-auto">

    <PreferenceCategory
        android:layout="@layout/layout_settings"
        android:key="pre_back_key">
    </PreferenceCategory>

    <PreferenceCategory android:title="Function1"
        android:layout="@layout/layout_pre_title"
        app:allowDividerAbove="true"
        app:allowDividerBelow="true"
        app:iconSpaceReserved="false">

        <SwitchPreference
            android:key="switch_key"
            android:defaultValue="true"
            app:iconSpaceReserved="false"
            app:allowDividerAbove="true"
            app:allowDividerBelow="true"
            android:title="switch"/>

        <ListPreference
            android:key="pre_led_key"
            android:entries="@array/display_led"
            android:dialogTitle="led"
            android:entryValues="@array/display_led_value"
            app:iconSpaceReserved="false"
            app:allowDividerAbove="true"
            app:allowDividerBelow="true"
            android:title="Led"
            android:widgetLayout="@layout/layout_pre_led"
            android:summary="blue, red, off"
            app:defaultValue="0"/>

    </PreferenceCategory>

</androidx.preference.PreferenceScreen>
key: 当前控件在SharedPreference存储中的key
title: 当前preference的标题
summary: 子标题
entries: 用户在列表中可以选择的值,可以在string.xml中设置string-array
entryValues: entries在SharedPreference中对应key的values
iconSpaceReserved: 默认是true,代表此preference一栏的最前面留有一个放置图片的空间,如果不需要的话可以设置成false
allowDividerAbove/allowDividerBelow: 指在此行上下是否显示分割线
dialogTitle: 弹出的选择框的标题
widgetLayout: 右侧独立的小块布局,可以自定义layout
<?xml version="1.0" encoding="utf-8"?>
<ImageView
    xmlns:android="http://schemas.android.com/apk/res/android"
    android:id="@android:id/widget_frame"
    android:layout_width="30dp"
    android:layout_height="30dp"
    android:src="@drawable/go"/>
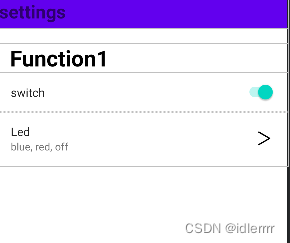
一个简单的preference布局就完成了
然后新建一个TestPreferenceFragment继承PreferenceFragmentCompat
class TestPreferenceFragment(private var spName : String) : PreferenceFragmentCompat(),
    Preference.OnPreferenceChangeListener{

    private var testTag = "TestPreferenceFragment"
    private lateinit var mLuminosityListPre: ListPreference


    override fun onCreatePreferences(savedInstanceState: Bundle?, rootKey: String?) {
        Log.d(testTag, "onCreatePreferences")
        preferenceManager.sharedPreferencesName = spName
        setPreferencesFromResource(R.xml.pref_test, rootKey)
        initAllPre()
    }

    /*override fun onPreferenceTreeClick(preference: Preference?): Boolean {
        Log.d(testTag, "onPreferenceTreeClick: ${preference!!.key}")
        return super.onPreferenceTreeClick(preference)
    }*/

    override fun onPreferenceChange(preference: Preference?, newValue: Any?): Boolean {
        if (preference != null) {
            Log.d(testTag, "onPreferenceChange -> preference.key: ${preference.key}" + ", preference.value: $newValue")
        }
        return true
    }


    private fun initAllPre() {
        mLuminosityListPre = findPreference(Constant.PRE_LUMINOSITY_KEY)!!
        mLuminosityListPre.onPreferenceChangeListener = this

    }
在onCreatePreferences方法中调用setPreferencesFromResource将之前创建的pref_test.xml传入也可以通过preferenceManager.sharedPreferencesName设置SharedPreference的文件名方便查找。
onPreferenceChange: 可以监听用户对所有preference的值的更改
onPreferenceTreeClick: 监听点击事件
2.自定义preference控件原生UI
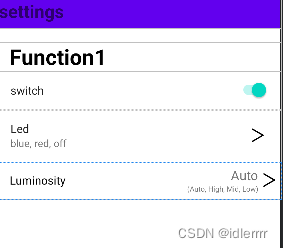
需要添加: android:layout="@layout/layout_pre_luminosity" 来填充自定义的视图
        <ListPreference
            android:key="pre_Luminosity_key"
            android:entries="@array/luminosity"
            android:dialogTitle="Luminosity"
            android:entryValues="@array/luminosity_value"
            app:allowDividerAbove="true"
            app:defaultValue="0"
            app:allowDividerBelow="true"
            android:icon="@drawable/go"
            android:title="Luminosity"
            android:summary="@string/luminosity_auto"
            android:layout="@layout/layout_pre_luminosity"
            android:widgetLayout="@layout/layout_widget"
            app:iconSpaceReserved="false"/>
重点来了,当你传入了自定义的layout之后,所有的控件id得根据preference_material.xml中原生定义的控件id设置你自己的控件id,不然会出现无法更新数据的问题!!!
<?xml version="1.0" encoding="utf-8"?>
<RelativeLayout
    xmlns:android="http://schemas.android.com/apk/res/android"
    android:layout_width="match_parent"
    android:paddingBottom="7dp"
    android:paddingTop="7dp"
    android:layout_height="wrap_content">

    <TextView
        android:id="@android:id/title"
        android:layout_width="wrap_content"
        android:layout_height="wrap_content"
        android:layout_centerVertical="true"
        android:layout_marginStart="15dp"
        android:textColor="#000000"
        android:textSize="16sp" />

    <ImageView
        android:id="@android:id/icon"
        android:layout_width="30dp"
        android:layout_alignParentEnd="true"
        android:layout_centerVertical="true"
        android:layout_height="30dp"
        android:src="@drawable/go"/>

    <TextView
        android:id="@android:id/summary"
        android:layout_width="wrap_content"
        android:layout_height="wrap_content"
        android:layout_alignParentEnd="true"
        android:layout_marginEnd="30dp"
        android:text="Auto"
        android:textSize="18sp" />

    <LinearLayout
        android:id="@android:id/widget_frame"
        android:layout_alignParentEnd="true"
        android:layout_below="@android:id/summary"
        android:layout_width="wrap_content"
        android:layout_height="wrap_content"
        android:orientation="vertical"
        android:layout_marginEnd="30dp">

        <TextView
            android:layout_width="wrap_content"
            android:layout_height="wrap_content"
            android:textSize="10sp"
            android:text="(Auto, High, Mid, Low)"/>
    </LinearLayout>

</RelativeLayout>
3.数据更新
当我们控制添加完的控件进行开关或者选项切换时将会触发onPreferenceChange()方法,根据传入的value进行对应的数据更新即可。
    override fun onPreferenceChange(preference: Preference?, newValue: Any?): Boolean {
        if (preference != null) {
            Log.d(testTag, "onPreferenceChange -> preference.key: ${preference.key}" + ", preference.value: $newValue")
            setListPreData(preference.key, newValue)
        }
        return true
    }

    private fun setListPreData(preKey: String, newValue : Any?) {
        Log.d(testTag, "preKey: $preKey + ------ value: $newValue")
        when (preKey) {

            Constant.PRE_LUMINOSITY_KEY -> {
                when (newValue) {
                    "0" -> mLuminosityListPre.summary = getString(R.string.luminosity_auto)
                    "1" -> mLuminosityListPre.summary = getString(R.string.luminosity_high)
                    "2" -> mLuminosityListPre.summary = getString(R.string.luminosity_mid)
                    "3" -> mLuminosityListPre.summary = getString(R.string.luminosity_low)
                }

            }
        }
    }
由于笔者时间紧张,所以没有进一步研究是否可以对layout中的id属性进行扩展,各位可以自行研究。
本文内容由网友自发贡献,版权归原作者所有,本站不承担相应法律责任。如您发现有涉嫌抄袭侵权的内容,请联系:hwhale#tublm.com(使用前将#替换为@)