MMDetection是一款优秀的基于PyTorch的深度学习目标检测工具箱,由香港中文大学(CUHK)多媒体实验室(mmlab)开发。基本上支持所有当前SOTA二阶段的目标检测算法,比如faster rcnn,mask rcnn,r-fcn,Cascade-RCNN等。读者可在 PyTorch 环境下测试不同的预训练模型及训练新的检测分割模型。
根据 GitHub 项目所述,MMDetection的主要特征可以总结为以下几个方面:
模块化设计:将检测或者分割任务分解成几个模块,通过模块的组合即可完成相应的任务。
支持多个框架,开箱即用:该工具包直接支持多种流行的检测框架,如 Faster RCNN、Mask RCNN、RetinaNet 等。
高效:所有基础边界框和掩码运算都在 GPU 上运行。不同模型的训练速度大约比 FAIR 的 Detectron 快 5% ~ 20%。
技术发展水平:达到了目前最先进的水平。
了解如何在计算机上安装MMDetection
Linux(不正式支持Windows)
Python 3.5+
PyTorch 1.1或更高版本
CUDA 9.0或更高
NCCL 2
GCC 4.9或更高
mmcv(https://github.com/open-mmlab/mmcv)
我们已经测试了以下版本的操作系统和软件:
OS: Ubuntu 16.04/18.04 and CentOS 7.2
CUDA: 9.0/9.2/10.0/10.1
NCCL: 2.1.15/2.2.13/2.3.7/2.4.2
GCC(G++): 4.9/5.3/5.4/7.3
a. 创建一个conda虚拟环境并激活它
conda create -n open-mmlab python=3.7-y
conda activate open-mmlab
b. 按照官方说明安装PyTorch和Torchvision(https://pytorch.org/) ,例如,
conda install pytorch torchvision -c pytorch
If you have CUDA 10.1 installed under /usr/local/cuda and would like to install PyTorch 1.5, you need to install the prebuilt PyTorch with CUDA 10.1.
conda install pytorch cudatoolkit=10.1 torchvision -c pytorch
If you have CUDA 9.2 installed under /usr/local/cuda and would like to install PyTorch 1.3.1., you need to install the prebuilt PyTorch with CUDA 9.2.
conda install pytorch=1.3.1 cudatoolkit=9.2 torchvision=0.4.2 -c pytorch
c. 克隆mmdetection存储库
git clone https://github.com/open-mmlab/mmdetection.git
cd mmdetection
d. 安装构建要求,然后安装mmdetection。(我们通过github repo安装pycocotools而不是pypi,因为pypi版本较旧并且与最新的numpy不兼容。)
pip install -r requirements/build.txt -i http://mirrors.aliyun.com/pypi/simple/ --trusted-host mirrors.aliyun.com
pip install "git+https://github.com/cocodataset/cocoapi.git#subdirectory=PythonAPI"
pip install -v -e .## or "python setup.py develop"

安装完成
Using /home/lhy/anaconda3/envs/mmdetection/lib/python3.7/site-packages
Finished processing dependencies for mmdet==2.24.1
注意:
1.git commit的id将在步骤d中写入版本号,例如0.6.0 + 2e7045c。该版本还将保存在经过训练的模型中。建议你每次从github获取一些更新时都运行步骤d。如果修改了C++/CUDA代码,则此步骤为强制性的。
2.按照上述说明,mmdetection将安装在dev模式下,对代码进行的任何本地修改都将生效,而无需重新安装它(除非你提交了一些提交并希望更新版本号)。
3.如果要使用 opencv-python-headless 来代替 opencv-python,可以在安装MMCV之前先安装它。
4.一些依赖关系是可选的。只需运行 pip install -v -e .,将只会安装最低运行时间要求。要使用可选的依赖项如albumentations和imagecorruptions,并使用pip install -r requirements/optional.txt 手动安装它们,或者在调用pip时指定所需的附加项(例如pip install -v -e .[optional])。对于额外字段的有效键为:all,tests,build,和 optional。
或者可以
pip install mmcv-full -f https://download.openmmlab.com/mmcv/dist/{cu_version}/{torch_version}/index.html
Please replace {cu_version} and {torch_version} in the url to your desired one. For example, to install the latest mmcv-full with CUDA 11.0 and PyTorch 1.7.0, use the following command:
pip install mmcv-full -f https://download.openmmlab.com/mmcv/dist/cu110/torch1.7.0/index.html
我们提供了一个Dockerfile(https://github.com/open-mmlab/mmdetection/blob/master/docker/Dockerfile)来构建映像。
使用PyTorch 1.1、CUDA 10.0和CUDNN 7.5构建图像
docker build -t mmdetection docker/
这是一个完整的脚本,用于使用conda设置mmdetection并链接数据集路径(假设你的COCO数据集路径为$ COCO_ROOT)。
conda create -n open-mmlab python=3.7-y
conda activate open-mmlab
conda install -c pytorch pytorch torchvision -y
git clone https://github.com/open-mmlab/mmdetection.git
cd mmdetection
pip install -r requirements/build.txt
pip install "git+https://github.com/cocodataset/cocoapi.git#subdirectory=PythonAPI"
如果网不好,可以按照下面的步骤安装
git clone https://github.com/cocodataset/cocoapi.git
cd cocoapi/PythonAPI

python setup.py build_ext --inplace
python setup.py build_ext install

pip install -v -e .


mkdir data
ln -s $COCO_ROOT data
如果你的机器上有多个mmdetection,并且你想交替使用它们,则建议的方法是创建多个conda环境并对不同版本使用不同的环境。
另一种方法是插入下面的代码到主脚本(train.py,test.py或任何其他脚本运行)
import os.path as osp
import sys
sys.path.insert(0,osp.join(osp.dirname(osp.abspath(__file__)),'../'))
或者在相应文件夹的终端中运行以下命令以临时使用当前文件夹。
export PYTHONPATH=`pwd`:$PYTHONPATH
我们提供用于在整个数据集(COCO、PASCAL VOC、Cityscapes 等)上评估现有模型的测试脚本。支持以下测试环境:
单GPU
中央处理器(CPU)
单节点多GPU
多个节点
你可以使用以下命令测试数据集。
RESULT_FILE: Filename of the output results in pickle format. If not specified, the results will not be saved to a file.(输出结果的文件名为pickle格式。如果未指定,结果将不会保存到文件中。)
EVAL_METRICS: Items to be evaluated on the results. Allowed values depend on the dataset, e.g., proposal_fast, proposal, bbox, segm are available for COCO, mAP, recall for PASCAL VOC. Cityscapes could be evaluated by cityscapes as well as all COCO metrics.(根据结果进行评估的项目。允许的值取决于数据集,例如,proposal_fast, proposal, box, segm可用于COCO, mAP, PASCAL VOC的recall。城市景观可以通过城市景观以及所有COCO指标进行评估)
–show: If specified, detection results will be plotted on the images and shown in a new window. It is only applicable to single GPU testing and used for debugging and visualization. Please make sure that GUI is available in your environment. Otherwise, you may encounter an error like cannot connect to X server.
–show-dir: If specified, detection results will be plotted on the images and saved to the specified directory. It is only applicable to single GPU testing and used for debugging and visualization. You do NOT need a GUI available in your environment for using this option.(如果指定,检测结果将绘制在图像上并保存到指定目录。仅适用于单个GPU测试,用于调试和可视化。您的环境中不需要可用的GUI来使用此选项)
–show-score-thr: If specified, detections with scores below this threshold will be removed.
–cfg-options: if specified, the key-value pair optional cfg will be merged into config file(如果指定,键值对可选CFG将被合并到配置文件中)
–eval-options: if specified, the key-value pair optional eval cfg will be kwargs for dataset.evaluate() function, it’s only for evaluation
#V2版本单GPU测试
python tools / test.py $ {CONFIG_FILE} $ {CHECKPOINT_FILE} [--out $ {RESULT_FILE}] [--eval $ {EVAL_METRICS}] [--show]

#多GPU测试和评估
./tools/dist_test.sh $ {CONFIG_FILE} $ {CHECKPOINT_FILE} $ {GPU_NUM} [--out $ {RESULT_FILE}] [--eval $ {EVAL_METRICS}]

#V3版本
# Single-gpu testing
python tools/test.py \
    ${CONFIG_FILE} \
    ${CHECKPOINT_FILE} \
    [--out ${RESULT_FILE}] \
    [--eval ${EVAL_METRICS}] \
    [--show]

# CPU: disable GPUs and run single-gpu testing script
export CUDA_VISIBLE_DEVICES=-1
python tools/test.py \
    ${CONFIG_FILE} \
    ${CHECKPOINT_FILE} \
    [--out ${RESULT_FILE}] \
    [--eval ${EVAL_METRICS}] \
    [--show]

# Multi-gpu testing
bash tools/dist_test.sh \
    ${CONFIG_FILE} \
    ${CHECKPOINT_FILE} \
    ${GPU_NUM} \
    [--out ${RESULT_FILE}]
    [--eval ${EVAL_METRICS}] \
tools/dist_test.sh也支持多节点测试,但依赖于 PyTorch 的launch utility。
可选参数:
RESULT_FILE:输出结果的文件名是pickle格式。如果未指定,结果将不会保存到文件中。
EVAL_METRICS:要根据结果评估的项目。允许的值取决于数据集,例如proposal_fast,proposal,bbox,segm可用于COCO和mAP,recall为PASCAL VOC。
–show:如果指定,检测结果将绘制在图像上并显示在新窗口中。它仅适用于单个GPU测试,并用于调试和可视化。请确保GUI在你的环境中可用,否则你可能会遇到类似cannot connect to X server的错误。
如果要评估数据集,请不要同时指定–show。
–show-dir:如果指定,检测结果将绘制在图像上并保存到指定目录。仅适用于单GPU测试,用于调试和可视化。您不需要在您的环境中使用此选项的 GUI。
–work-dir: 如果指定,包含评估指标的检测结果将保存到指定目录。
–cfg-options: 如果指定,键值对可选的cfg将被合并到配置文件中
假设你已经将检查点下载到目录checkpoints/。
python tools/test.py configs/faster_rcnn_r50_fpn_1x.py \
    checkpoints/faster_rcnn_r50_fpn_1x_20181010-3d1b3351.pth \
    --show

python tools/test.py \
    configs/faster_rcnn/faster-rcnn_r50_fpn_1x_coco.py \
    checkpoints/faster_rcnn_r50_fpn_1x_coco_20200130-047c8118.pth \
    --show

python tools/test.py \
    configs/faster_rcnn/faster-rcnn_r50_fpn_1x_coco.py \
    checkpoints/faster_rcnn_r50_fpn_1x_coco_20200130-047c8118.pth \
    --show-dir faster_rcnn_r50_fpn_1x_results
生成测试结果,.json和.pkl文件,加–eval bbox生成框的信息,用于目标检测。
python tools/test.py configs/faster_rcnn_r50_fpn_1x.py \
    checkpoints/faster_rcnn_r50_fpn_1x_20181010-3d1b3351.pth \
    --eval bbox --show
python tools/test.py configs/pascal_voc/faster_rcnn_r50_fpn_1x_voc.py \
    checkpoints/SOME_CHECKPOINT.pth \
    --eval mAP
python tools/test.py configs/mask_rcnn_r50_fpn_1x.py \
    checkpoints/mask_rcnn_r50_fpn_1x_20181010-069fa190.pth \
    --out results.pkl --eval bbox segm
./tools/dist_test.sh configs/mask_rcnn_r50_fpn_1x.py \
    checkpoints/mask_rcnn_r50_fpn_1x_20181010-069fa190.pth \
    8 --out results.pkl --eval bbox segm

./tools/dist_test.sh \
    configs/mask-rcnn_r50_fpn_1x_coco.py \
    checkpoints/mask_rcnn_r50_fpn_1x_coco_20200205-d4b0c5d6.pth \
    8 \
    --out results.pkl
tools/dist_test.sh也支持多节点测试,但依赖于PyTorch的启动工具。
./tools/dist_test.sh \
    configs/mask_rcnn/mask-rcnn_r50_fpn_1x_coco.py \
    checkpoints/mask_rcnn_r50_fpn_1x_coco_20200205-d4b0c5d6.pth \
    8 \
    --out results.pkl \
    --cfg-options test_evaluator.classwise=True
./tools/dist_test.sh configs/mask_rcnn_r50_fpn_1x.py \
    checkpoints/mask_rcnn_r50_fpn_1x_20181010-069fa190.pth \
    8 --format-only --options "jsonfile_prefix=./mask_rcnn_test-dev_results"
/media/lhy/Swin-Transformer-Object-Detection# python ./tools/test.py4_window7_mstrain_480-800_adamw_3x_coco.py work_dirs/mask_rcnn_swin_tiny_patch4_window7_mstrain_480-800_adamw_3x_coco/latest.pth --format_only --options "jsonfile_prefix=./result/maskrcnn_result"
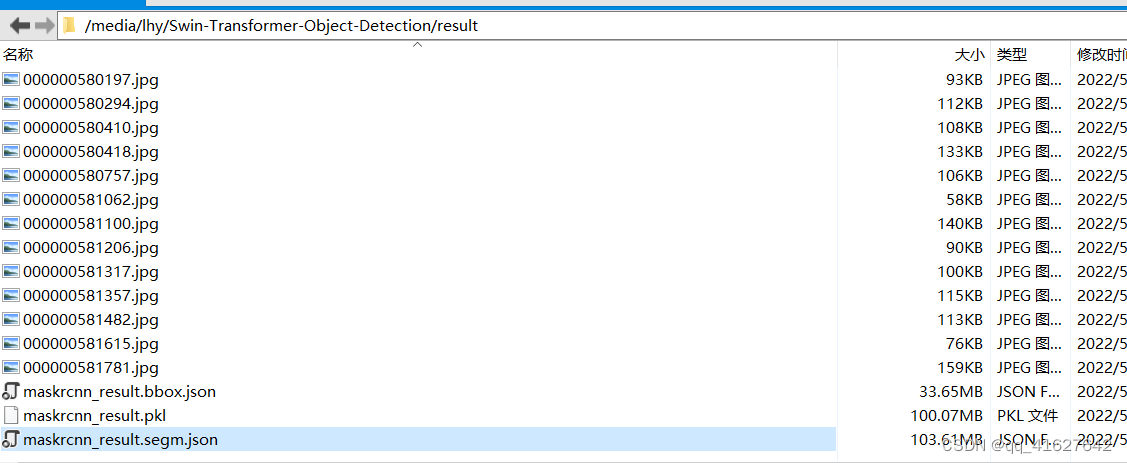
你将获得两个json文件mask_rcnn_test-dev_results.bbox.json和mask_rcnn_test-dev_results.segm.json。
./tools/dist_test.sh \
    configs/cityscapes/mask_rcnn_r50_fpn_1x_cityscapes.py \
    checkpoints/mask_rcnn_r50_fpn_1x_cityscapes_20200227-afe51d5a.pth \
    8 \
    --format-only \
    --options "txtfile_prefix=./mask_rcnn_cityscapes_test_results"
或者
python tools/test.py  work_dirs/mask_rcnn_swin_tiny_patch4_window7_mstrain_480-800_adamw_3x_coco/mask_rcnn_swin_tiny_patch4_window7_mstrain_480-800_adamw_3x_coco.py  work_dirs/mask_rcnn_swin_tiny_patch4_window7_mstrain_480-800_adamw_3x_coco/latest.pth  --out inference_dirs/mask_rcnn_swin_tiny_coco_result.pkl --format-only   --show-dir ./inference_dirs/  --options "txtfile_prefix=./inference_dirs/mask_rcnn_swin_tiny_coco_test_results"
生成的png和txt文件将在./mask_rcnn_cityscapes_test_results目录下。
MMDetection 支持使用CocoDataset. 如果你的数据集格式不是COCO格式,请转成COCO格式。例如,如果你的数据集格式是VOC,你可以直接将它转换成COCO格式如果你的数据集格式是Cityscapes,你可以直接将它转换成COCO格式,其余格式可以使用转换。
python tools/dataset_converters/images2coco.py \
    ${IMG_PATH} \
    ${CLASSES} \
    ${OUT} \
    [--exclude-extensions]
参数:
IMG_PATH:图片的根路径。
CLASSES:带有类别列表的文本文件。
OUT:输出注解的json文件名。保存目录与IMG_PATH.
exclude-extensions: 需要排除的图片后缀,比如’png’, ‘bmp’。
转换完成后,需要将原来的test_evaluator和test_dataloader替换为注释中的test_evaluator和test_dataloader (在’configs/ base /datasets’中找到当前config对应的数据集),运行:
# Single-gpu testing
python tools/test.py \
    ${CONFIG_FILE} \
    ${CHECKPOINT_FILE} \
    [--show]

# CPU: disable GPUs and run single-gpu testing script
export CUDA_VISIBLE_DEVICES=-1
python tools/test.py \
    ${CONFIG_FILE} \
    ${CHECKPOINT_FILE} \
    [--out ${RESULT_FILE}] \
    [--show]

# Multi-gpu testing
bash tools/dist_test.sh \
    ${CONFIG_FILE} \
    ${CHECKPOINT_FILE} \
    ${GPU_NUM} \
    [--show]
假设model zoo中的 checkpoints已经下载到目录checkpoints/,我们可以在 COCO test-dev 上用 8 个 GPU 测试 Mask R-CNN,并使用以下命令生成 JSON 文件。
./tools/dist_test.sh \
    configs/mask_rcnn/mask-rcnn_r50_fpn_1x_coco.py \
    checkpoints/mask_rcnn_r50_fpn_1x_coco_20200205-d4b0c5d6.pth \
    8
此命令生成两个 JSON 文件./work_dirs/coco_instance/test.bbox.json和./work_dirs/coco_instance/test.segm.json.
MMDetection 支持在测试模式下使用单个图像或批量图像进行推理。默认情况下,我们使用单图推理,您可以通过修改samples_per_gpu测试数据的配置来使用批量推理。您可以通过如下修改配置来做到这一点。
data = dict(train_dataloader=dict(...), val_dataloader=dict(...), test_dataloader=dict(batch_size=2, ...))
或者您可以将其设置–cfg-options为–cfg-options test_dataloader.batch_size=2
我们提供了一个网络摄像头演示来说明结果。
python demo / webcam_demo.py ${CONFIG_FILE} ${CHECKPOINT_FILE} [--device ${GPU_ID}] [--camera-id ${CAMERA-ID}] [--score-thr ${SCORE_THR}]
python demo/webcam_demo.py \
    ${CONFIG_FILE} \
    ${CHECKPOINT_FILE} \
    [--device ${GPU_ID}] \
    [--camera-id ${CAMERA-ID}] \
    [--score-thr ${SCORE_THR}]
python demo/webcam_demo.py configs/faster_rcnn_r50_fpn_1x.py \
    checkpoints/faster_rcnn_r50_fpn_1x_20181010-3d1b3351.pth
python demo/webcam_demo.py configs/faster_rcnn/faster_rcnn_r50_fpn_1x_coco.py weights/faster_rcnn_r50_fpn_1x_coco_20200130-047c8118.pth
python demo/webcam_demo.py \
    configs/faster_rcnn/faster-rcnn_r50_fpn_1x_coco.py \
    checkpoints/faster_rcnn_r50_fpn_1x_coco_20200130-047c8118.pth
python demo/video_demo.py \
    ${VIDEO_FILE} \
    ${CONFIG_FILE} \
    ${CHECKPOINT_FILE} \
    [--device ${GPU_ID}] \
    [--score-thr ${SCORE_THR}] \
    [--out ${OUT_FILE}] \
    [--show] \
    [--wait-time ${WAIT_TIME}]
python demo/video_demo.py demo/demo.mp4 \
    configs/faster_rcnn/faster_rcnn_r50_fpn_1x_coco.py \
    checkpoints/faster_rcnn_r50_fpn_1x_coco_20200130-047c8118.pth \
    --out result.mp4
python demo/video_demo.py demo/demo.mp4 \
    configs/faster_rcnn/faster_rcnn_r50_fpn_1x_coco.py \
    checkpoints/faster_rcnn_r50_fpn_1x_coco_20200130-047c8118.pth \
    --show

使用 GPU 加速的视频演示
此脚本使用 GPU 加速对视频执行推理。
python demo/video_gpuaccel_demo.py \
    ${VIDEO_FILE} \
    ${CONFIG_FILE} \
    ${CHECKPOINT_FILE} \
    [--device ${GPU_ID}] \
    [--score-thr ${SCORE_THR}] \
    [--nvdecode] \
    [--out ${OUT_FILE}] \
    [--show] \
    [--wait-time ${WAIT_TIME}]
python demo/video_gpuaccel_demo.py demo/demo.mp4 \
    configs/faster_rcnn/faster-rcnn_r50_fpn_1x_coco.py \
    checkpoints/faster_rcnn_r50_fpn_1x_coco_20200130-047c8118.pth \
    --nvdecode --out result.mp4
测试时间增强(TTA)是在测试阶段使用的数据增强策略。它将不同的增强(例如翻转和缩放)应用于同一图像以进行模型推理,然后合并每个增强图像的预测以获得更准确的预测。为了方便用户使用TTA,MMEngine提供了BaseTTAModel类,用户可以根据自己的需要,通过扩展BaseTTAModel类来实现不同的TTA策略。
在MMDetection中,我们提供了继承自BaseTTAModel的类。
使用 TTA 需要两个步骤。首先需要在配置文件中添加tta_model和:tta_pipeline
tta_model = dict(
    type='DetTTAModel',
    tta_cfg=dict(nms=dict(
                   type='nms',
                   iou_threshold=0.5),
                   max_per_img=100))

tta_pipeline = [
    dict(type='LoadImageFromFile',
        backend_args=None),
    dict(
        type='TestTimeAug',
        transforms=[[
            dict(type='Resize', scale=(1333, 800), keep_ratio=True)
        ], [ # It uses 2 flipping transformations (flipping and not flipping).
            dict(type='RandomFlip', prob=1.),
            dict(type='RandomFlip', prob=0.)
        ], [
            dict(
               type='PackDetInputs',
               meta_keys=('img_id', 'img_path', 'ori_shape',
                       'img_shape', 'scale_factor', 'flip',
                       'flip_direction'))
       ]])]
其次,–tta在运行测试脚本时进行设置,示例如下:
# Single-gpu testing
python tools/test.py \
    ${CONFIG_FILE} \
    ${CHECKPOINT_FILE} \
    [--tta]

# CPU: disable GPUs and run single-gpu testing script
export CUDA_VISIBLE_DEVICES=-1
python tools/test.py \
    ${CONFIG_FILE} \
    ${CHECKPOINT_FILE} \
    [--out ${RESULT_FILE}] \
    [--tta]

# Multi-gpu testing
bash tools/dist_test.sh \
    ${CONFIG_FILE} \
    ${CHECKPOINT_FILE} \
    ${GPU_NUM} \
    [--tta]
您还可以自行修改TTA配置,例如添加扩展增强功能:
tta_model = dict(
    type='DetTTAModel',
    tta_cfg=dict(nms=dict(
                   type='nms',
                   iou_threshold=0.5),
                   max_per_img=100))

img_scales = [(1333, 800), (666, 400), (2000, 1200)]
tta_pipeline = [
    dict(type='LoadImageFromFile',
         backend_args=None),
    dict(
        type='TestTimeAug',
        transforms=[[
            dict(type='Resize', scale=s, keep_ratio=True) for s in img_scales
        ], [
            dict(type='RandomFlip', prob=1.),
            dict(type='RandomFlip', prob=0.)
        ], [
            dict(
               type='PackDetInputs',
               meta_keys=('img_id', 'img_path', 'ori_shape',
                       'img_shape', 'scale_factor', 'flip',
                       'flip_direction'))
       ]])]
上述数据增强管道将首先对图像执行 3 次多尺度变换,然后是 2 次翻转变换(翻转和不翻转)。最后,使用 PackDetInputs 将图像打包成最终结果。
以下是更多 TTA 用例供您参考:
TTA更高级的使用和数据流程请参考MMEngine。后期我们会支持实例分割TTA。
MMDetection 提供用于图像推理的高级 Python API。下面是构建模型和对给定图像或视频进行推理的示例。
import cv2
import mmcv
from mmcv.transforms import Compose
from mmengine.utils import track_iter_progress
from mmdet.registry import VISUALIZERS
from mmdet.apis import init_detector, inference_detector


# Specify the path to model config and checkpoint file
config_file = 'configs/faster_rcnn/faster-rcnn_r50-fpn_1x_coco.py'
checkpoint_file = 'checkpoints/faster_rcnn_r50_fpn_1x_coco_20200130-047c8118.pth'

# Build the model from a config file and a checkpoint file
model = init_detector(config_file, checkpoint_file, device='cuda:0')

# Init visualizer
visualizer = VISUALIZERS.build(model.cfg.visualizer)
# The dataset_meta is loaded from the checkpoint and
# then pass to the model in init_detector
visualizer.dataset_meta = model.dataset_meta
# Ttest a single image and show the results

img = 'test.jpg'  # or img = mmcv.imread(img), which will only load it once
result = inference_detector(model, img)

# Show the results
img = mmcv.imread(img)
img = mmcv.imconvert(img, 'bgr', 'rgb')


visualizer.add_datasample(
    'result',
    img,
    data_sample=result,
    draw_gt=False,
    show=True)

# Test a video and show the results
# Build test pipeline
model.cfg.test_dataloader.dataset.pipeline[0].type = 'LoadImageFromNDArray'
test_pipeline = Compose(model.cfg.test_dataloader.dataset.pipeline)

# Init visualizer
visualizer = VISUALIZERS.build(model.cfg.visualizer)
# The dataset_meta is loaded from the checkpoint and
# then pass to the model in init_detector
visualizer.dataset_meta = model.dataset_meta

# The interval of show (s), 0 is block
wait_time = 1

video_reader = mmcv.VideoReader('video.mp4')

cv2.namedWindow('video', 0)

for frame in track_iter_progress(video_reader):
    result = inference_detector(model, frame, test_pipeline=test_pipeline)
    visualizer.add_datasample(
        name='video',
        image=frame,
        data_sample=result,
        draw_gt=False,
        show=False)
    frame = visualizer.get_image()
    mmcv.imshow(frame, 'video', wait_time)

cv2.destroyAllWindows()
同步接口
MMDetection提供了用于图像推断的高级Python apl。下面是一个在给定的图像或视频上构建模型和推理的例子。
from mmdet.apis import init_detector, inference_detector
import mmcv

# Specify the path to model config and checkpoint file
config_file = 'configs/faster_rcnn/faster_rcnn_r50_fpn_1x_coco.py'
checkpoint_file = 'checkpoints/faster_rcnn_r50_fpn_1x_coco_20200130-047c8118.pth'

# build the model from a config file and a checkpoint file
model = init_detector(config_file, checkpoint_file, device='cuda:0')

# test a single image and show the results
img = 'test.jpg'  # or img = mmcv.imread(img), which will only load it once
result = inference_detector(model, img)
# visualize the results in a new window
model.show_result(img, result)
# or save the visualization results to image files
model.show_result(img, result, out_file='result.jpg')

# test a video and show the results
video = mmcv.VideoReader('video.mp4')
for frame in video:
    result = inference_detector(model, frame)
    model.show_result(frame, result, wait_time=1)
异步接口
对于Python 3.7+, MMDetection也支持异步接口。通过使用CUDA流,它允许在GPU绑定推断代码上不阻塞CPU,并使单线程应用程序能够更好地利用CPU/GPU。推理可以在不同的输入数据样本之间,也可以在某些推理管道的不同模型之间并行进行。
请参阅tests/async_benchmark.py比较同步和异步接口的速度。
import asyncio
import torch
from mmdet.apis import init_detector, async_inference_detector
from mmdet.utils.contextmanagers import concurrent

async def main():
    config_file = 'configs/faster_rcnn/faster_rcnn_r50_fpn_1x_coco.py'
    checkpoint_file = 'checkpoints/faster_rcnn_r50_fpn_1x_coco_20200130-047c8118.pth'
    device = 'cuda:0'
    model = init_detector(config_file, checkpoint=checkpoint_file, device=device)

    # queue is used for concurrent inference of multiple images
    streamqueue = asyncio.Queue()
    # queue size defines concurrency level
    streamqueue_size = 3

    for _ in range(streamqueue_size):
        streamqueue.put_nowait(torch.cuda.Stream(device=device))

    # test a single image and show the results
    img = 'test.jpg'  # or img = mmcv.imread(img), which will only load it once

    async with concurrent(streamqueue):
        result = await async_inference_detector(model, img)

    # visualize the results in a new window
    model.show_result(img, result)
    # or save the visualization results to image files
    model.show_result(img, result, out_file='result.jpg')


asyncio.run(main())
MMDetection 还提供开箱即用的工具来训练检测模型。本节将展示如何在标准数据集(即 COCO)上训练预定义模型(在configs下)。
tools/misc/download_dataset.py supports downloading datasets such as COCO, VOC, and LVIS.
python tools/misc/download_dataset.py --dataset-name coco2017
python tools/misc/download_dataset.py --dataset-name voc2007
python tools/misc/download_dataset.py --dataset-name lvis
tools/data_converters/ contains tools to convert the Cityscapes dataset and Pascal VOC dataset to the COCO format.
tools/data_converters/包含将Cityscapes数据集和Pascal VOC数据集转换为COCO格式的工具。
python tools/dataset_converters/cityscapes.py ${CITYSCAPES_PATH} [-h] [--img-dir ${IMG_DIR}] [--gt-dir ${GT_DIR}] [-o ${OUT_DIR}] [--nproc ${NPROC}]
python tools/dataset_converters/pascal_voc.py ${DEVKIT_PATH} [-h] [-o ${OUT_DIR}]
训练也需要准备数据集。有关详细信息,请参阅上面的准备数据集部分。
注意:目前,下面的配置文件configs/cityscapes使用COCO预训练的权重进行初始化。如果网络连接不可用或速度慢,您可以提前下载现有模型。否则会导致训练开始时出错。
重要提示:配置文件中的默认学习率适用于 8 个 GPU 和每个 GPU 2 个样本(批量大小 = 8 * 2 = 16)。它已设置为auto_scale_lr.base_batch_size in config/base/default_runtime.py。当批量大小为16时,学习率将根据此值自动缩放。同时,为了不影响其他基于mmdet的代码库,该标志默认auto_scale_lr.enable设置为False。
如果要启用此功能,则需要添加参数–auto-scale-lr。在处理命令之前,您需要检查要使用的配置名称,因为配置名称表示默认的批处理大小。
By default, it is 8 x 2 = 16 batch size, like faster_rcnn_r50_caffe_fpn_90k_coco.py or pisa_faster_rcnn_x101_32x4d_fpn_1x_coco.py.In other cases, you will see the config file name have NxM in dictating, like cornernet_hourglass104_mstest_32x3_210e_coco.py which batch size is 32 x 3 = 96, or scnet_x101_64x4d_fpn_8x1_20e_coco.py which batch size is 8 x 1 = 8.
请记住检查您要使用的特定配置文件的底部,如果批处理大小不是16会有auto_scale_lr.base_batch_size. 如果找不到这些值,请检查其中的配置文件,base=[xxx]您会找到它。如果你想自动缩放 LR,请不要修改它的值。
学习率自动缩放的基本用法如下。
python tools/train.py \
    ${CONFIG_FILE} \
    --auto-scale-lr \
    [optional arguments]
如果启用此功能,学习率将根据机器上的 GPU 数量和训练的批量大小自动缩放。有关详细信息,请参见线性缩放规则。例如,如果有 4 个 GPU,每个 GPU 上有 2 张图片,那么lr = 0.01。如果有 16 个 GPU,每个 GPU 上有 4 张图片,它会自动缩放到lr = 0.08。如果你不想使用它,你需要根据线性缩放规则手动计算学习率,然后optimizer.lr在特定的配置文件中更改

python tools/train.py \
    ${CONFIG_FILE} \
    [optional arguments]
python tools/train.py configs/swin/mask_rcnn_swin_tiny_patch4_window7_mstrain_480-800_adamw_3x_coco.py
在培训过程中,日志文件和检查点将被保存到工作目录中,工作目录由配置文件中的work_dir指定或通过CLI参数——work-dir指定。在命令中指定工作目录,则可以添加参数–work_dir $ {YOUR_WORK_DIR}
默认情况下,模型每隔一段时间就会在验证集上评估,评估间隔可以在配置文件中指定,如下所示。
# evaluate the model every 12 epoch.
evaluation = dict(interval=12)
该工具接受几个可选参数,包括:
--no-validate (not suggested): Disable evaluation during training.在培训期间禁用评估

--work-dir ${WORK_DIR}: Override the working directory.设置工作目录

--resume-from ${CHECKPOINT_FILE}: Resume from a previous checkpoint file.从上一个检查点文件恢复

--options 'Key=value': Overrides other settings in the used config.覆盖所使用配置中的其他设置
CPU上的训练过程与单GPU训练过程一致。我们只需要在训练前禁用图形处理器。
export CUDA_VISIBLE_DEVICES=-1
python tools/train.py \
    ${CONFIG_FILE} \
    [optional arguments]
我们不建议用户使用 CPU 进行训练,因为它太慢了。我们支持此功能是为了方便用户在没有 GPU 的机器上进行调试。
bash ./tools/dist_train.sh \
    ${CONFIG_FILE} \
    ${GPU_NUM} \
    [optional arguments]

./tools/dist_train.sh $ {CONFIG_FILE} $ {GPU_NUM} [可选参数]
案例:多gpu断点恢复模型训练
./tools/dist_train.sh configs/swin/mask_rcnn_swin_tiny_patch4_window7_mstrain_480-800_adamw_3x_coco.py 3 --resume-from work_dirs/mask_rcnn_swin_tiny_patch4_window7_mstrain_480-800_adamw_3x_coco/latest.pth
在单台计算机上启动多个作业
如果你使用dist_train.sh启动训练作业,则可以在命令中设置端口。
如果你想在一台机器上启动多个任务,例如,在一台有8个gpu的机器上启动2个4-GPU训练的任务,你需要为每个任务指定不同的端口(默认29500),以避免通信冲突。如果使用dist_train.sh启动培训作业,可以在命令中设置端口。
CUDA_VISIBLE_DEVICES=0,1,2,3 PORT=29500 ./tools/dist_train.sh ${CONFIG_FILE} 4
CUDA_VISIBLE_DEVICES=4,5,6,7 PORT=29501 ./tools/dist_train.sh ${CONFIG_FILE} 4
如果您使用多台仅通过以太网连接的机器启动,则只需运行以下命令即可:
在第一台机器上:
NNODES=2 NODE_RANK=0 PORT=$MASTER_PORT MASTER_ADDR=$MASTER_ADDR sh tools/dist_train.sh $CONFIG $GPUS
在第二台机器上:
NNODES=2 NODE_RANK=1 PORT=$MASTER_PORT MASTER_ADDR=$MASTER_ADDR sh tools/dist_train.sh $CONFIG $GPUS
通常,如果您没有像 InfiniBand 这样的高速网络,它会很慢。
如果在由slurm(https://slurm.schedmd.com/) 管理的群集上运行MMDetection,则可以使用脚本"slurm_train.sh"。(此脚本还支持单机训练。)
[GPUS=${GPUS}] ./tools/slurm_train.sh ${PARTITION} ${JOB_NAME} ${CONFIG_FILE} ${WORK_DIR}
./tools/slurm_train.sh ${PARTITION} ${JOB_NAME} ${CONFIG_FILE} ${WORK_DIR} [${GPUS}]
下面是一个使用16个gpu在一个名为dev的Slurm分区上训练Mask R-CNN的示例,并将工作目录设置为一些共享文件系统。
GPUS=16 ./tools/slurm_train.sh dev mask_r50_1x configs/mask_rcnn_r50_fpn_1x_coco.py /nfs/xxxx/mask_rcnn_r50_fpn_1x
你可以检查slurm_train.sh(https://github.com/open-mmlab/mmdetection/blob/master/tools/slurm_train.sh) 中的完整参数和环境变量。
使用Slurm时,port选项可以通过以下方式设置:
CUDA_VISIBLE_DEVICES=0,1,2,3 GPUS=4 ./tools/slurm_train.sh ${PARTITION} ${JOB_NAME} config1.py ${WORK_DIR} --options 'dist_params.port=29500'
CUDA_VISIBLE_DEVICES=4,5,6,7 GPUS=4 ./tools/slurm_train.sh ${PARTITION} ${JOB_NAME} config2.py ${WORK_DIR} --options 'dist_params.port=29501'
如果只有多台计算机与以太网连接,则可以参考 pytorch 启动实用程序(https://pytorch.org/docs/stable/distributed_deprecated.html#launch-utility)。如果没有像infiniband这样的高速网络,通常速度很慢。
如果你将启动训练作业与slurm一起使用,则需要修改配置文件(通常是配置文件底部的第6行)以设置不同的通信端口。
在config1.py中,
dist_params = dict(backend='nccl', port=29500)
In config2.py, set
dist_params = dict(backend='nccl',port= 29501)
然后,你可以使用config1.py和config2.py启动两个作业。
CUDA_VISIBLE_DEVICES=0,1,2,3 GPUS=4 ./tools/slurm_train.sh ${PARTITION} ${JOB_NAME} config1.py ${WORK_DIR}
CUDA_VISIBLE_DEVICES=4,5,6,7 GPUS=4 ./tools/slurm_train.sh ${PARTITION} ${JOB_NAME} config2.py ${WORK_DIR}

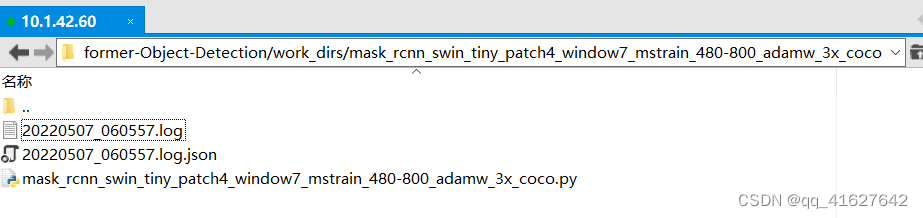
tensorboard --logdir work_dirs/mask_rcnn_swin_tiny_patch4_window7_mstrain_480-800_adamw_3x_coco/tf_logs --host 10.1.42.60
python tools/test.py configs/balloon/mask_rcnn_r50_caffe_fpn_mstrain-poly_1x_balloon.py work_dirs/mask_rcnn_r50_caffe_fpn_mstrain-poly_1x_balloon/latest.pth --eval bbox segm

在这一部分中,您将了解如何使用自定义数据集训练预定义模型,然后对其进行测试。我们以气球数据集为例来描述整个过程。
基本步骤如下:
准备自定义数据集
准备配置文件
在自定义数据集上训练、测试和推断模型。
1、 将数据集重组为COCO格式。
2、将数据集重新组织为中间格式。
3、实现一个新的数据集。
通常我们推荐使用前两种方法,它们通常比第三种更容易。
注意:MMDetection目前只支持评估coco格式数据集的掩码AP。例如实例分割任务用户应该将数据转换成coco格式。
更新注意:自 MMDetection 3.0 以来,数据集和指标已解耦,CityScapes 除外。因此,用户可以在验证期间对任何格式的数据集使用任何类型的评估指标。例如:使用 VOC 指标评估 COCO 数据集,或使用 VOC 和 COCO 指标评估 OpenImages 数据集。
在这篇笔记中,我们给出了一个将数据转换成 COCO 格式的例子。
COCO注释格式
{
    "images": [image],
    "annotations": [annotation],
    "categories": [category]
}

image = {
    "id": int,
    "width": int,
    "height": int,
    "file_name": str,
}

annotation = {
    "id": int,
    "image_id": int,
    "category_id": int,
    "segmentation": RLE or [polygon],
    "area": float,
    "bbox": [x,y,width,height], # (x, y) are the coordinates of the upper left corner of the bbox
    "iscrowd": 0 or 1,
}

categories = [{
    "id": int,
    "name": str,
    "supercategory": str,
}]
假设我们使用气球数据集。下载数据后,我们需要实现一个将标注格式转换为COCO格式的功能。然后我们可以使用CocoDataset来加载数据并进行训练和评估。
如果查看数据集,您会发现数据集格式如下:
{'base64_img_data': '',
 'file_attributes': {},
 'filename': '34020010494_e5cb88e1c4_k.jpg',
 'fileref': '',
 'regions': {'0': {'region_attributes': {},
   'shape_attributes': {'all_points_x': [1020,
     1000,
     994,
     1003,
     1023,
     1050,
     1089,
     1134,
     1190,
     1265,
     1321,
     1361,
     1403,
     1428,
     1442,
     1445,
     1441,
     1427,
     1400,
     1361,
     1316,
     1269,
     1228,
     1198,
     1207,
     1210,
     1190,
     1177,
     1172,
     1174,
     1170,
     1153,
     1127,
     1104,
     1061,
     1032,
     1020],
    'all_points_y': [963,
     899,
     841,
     787,
     738,
     700,
     663,
     638,
     621,
     619,
     643,
     672,
     720,
     765,
     800,
     860,
     896,
     942,
     990,
     1035,
     1079,
     1112,
     1129,
     1134,
     1144,
     1153,
     1166,
     1166,
     1150,
     1136,
     1129,
     1122,
     1112,
     1084,
     1037,
     989,
     963],
    'name': 'polygon'}}},
 'size': 1115004}
注释是一个 JSON 文件,其中每个键表示图像的所有注释。将气球数据集转换成coco格式的代码如下。
import os.path as osp

import mmcv

from mmengine.fileio import dump, load
from mmengine.utils import track_iter_progress


def convert_balloon_to_coco(ann_file, out_file, image_prefix):
    data_infos = load(ann_file)

    annotations = []
    images = []
    obj_count = 0
    for idx, v in enumerate(track_iter_progress(data_infos.values())):
        filename = v['filename']
        img_path = osp.join(image_prefix, filename)
        height, width = mmcv.imread(img_path).shape[:2]

        images.append(
            dict(id=idx, file_name=filename, height=height, width=width))

        for _, obj in v['regions'].items():
            assert not obj['region_attributes']
            obj = obj['shape_attributes']
            px = obj['all_points_x']
            py = obj['all_points_y']
            poly = [(x + 0.5, y + 0.5) for x, y in zip(px, py)]
            poly = [p for x in poly for p in x]

            x_min, y_min, x_max, y_max = (min(px), min(py), max(px), max(py))

            data_anno = dict(
                image_id=idx,
                id=obj_count,
                category_id=0,
                bbox=[x_min, y_min, x_max - x_min, y_max - y_min],
                area=(x_max - x_min) * (y_max - y_min),
                segmentation=[poly],
                iscrowd=0)
            annotations.append(data_anno)
            obj_count += 1

    coco_format_json = dict(
        images=images,
        annotations=annotations,
        categories=[{
            'id': 0,
            'name': 'balloon'
        }])
    dump(coco_format_json, out_file)


if __name__ == '__main__':
    convert_balloon_to_coco(ann_file='data/balloon/train/via_region_data.json',
                            out_file='data/balloon/train/annotation_coco.json',
                            image_prefix='data/balloon/train')
    convert_balloon_to_coco(ann_file='data/balloon/val/via_region_data.json',
                            out_file='data/balloon/val/annotation_coco.json',
                            image_prefix='data/balloon/val')
CocoDataset使用上面的功能,用户可以成功的将标注文件转换成json格式,然后我们就可以使用CocoMetric.
第二步是准备一个配置,这样数据集就可以成功加载。假设我们想要使用带有FPN的Mask R-CNN,在气球数据集上训练检测器的配置如下所示。
假设配置位于configs/balloon/目录下,命名为mask_rcnn_r50_caffe_fpn_mstrain-poly_1x_balloon.py,配置如下所示。
# The new config inherits a base config to highlight the necessary modification
#1、新配置继承了一个基本配置,以突出显示必要的修改
_base_ = 'mask_rcnn/mask_rcnn_r50_caffe_fpn_mstrain-poly_1x_coco.py'

# We also need to change the num_classes in head to match the dataset's annotation
#2、我们还需要更改head中的num_classes,以匹配数据集的注释
model = dict(
    roi_head=dict(
        bbox_head=dict(num_classes=1),
        mask_head=dict(num_classes=1)))

# Modify dataset related settings
#3、修改数据集相关设置
dataset_type = 'COCODataset'
classes = ('balloon',) #修改为自己数据集的名称
data = dict(
    train=dict(
        img_prefix='balloon/train/',
        classes=classes,
        ann_file='balloon/train/annotation_coco.json'),
    val=dict(
        img_prefix='balloon/val/',
        classes=classes,
        ann_file='balloon/val/annotation_coco.json'),
    test=dict(
        img_prefix='balloon/val/',
        classes=classes,
        ann_file='balloon/val/annotation_coco.json'))

# We can use the pre-trained Mask RCNN model to obtain higher performance
#4、我们可以使用预训练的Mask RCNN模型来获得更高的性能
load_from = 'checkpoints/mask_rcnn_r50_caffe_fpn_mstrain-poly_3x_coco_bbox_mAP-0.408__segm_mAP-0.37_20200504_163245-42aa3d00.pth'


# The new config inherits a base config to highlight the necessary modification
_base_ = '../mask_rcnn/mask-rcnn_r50-caffe_fpn_ms-poly-1x_coco.py'

# We also need to change the num_classes in head to match the dataset's annotation
model = dict(
    roi_head=dict(
        bbox_head=dict(num_classes=1), mask_head=dict(num_classes=1)))

# Modify dataset related settings
data_root = 'data/balloon/'
metainfo = {
    'classes': ('balloon', ),#单个类别后面要多加一个逗号
    'palette': [
        (220, 20, 60),
    ]
}
train_dataloader = dict(
    batch_size=1,
    dataset=dict(
        data_root=data_root,
        metainfo=metainfo,
        ann_file='train/annotation_coco.json',
        data_prefix=dict(img='train/')))
val_dataloader = dict(
    dataset=dict(
        data_root=data_root,
        metainfo=metainfo,
        ann_file='val/annotation_coco.json',
        data_prefix=dict(img='val/')))
test_dataloader = val_dataloader

# Modify metric related settings
val_evaluator = dict(ann_file=data_root + 'val/annotation_coco.json')
test_evaluator = val_evaluator

# We can use the pre-trained Mask RCNN model to obtain higher performance
load_from = 'https://download.openmmlab.com/mmdetection/v2.0/mask_rcnn/mask_rcnn_r50_caffe_fpn_mstrain-poly_3x_coco/mask_rcnn_r50_caffe_fpn_mstrain-poly_3x_coco_bbox_mAP-0.408__segm_mAP-0.37_20200504_163245-42aa3d00.pth'
要用新的配置训练模型,您可以简单地运行
python tools/train.py configs/balloon/mask_rcnn_r50_caffe_fpn_mstrain-poly_1x_balloon.py
python tools/train.py configs/balloon/mask-rcnn_r50-caffe_fpn_ms-poly-1x_balloon.py
python tools/test.py configs/balloon/mask-rcnn_r50-caffe_fpn_ms-poly-1x_balloon.py work_dirs/mask-rcnn_r50-caffe_fpn_ms-poly-1x_balloon/epoch_12.pth
在本笔记中,您将了解如何在标准数据集下训练、测试和推理您自己的自定义模型。我们使用 cityscapes 数据集训练一个自定义的 Cascade Mask R-CNN R50 模型作为示例来演示整个过程,它使用AugFPN替换默认FPN为颈部,并添加Rotate或TranslateX作为训练时自动增强。
基本步骤如下:
准备标准数据集
准备您自己的定制模型
准备配置
在标准数据集上训练、测试和推理模型。
在本笔记中,我们以标准的 cityscapes 数据集为例。
建议将数据集根符号链接到$MMDETECTION/data. 如果您的文件夹结构不同,您可能需要更改配置文件中的相应路径。
mmdetection
├── mmdet
├── tools
├── configs
├── data
│   ├── coco
│   │   ├── annotations
│   │   ├── train2017
│   │   ├── val2017
│   │   ├── test2017
│   ├── cityscapes
│   │   ├── annotations
│   │   ├── leftImg8bit
│   │   │   ├── train
│   │   │   ├── val
│   │   ├── gtFine
│   │   │   ├── train
│   │   │   ├── val
│   ├── VOCdevkit
│   │   ├── VOC2007
│   │   ├── VOC2012
或者您可以通过以下方式设置数据集根
export MMDET_DATASETS=$data_root
我们将数据集根目录替换为$MMDET_DATASETS,这样您就不用修改配置文件中对应的路径了。
cityscapes 注释必须使用以下方法转换为 coco 格式tools/dataset_converters/cityscapes.py:
pip install cityscapesscripts
python tools/dataset_converters/cityscapes.py ./data/cityscapes --nproc 8 --out-dir ./data/cityscapes/annotations
目前配置文件cityscapes使用COCO预训练权重进行初始化。如果网络不可用或速度较慢,您可以提前下载预训练模型,否则会导致训练开始时出错。
假设我们想实现一个名为AugFPN的新颈部,用现有检测器Cascade Mask R-CNN R50下的默认FPN替换。下面实现了AugFPN under MMDetection。
首先创建一个新文件mmdet/models/necks/augfpn.py。
from ..builder import NECKS

@NECKS.register_module()
class AugFPN(nn.Module):

    def __init__(self,
                in_channels,
                out_channels,
                num_outs,
                start_level=0,
                end_level=-1,
                add_extra_convs=False):
        pass

    def forward(self, inputs):
        # implementation is ignored
        pass
您可以将以下行添加到mmdet/models/necks/init.py,
from .augfpn import AugFPN
或者添加以下到配置文件,避免修改原始代码
custom_imports = dict(
    imports=['mmdet.models.necks.augfpn'],
    allow_failed_imports=False)
neck=dict(
    type='AugFPN',
    in_channels=[256, 512, 1024, 2048],
    out_channels=256,
    num_outs=5)
关于定制你自己的模型(例如实现一个新的主干、头部、损失等)和运行时训练设置(例如定义一个新的优化器、使用梯度剪辑、定制训练计划和钩子等)的更多详细用法,请参考指南分别自定义模型和自定义运行时设置。
第三步是为您自己的训练设置准备配置。假设我们想对现有的Cascade Mask R-CNN R50添加AugFPN和Rotate/或Translate扩充来训练cityscapes数据集,并假设配置在目录下configs/cityscapes/并命名为cascade-mask-rcnn_r50_augfpn_autoaug-10e_cityscapes.py,配置如下。
# The new config inherits the base configs to highlight the necessary modification
#新配置继承了基本配置,以突出显示必要的修改。模型的具体设置继承了cascade_mask_rcnn_r50_fpn.py,数据的基本设置继承了cityscapes_instance.py,运行的一些设置继承了default_runtime.py
_base_ = [
    '../_base_/models/cascade_mask_rcnn_r50_fpn.py',
    '../_base_/datasets/cityscapes_instance.py', '../_base_/default_runtime.py'
]

model = dict(
    # set None to avoid loading ImageNet pretrained backbone,
    #设置None以避免加载ImageNet预训练骨干
    # instead here we set `load_from` to load from COCO pretrained detectors.
    #这里我们将' load_from '设置为从COCO预训练的检测器加载。
    backbone=dict(init_cfg=None),
    # replace neck from defaultly `FPN` to our new implemented module `AugFPN`
    neck=dict(
        type='AugFPN',#这里修改为我们的neck
        in_channels=[256, 512, 1024, 2048],
        out_channels=256,
        num_outs=5),
    # We also need to change the num_classes in head from 80 to 8, to match the
    # cityscapes dataset's annotation. This modification involves `bbox_head` and `mask_head`.
    #我们还需要将head中的num_classes从80更改为8,以匹配cityscape数据集的注释。这个修改涉及到' bbox_head '和' mask_head '
    roi_head=dict(
        bbox_head=[
            dict(
                type='Shared2FCBBoxHead',
                in_channels=256,
                fc_out_channels=1024,
                roi_feat_size=7,
                # change the number of classes from defaultly COCO to cityscapes
                num_classes=8,
                bbox_coder=dict(
                    type='DeltaXYWHBBoxCoder',
                    target_means=[0., 0., 0., 0.],
                    target_stds=[0.1, 0.1, 0.2, 0.2]),
                reg_class_agnostic=True,
                loss_cls=dict(
                    type='CrossEntropyLoss',
                    use_sigmoid=False,
                    loss_weight=1.0),
                loss_bbox=dict(type='SmoothL1Loss', beta=1.0,
                               loss_weight=1.0)),
            dict(
                type='Shared2FCBBoxHead',
                in_channels=256,
                fc_out_channels=1024,
                roi_feat_size=7,
                # change the number of classes from defaultly COCO to cityscapes
                num_classes=8,
                bbox_coder=dict(
                    type='DeltaXYWHBBoxCoder',
                    target_means=[0., 0., 0., 0.],
                    target_stds=[0.05, 0.05, 0.1, 0.1]),
                reg_class_agnostic=True,
                loss_cls=dict(
                    type='CrossEntropyLoss',
                    use_sigmoid=False,
                    loss_weight=1.0),
                loss_bbox=dict(type='SmoothL1Loss', beta=1.0,
                               loss_weight=1.0)),
            dict(
                type='Shared2FCBBoxHead',
                in_channels=256,
                fc_out_channels=1024,
                roi_feat_size=7,
                # change the number of classes from defaultly COCO to cityscapes
                num_classes=8,
                bbox_coder=dict(
                    type='DeltaXYWHBBoxCoder',
                    target_means=[0., 0., 0., 0.],
                    target_stds=[0.033, 0.033, 0.067, 0.067]),
                reg_class_agnostic=True,
                loss_cls=dict(
                    type='CrossEntropyLoss',
                    use_sigmoid=False,
                    loss_weight=1.0),
                loss_bbox=dict(type='SmoothL1Loss', beta=1.0, loss_weight=1.0))
        ],
        mask_head=dict(
            type='FCNMaskHead',
            num_convs=4,
            in_channels=256,
            conv_out_channels=256,
            # change the number of classes from defaultly COCO to cityscapes
            num_classes=8,
            loss_mask=dict(
                type='CrossEntropyLoss', use_mask=True, loss_weight=1.0))))

# over-write `train_pipeline` for new added `AutoAugment` training setting
# 覆盖' train_pipeline '为新添加的' AutoAugment '培训设置
img_norm_cfg = dict(
    mean=[123.675, 116.28, 103.53], std=[58.395, 57.12, 57.375], to_rgb=True)
train_pipeline = [
    dict(type='LoadImageFromFile'),
    dict(type='LoadAnnotations', with_bbox=True, with_mask=True),
    dict(
        type='AutoAugment',
        policies=[
            [dict(
                 type='Rotate',#新增加了旋转的增强操作
                 level=5,
                 img_fill_val=(124, 116, 104),
                 prob=0.5,
                 scale=1)
            ],
            [dict(type='Rotate', level=7, img_fill_val=(124, 116, 104)),
             dict(
                 type='Translate',#新增加了变换的增强操作
                 level=5,
                 prob=0.5,
                 img_fill_val=(124, 116, 104))
            ],
        ]),
    dict(
        type='Resize', img_scale=[(2048, 800), (2048, 1024)], keep_ratio=True),
    dict(type='RandomFlip', flip_ratio=0.5),
    dict(type='Normalize', **img_norm_cfg),
    dict(type='Pad', size_divisor=32),
    dict(type='DefaultFormatBundle'),
    dict(type='Collect', keys=['img', 'gt_bboxes', 'gt_labels', 'gt_masks']),
]

# set batch_size per gpu, and set new training pipeline
#设置每个gpu的batch_size,并设置新的训练管道
data = dict(
    samples_per_gpu=1,
    workers_per_gpu=3,
    # over-write `pipeline` with new training pipeline setting
    train=dict(dataset=dict(pipeline=train_pipeline)))

# Set optimizer,设置优化器
optimizer = dict(type='SGD', lr=0.01, momentum=0.9, weight_decay=0.0001)
optimizer_config = dict(grad_clip=None)
# Set customized learning policy,设置自定义学习策略
lr_config = dict(
    policy='step',
    warmup='linear',
    warmup_iters=500,
    warmup_ratio=0.001,
    step=[8])
runner = dict(type='EpochBasedRunner', max_epochs=10)

# We can use the COCO pretrained Cascade Mask R-CNN R50 model for more stable performance initialization,我们可以使用COCO预训练的级联掩模R-CNN R50模型来实现更稳定的性能初始化(迁移学习)
load_from = 'https://download.openmmlab.com/mmdetection/v2.0/cascade_rcnn/cascade_mask_rcnn_r50_fpn_1x_coco/cascade_mask_rcnn_r50_fpn_1x_coco_20200203-9d4dcb24.pth'
# The new config inherits the base configs to highlight the necessary modification
_base_ = [
    '../_base_/models/cascade-mask-rcnn_r50_fpn.py',
    '../_base_/datasets/cityscapes_instance.py', '../_base_/default_runtime.py'
]

model = dict(
    # set None to avoid loading ImageNet pre-trained backbone,
    # instead here we set `load_from` to load from COCO pre-trained detectors.
    backbone=dict(init_cfg=None),
    # replace neck from defaultly `FPN` to our new implemented module `AugFPN`
    neck=dict(
        type='AugFPN',
        in_channels=[256, 512, 1024, 2048],
        out_channels=256,
        num_outs=5),
    # We also need to change the num_classes in head from 80 to 8, to match the
    # cityscapes dataset's annotation. This modification involves `bbox_head` and `mask_head`.
    roi_head=dict(
        bbox_head=[
            dict(
                type='Shared2FCBBoxHead',
                in_channels=256,
                fc_out_channels=1024,
                roi_feat_size=7,
                # change the number of classes from defaultly COCO to cityscapes
                num_classes=8,
                bbox_coder=dict(
                    type='DeltaXYWHBBoxCoder',
                    target_means=[0., 0., 0., 0.],
                    target_stds=[0.1, 0.1, 0.2, 0.2]),
                reg_class_agnostic=True,
                loss_cls=dict(
                    type='CrossEntropyLoss',
                    use_sigmoid=False,
                    loss_weight=1.0),
                loss_bbox=dict(type='SmoothL1Loss', beta=1.0,
                               loss_weight=1.0)),
            dict(
                type='Shared2FCBBoxHead',
                in_channels=256,
                fc_out_channels=1024,
                roi_feat_size=7,
                # change the number of classes from defaultly COCO to cityscapes
                num_classes=8,
                bbox_coder=dict(
                    type='DeltaXYWHBBoxCoder',
                    target_means=[0., 0., 0., 0.],
                    target_stds=[0.05, 0.05, 0.1, 0.1]),
                reg_class_agnostic=True,
                loss_cls=dict(
                    type='CrossEntropyLoss',
                    use_sigmoid=False,
                    loss_weight=1.0),
                loss_bbox=dict(type='SmoothL1Loss', beta=1.0,
                               loss_weight=1.0)),
            dict(
                type='Shared2FCBBoxHead',
                in_channels=256,
                fc_out_channels=1024,
                roi_feat_size=7,
                # change the number of classes from defaultly COCO to cityscapes
                num_classes=8,
                bbox_coder=dict(
                    type='DeltaXYWHBBoxCoder',
                    target_means=[0., 0., 0., 0.],
                    target_stds=[0.033, 0.033, 0.067, 0.067]),
                reg_class_agnostic=True,
                loss_cls=dict(
                    type='CrossEntropyLoss',
                    use_sigmoid=False,
                    loss_weight=1.0),
                loss_bbox=dict(type='SmoothL1Loss', beta=1.0, loss_weight=1.0))
        ],
        mask_head=dict(
            type='FCNMaskHead',
            num_convs=4,
            in_channels=256,
            conv_out_channels=256,
            # change the number of classes from default COCO to cityscapes
            num_classes=8,
            loss_mask=dict(
                type='CrossEntropyLoss', use_mask=True, loss_weight=1.0))))

# over-write `train_pipeline` for new added `AutoAugment` training setting
train_pipeline = [
    dict(type='LoadImageFromFile'),
    dict(type='LoadAnnotations', with_bbox=True, with_mask=True),
    dict(
        type='AutoAugment',
        policies=[
            [dict(
                 type='Rotate',
                 level=5,
                 img_fill_val=(124, 116, 104),
                 prob=0.5,
                 scale=1)
            ],
            [dict(type='Rotate', level=7, img_fill_val=(124, 116, 104)),
             dict(
                 type='TranslateX',
                 level=5,
                 prob=0.5,
                 img_fill_val=(124, 116, 104))
            ],
        ]),
    dict(
        type='RandomResize',
        scale=[(2048, 800), (2048, 1024)],
        keep_ratio=True),
    dict(type='RandomFlip', prob=0.5),
    dict(type='PackDetInputs'),
]

# set batch_size per gpu, and set new training pipeline
train_dataloader = dict(
    batch_size=1,
    num_workers=3,
    # over-write `pipeline` with new training pipeline setting
    dataset=dict(pipeline=train_pipeline))

# Set optimizer
optim_wrapper = dict(
    type='OptimWrapper',
    optimizer=dict(type='SGD', lr=0.01, momentum=0.9, weight_decay=0.0001))

# Set customized learning policy
param_scheduler = [
    dict(
        type='LinearLR', start_factor=0.001, by_epoch=False, begin=0, end=500),
    dict(
        type='MultiStepLR',
        begin=0,
        end=10,
        by_epoch=True,
        milestones=[8],
        gamma=0.1)
]

# train, val, test loop config
train_cfg = dict(max_epochs=10, val_interval=1)

# We can use the COCO pre-trained Cascade Mask R-CNN R50 model for a more stable performance initialization
load_from = 'https://download.openmmlab.com/mmdetection/v2.0/cascade_rcnn/cascade_mask_rcnn_r50_fpn_1x_coco/cascade_mask_rcnn_r50_fpn_1x_coco_20200203-9d4dcb24.pth'
要使用新配置训练模型,您只需运行
python tools/train.py configs/cityscapes/cascade-mask-rcnn_r50_augfpn_autoaug-10e_cityscapes.py
要测试经过训练的模型,您可以简单地运行
python tools/test.py configs/cityscapes/cascade-mask-rcnn_r50_augfpn_autoaug-10e_cityscapes.py work_dirs/cascade-mask-rcnn_r50_augfpn_autoaug-10e_cityscapes/epoch_10.pth
在 COCO 数据集上预训练的检测器可以作为其他数据集(例如 CityScapes 和 KITTI 数据集)的良好预训练模型。本教程指导用户将Model Zoo中提供的模型用于其他数据集以获得更好的性能。
以Cityscapes Dataset上的finetuning过程为例,用户需要修改config中的五个部分。
为了减轻编写整个配置的负担并减少错误,MMDetection V2.0 支持从多个现有配置中继承配置。为了微调 Mask RCNN 模型,需要继承新的配置 base/models/mask-rcnn_r50_fpn.py来构建模型的基本结构。要使用 Cityscapes 数据集,新配置也可以简单地继承_base_/datasets/cityscapes_instance.py. 对于记录器设置等运行时设置,新配置需要继承_base_/default_runtime.py. 对于训练计划,新的配置可以继承_base_/schedules/schedule_1x.py。这些配置都在configs目录中,用户也可以选择全部写入而不是继承。
_base_ = [
    '../_base_/models/mask-rcnn_r50_fpn.py',
    '../_base_/datasets/cityscapes_instance.py', '../_base_/default_runtime.py',
    '../_base_/schedules/schedule_1x.py'
]
然后新的配置需要根据新数据集的类别数修改头部。仅更改num_classes在roi_head,除最终预测头外,预训练模型的权重大部分被重用。
model = dict(
    roi_head=dict(
        bbox_head=dict(
            type='Shared2FCBBoxHead',
            in_channels=256,
            fc_out_channels=1024,
            roi_feat_size=7,
            num_classes=8,
            bbox_coder=dict(
                type='DeltaXYWHBBoxCoder',
                target_means=[0., 0., 0., 0.],
                target_stds=[0.1, 0.1, 0.2, 0.2]),
            reg_class_agnostic=False,
            loss_cls=dict(
                type='CrossEntropyLoss', use_sigmoid=False, loss_weight=1.0),
            loss_bbox=dict(type='SmoothL1Loss', beta=1.0, loss_weight=1.0)),
        mask_head=dict(
            type='FCNMaskHead',
            num_convs=4,
            in_channels=256,
            conv_out_channels=256,
            num_classes=8,#主要修改类别数
            loss_mask=dict(
                type='CrossEntropyLoss', use_mask=True, loss_weight=1.0))))
用户可能还需要准备数据集并编写有关数据集的配置,请参阅自定义数据集以获取更多详细信息。MMDetection V3.0 已经支持 VOC、WIDERFACE、COCO、LIVS、OpenImages、DeepFashion 和 Cityscapes 数据集。
微调超参数与默认计划不同。它通常需要更小的学习率和更少的训练周期.
# optimizer
# lr is set for a batch size of 8
optim_wrapper = dict(optimizer=dict(lr=0.01))

# learning rate
param_scheduler = [
    dict(
        type='LinearLR', start_factor=0.001, by_epoch=False, begin=0, end=500),
    dict(
        type='MultiStepLR',
        begin=0,
        end=8,
        by_epoch=True,
        milestones=[7],
        gamma=0.1)
]

# max_epochs
train_cfg = dict(max_epochs=8)

# log config
default_hooks = dict(logger=dict(interval=100)),
为了使用预训练模型,新配置在load_from. 用户可能需要在训练前下载模型权重,以避免训练期间的下载时间。
load_from = 'https://download.openmmlab.com/mmdetection/v2.0/mask_rcnn/mask_rcnn_r50_caffe_fpn_mstrain-poly_3x_coco/mask_rcnn_r50_caffe_fpn_mstrain-poly_3x_coco_bbox_mAP-0.408__segm_mAP-0.37_20200504_163245-42aa3d00.pth' # noqa
以下部分介绍如何在 COCO 测试开发集上生成全景分割模型的预测结果,并将预测结果提交给COCO 评估服务器。
下载COCO test dataset images , testing image info , and panoptic train/val annotations,然后解压,把’test2017’放到data/coco/,把json文件和标注文件放到data/coco/annotations/.
# suppose data/coco/ does not exist
mkdir -pv data/coco/

# download test2017
wget -P data/coco/ http://images.cocodataset.org/zips/test2017.zip
wget -P data/coco/ http://images.cocodataset.org/annotations/image_info_test2017.zip
wget -P data/coco/ http://images.cocodataset.org/annotations/panoptic_annotations_trainval2017.zip

# unzip them
unzip data/coco/test2017.zip -d data/coco/
unzip data/coco/image_info_test2017.zip -d data/coco/
unzip data/coco/panoptic_annotations_trainval2017.zip -d data/coco/

# remove zip files (optional)
rm -rf data/coco/test2017.zip data/coco/image_info_test2017.zip data/coco/panoptic_annotations_trainval2017.zip
运行以下代码以更新测试图像信息中的类别信息。由于isthing’image_info_test-dev2017.json’的类别信息中缺少该属性,我们需要使用’panoptic_val2017.json’中的类别信息更新它。
python tools/misc/gen_coco_panoptic_test_info.py data/coco/annotations
完成以上准备后,你的目录结构data应该是这样的:
data
`-- coco
    |-- annotations
    |   |-- image_info_test-dev2017.json
    |   |-- image_info_test2017.json
    |   |-- panoptic_image_info_test-dev2017.json
    |   |-- panoptic_train2017.json
    |   |-- panoptic_train2017.zip
    |   |-- panoptic_val2017.json
    |   `-- panoptic_val2017.zip
    `-- test2017
对 coco test-dev 的推断
要对 coco test-dev 进行推理,我们应该首先更新test_datalodert 和设置test_evaluator。有两种方法可以做到这一点: 1. 在配置文件中更新它们;2. 在t命令t行中更新它们。
在配置文件中更新它们
相关设置在文末提供configs/base/datasets/coco_panoptic.py,如下。
test_dataloader = dict(
    batch_size=1,
    num_workers=1,
    persistent_workers=True,
    drop_last=False,
    sampler=dict(type='DefaultSampler', shuffle=False),
    dataset=dict(
        type=dataset_type,
        data_root=data_root,
        ann_file='annotations/panoptic_image_info_test-dev2017.json',
        data_prefix=dict(img='test2017/'),
        test_mode=True,
        pipeline=test_pipeline))
test_evaluator = dict(
    type='CocoPanopticMetric',
    format_only=True,
    ann_file=data_root + 'annotations/panoptic_image_info_test-dev2017.json',
    outfile_prefix='./work_dirs/coco_panoptic/test')
以下任何一种方式都可用于更新 coco test-dev 集上的推理设置。
情况一:直接取消注释中的设置configs/base/datasets/coco_panoptic.py。
情况 2:将以下设置复制到您现在使用的配置文件中。
test_dataloader = dict(
    dataset=dict(
        ann_file='annotations/panoptic_image_info_test-dev2017.json',
        data_prefix=dict(img='test2017/', _delete_=True)))
test_evaluator = dict(
    format_only=True,
    ann_file=data_root + 'annotations/panoptic_image_info_test-dev2017.json',
    outfile_prefix='./work_dirs/coco_panoptic/test')
然后通过以下命令推断 coco test-dev et。
python tools/test.py \
    ${CONFIG_FILE} \
    ${CHECKPOINT_FILE}
在命令行中更新它们
在coco test-dev上更新相关设置和推断的命令如下。
# test with single gpu
CUDA_VISIBLE_DEVICES=0 python tools/test.py \
    ${CONFIG_FILE} \
    ${CHECKPOINT_FILE} \
    --cfg-options \
    test_dataloader.dataset.ann_file=annotations/panoptic_image_info_test-dev2017.json \
    test_dataloader.dataset.data_prefix.img=test2017 \
    test_dataloader.dataset.data_prefix._delete_=True \
    test_evaluator.format_only=True \
    test_evaluator.ann_file=data/coco/annotations/panoptic_image_info_test-dev2017.json \
    test_evaluator.outfile_prefix=${WORK_DIR}/results

# test with four gpus
CUDA_VISIBLE_DEVICES=0,1,3,4 bash tools/dist_test.sh \
    ${CONFIG_FILE} \
    ${CHECKPOINT_FILE} \
    8 \  # eights gpus
    --cfg-options \
    test_dataloader.dataset.ann_file=annotations/panoptic_image_info_test-dev2017.json \
    test_dataloader.dataset.data_prefix.img=test2017 \
    test_dataloader.dataset.data_prefix._delete_=True \
    test_evaluator.format_only=True \
    test_evaluator.ann_file=data/coco/annotations/panoptic_image_info_test-dev2017.json \
    test_evaluator.outfile_prefix=${WORK_DIR}/results

# test with slurm
GPUS=8 tools/slurm_test.sh \
    ${Partition} \
    ${JOB_NAME} \
    ${CONFIG_FILE} \
    ${CHECKPOINT_FILE} \
    --cfg-options \
    test_dataloader.dataset.ann_file=annotations/panoptic_image_info_test-dev2017.json \
    test_dataloader.dataset.data_prefix.img=test2017 \
    test_dataloader.dataset.data_prefix._delete_=True \
    test_evaluator.format_only=True \
    test_evaluator.ann_file=data/coco/annotations/panoptic_image_info_test-dev2017.json \
    test_evaluator.outfile_prefix=${WORK_DIR}/results
例子
假设我们test2017使用带有 ResNet-50 主干的预训练 MaskFormer 进行推理。
# test with single gpu
CUDA_VISIBLE_DEVICES=0 python tools/test.py \
    configs/maskformer/maskformer_r50_mstrain_16x1_75e_coco.py \
    checkpoints/maskformer_r50_mstrain_16x1_75e_coco_20220221_141956-bc2699cb.pth \
    --cfg-options \
    test_dataloader.dataset.ann_file=annotations/panoptic_image_info_test-dev2017.json \
    test_dataloader.dataset.data_prefix.img=test2017 \
    test_dataloader.dataset.data_prefix._delete_=True \
    test_evaluator.format_only=True \
    test_evaluator.ann_file=data/coco/annotations/panoptic_image_info_test-dev2017.json \
    test_evaluator.outfile_prefix=work_dirs/maskformer/results
重命名文件和压缩结果
推理后,全景分割结果(一个json文件和一个存放masks的目录)将在WORK_DIR. 我们应该按照COCO 网站上描述的命名规范来重命名它们。最后,我们需要将json和masks所在的目录压缩成一个zip文件,并按照命名约定重命名zip文件。请注意,zip 文件应直接包含上述两个文件。
重命名文件和压缩结果的命令:
# In WORK_DIR, we have panoptic segmentation results: 'panoptic' and 'results.panoptic.json'.
cd ${WORK_DIR}

# replace '[algorithm_name]' with the name of algorithm you used.
mv ./panoptic ./panoptic_test-dev2017_[algorithm_name]_results
mv ./results.panoptic.json ./panoptic_test-dev2017_[algorithm_name]_results.json
zip panoptic_test-dev2017_[algorithm_name]_results.zip -ur panoptic_test-dev2017_[algorithm_name]_results panoptic_test-dev2017_[algorithm_name]_results.json
在训练过程中,适当的初始化策略有利于加快训练速度或获得更高的性能。MMCV提供了一些常用的初始化模块的方法,例如nn.Conv2d. MMdetection中的模型初始化主要使用init_cfg. 用户可以通过以下两个步骤初始化模型:
Define init_cfg for a model or its components in model_cfg, but init_cfg of children components have higher priority and will override init_cfg of parents modules.
像往常一样构建模型,但model.init_weights()显式调用方法,模型参数将被初始化为配置。
MMdetection 中初始化的高级工作流程是:
model_cfg(init_cfg) -> build_from_cfg -> model -> init_weight() -> initialize(self, self.init_cfg) -> children’s init_weight()
它是 dict 或 list[dict],包含以下键和值:
type(str),在 INTIALIZERS中包含初始值设定项名称,后跟初始值设定项的参数。
layer(str 或 list[str]),包含 Pytorch 或 MMCV 中的基本层的名称,其中包含将被初始化的可学习参数,例如’Conv2d’, ‘DeformConv2d’.
override(dict or list[dict]),包含不继承自BaseModule且初始化配置与’layer’key中其他层不同的子模块。中定义的初始化type器将对所有层中定义的层起作用layer,因此如果子模块不是派生类,BaseModule但可以像层中相同的方式初始化layer,则不需要使用override。override包含:
type接着是初始化器的参数;
name指示将被初始化的子模块
从mmcv.runner.BaseModule or mmdet.models继承一个新模型,这里我们展示了一个 FooModel 的例子。
import torch.nn as nn
from mmcv.runner import BaseModule

class FooModel(BaseModule)
	def __init__(self,
                 arg1,
                 arg2,
                 init_cfg=None):
    	super(FooModel, self).__init__(init_cfg)
		...
Initialize model by using init_cfg directly in code
import torch.nn as nn
from mmcv.runner import BaseModule

class FooModel(BaseModule)
	def __init__(self,
                 arg1,
                 arg2,
                 init_cfg=None):
    	super(FooModel, self).__init__(init_cfg)
		...
init_cfg直接在代码中使用初始化模型
import torch.nn as nn
from mmcv.runner import BaseModule
# or directly inherit mmdet models

class FooModel(BaseModule)
	def __init__(self,
                arg1,
                arg2,
                init_cfg=XXX):
		super(FooModel, self).__init__(init_cfg)
init_cfg直接使用 inmmcv.Sequential或mmcv.ModuleList代码初始化模型
from mmcv.runner import BaseModulei, ModuleList

class FooModel(BaseModule)
	def __init__(self,
            	arg1,
            	arg2,
            	init_cfg=None):
		super(FooModel, self).__init__(init_cfg)
    	...
    	self.conv1 = ModuleList(init_cfg=XXX)
init_cfg在配置文件中使用初始化模型
model = dict(
	...
	model = dict(
    	type='FooModel',
    	arg1=XXX,
    	arg2=XXX,
    	init_cfg=XXX),
        ...
Initialize model by layer key
init_cfg = dict(type='Constant', layer=['Conv1d', 'Conv2d', 'Linear'], val=1)
# initialize whole module with same configuration
定义layer具有不同配置的初始化层的键。
init_cfg = [dict(type='Constant', layer='Conv1d', val=1),
            dict(type='Constant', layer='Conv2d', val=2),
            dict(type='Constant', layer='Linear', val=3)]
# nn.Conv1d will be initialized with dict(type='Constant', val=1)
# nn.Conv2d will be initialized with dict(type='Constant', val=2)
# nn.Linear will be initialized with dict(type='Constant', val=3)
Initialize model by override key
# layers:
# self.feat = nn.Conv1d(3, 1, 3)
# self.reg = nn.Conv2d(3, 3, 3)
# self.cls = nn.Linear(1,2)

init_cfg = dict(type='Constant',
                layer=['Conv1d','Conv2d'], val=1, bias=2,
                override=dict(type='Constant', name='reg', val=3, bias=4))
# self.feat and self.cls will be initialized with 	dict(type='Constant', val=1, bias=2)
# The module called 'reg' will be initialized with dict(type='Constant', val=3, bias=4)
如果layerinit_cfg中为None,则只初始化override中同名的子模块,override中的type等参数可以省略。
# layers:
# self.feat = nn.Conv1d(3, 1, 3)
# self.reg = nn.Conv2d(3, 3, 3)
# self.cls = nn.Linear(1,2)

init_cfg = dict(type='Constant', val=1, bias=2, 	override=dict(name='reg'))

# self.feat and self.cls will be initialized by Pytorch
# The module called 'reg' will be initialized with dict(type='Constant', val=1, bias=2)
如果我们不定义layer键或override键,它不会初始化任何东西。
无效用法
# It is invalid that override don't have name key
init_cfg = dict(type='Constant', layer=['Conv1d','Conv2d'], val=1, bias=2,
            	override=dict(type='Constant', val=3, bias=4))

# It is also invalid that override has name and other args except type
init_cfg = dict(type='Constant', layer=['Conv1d','Conv2d'], val=1, bias=2,
                override=dict(name='reg', val=3, bias=4))
使用预训练模型初始化模型
init_cfg = dict(type='Pretrained',
            checkpoint='torchvision://resnet50')
区域提议网络(RPN)是Faster R-CNN中的一个子模块,它为 Faster R-CNN 第二阶段生成提议。MMDetection 中的大多数两级检测器用于生成 RPN 提案。然而,任何单级检测器都可以用作 RPN,因为它们的边界框预测也可以被视为区域提议,从而在 R-CNN 中进行细化。因此,MMDetection v3.0 支持这一点。
为了说明整个过程,这里我们举一个例子,说明如何使用anchor-free作为RPN在单阶段模型.
本教程的概要如下:
在 Faster R-CNN中用FCOSHead作RPNHead
评估提案
使用预训练的 FCOS 训练定制的 Faster R-CNN
要在 Faster R-CNN 中设置FCOSHead作为RPNHead,我们应该创建一个名为 configs/faster_rcnn/faster-rcnn_r50_fpn_fcos-rpn_1x_coco.py的新配置文件,在configs/fcos/fcos_r50-caffe_fpn_gn-head_1x_coco.py中将rpn_head 的设置替换为bbox_head的设置。此外,我们仍然使用FCOS的颈部设置,步长为[8, 16, 32, 64, 128],and update featmap_strides of bbox_roi_extractor to [8, 16, 32, 64, 128]。为了避免损失变为 NAN,我们在前 1000 次迭代而不是前 500 次迭代中应用预热,这意味着 lr 增加得更慢。配置如下:
_base_ = [
    '../_base_/models/faster-rcnn_r50_fpn.py',
    '../_base_/datasets/coco_detection.py',
    '../_base_/schedules/schedule_1x.py', '../_base_/default_runtime.py'
]

model = dict(
    # copied from configs/fcos/fcos_r50-caffe_fpn_gn-head_1x_coco.py
    neck=dict(
        start_level=1,
        add_extra_convs='on_output',  # use P5
        relu_before_extra_convs=True),
    rpn_head=dict(
        _delete_=True,  # ignore the unused old settings
        type='FCOSHead',
        num_classes=1,  # num_classes = 1 for rpn, if num_classes > 1, it will be set to 1 in TwoStageDetector automatically
        in_channels=256,
        stacked_convs=4,
        feat_channels=256,
        strides=[8, 16, 32, 64, 128],
        loss_cls=dict(
            type='FocalLoss',
            use_sigmoid=True,
            gamma=2.0,
            alpha=0.25,
            loss_weight=1.0),
        loss_bbox=dict(type='IoULoss', loss_weight=1.0),
        loss_centerness=dict(
            type='CrossEntropyLoss', use_sigmoid=True, loss_weight=1.0)),
    roi_head=dict(  # update featmap_strides due to the strides in neck
        bbox_roi_extractor=dict(featmap_strides=[8, 16, 32, 64, 128])))

# learning rate
param_scheduler = [
    dict(
        type='LinearLR', start_factor=0.001, by_epoch=False, begin=0,
        end=1000),  # Slowly increase lr, otherwise loss becomes NAN
    dict(
        type='MultiStepLR',
        begin=0,
        end=12,
        by_epoch=True,
        milestones=[8, 11],
        gamma=0.1)
]
然后,我们可以使用以下命令来训练我们的定制模型。更多训练命令请参考这里。
# training with 8 GPUS
bash tools/dist_train.sh configs/faster_rcnn/faster-rcnn_r50_fpn_fcos-rpn_1x_coco.py \
    8 \
    --work-dir ./work_dirs/faster-rcnn_r50_fpn_fcos-rpn_1x_coco
提案的质量对于检测器的性能非常重要,因此,我们还提供了一种评估提案的方法。与上面相同,创建一个名为configs/rpn/fcos-rpn_r50_fpn_1x_coco.py 的新配置文件,并将rpn_head 的设置替换为rpn_head的设置在configs/fcos/fcos_r50-caffe_fpn_gn-head_1x_coco.py
_base_ = [
    '../_base_/models/rpn_r50_fpn.py', '../_base_/datasets/coco_detection.py',
    '../_base_/schedules/schedule_1x.py', '../_base_/default_runtime.py'
]

val_evaluator = dict(metric='proposal_fast')
test_evaluator = val_evaluator

model = dict(
    # copied from configs/fcos/fcos_r50-caffe_fpn_gn-head_1x_coco.py
    neck=dict(
        start_level=1,
        add_extra_convs='on_output',  # use P5
        relu_before_extra_convs=True),
    rpn_head=dict(
        _delete_=True,  # ignore the unused old settings
        type='FCOSHead',
        num_classes=1,  # num_classes = 1 for rpn, if num_classes > 1, it will be set to 1 in RPN automatically
        in_channels=256,
        stacked_convs=4,
        feat_channels=256,
        strides=[8, 16, 32, 64, 128],
        loss_cls=dict(
            type='FocalLoss',
            use_sigmoid=True,
            gamma=2.0,
            alpha=0.25,
            loss_weight=1.0),
        loss_bbox=dict(type='IoULoss', loss_weight=1.0),
        loss_centerness=dict(
            type='CrossEntropyLoss', use_sigmoid=True, loss_weight=1.0)))
假设我们在训练后有了检查点./work_dirs/faster-rcnn_r50_fpn_fcos-rpn_1x_coco/epoch_12.pth,那么我们可以使用以下命令评估提案的质量。
# testing with 8 GPUs
bash tools/dist_test.sh \
    configs/rpn/fcos-rpn_r50_fpn_1x_coco.py \
    ./work_dirs/faster-rcnn_r50_fpn_fcos-rpn_1x_coco/epoch_12.pth \
    8
预训练不仅可以加快训练的收敛速度,还可以提高检测器的性能。因此,这里我们通过一个例子来说明如何使用预训练的FCOS作为RPN来加速训练并提高准确性。假设我们想FCOSHead在 Faster R-CNN 中用作 rpn 头并使用 fcos_r50-caffe_fpn_gn-head_1x_coco预训练名为configs/faster_rcnn/faster-rcnn_r50-caffe_fpn_fcos-rpn_1x_coco.py的配置文件的内容如下。请注意,fcos_r50-caffe_fpn_gn-head_1x_coco使用 caffe 版本 的ResNet50 ,data_preprocessor因此需要更新像素平均值和标准差。
_base_ = [
    '../_base_/models/faster-rcnn_r50_fpn.py',
    '../_base_/datasets/coco_detection.py',
    '../_base_/schedules/schedule_1x.py', '../_base_/default_runtime.py'
]

model = dict(
    data_preprocessor=dict(
        mean=[103.530, 116.280, 123.675],
        std=[1.0, 1.0, 1.0],
        bgr_to_rgb=False),
    backbone=dict(
        norm_cfg=dict(type='BN', requires_grad=False),
        style='caffe',
        init_cfg=None),  # the checkpoint in ``load_from`` contains the weights of backbone
    neck=dict(
        start_level=1,
        add_extra_convs='on_output',  # use P5
        relu_before_extra_convs=True),
    rpn_head=dict(
        _delete_=True,  # ignore the unused old settings
        type='FCOSHead',
        num_classes=1,  # num_classes = 1 for rpn, if num_classes > 1, it will be set to 1 in TwoStageDetector automatically
        in_channels=256,
        stacked_convs=4,
        feat_channels=256,
        strides=[8, 16, 32, 64, 128],
        loss_cls=dict(
            type='FocalLoss',
            use_sigmoid=True,
            gamma=2.0,
            alpha=0.25,
            loss_weight=1.0),
        loss_bbox=dict(type='IoULoss', loss_weight=1.0),
        loss_centerness=dict(
            type='CrossEntropyLoss', use_sigmoid=True, loss_weight=1.0)),
    roi_head=dict(  # update featmap_strides due to the strides in neck
        bbox_roi_extractor=dict(featmap_strides=[8, 16, 32, 64, 128])))

load_from = 'https://download.openmmlab.com/mmdetection/v2.0/fcos/fcos_r50_caffe_fpn_gn-head_1x_coco/fcos_r50_caffe_fpn_gn-head_1x_coco-821213aa.pth'
训练命令如下。
bash tools/dist_train.sh \
    configs/faster_rcnn/faster-rcnn_r50-caffe_fpn_fcos-rpn_1x_coco.py \
    8 \
    --work-dir ./work_dirs/faster-rcnn_r50-caffe_fpn_fcos-rpn_1x_coco
半监督对象检测使用标记数据和未标记数据进行训练。它不仅减轻了训练高性能目标检测器的标注负担,而且通过使用大量未标记数据进一步改进了目标检测器。
训练半监督目标检测器的典型过程如下:
准备和拆分数据集
配置多分支流水线
配置半监督数据加载器
配置半监督模型
配置 MeanTeacherHook
配置 TeacherStudentValLoop
我们提供数据集下载脚本,默认下载coco2017数据集并自动解压。
python tools/misc/download_dataset.py
解压后的数据集目录结构如下:
mmdetection
├── data
│   ├── coco
│   │   ├── annotations
│   │   │   ├── image_info_unlabeled2017.json
│   │   │   ├── instances_train2017.json
│   │   │   ├── instances_val2017.json
│   │   ├── test2017
│   │   ├── train2017
│   │   ├── unlabeled2017
│   │   ├── val2017
coco2017数据集上的半监督目标检测有两种常见的实验设置:
train2017按照固定比例(1%、2%、5%和10% )拆分为标记数据集,其余train2017为未标记数据集。由于train2017标记数据集的不同拆分会导致半监督检测器的准确性出现显着波动,因此在实践中使用五折交叉验证来评估算法。我们提供数据集分割脚本:
python tools/misc/split_coco.py
默认情况下,脚本会train2017按照标注数据比例1%、2%、5%和10%进行拆分,每次拆分随机重复5次进行交叉验证。生成的半监督标注文件名格式如下:
标注数据集名称格式:instances_train2017.{fold}@{percent}.json
未标注数据集名称格式:instances_train2017.{fold}@{percent}-unlabeled.json
这里,fold用于交叉验证,percent表示标记数据的比例。分割后的数据集目录结构如下:
mmdetection
├── data
│ ├── coco
│ │ ├── annotations
│ │ │ ├── image_info_unlabeled2017.json
│ │ │ ├── instances_train2017.json
│ │ │ ├── instances_val2017.json
│ │ ├── semi_anns
│ │ │ ├── instances_train2017.1@1.json
│ │ │ ├── instances_train2017.1@1-unlabeled.json
│ │ │ ├── instances_train2017.1@2.json
│ │ │ ├── instances_train2017.1@2-unlabeled.json
│ │ │ ├── instances_train2017.1@5.json
│ │ │ ├── instances_train2017.1@5-unlabeled.json
│ │ │ ├── instances_train2017.1@10.json
│ │ │ ├── instances_train2017.1@10-unlabeled.json
│ │ │ ├── instances_train2017.2@1.json
│ │ │ ├── instances_train2017.2@1-unlabeled.json
│ │ ├── test2017
│ │ ├── train2017
│ │ ├── unlabeled2017
│ │ ├── val2017
(2) train2017和unlabeled2017作为有标签数据集无标签数据集使用。由于image_info_unlabeled2017.json不包含categories信息,CocoDataset无法初始化,所以需要将categories of instances_train2017.json写入image_info_unlabeled2017.json保存为instances_unlabeled2017.json,相关脚本如下
from mmengine.fileio import load, dump

anns_train = load('instances_train2017.json')
anns_unlabeled = load('image_info_unlabeled2017.json')
anns_unlabeled['categories'] = anns_train['categories']
dump(anns_unlabeled, 'instances_unlabeled2017.json')
处理后的数据集目录如下:
mmdetection
├── data
│   ├── coco
│   │   ├── annotations
│   │   │   ├── image_info_unlabeled2017.json
│   │   │   ├── instances_train2017.json
│   │   │   ├── instances_unlabeled2017.json
│   │   │   ├── instances_val2017.json
│   │   ├── test2017
│   │   ├── train2017
│   │   ├── unlabeled2017
│   │   ├── val2017
半监督学习有两种主要方法, 一致性正则化 和伪标签。一致性正则化通常需要一些精心设计,而伪标签具有更简单的形式并且更容易扩展到下游任务。我们采用了基于伪标签的师生联合训练半监督目标检测框架,因此有标签数据和无标签数据需要配置不同的数据管道:
(1) Pipeline for labeled data:
# pipeline used to augment labeled data,
# which will be sent to student model for supervised training.
sup_pipeline = [
    dict(type='LoadImageFromFile', file_client_args=file_client_args),
    dict(type='LoadAnnotations', with_bbox=True),
    dict(type='RandomResize', scale=scale, keep_ratio=True),
    dict(type='RandomFlip', prob=0.5),
    dict(type='RandAugment', aug_space=color_space, aug_num=1),
    dict(type='FilterAnnotations', min_gt_bbox_wh=(1e-2, 1e-2)),
    dict(type='MultiBranch', sup=dict(type='PackDetInputs'))
]
(2) Pipeline for unlabeled data:
# pipeline used to augment unlabeled data weakly,
# which will be sent to teacher model for predicting pseudo instances.
weak_pipeline = [
    dict(type='RandomResize', scale=scale, keep_ratio=True),
    dict(type='RandomFlip', prob=0.5),
    dict(
        type='PackDetInputs',
        meta_keys=('img_id', 'img_path', 'ori_shape', 'img_shape',
                   'scale_factor', 'flip', 'flip_direction',
                   'homography_matrix')),
]

# pipeline used to augment unlabeled data strongly,
# which will be sent to student model for unsupervised training.
strong_pipeline = [
    dict(type='RandomResize', scale=scale, keep_ratio=True),
    dict(type='RandomFlip', prob=0.5),
    dict(
        type='RandomOrder',
        transforms=[
            dict(type='RandAugment', aug_space=color_space, aug_num=1),
            dict(type='RandAugment', aug_space=geometric, aug_num=1),
        ]),
    dict(type='RandomErasing', n_patches=(1, 5), ratio=(0, 0.2)),
    dict(type='FilterAnnotations', min_gt_bbox_wh=(1e-2, 1e-2)),
    dict(
        type='PackDetInputs',
        meta_keys=('img_id', 'img_path', 'ori_shape', 'img_shape',
                   'scale_factor', 'flip', 'flip_direction',
                   'homography_matrix')),
]

# pipeline used to augment unlabeled data into different views
unsup_pipeline = [
    dict(type='LoadImageFromFile', file_client_args=file_client_args),
    dict(type='LoadEmptyAnnotations'),
    dict(
        type='MultiBranch',
        unsup_teacher=weak_pipeline,
        unsup_student=strong_pipeline,
    )
]
(1) 构建半监督数据集。用于ConcatDataset连接标记和未标记的数据集。
labeled_dataset = dict(
    type=dataset_type,
    data_root=data_root,
    ann_file='annotations/instances_train2017.json',
    data_prefix=dict(img='train2017/'),
    filter_cfg=dict(filter_empty_gt=True, min_size=32),
    pipeline=sup_pipeline)

unlabeled_dataset = dict(
    type=dataset_type,
    data_root=data_root,
    ann_file='annotations/instances_unlabeled2017.json',
    data_prefix=dict(img='unlabeled2017/'),
    filter_cfg=dict(filter_empty_gt=False),
    pipeline=unsup_pipeline)

train_dataloader = dict(
    batch_size=batch_size,
    num_workers=num_workers,
    persistent_workers=True,
    sampler=dict(
        type='GroupMultiSourceSampler',
        batch_size=batch_size,
        source_ratio=[1, 4]),
    dataset=dict(
        type='ConcatDataset', datasets=[labeled_dataset, unlabeled_dataset]))
(2) 使用多源数据集采样器。用于GroupMultiSourceSampler从labeled_dataset和的批次中采样数据labeled_dataset,source_ratio控制批次中标记数据和未标记数据的比例。GroupMultiSourceSampler还确保同一批次中的图像具有相似的纵横比。如果您不需要保证批处理中图像的纵横比,您可以使用MultiSourceSampler. 的采样图GroupMultiSourceSampler如下:
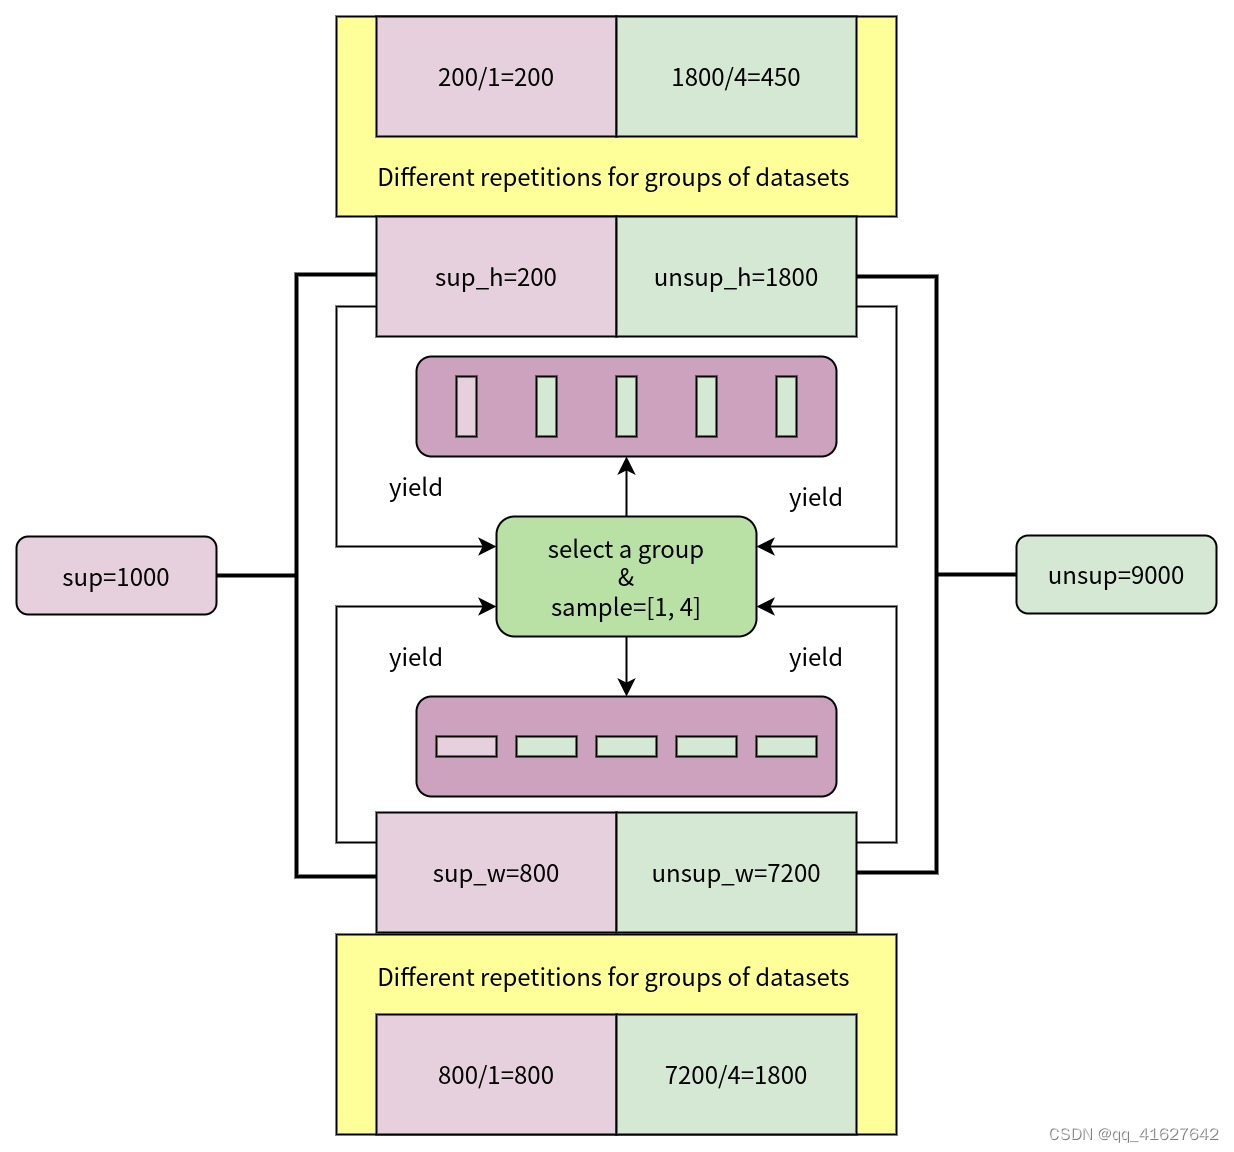
sup=1000表示标注数据集的尺度为1000,sup_h=200表示标注数据集中纵横比大于等于1sup_w=800的图像的尺度为200,表示纵横比小于1的图像的尺度在有标签的数据集中为800, unsup=9000表示无标签数据集的尺度为9000,unsup_h=1800表示无标签数据集中纵横比大于等于1的图像的尺度为1800,unsup_w=7200表示有的图像的尺度为未标记数据集中小于 1 的纵横比为 7200。 GroupMultiSourceSampler根据标记数据集和未标记数据集中图像的整体纵横比分布随机选择一组,然后根据 对两个数据集进行数据采样以形成批次source_ratio,因此标记数据集和未标记数据集具有不同的重复。
我们选择Faster R-CNN进行半监督训练。以SoftTeacher 半监督目标检测算法为例,模型配置可以继承自_base_/models/faster-rcnn_r50_fpn.py,replacing the backbone network of the detector with caffe style。请注意,与监督训练配置不同,Faster R-CNN as detector is an attribute of model。此外,data_preprocessor needs to be set to MultiBranchDataPreprocessor,用于对来自不同管道的图像进行填充和归一化。最后,可以通过semi_train_cfg and semi_test_cfg和配置半监督训练和测试所需的参数。
We choose Faster R-CNN as detector for semi-supervised training. Take the semi-supervised object detection algorithm SoftTeacher as an example, the model configuration can be inherited from base/models/faster-rcnn_r50_fpn.py, replacing the backbone network of the detector with caffe style. Note that unlike the supervised training configs, Faster R-CNN as detector is an attribute of model, not model . In addition, data_preprocessor needs to be set to MultiBranchDataPreprocessor, which is used to pad and normalize images from different pipelines. Finally, parameters required for semi-supervised training and testing can be configured via semi_train_cfg and semi_test_cfg.
_base_ = [
    '../_base_/models/faster-rcnn_r50_fpn.py', '../_base_/default_runtime.py',
    '../_base_/datasets/semi_coco_detection.py'
]

detector = _base_.model
detector.data_preprocessor = dict(
    type='DetDataPreprocessor',
    mean=[103.530, 116.280, 123.675],
    std=[1.0, 1.0, 1.0],
    bgr_to_rgb=False,
    pad_size_divisor=32)
detector.backbone = dict(
    type='ResNet',
    depth=50,
    num_stages=4,
    out_indices=(0, 1, 2, 3),
    frozen_stages=1,
    norm_cfg=dict(type='BN', requires_grad=False),
    norm_eval=True,
    style='caffe',
    init_cfg=dict(
        type='Pretrained',
        checkpoint='open-mmlab://detectron2/resnet50_caffe'))

model = dict(
    _delete_=True,
    type='SoftTeacher',
    detector=detector,
    data_preprocessor=dict(
        type='MultiBranchDataPreprocessor',
        data_preprocessor=detector.data_preprocessor),
    semi_train_cfg=dict(
        freeze_teacher=True,
        sup_weight=1.0,
        unsup_weight=4.0,
        pseudo_label_initial_score_thr=0.5,
        rpn_pseudo_thr=0.9,
        cls_pseudo_thr=0.9,
        reg_pseudo_thr=0.02,
        jitter_times=10,
        jitter_scale=0.06,
        min_pseudo_bbox_wh=(1e-2, 1e-2)),
    semi_test_cfg=dict(predict_on='teacher'))
In addition, we also support semi-supervised training for other detection models, such as RetinaNet and Cascade R-CNN. Since SoftTeacher only supports Faster R-CNN, it needs to be replaced with SemiBaseDetector, example is as below:
_base_ = [
    '../_base_/models/retinanet_r50_fpn.py', '../_base_/default_runtime.py',
    '../_base_/datasets/semi_coco_detection.py'
]

detector = _base_.model

model = dict(
    _delete_=True,
    type='SemiBaseDetector',
    detector=detector,
    data_preprocessor=dict(
        type='MultiBranchDataPreprocessor',
        data_preprocessor=detector.data_preprocessor),
    semi_train_cfg=dict(
        freeze_teacher=True,
        sup_weight=1.0,
        unsup_weight=1.0,
        cls_pseudo_thr=0.9,
        min_pseudo_bbox_wh=(1e-2, 1e-2)),
    semi_test_cfg=dict(predict_on='teacher'))
Following the semi-supervised training configuration of SoftTeacher, change batch_size to 2 and source_ratio to [1, 1], the experimental results of supervised and semi-supervised training of RetinaNet, Faster R-CNN, Cascade R-CNN and SoftTeacher on the 10% coco train2017 are as below:
Model Detector BackBone Style sup-0.1-coco mAP semi-0.1-coco mAP
SemiBaseDetector RetinaNet R-50-FPN caffe 23.5 27.7
SemiBaseDetector Faster R-CNN R-50-FPN caffe 26.7 28.4
SemiBaseDetector Cascade R-CNN R-50-FPN caffe 28.0 29.7
SoftTeacher Faster R-CNN R-50-FPN caffe 26.7 31.1
通常,教师模型通过学生模型的指数移动平均(EMA)更新,然后教师模型随着学生模型的优化而优化,这可以通过配置来实现custom_hooks:
custom_hooks = [dict(type='MeanTeacherHook')]
由于师生联合训练框架中有两个模型,我们可以替换ValLoop为TeacherStudentValLoop来测试两个模型在训练过程中的准确率。
val_cfg = dict(type='TeacherStudentValLoop')
#demo 的单张图片测试
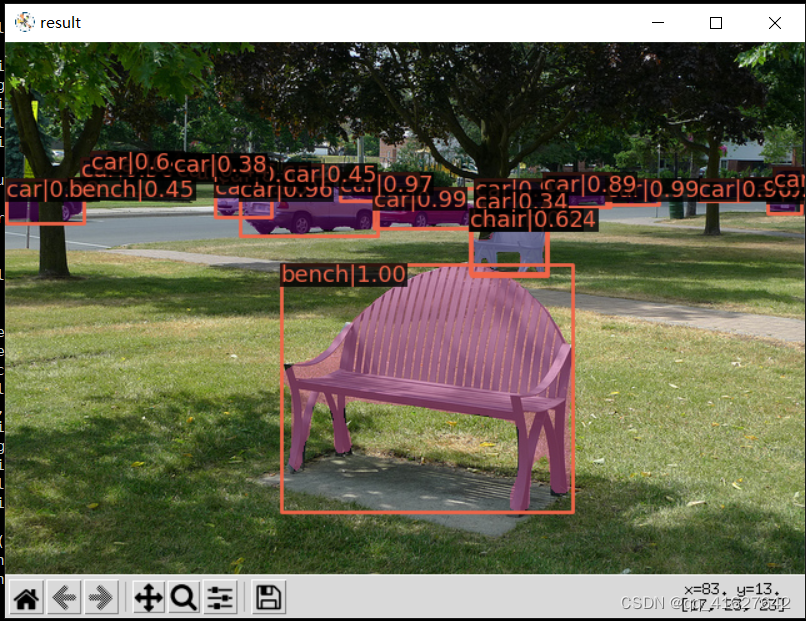
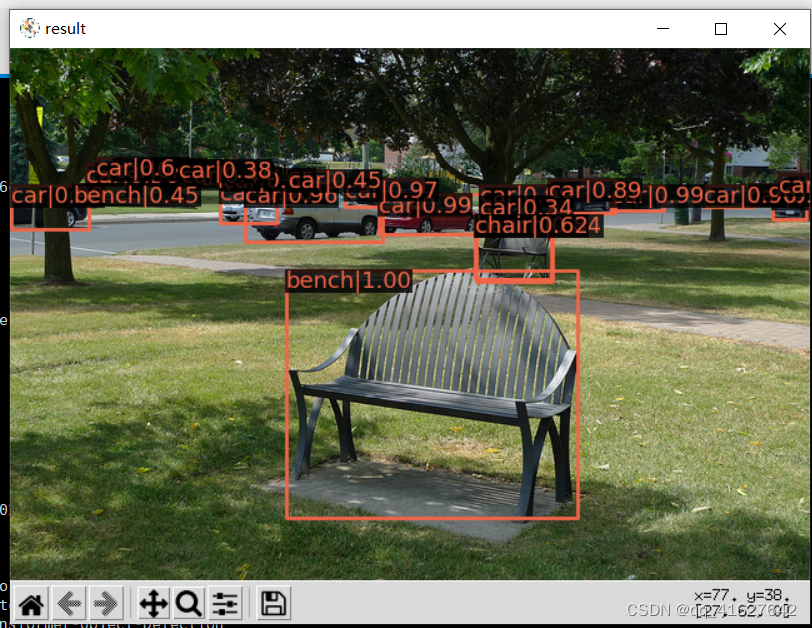
python demo/image_demo.py demo/demo.jpg configs/swin/mask_rcnn_swin_tiny_patch4_window7_mstrain_480-800_adamw_3x_coco.py mask_rcnn_swin_tiny_patch4_window7.pth
成功的话 能看到实例图片,当 mask_rcnn_swin_tiny_patch4_window7.pth 不在项目根目录下的时候,需要在前面指定具体位置。
demo/image_demo.py 做如下修改:

    # test a single image
    result = inference_detector(model, args.img)
    new_result = result[0]
    # show the results
    show_result_pyplot(model, args.img, new_result, score_thr=args.score_thr)
python demo/image_detection_demo.py demo/demo.jpg configs/swin/mask_rcnn_swin_tiny_patch4_window7_mstrain_480-800_adamw_3x_coco.py mask_rcnn_swin_tiny_patch4_window7.pth
**
TypeError: SwinTransformer: init() got an unexpected keyword argument ‘embed_dim‘
**
在不同目录下它寻找的mmdet包不同
在swin_master/(你的项目)目录下它会寻找该项目内本来包含的mmdet文件夹
但是在swin_master/tools文件夹下,它会寻找openmmlab环境中的mmdet
设置环境变量,指定它去该目录下寻找mmdet包
进入配置信息 sudo vi /etc/profile
export PYTHONPATH= export PYTHONPATH=/media/lhy/Swin-Transformer-Object-Detection
(包含mmdet文件夹的你的项目路径)
除了培训/测试脚本,我们在tools/目录下提供了许多有用的工具。
tools/analysis_tools/analyze_logs.py 给出一个训练日志文件,绘制损失/mAP曲线。
Run pip install seaborn first to install the dependency.
python tools/analysis_tools/analyze_logs.py plot_curve [--keys ${KEYS}] [--title ${TITLE}] [--legend ${LEGEND}] [--backend ${BACKEND}] [--style ${STYLE}] [--out ${OUT_FILE}]
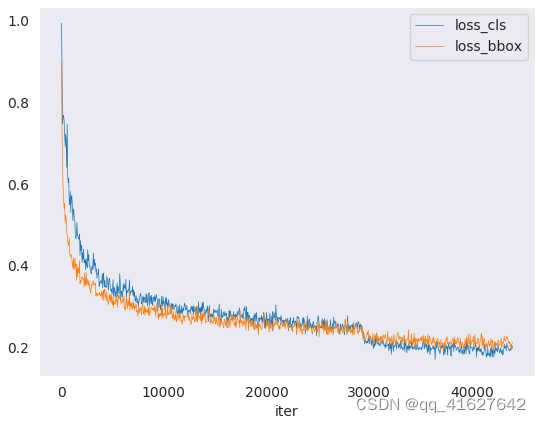
python tools/analysis_tools/analyze_logs.py plot_curve log.json --keys loss_cls --legend loss_cls
python tools/analysis_tools/analyze_logs.py plot_curve log.json --keys loss_cls loss_bbox --out losses.pdf
python tools/analysis_tools/analyze_logs.py plot_curve log1.json log2.json --keys bbox_mAP --legend run1 run2
python tools/analysis_tools/analyze_logs.py cal_train_time log.json [--include-outliers]
The output is expected to be like the following.
-----Analyze train time of work_dirs/some_exp/20190611_192040.log.json-----
slowest epoch 11, average time is 1.2024
fastest epoch 1, average time is 1.1909
time std over epochs is 0.0028
average iter time: 1.1959 s/iter
tools/analysis_tools/analyze_results.py计算单个图像mAP,并根据预测结果保存或显示得分最高和最低的topk图像。
python tools/analysis_tools/analyze_results.py \
      ${CONFIG} \
      ${PREDICTION_PATH} \
      ${SHOW_DIR} \
      [--show] \
      [--wait-time ${WAIT_TIME}] \
      [--topk ${TOPK}] \
      [--show-score-thr ${SHOW_SCORE_THR}] \
      [--cfg-options ${CFG_OPTIONS}]
config : The path of a model config file.模型配置文件的路径。
prediction_path: Output result file in pickle format from tools/test.py,从tools/test.py输出pickle格式的结果文件
show_dir: Directory where painted GT and detection images will be saved,绘制的GT和检测图像保存的目录
–show:Determines whether to show painted images, If not specified, it will be set to False
–wait-time: The interval of show (s), 0 is block
–topk: The number of saved images that have the highest and lowest topk scores after sorting. If not specified, it will be set to 20.
–show-score-thr: Show score threshold. If not specified, it will be set to 0.
–cfg-options: If specified, the key-value pair optional cfg will be merged into config file
Assume that you have got result file in pickle format from tools/test.py in the path ‘./result.pkl’.
"假设你在’./result.pkl’路径下从tools/test.py获得了pickle格式的结果文件。
Test Faster R-CNN and visualize the results, save images to the directory results/
测试更快的R-CNN并可视化结果,将图像保存到目录results/
python tools/analysis_tools/analyze_results.py \
       configs/faster_rcnn/faster_rcnn_r50_fpn_1x_coco.py \
       result.pkl \
       results \
       --show
Test Faster R-CNN and specified topk to 50, save images to the directory results/
测试更快的R-CNN和指定topk为50,保存图像到目录results/
python tools/analysis_tools/analyze_results.py \
       configs/faster_rcnn/faster_rcnn_r50_fpn_1x_coco.py \
       result.pkl \
       results \
       --topk 50
If you want to filter the low score prediction results, you can specify the show-score-thr parameter
如果你想过滤低分数预测结果,你可以指定参数show-score-thr参数
python tools/analysis_tools/analyze_results.py \
       configs/faster_rcnn/faster_rcnn_r50_fpn_1x_coco.py \
       result.pkl \
       results \
       --show-score-thr 0.3
tools/analysis_tools/coco_error_analysis.py根据不同的标准分析每个类别的COCO结果。它还可以制作一个情节,提供有用的信息。
python tools/analysis_tools/coco_error_analysis.py ${RESULT} ${OUT_DIR} [-h] [--ann ${ANN}] [--types ${TYPES[TYPES...]}]
Assume that you have got Mask R-CNN checkpoint file in the path ‘checkpoint’. For other checkpoints, please refer to our model zoo. You can use the following command to get the results bbox and segmentation json file.
假设你有掩码R-CNN检查点文件在路径’checkpoint’。其他检查站请参考我们的模型动物园。您可以使用以下命令获取结果框和分段json文件。 out: results.bbox.json and results.segm.json
python tools/test.py \
       configs/mask_rcnn/mask_rcnn_r50_fpn_1x_coco.py \
       checkpoint/mask_rcnn_r50_fpn_1x_coco_20200205-d4b0c5d6.pth \
       --format-only \
       --options "jsonfile_prefix=./results"
获取每个类别的COCO box错误结果,将分析结果图像保存到目录results/
Get COCO bbox error results per category , save analyze result images to the directory results/
python tools/analysis_tools/coco_error_analysis.py \
       results.bbox.json \
       results \
       --ann=data/coco/annotations/instances_val2017.json \
获取COCO每个类别的分割错误结果,将分析结果图像保存到目录results/
Get COCO segmentation error results per category , save analyze result images to the directory results/
python tools/analysis_tools/coco_error_analysis.py \
       results.segm.json \
       results \
       --ann=data/coco/annotations/instances_val2017.json \
       --types='segm'
Tools /misc/browse_data .py帮助用户可视化地浏览检测数据集(包括图像和边界框注释),或者将图像保存到指定目录
python tools/misc/browse_dataset.py ${CONFIG} [-h] [--skip-type ${SKIP_TYPE[SKIP_TYPE...]}] [--output-dir ${OUTPUT_DIR}] [--not-show] [--show-interval ${SHOW_INTERVAL}]
对VisDrone2019转化的coco格式数据集进行可视化
python tools/misc/browse_dataset.py runs/train/dino/dino-4scale_r50_8xb2-12e_coco.py --output-dir data/COCO/VisDrone2019/val2017_annshow
这是v3.1.0的运行代码
python tools/analysis_tools/browse_dataset.py runs/train/dino/dino-4scale_r50_8xb2-12e_coco.py --output-dir data/COCO/VisDrone2019/val2017_annshow
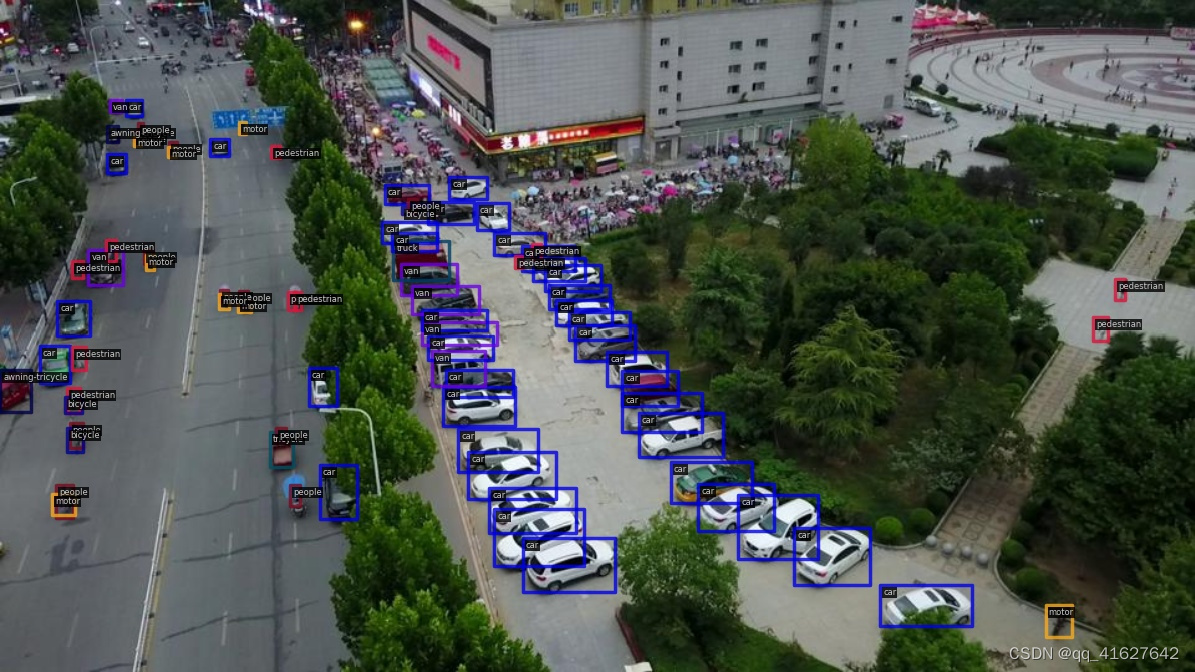
首先,按照这里的描述将模型转换为ONNX
请注意,目前只支持RetinaNet,对其他型号的支持将在以后的版本中出现。转换后的模型可以通过netron等工具进行可视化。
如果您需要一个轻量级的GUI来可视化检测结果,您可以参考 DetVisGUI project.
为了使用TorchServe添加链接描述服务一个MMDetection模型,你可以按照以下步骤:
python tools/deployment/mmdet2torchserve.py ${CONFIG_FILE} ${CHECKPOINT_FILE} \
--output-folder ${MODEL_STORE} \
--model-name ${MODEL_NAME}
注意:$(MODEL_STORE)需要是一个文件夹的绝对路径。
docker build -t mmdet-serve:latest docker/serve/
Check the official docs for running TorchServe with docker.
In order to run in GPU, you need to install nvidia-docker. You can omit the --gpus argument in order to run in CPU.
Example:
docker run --rm \
--cpus 8 \
--gpus device=0 \
-p8080:8080 -p8081:8081 -p8082:8082 \
--mount type=bind,source=$MODEL_STORE,target=/home/model-server/model-store \
mmdet-serve:latest
curl -O curl -O https://raw.githubusercontent.com/pytorch/serve/master/docs/images/3dogs.jpg
curl http://127.0.0.1:8080/predictions/${MODEL_NAME} -T 3dogs.jpg
你应该得到类似于下面的结果
[
  {
    "class_name": "dog",
    "bbox": [
      294.63409423828125,
      203.99111938476562,
      417.048583984375,
      281.62744140625
    ],
    "score": 0.9987992644309998
  },
  {
    "class_name": "dog",
    "bbox": [
      404.26019287109375,
      126.0080795288086,
      574.5091552734375,
      293.6662292480469
    ],
    "score": 0.9979367256164551
  },
  {
    "class_name": "dog",
    "bbox": [
      197.2144775390625,
      93.3067855834961,
      307.8505554199219,
      276.7560119628906
    ],
    "score": 0.993338406085968
  }
]
你可以使用test_torchserver.py来比较torchserver和pytorch的结果,并将它们可视化。
python tools/deployment/test_torchserver.py ${IMAGE_FILE} ${CONFIG_FILE} ${CHECKPOINT_FILE} ${MODEL_NAME}
[--inference-addr ${INFERENCE_ADDR}] [--device ${DEVICE}] [--score-thr ${SCORE_THR}]


Example:

python tools/deployment/test_torchserver.py \
demo/demo.jpg \
configs/yolo/yolov3_d53_320_273e_coco.py \
checkpoint/yolov3_d53_320_273e_coco-421362b6.pth \
yolov3
我们提供了一个脚本来将模型转换为ONNX格式。我们还支持对比Pytorch和ONNX模型的输出结果进行验证。
python tools/deployment/pytorch2onnx.py ${CONFIG_FILE} ${CHECKPOINT_FILE} --output-file ${ONNX_FILE} [--shape ${INPUT_SHAPE} --verify]
tools/model_converters/upgrade_model_version.py将以前的MMDetection检查点升级到新版本。注意,这个脚本不能保证工作,因为在新版本中引入了一些破坏性的更改。建议直接使用新的检查点。
python tools/model_converters/upgrade_model_version.py ${IN_FILE} ${OUT_FILE} [-h] [--num-classes NUM_CLASSES]
tools/model_converters/ regnet2mmdett .py将在pycls预训练的RegNet模型中的键转换为MMDetection风格。
python tools/model_converters/regnet2mmdet.py ${SRC} ${DST} [-h]
tools/model_converters/detectron2pytorch.py将原始的detectron预训练ResNet模型中的键转换为PyTorch样式。
python tools/model_converters/detectron2pytorch.py ${SRC} ${DST} ${DEPTH} [-h]
tools /model_converters/publish_model.py帮助用户准备发布模型。
在您将模型上传到AWS之前,您可能需要
在将模型上传到AWS之前,你可能需要
(1)将模型权重转换为CPU张量,
(2)删除优化器状态并
(3)计算检查点文件的哈希并将哈希ID附加到文件名中。
python tools/model_converters/publish_model.py ${INPUT_FILENAME} ${OUTPUT_FILENAME}
python tools/model_converters/publish_model.py work_dirs/faster_rcnn/latest.pth faster_rcnn_r50_fpn_1x_20190801.pth
最终的输出文件名将是faster_rcnn_r50_fpn_1x_20190801-[哈希id).pth。
tools/analysis_tools/get_flops.py是一个改编自失败计数器的 flops-counter.pytorch脚本。pytorch来计算给定模型的FLOPs和参数。
python tools/analysis_tools/get_flops.py ${CONFIG_FILE} [--shape ${INPUT_SHAPE}]
你会得到这样的结果。
Input shape: (3, 1280, 800)
Flops: 239.32 GFLOPs
Params: 37.74 M
注意:此工具仍处于试验阶段,我们不能保证数字是绝对正确的。你可以将结果用于简单的比较,但是在你在技术报告或论文中采用它之前要再三检查它。
tools/analysis_tools/test_robustness.py并tools/analysis_tools/robustness_eval.py 帮助用户评估模型的稳健性。核心思想来自Benchmarking Robustness in Object Detection: Autonomous Driving when Winter is Coming。有关如何评估一组标准模型的损坏图像和结果的模型的更多信息,请参阅robustness_benchmarking.md。
tools/analysis_tools/benchmark.py帮助用户计算FPS。FPS值包括模型转发和后期处理。为了得到更准确的数值,目前仅支持单GPU分布式启动方式。
python -m torch.distributed.launch --nproc_per_node=1 --master_port=${PORT} tools/analysis_tools/benchmark.py \
    ${CONFIG} \
    ${CHECKPOINT} \
    [--repeat-num ${REPEAT_NUM}] \
    [--max-iter ${MAX_ITER}] \
    [--log-interval ${LOG_INTERVAL}] \
    --launcher pytorch
Tools /analysis_tools/eval_metric.py 根据配置文件评估PKL结果文件的某些度量。
python tools/analysis_tools/eval_metric.py ${CONFIG} ${PKL_RESULTS} [-h] [--format-only] [--eval ${EVAL[EVAL ...]}]
                      [--cfg-options ${CFG_OPTIONS [CFG_OPTIONS ...]}]
                      [--eval-options ${EVAL_OPTIONS [EVAL_OPTIONS ...]}]
混淆矩
阵混淆矩阵是预测结果的总结
tools/analysis_tools/confusion_matrix.py can analyze the prediction results and plot a confusion matrix table.
First, run tools/test.py to save the .pkl detection results.
首先,运行tools/test.py来保存.pkl检测结果。
python tools/analysis_tools/confusion_matrix.py ${CONFIG} ${DETECTION_RESULTS} ${SAVE_DIR} --show
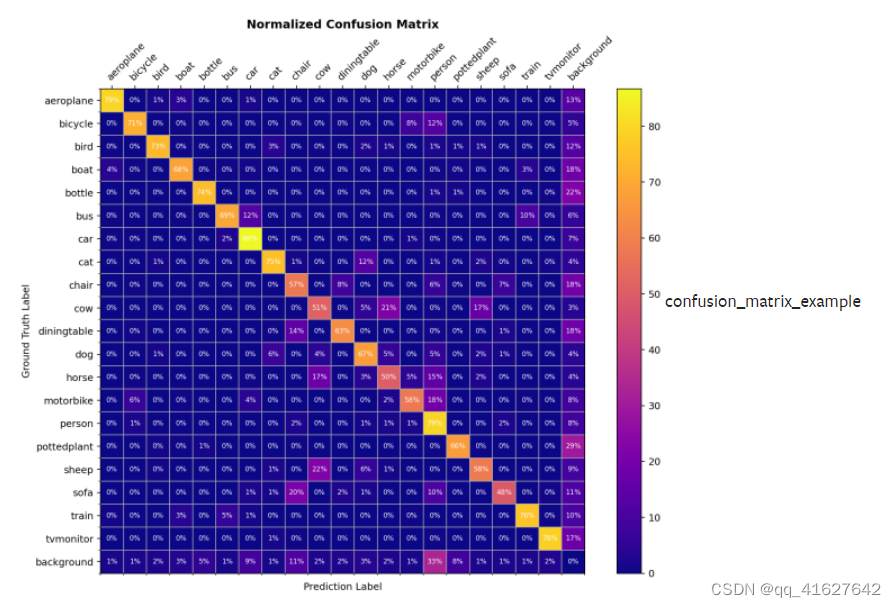
Tools /misc/print_config.py逐字打印整个配置,展开所有导入。
python tools/misc/print_config.py ${CONFIG} [-h] [--options ${OPTIONS [OPTIONS...]}]
YOLO Anchor Optimization
tools/analysis_tools/optimize_anchors.py提供了两种优化YOLO锚的方法
python tools/analysis_tools/optimize_anchors.py ${CONFIG} --algorithm k-means --input-shape ${INPUT_SHAPE [WIDTH HEIGHT]} --output-dir ${OUTPUT_DIR}
python tools/analysis_tools/optimize_anchors.py ${CONFIG} --algorithm differential_evolution --input-shape ${INPUT_SHAPE [WIDTH HEIGHT]} --output-dir ${OUTPUT_DIR}
python tools/analysis_tools/optimize_anchors.py configs/yolo/yolov3_d53_320_273e_coco.py --algorithm differential_evolution --input-shape 608 608 --device cuda --output-dir work_dirs
你会得到:
loading annotations into memory...
Done (t=9.70s)
creating index...
index created!
2021-07-19 19:37:20,951 - mmdet - INFO - Collecting bboxes from annotation...
[>>>>>>>>>>>>>>>>>>>>>>>>>>>>>>>>>>>>>>>>>>>>>>>>>>] 117266/117266, 15874.5 task/s, elapsed: 7s, ETA:     0s

2021-07-19 19:37:28,753 - mmdet - INFO - Collected 849902 bboxes.
differential_evolution step 1: f(x)= 0.506055
differential_evolution step 2: f(x)= 0.506055
......

differential_evolution step 489: f(x)= 0.386625
2021-07-19 19:46:40,775 - mmdet - INFO Anchor evolution finish. Average IOU: 0.6133754253387451
2021-07-19 19:46:40,776 - mmdet - INFO Anchor differential evolution result:[[10, 12], [15, 30], [32, 22], [29, 59], [61, 46], [57, 116], [112, 89], [154, 198], [349, 336]]
2021-07-19 19:46:40,798 - mmdet - INFO Result saved in work_dirs/anchor_optimize_result.json
对于最先进的物体检测器来说,检测被遮挡的物体仍然是一个挑战。我们实现了论文《改进遮挡检测的三层插件》中提出的指标,以计算分离和遮挡掩模的召回率。
有两种方法可以使用该指标:
我们提供了一个脚本来使用转储的预测文件来计算指标。
首先,使用tools/test.py脚本转储检测结果:
python tools/test.py ${CONFIG} ${MODEL_PATH} --out results.pkl
然后,运行tools/analysis_tools/coco_occluded_separated_recall.py脚本以调用分离和遮挡的蒙版:
python tools/analysis_tools/coco_occluded_separated_recall.py results.pkl --out occluded_separated_recall.json
loading annotations into memory...
Done (t=0.51s)
creating index...
index created!
processing detection results...
[>>>>>>>>>>>>>>>>>>>>>>>>>>>>>>>>>>>>>>>>>>>>>>>>>>] 5000/5000, 109.3 task/s, elapsed: 46s, ETA:     0s
computing occluded mask recall...
[>>>>>>>>>>>>>>>>>>>>>>>>>>>>>>>>>>>>>>>>>>>>>>>>>>] 5550/5550, 780.5 task/s, elapsed: 7s, ETA:     0s
COCO occluded mask recall: 58.79%
COCO occluded mask success num: 3263
computing separated mask recall...
[>>>>>>>>>>>>>>>>>>>>>>>>>>>>>>>>>>>>>>>>>>>>>>>>>>] 3522/3522, 778.3 task/s, elapsed: 5s, ETA:     0s
COCO separated mask recall: 31.94%
COCO separated mask success num: 1125

+-----------+--------+-------------+
| mask type | recall | num correct |
+-----------+--------+-------------+
| occluded  | 58.79% | 3263        |
| separated | 31.94% | 1125        |
+-----------+--------+-------------+
Evaluation results have been saved to occluded_separated_recall.json.
我们实现了CocoOccludedSeparatedMetric继承自CocoMetic. 'CocoOccludedSeparatedMetric’要评估训练期间分离和遮挡掩模的召回率,只需将配置中的评估器指标类型替换为:
val_evaluator = dict(
    type='CocoOccludedSeparatedMetric',  # modify this
    ann_file=data_root + 'annotations/instances_val2017.json',
    metric=['bbox', 'segm'],
    format_only=False)
test_evaluator = val_evaluator
MMDetection 和 MMEngine 为用户提供了各种有用的钩子,包括log hooks、NumClassCheckHook, 等。本教程介绍了 MMDetection 中实现的钩子的功能和用法。关于在 MMEngine 中使用 hooks,请阅读MMEngine 中的 API 文档。
内存分析器钩子记录内存信息,包括虚拟内存、交换内存和当前进程的内存。该钩子有助于掌握系统的内存使用情况并发现潜在的内存泄漏错误。要使用这个钩子,用户应该先安装memory_profiler and psutil
pip install memory_profiler psutil
要使用此挂钩,用户应将以下代码添加到配置文件中。
custom_hooks = [
    dict(type='MemoryProfilerHook', interval=50)
]
MemoryProfilerHook在训练过程中,您可以在日志中看到如下记录的消息。
The system has 250 GB (246360 MB + 9407 MB) of memory and 8 GB (5740 MB + 2452 MB) of swap memory in total. Currently 9407 MB (4.4%) of memory and 5740 MB (29.9%) of swap memory were consumed. And the current training process consumed 5434 MB of memory.

2022-04-21 08:49:56,881 - mmengine - INFO - Memory information available_memory: 246360 MB, used_memory: 9407 MB, memory_utilization: 4.4 %, available_swap_memory: 5740 MB, used_swap_memory: 2452 MB, swap_memory_utilization: 29.9 %, current_process_memory: 5434 MB
一般来说,模型训练从开始到结束有20个点可以插入hook。用户可以实现自定义钩子并将其插入到训练过程中的不同点以执行他们想要的操作。
global points:before_run,after_run
points in training:before_train, before_train_epoch, before_train_iter, after_train_iter, after_train_epoch,after_train
points in validation:before_val, before_val_epoch, before_val_iter, after_val_iter, after_val_epoch,after_val
points at testing:before_test, before_test_epoch, before_test_iter, after_test_iter, after_test_epoch, after_test
other points:before_save_checkpoint,after_save_checkpoint
例如,用户可以实现一个钩子来检查损失并在损失变为 NaN 时终止训练。为了实现这一目标,需要采取三个步骤:
实现一个new Hook继承MMEngine 中的Hook类,并实现after_train_iter方法检查每次训练n迭代后损失是否变为 NaN 。
实现的钩子应该注册在HOOKSby中@HOOKS.register_module(),如下面的代码所示。
添加到配置文件中。
custom_hooks = [dict(type='CheckInvalidLossHook', interval=50)]
from typing import Optional

import torch
from mmengine.hooks import Hook
from mmengine.runner import Runner

from mmdet.registry import HOOKS


@HOOKS.register_module()
class CheckInvalidLossHook(Hook):
    """Check invalid loss hook.

    This hook will regularly check whether the loss is valid
    during training.

    Args:
        interval (int): Checking interval (every k iterations).
            Default: 50.
    """

    def __init__(self, interval: int = 50) -> None:
        self.interval = interval

    def after_train_iter(self,
                         runner: Runner,
                         batch_idx: int,
                         data_batch: Optional[dict] = None,
                         outputs: Optional[dict] = None) -> None:
        """Regularly check whether the loss is valid every n iterations.

        Args:
            runner (:obj:`Runner`): The runner of the training process.
            batch_idx (int): The index of the current batch in the train loop.
            data_batch (dict, Optional): Data from dataloader.
                Defaults to None.
            outputs (dict, Optional): Outputs from model. Defaults to None.
        """
        if self.every_n_train_iters(runner, self.interval):
            assert torch.isfinite(outputs['loss']), \
                runner.logger.info('loss become infinite or NaN!')
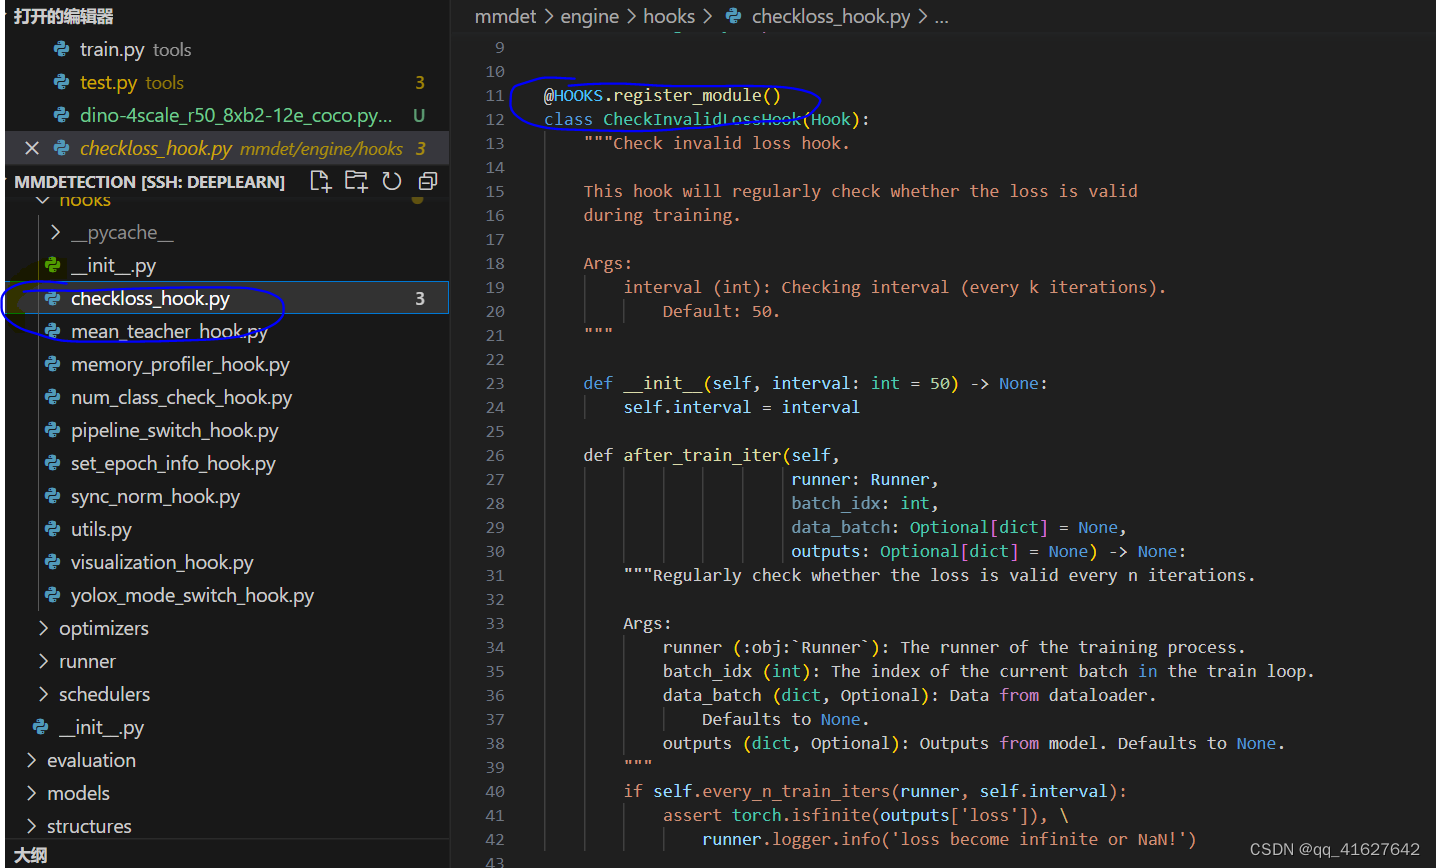
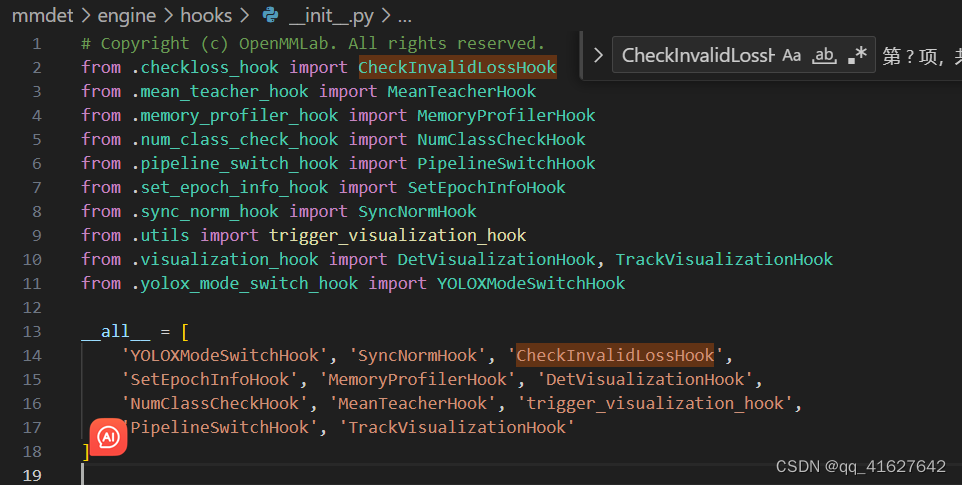
我们提供了工具来在对象检测的鲁棒性基准测试中定义的图像损坏基准测试对象检测和实例分割模型:冬季来临时的自动驾驶。本页面提供了如何使用基准测试的基本教程。

关于基准
要将结果提交给基准测试,请访问基准测试主页
该基准测试以imagenet-c 基准测试为蓝本,该基准测试最初由 Dan Hendrycks 和 Thomas Dietterich在Benchmarking Neural Network Robustness to Common Corruptions and Perturbations (ICLR 2019)中发布。
图像损坏函数包含在该库中,但可以使用以下命令单独安装:
pip install imagecorruptions
与 imagenet-c 相比,必须进行一些更改才能处理任意大小的图像和灰度图像。我们还修改了“运动模糊”和“雪花”损坏,以消除对 Linux 特定库的依赖,否则必须单独安装。有关详细信息,请参阅imagecorruptions 存储库。
使用预训练模型进行推理
我们提供了一个测试脚本来评估模型在基准测试中提供的损坏的任意组合上的性能。
测试数据集
[x] 单 GPU 测试
[ ] 多GPU测试
[ ] 可视化检测结果
您可以使用以下命令来测试模型在基准测试中使用的 15 种损坏情况下的性能。
# single-gpu testing
python tools/analysis_tools/test_robustness.py ${CONFIG_FILE} ${CHECKPOINT_FILE} [--out ${RESULT_FILE}]
或者可以选择不同的损坏组。
# noise
python tools/analysis_tools/test_robustness.py ${CONFIG_FILE} ${CHECKPOINT_FILE} [--out ${RESULT_FILE}] --corruptions noise

# blur
python tools/analysis_tools/test_robustness.py ${CONFIG_FILE} ${CHECKPOINT_FILE} [--out ${RESULT_FILE}] --corruptions blur

# wetaher
python tools/analysis_tools/test_robustness.py ${CONFIG_FILE} ${CHECKPOINT_FILE} [--out ${RESULT_FILE}] --corruptions weather

# digital
python tools/analysis_tools/test_robustness.py ${CONFIG_FILE} ${CHECKPOINT_FILE} [--out ${RESULT_FILE}] --corruptions digital
或者一组自定义的损坏,例如:
# gaussian noise, zoom blur and snow
python tools/analysis_tools/test_robustness.py ${CONFIG_FILE} ${CHECKPOINT_FILE} [--out ${RESULT_FILE}] [--eval ${EVAL_METRICS}] --corruptions gaussian_noise zoom_blur snow
最后可以选择要评估的腐败严重程度。严重性 0 对应于干净的数据,效果从 1 增加到 5。
 severity 1
python tools/analysis_tools/test_robustness.py ${CONFIG_FILE} ${CHECKPOINT_FILE} [--out ${RESULT_FILE}] [--eval ${EVAL_METRICS}] --severities 1

# severities 0,2,4
python tools/analysis_tools/test_robustness.py ${CONFIG_FILE} ${CHECKPOINT_FILE} [--out ${RESULT_FILE}] [--eval ${EVAL_METRICS}] --severities 0 2 4
支持的跟踪算法包括多目标跟踪(MOT)算法SORT、DeepSORT、StrongSORT、OCSORT、ByteTrack、QDTrack以及视频实例分割(VIS)算法MaskTrackRCNN、Mask2Former-VIS。
tools/analysis_tools/mot/mot_param_search.py可以搜索MOT模型的参数。它的使用方式相同使用tools/test.py,但配置不同。
这是一个显示如何修改配置的示例:
定义要记录的所需评估指标。
例如,您可以定义evaluator为
test_evaluator=dict(type='MOTChallengeMetrics', metric=['HOTA', 'CLEAR', 'Identity'])
当然,你也可以自定义test_evaluator中的metric的内容。您可以自由选择其中一项或多项。[‘HOTA’, ‘CLEAR’, ‘Identity’]
定义要搜索的参数和值。
假设你有一个像这样的跟踪器
model=dict(
    tracker=dict(
        type='BaseTracker',
        obj_score_thr=0.5,
        match_iou_thr=0.5
    )
)
如果要搜索跟踪器的参数,只需将值更改为如下列表即可
model=dict(
    tracker=dict(
        type='BaseTracker',
        obj_score_thr=[0.4, 0.5, 0.6],
        match_iou_thr=[0.4, 0.5, 0.6, 0.7]
    )
)
tools/analysis_tools/mot/mot_error_visualize.py可以可视化多个对象跟踪的错误。该脚本需要推理的结果。默认情况下,红色边界框表示误报,黄色边界框表示误报,蓝色边界框表示 ID 开关。
python tools/analysis_tools/mot/mot_error_visualize.py \
    ${CONFIG_FILE}\
    --input ${INPUT} \
    --result-dir ${RESULT_DIR} \
    [--output-dir ${OUTPUT}] \
    [--fps ${FPS}] \
    [--show] \
    [--backend ${BACKEND}]
包含RESULT_DIR所有视频的推理结果,推理结果是一个txt文件。
可选参数:
OUTPUT:可视化演示的输出。如果未指定,则–show有义务即时播放视频。
FPS:输出视频的 FPS。
–show:是否动态显示视频。
BACKEND:可视化盒子的后端。选项有cv2和plt。
tools/analysis_tools/mot/browse_dataset.py可以可视化训练数据集,检查数据集配置是否正确。
python tools/analysis_tools/browse_dataset.py ${CONFIG_FILE} [--show-interval ${SHOW_INTERVAL}]
可选参数:
SHOW_INTERVAL:节目的间隔时间。
–show:是否动态显示图像。
本页面提供了在现有基准上准备数据集的说明,包括
多目标跟踪
MOT 挑战
人群人类
视频实例分割
YouTube-VIS
1.1 多目标跟踪
对于多目标跟踪任务的训练和测试,需要MOT Challenge数据集之一(例如MOT17、MOT20),CrowdHuman可以作为补充数据集。
对于中国用户,可以从OpenDataLab高速下载以下数据集:
莫特17
莫特20
人群人类
1.2 视频实例分割
对于视频实例分割任务的训练和测试,仅需要YouTube-VIS数据集之一(例如YouTube-VIS 2019、YouTube-VIS 2021)。
YouTube-VIS 2019 数据集可以从YouTubeVOS下载
YouTube-VIS 2021 数据集可从YouTubeVOS下载
1.3 数据结构
如果您的文件夹结构与以下不同,您可能需要更改配置文件中的相应路径。
mmdetection
├── mmdet
├── tools
├── configs
├── data
│ ├── coco
│ │ ├── train2017
│ │ ├── val2017
│ │ ├── test2017
│ │ ├── annotations
│ │
| ├── MOT15/MOT16/MOT17/MOT20
| | ├── train
| | | ├── MOT17-02-DPM
| | | | ├── det
| │ │ │ ├── gt
| │ │ │ ├── img1
| │ │ │ ├── seqinfo.ini
│ │ │ ├── …
| | ├── test
| | | ├── MOT17-01-DPM
| | | | ├── det
| │ │ │ ├── img1
| │ │ │ ├── seqinfo.ini
│ │ │ ├── …
│ │
│ ├── crowdhuman
│ │ ├── annotation_train.odgt
│ │ ├── annotation_val.odgt
│ │ ├── train
│ │ │ ├── Images
│ │ │ ├── CrowdHuman_train01.zip
│ │ │ ├── CrowdHuman_train02.zip
│ │ │ ├── CrowdHuman_train03.zip
│ │ ├── val
│ │ │ ├── Images
│ │ │ ├── CrowdHuman_val.zip
│ │
# MOT17
# The processing of other MOT Challenge dataset is the same as MOT17
python ./tools/dataset_converters/mot2coco.py -i ./data/MOT17/ -o ./data/MOT17/annotations --split-train --convert-det
python ./tools/dataset_converters/mot2reid.py -i ./data/MOT17/ -o ./data/MOT17/reid --val-split 0.2 --vis-threshold 0.3

# CrowdHuman
python ./tools/dataset_converters/crowdhuman2coco.py -i ./data/crowdhuman -o ./data/crowdhuman/annotations

# YouTube-VIS 2019
python ./tools/dataset_converters/youtubevis/youtubevis2coco.py -i ./data/youtube_vis_2019 -o ./data/youtube_vis_2019/annotations --version 2019

# YouTube-VIS 2021
python ./tools/dataset_converters/youtubevis/youtubevis2coco.py -i ./data/youtube_vis_2021 -o ./data/youtube_vis_2021/annotations --version 2021
