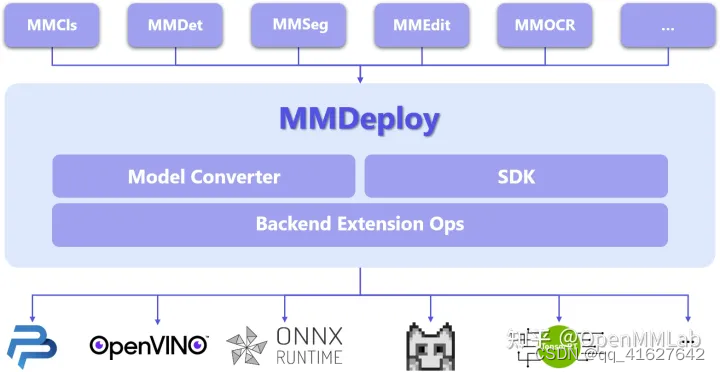
一、MMDepoly整体框架
模型部署是指把机器学习训练生成的算法模型,部署到各类云、边、端设备上去, 并使之高效运行,从而将算法模型实际地应用到现实生活中的各类任务中去,从而实现AI+的智能化转型。
目前,我们已经支持 5 个算法库和 5 种后端推理引擎,囊括多种应用场景:
MMDeploy 所支持算法库:
• 检测(MMDetection)
• 分割(MMSegmentation)
• 分类(MMClassification)
• 编辑(MMEditing)
• 文字识别(MMOCR)
MMDeploy 所支持后端推理引擎:
• ONNX Runtime
• TensorRT
• OpenPPL.NN
• ncnn
• OpenVINO
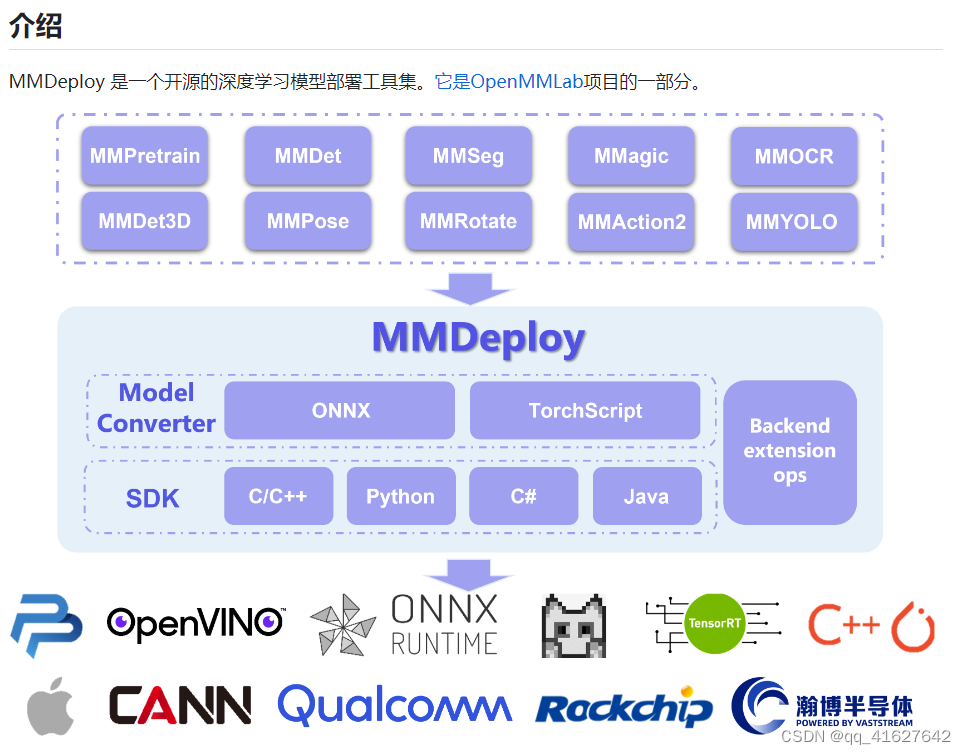
从具体模块组成看,MMDeploy 包含 2 个核心要素:模型转换器 ( Model Converter ) 和应用开发工具包(SDK)。
2.1 模型转换器

模型转换器 ( Model Converter ) 负责把各算法库的 PyTorch 模型转换成推理后端的模型,并进一步封装为 SDK 模型。
模型转换器的具体步骤为:
1)把 PyTorch 转换成 ONNX 模型;
2)对 ONNX 模型进行优化;
3)把 ONNX 模型转换成后端推理引擎支持的模型格式;
4)(可选)把模型转换中的 meta 信息和后端模型打包成 SDK 模型。
在传统部署流水线中,兼容性是最难以解决的瓶颈。针对这些问题,MMDeploy 在模型转换器中添加了模块重写、模型分块和自定义算子这三大功能
模块重写——有效代码替换
针对部分 Python 代码无法直接转换成 ONNX 的问题,MMDeploy 使用重写机制实现了函数、模块、符号表等三种粒度的代码替换,有效地适配 ONNX。
模型分块——精准切除冗余
针对部分模型的逻辑过于复杂,在后端里无法支持的问题,MMDeploy 使用了模型分块机制,能像手术刀一样精准切除掉模型中难以转换的部分,把原模型分成多个子模型,分别转换。这些被去掉的逻辑会在 SDK 中实现。
自定义算子——扩展引擎能力
OpenMMLab 实现了一些新算子,这些算子在 ONNX 或者后端中没有支持。针对这个问题,MMDeploy 把自定义算子在多个后端上进行了实现,扩充了推理引擎的表达能力。
2.2 应用开发工具包 SDK
SDK 为每种视觉任务均提供一组 C API。目前开放了分类、检测、分割、超分、文字检测、文字识别等几类任务的接口。 SDK 充分考虑了接口的易用性和友好性。每组接口均只由 ‘创建句柄’、‘应用句柄’、‘销毁数据’ 和 ‘销毁句柄’ 等函数组成。用法简单、便于集成。

2、 先决条件
为了进行端到端的模型部署,MMDeploy 需要 Python 3.6+ 和 PyTorch 1.8+。
conda create --name mmdeploy python=3.8 -y
conda activate mmdeploy
conda install pytorch=={pytorch_version} torchvision=={torchvision_version} cudatoolkit={cudatoolkit_version} -c pytorch -c conda-forge
pip3 install torch==1.8.2+cu102 torchvision==0.9.2+cu102 torchaudio===0.8.2 -f https://download.pytorch.org/whl/lts/1.8/torch_lts.html -i http://mirrors.aliyun.com/pypi/simple/ --trusted-host mirrors.aliyun.com
# CUDA 11.6
conda install pytorch==1.12.0 torchvision==0.13.0 torchaudio==0.12.0 cudatoolkit=11.6 -c pytorch -c conda-forge
3、安装
步骤 0.安装MMCV
pip install -U openmim
mim install mmengine
mim install "mmcv>=2.0.0rc2"  -i http://mirrors.aliyun.com/pypi/simple/ --trusted-host mirrors.aliyun.com
Step 1.安装MMDeploy和推理引擎
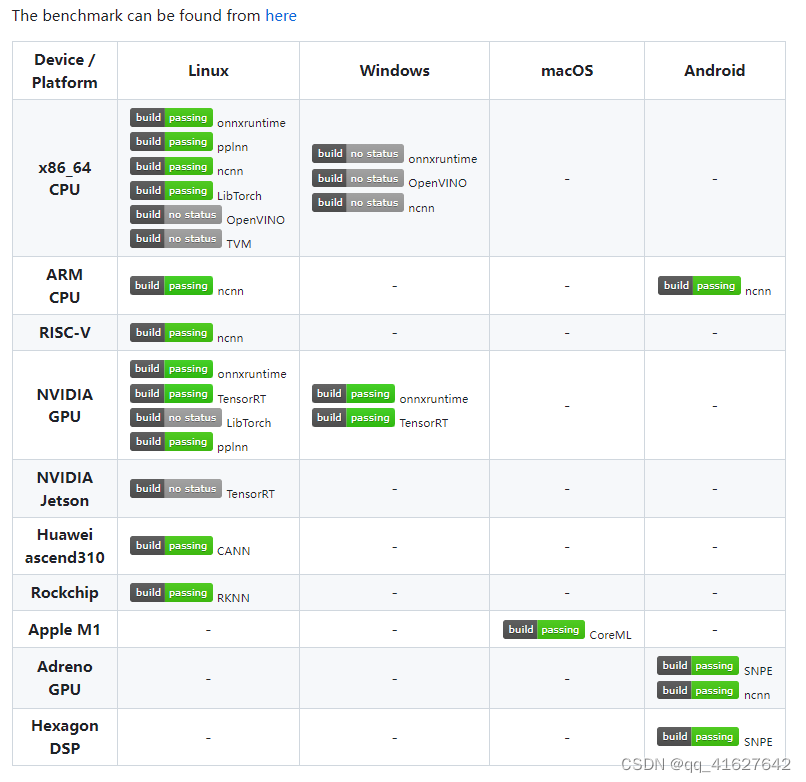
我们建议使用 MMDeploy 预编译包作为我们的最佳实践。目前支持model converter和sdk inference pypi包,这里添加链接描述提供sdk c/cpp库。您可以根据您的目标平台和设备下载它们。
支持的平台和设备矩阵如下:
注意:如果 MMDeploy 预构建包不符合您的目标平台或设备,请从源代码构建 MMDeploy。
1、以最新的预编译包为例,安装方法如下:
Linux-x86_64
# 安装 ONNX Runtime, ONNX, OpenCV
pip install onnxruntime onnx opencv-python
pip install onnxruntime==1.8.1 -i https://pypi.tuna.tsinghua.edu.cn/simple
# 1. install MMDeploy model converter
pip install mmdeploy==1.1.0

# 2. install MMDeploy sdk inference
# you can install one to install according whether you need gpu inference
# 2.1 support onnxruntime
pip install mmdeploy-runtime==1.1.0
# 2.2 support onnxruntime-gpu, tensorrt
pip install mmdeploy-runtime-gpu==1.1.0

# 3. install inference engine
# 3.1 install TensorRT
# !!! If you want to convert a tensorrt model or inference with tensorrt,
# download TensorRT-8.2.3.0 CUDA 11.x tar package from NVIDIA, and extract it to the current directory
https://developer.nvidia.com/nvidia-tensorrt-download
https://developer.nvidia.com/nvidia-tensorrt-8x-download

pip install TensorRT-8.2.3.0/python/tensorrt-8.2.3.0-cp38-none-linux_x86_64.whl
pip install pycuda
export TENSORRT_DIR=$(pwd)/TensorRT-8.2.3.0
export LD_LIBRARY_PATH=${TENSORRT_DIR}/lib:$LD_LIBRARY_PATH
# !!! Moreover, download cuDNN 8.2.1 CUDA 11.x tar package from NVIDIA, and extract it to the current directory
export CUDNN_DIR=$(pwd)/cuda
export LD_LIBRARY_PATH=$CUDNN_DIR/lib64:$LD_LIBRARY_PATH

# 3.2 install ONNX Runtime
# you can install one to install according whether you need gpu inference
# 3.2.1 onnxruntime
pip install onnxruntime==1.8.1 -i https://pypi.tuna.tsinghua.edu.cn/simple
wget https://github.com/microsoft/onnxruntime/releases/download/v1.8.1/onnxruntime-linux-x64-1.8.1.tgz
tar -zxvf onnxruntime-linux-x64-1.8.1.tgz
export ONNXRUNTIME_DIR=$(pwd)/onnxruntime-linux-x64-1.8.1
export LD_LIBRARY_PATH=$ONNXRUNTIME_DIR/lib:$LD_LIBRARY_PATH

# 3.2.2 onnxruntime-gpu
pip install onnxruntime-gpu==1.8.1
wget https://github.com/microsoft/onnxruntime/releases/download/v1.8.1/onnxruntime-linux-x64-gpu-1.8.1.tgz
tar -zxvf onnxruntime-linux-x64-gpu-1.8.1.tgz
export ONNXRUNTIME_DIR=$(pwd)/onnxruntime-linux-x64-gpu-1.8.1
export LD_LIBRARY_PATH=$ONNXRUNTIME_DIR/lib:$LD_LIBRARY_PATH
2、从源代码构建
手把手教你在 ubuntu 上使用 MMDeploy
Download
git clone -b main git@github.com:open-mmlab/mmdeploy.git --recursive
注意:
如果获取子模块失败,您可以按照以下说明手动获取子模块:
cd mmdeploy
git clone git@github.com:NVIDIA/cub.git third_party/cub
cd third_party/cub
git checkout c3cceac115

# go back to third_party directory and git clone pybind11
cd ..
git clone git@github.com:pybind/pybind11.git pybind11
cd pybind11
git checkout 70a58c5

cd ..
git clone git@github.com:gabime/spdlog.git spdlog
cd spdlog
git checkout 9e8e52c048
If it fails when git clone via SSH, you can try the HTTPS protocol like this:
git clone -b main https://github.com/open-mmlab/mmdeploy.git --recursive
Build
请访问以下链接了解如何根据目标平台构建MMDeploy。
4、配置怎么写
本教程介绍如何编写模型转换和部署的配置。部署配置包括onnx config, codebase config, backend config。
1.如何编写onnx配置
Onnx 配置描述如何将模型从 pytorch 导出到 onnx。
onnx 配置参数的描述
type:配置字典的类型。默认为onnx.
export_params:如果指定,将导出所有参数。如果您想导出未经训练的模型,请将其设置为 False。
keep_initializers_as_inputs:如果为 True,则导出图中的所有初始值设定项(通常对应于参数)也将作为输入添加到图中。如果为 False,则初始值设定项不会添加为图形的输入,并且仅将非参数输入添加为输入。
opset_version:Opset_version 默认为 11。
save_file:输出onnx文件。
input_names:分配给图形输入节点的名称。
output_names:分配给图的输出节点的名称。
input_shape:模型输入张量的高度和宽度。
onnx_config = dict(
    type='onnx',
    export_params=True,
    keep_initializers_as_inputs=False,
    opset_version=11,
    save_file='end2end.onnx',
    input_names=['input'],
    output_names=['output'],
    input_shape=None)
如果您需要使用动态轴
如果需要输入和输出的动态形状,则需要在onnx配置中添加dynamic_axes dict。
dynamic_axes:描述输入和输出的维度信息
    dynamic_axes={
        'input': {
            0: 'batch',
            2: 'height',
            3: 'width'
        },
        'dets': {
            0: 'batch',
            1: 'num_dets',
        },
        'labels': {
            0: 'batch',
            1: 'num_dets',
        },
    }
2. 如何编写代码库配置
代码库配置部分包含代码库类型和任务类型等信息。
代码库配置参数的描述
type:模型的代码库,包括mmpretrain, mmdet, mmseg, mmocr, mmagic。
task:模型的任务类型,参考所有代码库中的任务列表
codebase_config = dict(type='mmpretrain', task='Classification')
3. 后端配置如何写
后端配置主要用于指定模型运行的后端,并提供模型在后端运行时所需的信息,参考ONNX Runtime、TensorRT、ncnn、PPLNN。
type:模型后台,包括onnxruntime、、、、、。ncnnpplnntensorrtopenvino
backend_config = dict(
    type='tensorrt',
    common_config=dict(
        fp16_mode=False, max_workspace_size=1 << 30),
    model_inputs=[
        dict(
            input_shapes=dict(
                input=dict(
                    min_shape=[1, 3, 512, 1024],
                    opt_shape=[1, 3, 1024, 2048],
                    max_shape=[1, 3, 2048, 2048])))
    ])
4. TensorRT上mmpretrain的完整示例
在这里,我们提供了 TensorRT 上 mmpretrain 的完整部署配置。
codebase_config = dict(type='mmpretrain', task='Classification')

backend_config = dict(
    type='tensorrt',
    common_config=dict(
        fp16_mode=False,
        max_workspace_size=1 << 30),
    model_inputs=[
        dict(
            input_shapes=dict(
                input=dict(
                    min_shape=[1, 3, 224, 224],
                    opt_shape=[4, 3, 224, 224],
                    max_shape=[64, 3, 224, 224])))])

onnx_config = dict(
    type='onnx',
    dynamic_axes={
        'input': {
            0: 'batch',
            2: 'height',
            3: 'width'
        },
        'output': {
            0: 'batch'
        }
    },
    export_params=True,
    keep_initializers_as_inputs=False,
    opset_version=11,
    save_file='end2end.onnx',
    input_names=['input'],
    output_names=['output'],
    input_shape=[224, 224])
5.我们的部署配置的命名规则
部署配置文件的文件名有特定的命名约定。
(task name)(backend name)(dynamic or static).py
task name:模型的任务类型。
backend name: 后端的名称。注意如果使用量化功能,需要指明量化类型。就像tensorrt-int8。
dynamic or static:动态或静态导出。请注意,如果后端需要明确的形状信息,则需要添加输入大小和height x width格式的描述。就像 一样dynamic-512x1024-2048x2048,这意味着最小输入形状是512x1024,最大输入形状是2048x2048。
detection_tensorrt-int8_dynamic-320x320-1344x1344.py
6. 如何编写模型配置
根据模型的代码库,编写模型配置文件。模型的配置文件用于初始化模型,参考MMPretrain、MMDetection、MMSegmentation、MMOCR、MMagic。
5、 转换模型
安装完成后,您可以通过运行来享受将 PyTorch 模型转换为当前模型开始的模型部署之旅tools/deploy.py。
基于以上设置,我们提供了将 MMDetection中的 Faster R-CNN 转换为 TensorRT 的示例,如下所示:
# clone mmdeploy to get the deployment config. `--recursive` is not necessary
git clone -b main https://github.com/open-mmlab/mmdeploy.git

# clone mmdetection repo. We have to use the config file to build PyTorch nn module
git clone -b 3.x https://github.com/open-mmlab/mmdetection.git
cd mmdetection
mim install -v -e .
cd ..

# download Faster R-CNN checkpoint
wget -P checkpoints https://download.openmmlab.com/mmdetection/v2.0/faster_rcnn/faster_rcnn_r50_fpn_1x_coco/faster_rcnn_r50_fpn_1x_coco_20200130-047c8118.pth

# run the command to start model conversion
python mmdeploy/tools/deploy.py \
    mmdeploy/configs/mmdet/detection/detection_tensorrt_dynamic-320x320-1344x1344.py \
    mmdetection/configs/faster_rcnn/faster-rcnn_r50_fpn_1x_coco.py \
    checkpoints/faster_rcnn_r50_fpn_1x_coco_20200130-047c8118.pth \
    mmdetection/demo/demo.jpg \
    --work-dir mmdeploy_model/faster-rcnn \
    --device cuda \
    --dump-info
转换后的模型及其元信息将在 指定的路径中找到–work-dir。它们组成了 MMDeploy 模型,可以将其馈送到 MMDeploy SDK 中进行模型推理。
有关模型转换的更多详细信息,您可以阅读how_to_convert_model。如果您想自定义转换管道,可以按照本教程编辑配置文件。
本教程简要介绍如何使用 MMDeploy 工具将 OpenMMlab 模型导出到特定后端。笔记:
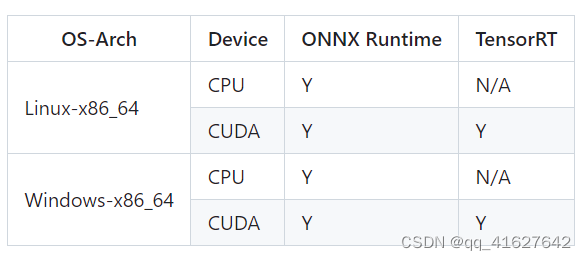
支持的后端有ONNXRuntime、TensorRT、ncnn、PPLNN、OpenVINO。
支持的代码库有MMPretrain、MMDetection、MMSegmentation、MMOCR、MMagic。
如何将模型从 Pytorch 转换到其他后端
先决条件
安装并构建您的目标后端。您可以参考ONNXRuntime-install、TensorRT-install、ncnn-install、PPLNN-install、OpenVINO-install了解更多信息。
安装并构建您的目标代码库。您可以参考MMPretrain-install、MMDetection-install、MMSegmentation-install、MMOCR-install、MMagic-install。
用法
python ./tools/deploy.py \
    ${DEPLOY_CFG_PATH} \
    ${MODEL_CFG_PATH} \
    ${MODEL_CHECKPOINT_PATH} \
    ${INPUT_IMG} \
    --test-img ${TEST_IMG} \
    --work-dir ${WORK_DIR} \
    --calib-dataset-cfg ${CALIB_DATA_CFG} \
    --device ${DEVICE} \
    --log-level INFO \
    --show \
    --dump-info
所有参数的描述
**deploy_cfg:**mmdeploy对模型的部署配置,包括推理框架的类型、是否量化、输入形状是否动态等。配置文件之间可能存在引用关系,是一个例子mmdeploy/mmpretrain/classification_ncnn_static.py。
**model_cfg:**算法库的模型配置,例如mmpretrain/configs/vision_transformer/vit-base-p32_ft-64xb64_in1k-384.py,不管mmdeploy的路径如何。
**checkpoint:**火炬模型路径。mmcv.FileClient可以以http/https开头,具体参见实现。
**img:**模型转换过程中用于测试的图像或点云文件的路径。
**–test-img:**用于测试模型的图像文件的路径。如果没有指定,它将被设置为None。
**–work-dir:**用于保存日志和模型的工作目录路径。
–calib-dataset-cfg:仅在int8模式下有效。用于校准的配置。如果未指定,它将被设置为None并使用模型配置中的“val”数据集进行校准。
–device:用于模型转换的设备。如果没有指定,它将被设置为cpu。对于 trt,请使用cuda:0格式。
–log-level:设置日志级别’CRITICAL’, ‘FATAL’, ‘ERROR’, ‘WARN’, ‘WARNING’, ‘INFO’, ‘DEBUG’, ‘NOTSET’。如果没有指定,它将被设置为INFO。
–show:是否显示检测输出。
–dump-info:是否输出SDK信息。
如何找到 PyTorch 模型对应的部署配置
Find the model's codebase folder in configs/. For converting a yolov3 model, you need to check configs/mmdet folder.
Find the model's task folder in configs/codebase_folder/. For a yolov3 model, you need to check configs/mmdet/detection folder.
Find the deployment config file in configs/codebase_folder/task_folder/. For deploying a yolov3 model to the onnx backend, you could use configs/mmdet/detection/detection_onnxruntime_dynamic.py.
Example
python ./tools/deploy.py \
    configs/mmdet/detection/detection_tensorrt_dynamic-320x320-1344x1344.py \
    $PATH_TO_MMDET/configs/yolo/yolov3_d53_8xb8-ms-608-273e_coco.py \
    $PATH_TO_MMDET/checkpoints/yolo/yolov3_d53_mstrain-608_273e_coco_20210518_115020-a2c3acb8.pth \
    $PATH_TO_MMDET/demo/demo.jpg \
    --work-dir work_dir \
    --show \
    --device cuda:0
5、 推理模型
模型转换后,我们不仅可以通过Model Converter进行推理,还可以通过Inference SDK进行推理。
(一)通过模型转换器进行推理
Model Converter 提供了一个名为 inference_model 的统一 API来完成这项工作,使所有推理后端 API 对用户透明。以之前转换的Faster R-CNN张量模型为例,
from mmdeploy.apis import inference_model
result = inference_model(
  model_cfg='mmdetection/configs/faster_rcnn/faster_rcnn_r50_fpn_1x_coco.py',
  deploy_cfg='mmdeploy/configs/mmdet/detection/detection_tensorrt_dynamic-320x320-1344x1344.py',
  backend_files=['mmdeploy_model/faster-rcnn/end2end.engine'],
  img='mmdetection/demo/demo.jpg',
  device='cuda:0')
'backend_files' in this API refers to backend engine file path, which MUST be put in a list, since some inference engines like OpenVINO and ncnn separate the network structure and its weights into two files.
(二)通过SDK进行推理
您可以直接运行预编译包中的MMDeploy演示程序来获取推理结果。
wget https://github.com/open-mmlab/mmdeploy/releases/download/v1.1.0/mmdeploy-1.1.0-linux-x86_64-cuda11.3.tar.gz
tar xf mmdeploy-1.1.0-linux-x86_64-cuda11.3
cd mmdeploy-1.1.0-linux-x86_64-cuda11.3
# run python demo
python example/python/object_detection.py cuda ../mmdeploy_model/faster-rcnn ../mmdetection/demo/demo.jpg
# run C/C++ demo
# build the demo according to the README.md in the folder.
./bin/object_detection cuda ../mmdeploy_model/faster-rcnn ../mmdetection/demo/demo.jpg
In the above command, the input model is SDK Model path. It is NOT engine file path but actually the path passed to --work-dir. It not only includes engine files but also meta information like 'deploy.json' and 'pipeline.json'.
在下一节中,我们将提供使用 SDK 不同的 FFI(外部函数接口)部署上述转换后的 Faster R-CNN 模型的示例。
Python API
from mmdeploy_runtime import Detector
import cv2

img = cv2.imread('mmdetection/demo/demo.jpg')

# create a detector
detector = Detector(model_path='mmdeploy_models/faster-rcnn', device_name='cuda', device_id=0)
# run the inference
bboxes, labels, _ = detector(img)
# Filter the result according to threshold
indices = [i for i in range(len(bboxes))]
for index, bbox, label_id in zip(indices, bboxes, labels):
  [left, top, right, bottom], score = bbox[0:4].astype(int),  bbox[4]
  if score < 0.3:
      continue
  cv2.rectangle(img, (left, top), (right, bottom), (0, 255, 0))

cv2.imwrite('output_detection.png', img)
image_classification.py
# Copyright (c) OpenMMLab. All rights reserved.
import argparse

import cv2
from mmdeploy_runtime import Classifier


def parse_args():
    parser = argparse.ArgumentParser(
        description='show how to use sdk python api')
    parser.add_argument('device_name', help='name of device, cuda or cpu')
    parser.add_argument(
        'model_path',
        help='path of mmdeploy SDK model dumped by model converter')
    parser.add_argument('image_path', help='path of an image')
    args = parser.parse_args()
    return args


def main():
    args = parse_args()

    img = cv2.imread(args.image_path)
    classifier = Classifier(
        model_path=args.model_path, device_name=args.device_name, device_id=0)
    result = classifier(img)
    for label_id, score in result:
        print(label_id, score)


if __name__ == '__main__':
    main()
object_detection.py
# Copyright (c) OpenMMLab. All rights reserved.
import argparse
import math

import cv2
from mmdeploy_runtime import Detector


def parse_args():
    parser = argparse.ArgumentParser(
        description='show how to use sdk python api')
    parser.add_argument('device_name', help='name of device, cuda or cpu')
    parser.add_argument(
        'model_path',
        help='path of mmdeploy SDK model dumped by model converter')
    parser.add_argument('image_path', help='path of an image')
    args = parser.parse_args()
    return args


def main():
    args = parse_args()

    img = cv2.imread(args.image_path)
    detector = Detector(
        model_path=args.model_path, device_name=args.device_name, device_id=0)
    bboxes, labels, masks = detector(img)

    indices = [i for i in range(len(bboxes))]
    for index, bbox, label_id in zip(indices, bboxes, labels):
        [left, top, right, bottom], score = bbox[0:4].astype(int), bbox[4]
        if score < 0.3:
            continue

        cv2.rectangle(img, (left, top), (right, bottom), (0, 255, 0))

        if masks[index].size:
            mask = masks[index]
            blue, green, red = cv2.split(img)

            x0 = int(max(math.floor(bbox[0]) - 1, 0))
            y0 = int(max(math.floor(bbox[1]) - 1, 0))
            mask_img = blue[y0:y0 + mask.shape[0], x0:x0 + mask.shape[1]]
            cv2.bitwise_or(mask, mask_img, mask_img)
            img = cv2.merge([blue, green, red])

    cv2.imwrite('output_detection.png', img)


if __name__ == '__main__':
    main()
image_segmentation.py
# Copyright (c) OpenMMLab. All rights reserved.
import argparse

import cv2
import numpy as np
from mmdeploy_runtime import Segmentor


def parse_args():
    parser = argparse.ArgumentParser(
        description='show how to use sdk python api')
    parser.add_argument('device_name', help='name of device, cuda or cpu')
    parser.add_argument(
        'model_path',
        help='path of mmdeploy SDK model dumped by model converter')
    parser.add_argument('image_path', help='path of an image')
    args = parser.parse_args()
    return args


def get_palette(num_classes=256):
    state = np.random.get_state()
    # random color
    np.random.seed(42)
    palette = np.random.randint(0, 256, size=(num_classes, 3))
    np.random.set_state(state)
    return [tuple(c) for c in palette]


def main():
    args = parse_args()

    img = cv2.imread(args.image_path)

    segmentor = Segmentor(
        model_path=args.model_path, device_name=args.device_name, device_id=0)
    seg = segmentor(img)
    if seg.dtype == np.float32:
        seg = np.argmax(seg, axis=0)

    palette = get_palette()
    color_seg = np.zeros((seg.shape[0], seg.shape[1], 3), dtype=np.uint8)
    for label, color in enumerate(palette):
        color_seg[seg == label, :] = color
    # convert to BGR
    color_seg = color_seg[..., ::-1]

    img = img * 0.5 + color_seg * 0.5
    img = img.astype(np.uint8)
    cv2.imwrite('output_segmentation.png', img)


if __name__ == '__main__':
    main()
C++ API
使用 SDK C++ API 应遵循以下模式,

现在我们将这个过程应用到上面的 Faster R-CNN 模型上。
#include <cstdlib>
#include <opencv2/opencv.hpp>
#include "mmdeploy/detector.hpp"

int main() {
  const char* device_name = "cuda";
  int device_id = 0;
  std::string model_path = "mmdeploy_model/faster-rcnn";
  std::string image_path = "mmdetection/demo/demo.jpg";

  // 1. load model
  mmdeploy::Model model(model_path);
  // 2. create predictor
  mmdeploy::Detector detector(model, mmdeploy::Device{device_name, device_id});
  // 3. read image
  cv::Mat img = cv::imread(image_path);
  // 4. inference
  auto dets = detector.Apply(img);
  // 5. deal with the result. Here we choose to visualize it
  for (int i = 0; i < dets.size(); ++i) {
    const auto& box = dets[i].bbox;
    fprintf(stdout, "box %d, left=%.2f, top=%.2f, right=%.2f, bottom=%.2f, label=%d, score=%.4f\n",
            i, box.left, box.top, box.right, box.bottom, dets[i].label_id, dets[i].score);
    if (bboxes[i].score < 0.3) {
      continue;
    }
    cv::rectangle(img, cv::Point{(int)box.left, (int)box.top},
                  cv::Point{(int)box.right, (int)box.bottom}, cv::Scalar{0, 255, 0});
  }
  cv::imwrite("output_detection.png", img);
  return 0;
}
当您构建此示例时,请尝试在 CMake 项目中添加 MMDeploy 包,如下所示。然后传给-DMMDeploy_DIRcmake,cmake表示所在路径MMDeployConfig.cmake。您可以在预构建的包中找到它。
When you build this example, try to add MMDeploy package in your CMake project as following. Then pass -DMMDeploy_DIR to cmake, which indicates the path where MMDeployConfig.cmake locates. You can find it in the prebuilt package.
find_package(MMDeploy REQUIRED)
target_link_libraries(${name} PRIVATE mmdeploy ${OpenCV_LIBS})
有关更多 SDK C++ API 用法,请阅读这些示例
其余的 C、C# 和 Java API 用法请分别阅读C 演示、C# 演示和Java 演示。我们将在下一个版本中更多地讨论它们。
加速预处理(实验)
如果你想融合预处理来加速,请参考这个文档添加链接描述
在某些情况下,MMDeploy 提供了融合转换以实现加速的功能。
使用SDK进行推理时,可以编辑pipeline.json来开启fuse选项。
给MMDeploy带来fuse变换的能力,可以参考CVFusion的使用。
6、评估模型
您可以使用测试已部署模型的性能tool/test.py。例如
python ${MMDEPLOY_DIR}/tools/test.py \
    ${MMDEPLOY_DIR}/configs/detection/detection_tensorrt_dynamic-320x320-1344x1344.py \
    ${MMDET_DIR}/configs/faster_rcnn/faster_rcnn_r50_fpn_1x_coco.py \
    --model ${BACKEND_MODEL_FILES} \
    --metrics ${METRICS} \
    --device cuda:0
您可以阅读如何评估模型以了解更多详细信息。添加链接描述
Useful Tools
除deploy.py之外,该目录下还有其他有用的工具tools/。
torch3onnx
onnx2pplnn
onnx2tensorrt
onnx2ncnn