以下原图中,物体连靠在一起,目的是将其分割开,再提取轮廓和定位
原图: 
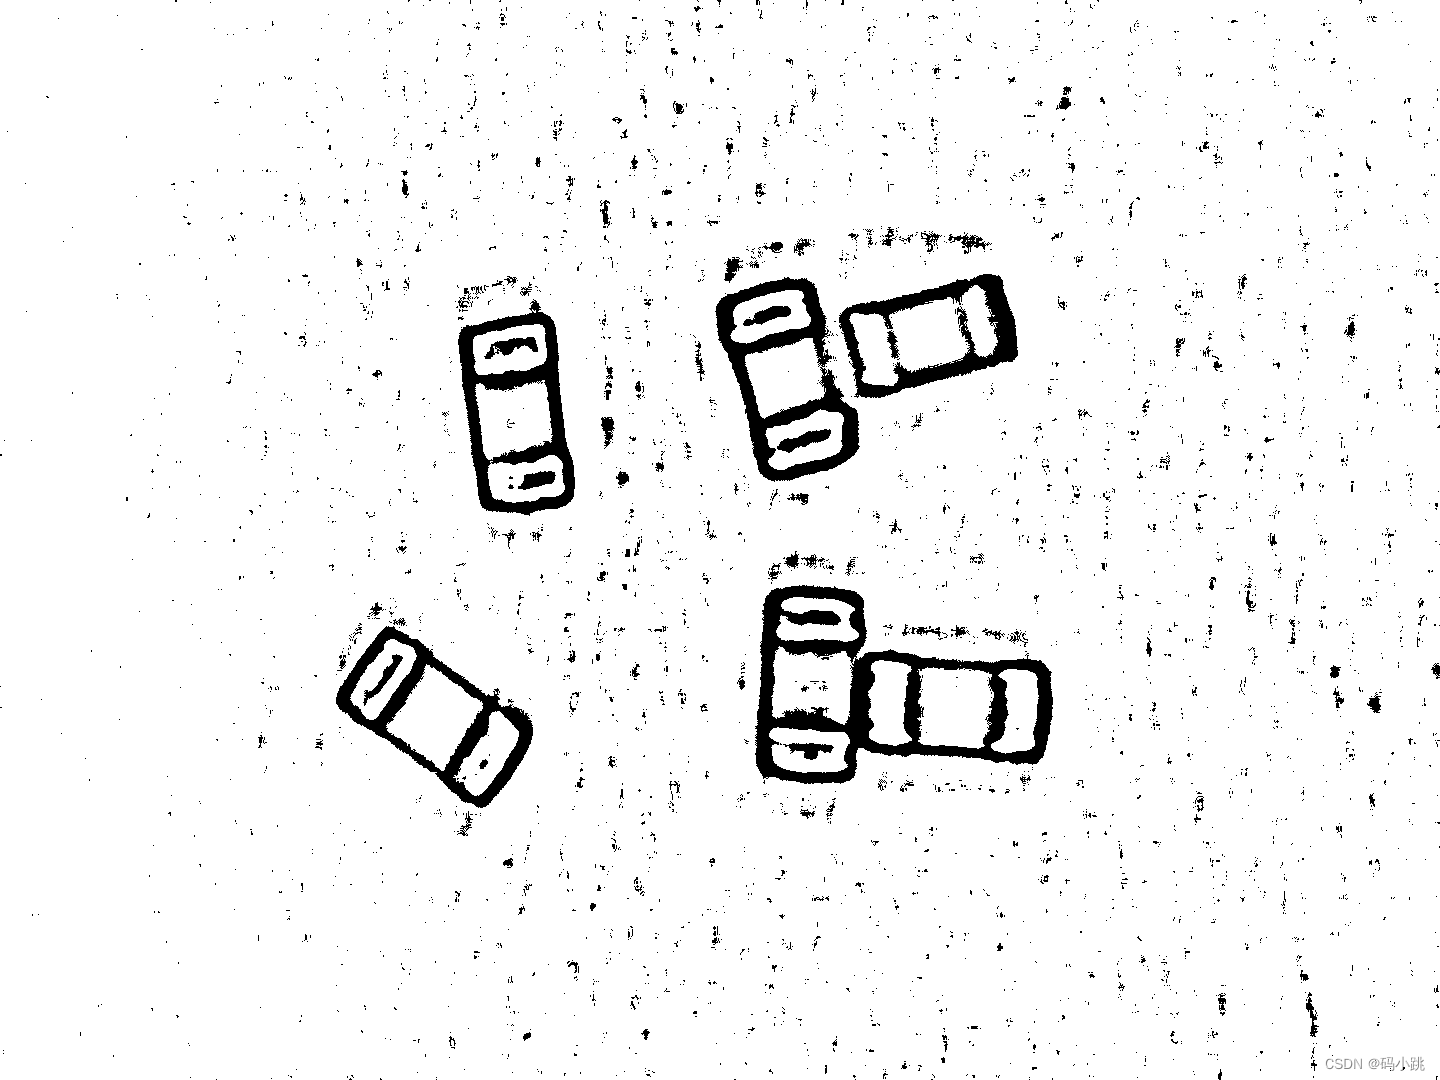
最终效果:

麻烦的地方是,分割开右下角部分,两个连在一起的目标物体,下图所示: 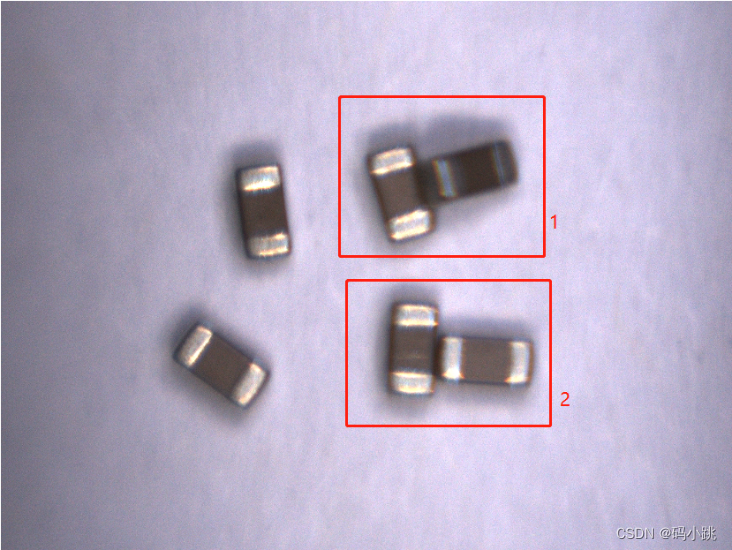
基本方法:BoxFilter滤波、二值化、轮廓提取,凸包检测,图像的矩
代码如下:
        /// <summary>
        /// 获取分割点
        /// </summary>
        /// <param name="contours"></param>
        /// <param name="contourCount"></param>
        /// <param name="arcLength"></param>
        /// <param name="farDistance"></param>
        /// <returns></returns>
        public List<Point> GetSplitPoints(Point[][] contours, List<int> contourCount, int arcLength, int farDistance)
        {
            #region 凸包检测
            List<double> lArc = new List<double>();
            //Mat src = srcImage.Clone();
            List<Point[]> lpContours = new List<Point[]>();
            List<int> hulls = new List<int>();
            Point lastP = new Point();
            Point firstP = new Point();
            Point farLastP = new Point();
            List<Point> lps = new List<Point>();
            int dot = 1;
            List<int> depth = new List<int>();
            for (int i = 0; i < contourCount.Count; i++)
            {
                InputArray inputArray = InputArray.Create<Point>(contours[contourCount[i]]);
                OutputArray outputArray = OutputArray.Create(hulls);
                Cv2.ConvexHull(inputArray, outputArray, false, false);
                if (Cv2.ArcLength(inputArray, true) < arcLength)
                {
                    //lArc.Add(Cv2.ArcLength(inputArray, true));
                    continue;
                }
                //前三个值得含义分别为:凸缺陷的起始点,凸缺陷的终点,凸缺陷的最深点(即边缘点到凸包距离最大点)。
                var defects = Cv2.ConvexityDefects(contours[contourCount[i]], hulls);
                for (int j = 0; j < defects.Length; j++)
                {
                    OpenCvSharp.Point start = contours[contourCount[i]][defects[j].Item0];
                    OpenCvSharp.Point end = contours[contourCount[i]][defects[j].Item1];
                    OpenCvSharp.Point far = contours[contourCount[i]][defects[j].Item2];
                    //OpenCvSharp.Point fart = contours[contourCount[i]][defects[j].Item3];
                    if (defects[j].Item3 > farDistance) //(4500 < defects[j].Item3 && defects[j].Item3 < 300000)
                    {
                        lps.Add(contours[contourCount[i]][defects[j].Item2]);
                        depth.Add(defects[j].Item3);
                    }
                }
            }
            #endregion
            return lps;
        }

        /// <summary>
        /// 获取最小内接矩形
        /// </summary>
        /// <param name="contours"></param>
        /// <param name="contourCount"></param>
        /// <returns></returns>
        public List<RotatedRect> GetMinRects(Point[][] contours, List<int> contourCount)
        {
            //Cv2.ImShow(",mmmm", morphImage);

            //double rotateAngel = 0;
            Point2f[] vertices = new Point2f[4];
            //Point2f minRectcenterPoint = new Point2f();
            List<RotatedRect> minRects = new List<RotatedRect>();
            for (int i = 0; i < contourCount.Count; i++)
            {
                //获取轮廓点的矩形区域
                //绘制Rio区域最小矩形
                #region 绘制Rio区域最小矩形
                RotatedRect minRect = Cv2.MinAreaRect(contours[contourCount[i]]);
                minRects.Add(minRect);
                #endregion
            }
            return minRects;
        }
        /// <summary>
        /// 返回设置范围内的轮廓
        /// </summary>
        /// <param name="mat"></param>
        /// <param name="range1"></param>
        /// <param name="range2"></param>
        /// <param name="contourCount"></param>
        /// <returns></returns>
        public Point[][] GetImageContours(Mat mat, int length, out List<int> contourCount)
        {
            List<double> arclength = new List<double>();
            OpenCvSharp.Point[][] contours;
            HierarchyIndex[] hierarchies;
            //Cv2.ImShow(",mmmm", mat);
            Cv2.FindContours(mat, out contours, out hierarchies, RetrievalModes.External, ContourApproximationModes.ApproxSimple, new Point());
            Mat connImg = Mat.Zeros(mat.Size(), MatType.CV_8UC3);
            Point2f[] vertices = new Point2f[4];
            Mat drawOutline = Mat.Zeros(mat.Size(), mat.Type());
            int sum = 0;
            contourCount = new List<int>();
            for (int i = 0; i < contours.Length; i++)
            {
                Rect rect1 = Cv2.BoundingRect(contours[i]);
                if (Cv2.ArcLength(contours[i], true) > length)//(rect1.Width > range1 && rect1.Height < range2)
                {
                    Cv2.DrawContours(drawOutline, contours, i, new Scalar(255, 0, 255), 2, LineTypes.Link8, hierarchies);
                    contourCount.Add(i);
                    arclength.Add(Cv2.ArcLength(contours[i], true));
                    sum++;
                }
            }
            Cv2.ImShow("contours", drawOutline);
            return contours;
        }


        /// <summary>
        /// 图像灰度
        /// 盒子滤波 保留边缘信息
        /// 自适应阈值 效果不错 无需形态学降噪
        /// 取反操作
        /// 过滤不需要轮廓信息(面积 边长)
        /// 轮廓提取
        /// (以上每一步都很重要,否则,无法获取良好的轮廓)
        /// 凸包检测
        /// 根据轮廓信息,查找大凸包,获取分割点
        /// 重新操作图像
        /// 在二值化图像时,分割连接点位置
        /// 绘制轮廓
        /// 绘制最小内接矩形和质心点
        /// 识别目标位置完成
        /// 注意:不同大小的图像处理时,需要修改自适应阈值参数、轮廓过滤面积、凸包检测的分割点过滤
        /// </summary>
        /// <param name="srcImage"></param>
        /// <returns></returns>
        public Mat PreProcess(Mat srcImage)
        {
            Mat grayMat = new Mat();
            Cv2.CvtColor(srcImage, grayMat, ColorConversionCodes.BGRA2GRAY);
            //Cv2.ImShow("grayMat", grayMat);

            Mat blurImg = BoxFilter(grayMat);
            //Cv2.ImShow("blurImg", blurImg);

            // 注意:不同大小的图像处理时,需要修改参数
            Mat threshold = new Mat();
            Cv2.AdaptiveThreshold(blurImg, threshold, 255, AdaptiveThresholdTypes.MeanC, ThresholdTypes.Binary, 15, 2);
            //Cv2.Threshold(threshold, threshold, 0, 255, ThresholdTypes.BinaryInv);
            Cv2.ImShow("threshold", threshold);


            //Mat morphImg = MorphImage(threshold, MorphShapes.Ellipse, MorphTypes.Dilate, 1, new OpenCvSharp.Size(3, 3));
            //Cv2.ImShow("morphImg", morphImg);

            //Mat cannyImg = new Mat();
            //Cv2.Laplacian(morphImg2, cannyImg, MatType.CV_8UC3, 5, 1);//Cv2.Canny(morphImg, cannyImg, 30, 90);//3和4参数的 最佳比例在1/3和1/2之间
            //Cv2.ImShow("cannyImg", cannyImg);

            Mat bitwiseMat = new Mat();
            Cv2.BitwiseNot(threshold, bitwiseMat);
            Cv2.ImShow("bitwiseMat", bitwiseMat);

            List<int> contourCount;
            //轮廓提取
            Point[][] contours = GetImageContours(bitwiseMat, 600, out contourCount);
            //凸包检测
            List<Point> lps = GetSplitPoints(contours, contourCount, 800, 4500);


            // 注意:不同大小的图像处理时,需要修改参数
            //重新处理
            Cv2.AdaptiveThreshold(blurImg, threshold, 255.0, AdaptiveThresholdTypes.MeanC, ThresholdTypes.Binary, 13, 2);
            Cv2.ImShow("threshold1", threshold);

            //MorphImage(threshold, MorphShapes.Ellipse, MorphTypes.Close, 1, new OpenCvSharp.Size(3, 3));
            //Cv2.ImShow("morphImg1", morphImg);

            Cv2.BitwiseNot(threshold, bitwiseMat);
            Cv2.ImShow("bitwiseMat1", bitwiseMat);
            //提取凸显点坐标

            if (lps.Count > 1)
            {
                Cv2.Line(bitwiseMat, lps[0], lps[1], Scalar.Black, 2, LineTypes.Link8);
            }
            Cv2.ImShow("bitwiseMat2", bitwiseMat);
            //轮廓提取
            contourCount.Clear();    // 注意:不同大小的图像处理时,需要修改length参数
            Point[][] newContours = GetImageContours(bitwiseMat, 550, out contourCount);
            List<RotatedRect> rotatedRects = GetMinRects(newContours, contourCount);

            for (int i = 0; i < rotatedRects.Count; i++)
            {
                #region 绘制Rio区域最小矩形
                Point2f[] vertices = rotatedRects[i].Points();
                #endregion
                //绘制最小矩形
                #region 绘制最小矩形
                Cv2.Line(srcImage, Convert.ToInt32(vertices[0].X), Convert.ToInt32(vertices[0].Y), Convert.ToInt32(vertices[1].X), Convert.ToInt32(vertices[1].Y), new Scalar(0, 0, 255), 2);
                Cv2.Line(srcImage, Convert.ToInt32(vertices[0].X), Convert.ToInt32(vertices[0].Y), Convert.ToInt32(vertices[3].X), Convert.ToInt32(vertices[3].Y), new Scalar(0, 0, 255), 2);
                Cv2.Line(srcImage, Convert.ToInt32(vertices[1].X), Convert.ToInt32(vertices[1].Y), Convert.ToInt32(vertices[2].X), Convert.ToInt32(vertices[2].Y), new Scalar(0, 0, 255), 2);
                Cv2.Line(srcImage, Convert.ToInt32(vertices[2].X), Convert.ToInt32(vertices[2].Y), Convert.ToInt32(vertices[3].X), Convert.ToInt32(vertices[3].Y), new Scalar(0, 0, 255), 2);
                //获取重心点
                Moments M;
                M = Cv2.Moments(vertices);
                double cX = M.M10 / M.M00;
                double cY = M.M01 / M.M00;
                //显示目标中心并提取坐标点
                Cv2.Circle(srcImage, (int)cX, (int)cY, 2, Scalar.Yellow, 2);
                //Console.WriteLine("AngleRect_angle: {0}", minRect.Angle);
                #endregion
            }
            Cv2.ImShow("srcImage", srcImage);
            return null;
        }
灰度图像后图像二值化:
图像取反

绘制轮廓

凸包检测,查找分割点,下图黄色点标记处即找到的分割点位置

将找到的分割点在二值化图像中,连接一条线后,重新轮廓识别即可分割

最小轮廓矩形提取和绘制,以及绘制质心位置
 到此,已将连接处分隔开
注意:使用以上方法是需要根据图像大小设置部分参数,例如二值化处理参数、过滤轮廓形状大小,凸包检测点的获取等位置,需要根据实际情况设置参数;