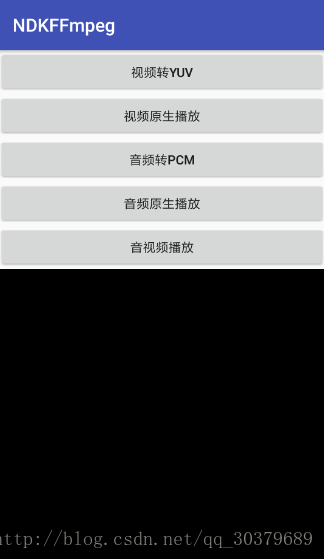
项目演示
前提准备
- 编译FFmpeg+CMake并能运行,详细可见我博客
- 下载libyuv库并编译成libyuv.so库,用于实现转换RGB格式功能
FFmpeg库简介
- avcodec:编解码,包含
- avformate:封装格式处理
- avfilter:滤镜特效处理
- avdevice:输入输出设备
- avutil:工具库
- swresample:音频采样处理
- swscale:视频像素格式转换,缩放等
FFmpeg解码流程
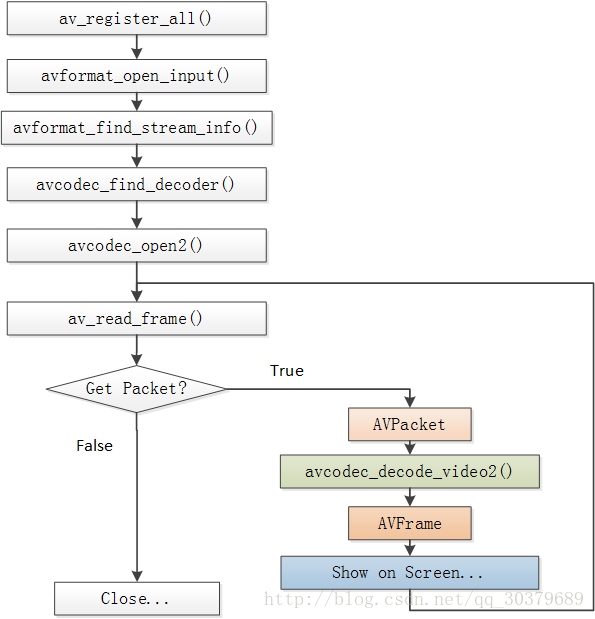
流程从上到下分别为
- 注册所有组件
- 打开视频文件
- 获取视频信息
- 获取解码器
- 打开解码器
- 循环解析每一帧数据
FFmpeg的数据结构
- AVFormatContext:封装格式上下文结构体,也是统领全局的结构体,保存了视频文件封装格式相关信息
- iformat:输入视频的AVInputFormat
- nb_streams :输入视频的AVStream 个数
- streams :输入视频的AVStream []数组
- duration :输入视频的时长(以微秒为单位)
- bit_rate :输入视频的码率
- AVInputFormat:每种封装格式(例如FLV, MKV, MP4, AVI)对应一个该结构体
- name:封装格式名称
- long_name:封装格式的长名称
- extensions:封装格式的扩展名
- id:封装格式ID
- AVStream:视频文件中每个视频(音频)流对应一个该结构体
- id:序号
- codec:该流对应的AVCodecContext
- time_base:该流的时基
- r_frame_rate:该流的帧率
- AVCodecContext:编码器上下文结构体,保存了视频(音频)编解码相关信息
- codec:编解码器的AVCodec
- width, height:图像的宽高(只针对视频)
- pix_fmt:像素格式(只针对视频)
- sample_rate:采样率(只针对音频)
- channels:声道数(只针对音频)
- sample_fmt:采样格式(只针对音频)
- AVCodec:每种视频(音频)编解码器(例如H.264解码器)对应一个该结构体
- name:编解码器名称
- long_name:编解码器长名称
- type:编解码器类型
- id:编解码器ID
- AVPacket:存储一帧压缩编码数据
- pts:显示时间戳
- dts :解码时间戳
- data :压缩编码数据
- size :压缩编码数据大小
- stream_index :所属的AVStream
- AVFrame:存储一帧解码后像素(采样)数据
- data:解码后的图像像素数据(音频采样数据)
- linesize:对视频来说是图像中一行像素的大小;对音频来说是音频帧的大小
- width, height:图像的宽高(只针对视频)
- key_frame:是否为关键帧(只针对视频)
- pict_type:帧类型(只针对视频) 。例如I,P,B
项目结构

- native-lib.cpp:文件中实现的功能有,视频转YUV、视频转RGB显示、音频转PCM、音频播放
- native-player.cpp:文件中实现的功能有,音视频同步
- queue.cpp:文件中实现的功能有,提供一个队列可以存放AVPacket,用于音视频同步
- FFmpegUtils:存放本地静态方法
- MainActivity:主界面
- VideoView:用于视频的播放界面,为屏幕下面黑屏部分
本地方法
public class FFmpegUtils {

    static {
        System.loadLibrary("avutil-54");
        System.loadLibrary("swresample-1");
        System.loadLibrary("avcodec-56");
        System.loadLibrary("avformat-56");
        System.loadLibrary("swscale-3");
        System.loadLibrary("postproc-53");
        System.loadLibrary("avfilter-5");
        System.loadLibrary("avdevice-56");
        System.loadLibrary("yuv");
        System.loadLibrary("native-lib");
        System.loadLibrary("native-player");
    }

    /**
     * 视频转换输出YUV格式文件
     *
     * @param input_path
     * @param output_path
     */
    public static native void video2YUV(String input_path, String output_path);

    /**
     * 视频转换显示RGB格式
     *
     * @param video_path
     * @param surface
     */
    public static native void video2RGB(String video_path, Surface surface);

    /**
     * 音频转换输出PCM文件
     *
     * @param input_path
     * @param output_path
     */
    public static native void sound2PCM(String input_path, String output_path);


    /**
     * 播放音频
     *
     * @param input_path
     */
    public native void soundPlay(String input_path);

    /**
     * 播放音视频
     *
     * @param input_path
     * @param surface
     */
    public native void videoAndSoundPlay(String input_path, Surface surface);


    /**
     * 创建一个AudioTrack对象,用于播放
     *
     * @param nb_channels
     * @return
     */
    public AudioTrack createAudioTrack(int nb_channels) {
        //固定的比特率
        int sampleRateInHz = 44100;
        //固定格式的音频码流
        int audioFormat = AudioFormat.ENCODING_PCM_16BIT;
        //声道布局
        int channelConfig;
        if (nb_channels == 1) {
            channelConfig = android.media.AudioFormat.CHANNEL_OUT_MONO;
        } else if (nb_channels == 2) {
            channelConfig = android.media.AudioFormat.CHANNEL_OUT_STEREO;
        } else {
            channelConfig = android.media.AudioFormat.CHANNEL_OUT_STEREO;
        }
        int bufferSizeInBytes = AudioTrack.getMinBufferSize(sampleRateInHz, channelConfig, audioFormat);

        AudioTrack audioTrack = new AudioTrack(AudioManager.STREAM_MUSIC, sampleRateInHz, channelConfig,
                audioFormat, bufferSizeInBytes, AudioTrack.MODE_STREAM);
        return audioTrack;
    }

}
CmakeLists
cmake_minimum_required(VERSION 3.4.1)


include_directories(./libs/include
                    ./libs/include/libyuv)

link_directories(./libs/${ANDROID_ABI})

find_library(log-lib
             log)
find_library(android-lib
             android)

add_library(
             native-lib
             SHARED
             src/main/cpp/native-lib.cpp )
add_library(
             native-player
             SHARED
             src/main/cpp/native-player.cpp
             src/main/cpp/queue.cpp)

target_link_libraries(native-lib
                       ${log-lib}
                       ${android-lib}
                       avutil-54
                       swresample-1
                       avcodec-56
                       avformat-56
                       swscale-3
                       postproc-53
                       avfilter-5
                       avdevice-56
                       yuv)
target_link_libraries(native-player
                       ${log-lib}
                       ${android-lib}
                       avutil-54
                       swresample-1
                       avcodec-56
                       avformat-56
                       swscale-3
                       postproc-53
                       avfilter-5
                       avdevice-56
                       yuv)
权限声明
由于需要将生成的文件放入SD卡中,所以需要相应的权限
<uses-permission android:name="android.permission.READ_EXTERNAL_STORAGE" />
<!-- 往SDCard写入数据权限 -->
<uses-permission android:name="android.permission.WRITE_EXTERNAL_STORAGE" />
<!-- 在SDCard中创建与删除文件权限 -->
<uses-permission android:name="android.permission.MOUNT_UNMOUNT_FILESYSTEMS" />
头文件
注意增加extern “C” 写法,兼容c
#include <jni.h>
#include <stdlib.h>
#include <stdio.h>
#include <unistd.h>
#include <android/log.h>

#include <android/native_window.h>
#include <android/native_window_jni.h>

extern "C" {
#include "libavformat/avformat.h"
#include "libavcodec/avcodec.h"
#include "libswscale/swscale.h"
#include "libswresample/swresample.h"
#include "libyuv/libyuv.h"
}

#define LOGE(FORMAT, ...) __android_log_print(ANDROID_LOG_ERROR,"ffmpeg",FORMAT,##__VA_ARGS__);
//16bit 44100 PCM 数据大小
#define MAX_AUDIO_FRME_SIZE 44100 * 2
视频转YUV
将视频文件格式转为指定的YUV420P像素帧,并生成YUV新文件
extern "C"
JNIEXPORT void JNICALL
Java_com_handsome_ndkffmpeg_FFmpegUtils_video2YUV(JNIEnv *env, jclass jclazz, jstring input_path_,
                                                  jstring out_path_) {
    const char *input_path = env->GetStringUTFChars(input_path_, NULL);
    const char *output_path = env->GetStringUTFChars(out_path_, NULL);
    //1、注册所有组件
    av_register_all();
    //2、打开视频文件
    AVFormatContext *pFormatCtx = avformat_alloc_context();
    if ((avformat_open_input(&pFormatCtx, input_path, NULL, NULL)) < 0) {
        LOGE("Cannot open input file");
        return;
    }
    //3、获取视频信息
    if (avformat_find_stream_info(pFormatCtx, NULL) < 0) {
        LOGE("Cannot find stream\n");
        return;
    }
    //4、找到视频流的位置
    int video_stream_index = -1;
    int i = 0;
    for (; i < pFormatCtx->nb_streams; i++) {
        if (pFormatCtx->streams[i]->codec->codec_type == AVMEDIA_TYPE_VIDEO) {
            video_stream_index = i;
            LOGE("find the stream index %d", video_stream_index);
            break;
        }
    }
    //5、获取解码器
    AVCodecContext *pCodeCtx = pFormatCtx->streams[video_stream_index]->codec;
    AVCodec *pCodec = avcodec_find_decoder(pCodeCtx->codec_id);
    if (pCodec == NULL) {
        LOGE("Cannot find decoder\n");
        return;
    }
    //6、打开解码器
    if (avcodec_open2(pCodeCtx, pCodec, NULL) < 0) {
        LOGE("Cannot open codec\n");
        return;
    }
    //7、解析每一帧数据
    int got_picture_ptr, frame_count = 1;
    //压缩数据
    AVPacket *packet = (AVPacket *) av_malloc(sizeof(AVPacket));
    //解压缩数据
    AVFrame *frame = av_frame_alloc();
    AVFrame *yuvFrame = av_frame_alloc();

    //将视频转换成指定的420P的YUV格式
    //缓冲区分配内存
    uint8_t *out_buffer = (uint8_t *) av_malloc(
            avpicture_get_size(AV_PIX_FMT_YUV420P, pCodeCtx->width, pCodeCtx->height));
    //初始化缓冲区
    avpicture_fill((AVPicture *) yuvFrame, out_buffer, AV_PIX_FMT_YUV420P, pCodeCtx->width,
                   pCodeCtx->height);
    //用于像素格式转换或者缩放
    struct SwsContext *sws_ctx = sws_getContext(
            pCodeCtx->width, pCodeCtx->height, pCodeCtx->pix_fmt,
            pCodeCtx->width, pCodeCtx->height, AV_PIX_FMT_YUV420P,
            SWS_BILINEAR, NULL, NULL, NULL);
    //输出文件
    FILE *fp_yuv = fopen(output_path, "wb");
    //一帧一帧读取压缩的视频数据
    while (av_read_frame(pFormatCtx, packet) >= 0) {
        //找到视频流
        if (packet->stream_index == video_stream_index) {
            avcodec_decode_video2(pCodeCtx, frame, &got_picture_ptr, packet);
            //正在解码
            if (got_picture_ptr) {
                //frame->yuvFrame,转为指定的YUV420P像素帧
                sws_scale(sws_ctx, (const uint8_t *const *) frame->data, frame->linesize, 0,
                          frame->height, yuvFrame->data, yuvFrame->linesize);
                //计算视频数据总大小
                int y_size = pCodeCtx->width * pCodeCtx->height;
                //AVFrame->YUV,由于YUV的比例是4:1:1
                fwrite(yuvFrame->data[0], 1, y_size, fp_yuv);
                fwrite(yuvFrame->data[1], 1, y_size / 4, fp_yuv);
                fwrite(yuvFrame->data[2], 1, y_size / 4, fp_yuv);
                LOGE("解析第%d帧", (frame_count++));
            }
            av_free_packet(packet);
        }
    }
    //8、释放资源
    fclose(fp_yuv);
    av_frame_free(&frame);
    avcodec_close(pCodeCtx);
    avformat_free_context(pFormatCtx);
    env->ReleaseStringUTFChars(input_path_, input_path);
    env->ReleaseStringUTFChars(out_path_, output_path);
}
视频转RGB显示
1、在屏幕上需要一个SurfaceView来显示我们的视频,设置一下其显示的格式,与FFmepg转换的格式匹配
public class VideoView extends SurfaceView {
    public VideoView(Context context) {
        this(context, null);
    }

    public VideoView(Context context, AttributeSet attrs) {
        this(context, attrs, 0);
    }

    public VideoView(Context context, AttributeSet attrs, int defStyleAttr) {
        super(context, attrs, defStyleAttr);
        init();
    }

    public void init() {
        getHolder().setFormat(PixelFormat.RGBA_8888);
    }
}
2、采用libyuv的转换方法,将YUV格式转换成RGB格式,并在SurfaceView上显示
extern "C"
JNIEXPORT void JNICALL
Java_com_handsome_ndkffmpeg_FFmpegUtils_video2RGB(JNIEnv *env, jclass type, jstring input_path_,
                                                  jobject surface) {
    const char *input_path = env->GetStringUTFChars(input_path_, 0);
    //1、注册所有组件
    av_register_all();
    //2、打开视频文件
    AVFormatContext *pFormatCtx = avformat_alloc_context();
    if ((avformat_open_input(&pFormatCtx, input_path, NULL, NULL)) < 0) {
        LOGE("Cannot open input file");
        return;
    }
    //3、获取视频信息
    if (avformat_find_stream_info(pFormatCtx, NULL) < 0) {
        LOGE("Cannot find stream\n");
        return;
    }
    //4、找到视频流的位置
    int video_stream_index = -1;
    int i = 0;
    for (; i < pFormatCtx->nb_streams; i++) {
        if (pFormatCtx->streams[i]->codec->codec_type == AVMEDIA_TYPE_VIDEO) {
            video_stream_index = i;
            LOGE("find the stream index %d", video_stream_index);
            break;
        }
    }
    //5、获取解码器
    AVCodecContext *pCodeCtx = pFormatCtx->streams[video_stream_index]->codec;
    AVCodec *pCodec = avcodec_find_decoder(pCodeCtx->codec_id);
    if (pCodec == NULL) {
        LOGE("Cannot find decoder\n");
        return;
    }
    //6、打开解码器
    if (avcodec_open2(pCodeCtx, pCodec, NULL) < 0) {
        LOGE("Cannot open codec\n");
        return;
    }
    //7、解析每一帧数据
    int got_picture_ptr, frame_count = 1;
    //压缩数据
    AVPacket *packet = (AVPacket *) av_malloc(sizeof(AVPacket));
    //解压缩数据
    AVFrame *yuv_frame = av_frame_alloc();
    AVFrame *rgb_frame = av_frame_alloc();
    //绘制时的surface窗口
    ANativeWindow *window = ANativeWindow_fromSurface(env, surface);
    //绘制时的缓冲区
    ANativeWindow_Buffer outBuffer;
    //一帧一帧读取压缩的视频数据
    while (av_read_frame(pFormatCtx, packet) >= 0) {
        //找到视频流
        if (packet->stream_index == video_stream_index) {
            avcodec_decode_video2(pCodeCtx, yuv_frame, &got_picture_ptr, packet);
            //正在解码
            if (got_picture_ptr) {
                LOGE("解码%d帧", frame_count++);
                //设置缓冲区的属性(宽、高、像素格式)
                ANativeWindow_setBuffersGeometry(window, pCodeCtx->width, pCodeCtx->height,
                                                 WINDOW_FORMAT_RGBA_8888);
                ANativeWindow_lock(window, &outBuffer, NULL);
                //设置rgb_frame的属性(像素格式、宽高)和缓冲区
                //rgb_frame缓冲区与outBuffer.bits是同一块内存
                avpicture_fill((AVPicture *) rgb_frame, (const uint8_t *) outBuffer.bits,
                               PIX_FMT_RGBA, pCodeCtx->width, pCodeCtx->height);
                //YUV->RGBA_8888
                libyuv::I420ToARGB(yuv_frame->data[0], yuv_frame->linesize[0],
                                   yuv_frame->data[2], yuv_frame->linesize[2],
                                   yuv_frame->data[1], yuv_frame->linesize[1],
                                   rgb_frame->data[0], rgb_frame->linesize[0],
                                   pCodeCtx->width, pCodeCtx->height);
                //unlock
                ANativeWindow_unlockAndPost(window);
                //绘制停顿16ms
                usleep(1000 * 16);
            }
            av_free_packet(packet);
        }
    }
    //8、释放资源
    ANativeWindow_release(window);
    av_frame_free(&yuv_frame);
    avcodec_close(pCodeCtx);
    avformat_free_context(pFormatCtx);
    env->ReleaseStringUTFChars(input_path_, input_path);
}
音频转PCM
将音频采样进行重采样,获取我们需要的PCM格式的音频文件,并生成PCM新文件
extern "C"
JNIEXPORT void JNICALL
Java_com_handsome_ndkffmpeg_FFmpegUtils_sound2PCM(JNIEnv *env, jclass type, jstring input_path_,
                                                  jstring output_path_) {
    const char *input_path = env->GetStringUTFChars(input_path_, 0);
    const char *output_path = env->GetStringUTFChars(output_path_, 0);
    //1、注册所有组件
    av_register_all();
    //2、打开视频文件
    AVFormatContext *pFormatCtx = avformat_alloc_context();
    if ((avformat_open_input(&pFormatCtx, input_path, NULL, NULL)) < 0) {
        LOGE("Cannot open input file");
        return;
    }
    //3、获取视频信息
    if (avformat_find_stream_info(pFormatCtx, NULL) < 0) {
        LOGE("Cannot find stream\n");
        return;
    }
    //4、找到视频流的位置
    int audio_stream_index = -1;
    int i = 0;
    for (; i < pFormatCtx->nb_streams; i++) {
        if (pFormatCtx->streams[i]->codec->codec_type == AVMEDIA_TYPE_AUDIO) {
            audio_stream_index = i;
            LOGE("find the stream index %d", audio_stream_index);
            break;
        }
    }
    //5、获取解码器
    AVCodecContext *pCodeCtx = pFormatCtx->streams[audio_stream_index]->codec;
    AVCodec *pCodec = avcodec_find_decoder(pCodeCtx->codec_id);
    if (pCodec == NULL) {
        LOGE("Cannot find decoder\n");
        return;
    }
    //6、打开解码器
    if (avcodec_open2(pCodeCtx, pCodec, NULL) < 0) {
        LOGE("Cannot open codec\n");
        return;
    }
    //7、解析每一帧数据(包含重采样)
    int got_picture_ptr, frame_count = 1;
    //压缩数据
    AVPacket *packet = (AVPacket *) av_malloc(sizeof(AVPacket));
    //解压缩数据
    AVFrame *frame = av_frame_alloc();

    //重采样设置参数,将frame数据转成16bit比特率44100的PCM格式
    //重采样上下文
    SwrContext *swrCtx = swr_alloc();
    //输入的采样格式
    enum AVSampleFormat in_sample_fmt = pCodeCtx->sample_fmt;
    //输出采样格式16bit的PCM
    enum AVSampleFormat out_sample_fmt = AV_SAMPLE_FMT_S16;
    //输入采样率
    int in_sample_rate = pCodeCtx->sample_rate;
    //输出采样率
    int out_sample_rate = 44100;
    //获取输入的声道布局
    uint64_t in_ch_layout = pCodeCtx->channel_layout;
    //输出的声道布局(立体声)
    uint64_t out_ch_layout = AV_CH_LAYOUT_STEREO;
    //设置重采样配置
    swr_alloc_set_opts(swrCtx,
                       out_ch_layout, out_sample_fmt, out_sample_rate,
                       in_ch_layout, in_sample_fmt, in_sample_rate,
                       0, NULL);
    //重采样初始化
    swr_init(swrCtx);
    //获取输出的声道个数
    int out_channel_nb = av_get_channel_layout_nb_channels(out_ch_layout);
    //16bit 44100 PCM 数据
    uint8_t *out_buffer = (uint8_t *) av_malloc(MAX_AUDIO_FRME_SIZE);
    //输出文件
    FILE *fp_pcm = fopen(output_path, "wb");
    //一帧一帧读取压缩的视频数据
    while (av_read_frame(pFormatCtx, packet) >= 0) {
        //找到音频流
        if (packet->stream_index == audio_stream_index) {
            avcodec_decode_audio4(pCodeCtx, frame, &got_picture_ptr, packet);
            //正在解码
            if (got_picture_ptr) {
                //重采样转换
                swr_convert(swrCtx, &out_buffer, MAX_AUDIO_FRME_SIZE,
                            (const uint8_t **) frame->data,
                            frame->nb_samples);
                //获取采样的大小
                int out_buffer_size = av_samples_get_buffer_size(NULL, out_channel_nb,
                                                                 frame->nb_samples, out_sample_fmt,
                                                                 1);
                fwrite(out_buffer, 1, out_buffer_size, fp_pcm);
                LOGE("解析第%d帧", (frame_count++));
            }
            av_free_packet(packet);
        }
    }
    //8、释放资源
    fclose(fp_pcm);
    av_frame_free(&frame);
    av_free(out_buffer);
    swr_free(&swrCtx);
    avcodec_close(pCodeCtx);
    avformat_close_input(&pFormatCtx);
    env->ReleaseStringUTFChars(input_path_, input_path);
    env->ReleaseStringUTFChars(output_path_, output_path);
}
音频播放
这里可以采用OpenSL完全在Native层处理播放音频,或者在Java层采用AudioTrack播放,这里演示采用后者,所以需要通过JNI调用Java方法
extern "C"
JNIEXPORT void JNICALL
Java_com_handsome_ndkffmpeg_FFmpegUtils_soundPlay(JNIEnv *env, jobject instance,
                                                  jstring input_path_) {
    const char *input_path = env->GetStringUTFChars(input_path_, 0);
    //1、注册所有组件
    av_register_all();
    //2、打开视频文件
    AVFormatContext *pFormatCtx = avformat_alloc_context();
    if ((avformat_open_input(&pFormatCtx, input_path, NULL, NULL)) < 0) {
        LOGE("Cannot open input file");
        return;
    }
    //3、获取视频信息
    if (avformat_find_stream_info(pFormatCtx, NULL) < 0) {
        LOGE("Cannot find stream\n");
        return;
    }
    //4、找到视频流的位置
    int audio_stream_index = -1;
    int i = 0;
    for (; i < pFormatCtx->nb_streams; i++) {
        if (pFormatCtx->streams[i]->codec->codec_type == AVMEDIA_TYPE_AUDIO) {
            audio_stream_index = i;
            LOGE("find the stream index %d", audio_stream_index);
            break;
        }
    }
    //5、获取解码器
    AVCodecContext *pCodeCtx = pFormatCtx->streams[audio_stream_index]->codec;
    AVCodec *pCodec = avcodec_find_decoder(pCodeCtx->codec_id);
    if (pCodec == NULL) {
        LOGE("Cannot find decoder\n");
        return;
    }
    //6、打开解码器
    if (avcodec_open2(pCodeCtx, pCodec, NULL) < 0) {
        LOGE("Cannot open codec\n");
        return;
    }
    //7、解析每一帧数据(包含重采样)
    int got_picture_ptr, frame_count = 1;
    //压缩数据
    AVPacket *packet = (AVPacket *) av_malloc(sizeof(AVPacket));
    //解压缩数据
    AVFrame *frame = av_frame_alloc();

    //重采样设置参数,将frame数据转成16bit比特率44100的PCM格式
    //重采样上下文
    SwrContext *swrCtx = swr_alloc();
    //输入的采样格式
    enum AVSampleFormat in_sample_fmt = pCodeCtx->sample_fmt;
    //输出采样格式16bit的PCM
    enum AVSampleFormat out_sample_fmt = AV_SAMPLE_FMT_S16;
    //输入采样率
    int in_sample_rate = pCodeCtx->sample_rate;
    //输出采样率
    int out_sample_rate = 44100;
    //获取输入的声道布局
    uint64_t in_ch_layout = pCodeCtx->channel_layout;
    //输出的声道布局(立体声)
    uint64_t out_ch_layout = AV_CH_LAYOUT_STEREO;
    //设置重采样配置
    swr_alloc_set_opts(swrCtx,
                       out_ch_layout, out_sample_fmt, out_sample_rate,
                       in_ch_layout, in_sample_fmt, in_sample_rate,
                       0, NULL);
    //重采样初始化
    swr_init(swrCtx);
    //获取输出的声道个数
    int out_channel_nb = av_get_channel_layout_nb_channels(out_ch_layout);
    //16bit 44100 PCM 数据大小
    uint8_t *out_buffer = (uint8_t *) av_malloc(MAX_AUDIO_FRME_SIZE);

    //在读取之前拿到AudioTrack
    //begin--JNI
    jclass player_class = env->GetObjectClass(instance);
    //获取AudioTrack对象
    jmethodID create_audio_track_mid = env->GetMethodID(player_class, "createAudioTrack",
                                                        "(I)Landroid/media/AudioTrack;");
    jobject audio_track = env->CallObjectMethod(instance, create_audio_track_mid, out_channel_nb);
    //调用AudioTrack.play方法
    jclass audio_track_class = env->GetObjectClass(audio_track);
    jmethodID audio_track_play_mid = env->GetMethodID(audio_track_class, "play", "()V");
    env->CallVoidMethod(audio_track, audio_track_play_mid);
    //获取AudioTrack.write
    jmethodID audio_track_write_mid = env->GetMethodID(audio_track_class, "write", "([BII)I");
    //end--JNI

    //一帧一帧读取压缩的视频数据
    while (av_read_frame(pFormatCtx, packet) >= 0) {
        //找到音频流
        if (packet->stream_index == audio_stream_index) {
            avcodec_decode_audio4(pCodeCtx, frame, &got_picture_ptr, packet);
            //正在解码
            if (got_picture_ptr) {
                //重采样转换
                swr_convert(swrCtx, &out_buffer, MAX_AUDIO_FRME_SIZE,
                            (const uint8_t **) frame->data,
                            frame->nb_samples);
                //获取采样的大小
                int out_buffer_size = av_samples_get_buffer_size(NULL, out_channel_nb,
                                                                 frame->nb_samples, out_sample_fmt,
                                                                 1);
                //播放每一帧的音频
                //begin--JNI
                //out_buffer_size缓冲区数据,转成byte数组
                jbyteArray audio_sample_array = env->NewByteArray(out_buffer_size);
                jbyte *sample_byte = env->GetByteArrayElements(audio_sample_array, NULL);
                //out_buffer的数据复制到sample_byte
                memcpy(sample_byte, out_buffer, out_buffer_size);
                //同步数据
                env->ReleaseByteArrayElements(audio_sample_array, sample_byte, 0);
                //调用AudioTrack.write
                env->CallIntMethod(audio_track, audio_track_write_mid,
                                   audio_sample_array, 0, out_buffer_size);
                //释放局部引用
                env->DeleteLocalRef(audio_sample_array);
                usleep(1000 * 16);
                //end--JNI
                LOGE("解析第%d帧", (frame_count++));
            }
            av_free_packet(packet);
        }
    }
    //8、释放资源
    av_frame_free(&frame);
    av_free(out_buffer);
    swr_free(&swrCtx);
    avcodec_close(pCodeCtx);
    avformat_close_input(&pFormatCtx);
    env->ReleaseStringUTFChars(input_path_, input_path);
}
音视频同步
思路分析
- 采用队列的形式,循环的读取视频和音频的信息,存储在队列中
- 采用生产消费模式,队列生产,则通过线程消费,进行音视频播放
- 采用两个队列分别是音频队列、视频队列
- 采用三个线程分别是读取音视频数据、播放视频、播放音频
存在问题
- 在读取到最后一帧的时候,如果直接break代码,将导致闪退,解决方法是在读取音视频完成时,将代码进入死循环,这个时候会导致主线程阻塞
- 在读取音视频的时候并没有加入延迟计算来播放音视频,具体可以参考ffplay的代码进行时间的计算,来实现更准确的同步播放
解决Bug工具
- 采用toolchains里面的addr2line工具,使用方法如下
E:\Eclipse\android-studio-sdk\android-sdk-windows\ndk-bundle\toolchains\arm-linux-androideabi-4.9\prebuilt\windows-x86_64\bin>arm-linux-androideabi-addr2line -e D:\workspace6\NDKFFmpeg\app\build\intermediates\cmake\debug\obj\armeabi\libnative-player.so 00001e94

//运行出现错误的行数
D:\workspace6\NDKFFmpeg\app\src\main\cpp/native-player.cpp:225
队列头文件
#include <malloc.h>
#include <android/log.h>

typedef struct _Queue Queue;
//分配队列元素内存的函数
typedef void *(*queue_fill_func)();
//释放队列中元素所占用的内存
typedef void *(*queue_free_func)(void *elem);

/**
 * 初始化队列
 */
Queue *queue_init(int size, queue_fill_func fill_func);

/**
 * 销毁队列
 */
void queue_free(Queue *queue, queue_free_func free_func);

/**
 * 获取下一个索引位置
 */
int queue_get_next(Queue *queue, int current);

/**
 * 队列压人元素
 */
void* queue_push(Queue *queue,pthread_mutex_t *mutex, pthread_cond_t *cond);

/**
 * 弹出元素
 */
void* queue_pop(Queue *queue,pthread_mutex_t *mutex, pthread_cond_t *cond);
队列实现
#include "queue.h"

#include <android/log.h>
#include <pthread.h>

#define LOGE(FORMAT, ...) __android_log_print(ANDROID_LOG_ERROR,"ffmpeg",FORMAT,##__VA_ARGS__);

struct _Queue {
    //队列长度
    int size;
    //存放size个的AVPacket **packets;
    void **tab;
    //压入栈元素的下一个元素位置
    int next_to_write;
    //弹出栈元素的下一个元素位置
    int next_to_read;
};

/**
 * 初始化队列
 */
Queue *queue_init(int size, queue_fill_func fill_func){
    Queue* queue = (Queue*)malloc(sizeof(Queue));
    queue->size = size;
    queue->next_to_write = 0;
    queue->next_to_read = 0;
    //数组开辟空间
    queue->tab = (void **) malloc(sizeof(*queue->tab) * size);
    int i;
    for(i=0; i<size; i++){
        queue->tab[i] = fill_func();
    }
    return queue;
}

/**
 * 销毁队列
 */
void queue_free(Queue *queue, queue_free_func free_func){
    int i;
    for(i=0; i<queue->size; i++){
        //销毁队列的元素,通过使用回调函数
        free_func((void*)queue->tab[i]);
    }
    free(queue->tab);
    free(queue);
}

/**
 * 获取下一个索引位置
 */
int queue_get_next(Queue *queue, int current){
    return (current + 1) % queue->size;
}

/**
 * 队列压人元素(生产)
 */
void* queue_push(Queue *queue,pthread_mutex_t *mutex, pthread_cond_t *cond){
    int current = queue->next_to_write;
    int next_to_write;
    for(;;){
        //下一个要读的位置等于下一个要写的,等我写完,在读
        //不等于,就继续
        next_to_write = queue_get_next(queue,current);
        if(next_to_write != queue->next_to_read){
            break;
        }
        //阻塞
        pthread_cond_wait(cond,mutex);
    }

    queue->next_to_write = next_to_write;
    LOGE("queue_push queue:%#x, %d",queue,current);
    //通知
    pthread_cond_broadcast(cond);

    return queue->tab[current];
}

/**
 * 弹出元素(消费)
 */
void* queue_pop(Queue *queue,pthread_mutex_t *mutex, pthread_cond_t *cond){
    int current = queue->next_to_read;
    for(;;){
        if(queue->next_to_read != queue->next_to_write){
            break;
        }
        pthread_cond_wait(cond,mutex);
    }

    queue->next_to_read = queue_get_next(queue,current);
    LOGE("queue_pop queue:%#x, %d",queue,current);

    pthread_cond_broadcast(cond);
    return queue->tab[current];
}
音视频同步
#include <jni.h>
#include <stdlib.h>
#include <stdio.h>
#include <unistd.h>
#include <pthread.h>
#include <android/log.h>
#include <android/native_window.h>
#include <android/native_window_jni.h>

extern "C" {
#include "libavformat/avformat.h"
#include "libavcodec/avcodec.h"
#include "libswscale/swscale.h"
#include "libswresample/swresample.h"
#include "libyuv/libyuv.h"
}

#include "queue.h"

#define LOGE(FORMAT, ...) __android_log_print(ANDROID_LOG_ERROR,"ffmpeg",FORMAT,##__VA_ARGS__);

//队列的大小
#define PACKET_QUEUE_SIZE 50
//16bit 44100 PCM 数据大小
#define MAX_AUDIO_FRME_SIZE 44100 * 2
//视频文件中存在,音频流,视频流,字幕流,这里不测试字幕
#define MAX_STREAM 2

typedef struct _Player Player;
typedef struct _DecoderData DecoderData;

struct _Player {
    //虚拟机
    JavaVM *javaVM;
    //封装格式上下文
    AVFormatContext *input_format_ctx;
    //音频视频流索引位置
    int video_stream_index;
    int audio_stream_index;
    //流的总个数
    int captrue_streams_no;
    //解码器上下文数组
    AVCodecContext *input_codec_ctx[MAX_STREAM];
    //解码线程ID
    pthread_t decode_threads[MAX_STREAM];
    //surface输出窗口
    ANativeWindow *nativeWindow;
    //重采样上下文
    SwrContext *swr_ctx;
    //输入的采样格式
    enum AVSampleFormat in_sample_fmt;
    //输出采样格式16bit PCM
    enum AVSampleFormat out_sample_fmt;
    //输入采样率
    int in_sample_rate;
    //输出采样率
    int out_sample_rate;
    //输出的声道个数
    int out_channel_nb;
    //JNI
    jobject audio_track;
    jmethodID audio_track_write_mid;

    pthread_t thread_read_from_stream;
    //音频,视频队列数组
    Queue *packets[MAX_STREAM];

    //互斥锁
    pthread_mutex_t mutex;
    //条件变量
    pthread_cond_t cond;
};

/**
 * 解码数据
 */
struct _DecoderData {
    Player *player;
    int stream_index;
};

/**
 * 初始化封装格式上下文,获取音频视频流的索引位置
 */
void init_input_format_ctx(Player *player, const char *input_cstr) {
    //1、注册所有组件
    av_register_all();
    //封装格式上下文
    AVFormatContext *format_ctx = avformat_alloc_context();
    //2、打开视频文件
    if (avformat_open_input(&format_ctx, input_cstr, NULL, NULL) != 0) {
        LOGE("Cannot open input file");
        return;
    }
    //3、获取视频信息
    if (avformat_find_stream_info(format_ctx, NULL) < 0) {
        LOGE("Cannot find stream\n");
        return;
    }
    player->captrue_streams_no = format_ctx->nb_streams;
    LOGE("captrue_streams_no:%d", player->captrue_streams_no);
    //4、获取音频和视频流的索引位置
    int i;
    for (i = 0; i < player->captrue_streams_no; i++) {
        if (format_ctx->streams[i]->codec->codec_type == AVMEDIA_TYPE_VIDEO) {
            player->video_stream_index = i;
        } else if (format_ctx->streams[i]->codec->codec_type == AVMEDIA_TYPE_AUDIO) {
            player->audio_stream_index = i;
        }
    }
    player->input_format_ctx = format_ctx;
}

/**
 * 初始化解码器上下文
 */
void init_codec_context(Player *player, int stream_idx) {
    AVFormatContext *format_ctx = player->input_format_ctx;
    //获取解码器
    AVCodecContext *codec_ctx = format_ctx->streams[stream_idx]->codec;
    AVCodec *codec = avcodec_find_decoder(codec_ctx->codec_id);
    if (codec == NULL) {
        LOGE("%s", "无法解码");
        return;
    }
    //打开解码器
    if (avcodec_open2(codec_ctx, codec, NULL) < 0) {
        LOGE("%s", "解码器无法打开");
        return;
    }
    player->input_codec_ctx[stream_idx] = codec_ctx;
}

/**
 * 视频解码准备
 */
void decode_video_prepare(JNIEnv *env, Player *player, jobject surface) {
    player->nativeWindow = ANativeWindow_fromSurface(env, surface);
}

/**
 * 音频解码准备
 */
void decode_audio_prepare(Player *player) {
    AVCodecContext *codec_ctx = player->input_codec_ctx[player->audio_stream_index];
    //输入的采样格式
    enum AVSampleFormat in_sample_fmt = codec_ctx->sample_fmt;
    //输出采样格式16bit PCM
    enum AVSampleFormat out_sample_fmt = AV_SAMPLE_FMT_S16;
    //输入采样率
    int in_sample_rate = codec_ctx->sample_rate;
    //输出采样率
    int out_sample_rate = in_sample_rate;
    //获取输入的声道布局
    uint64_t in_ch_layout = codec_ctx->channel_layout;
    //输出的声道布局(立体声)
    uint64_t out_ch_layout = AV_CH_LAYOUT_STEREO;

    //frame->16bit 44100 PCM 统一音频采样格式与采样率
    SwrContext *swr_ctx = swr_alloc();
    //重采样设置参数
    swr_alloc_set_opts(swr_ctx,
                       out_ch_layout, out_sample_fmt, out_sample_rate,
                       in_ch_layout, in_sample_fmt, in_sample_rate,
                       0, NULL);
    swr_init(swr_ctx);
    //输出的声道个数
    int out_channel_nb = av_get_channel_layout_nb_channels(out_ch_layout);

    player->in_sample_fmt = in_sample_fmt;
    player->out_sample_fmt = out_sample_fmt;
    player->in_sample_rate = in_sample_rate;
    player->out_sample_rate = out_sample_rate;
    player->out_channel_nb = out_channel_nb;
    player->swr_ctx = swr_ctx;
}

/**
 * 初始化JNI
 */
void jni_audio_prepare(JNIEnv *env, jobject jthiz, Player *player) {
    //JNI begin------------------
    //JasonPlayer
    jclass player_class = env->GetObjectClass(jthiz);
    //AudioTrack对象
    jmethodID create_audio_track_mid = env->GetMethodID(player_class, "createAudioTrack",
                                                        "(I)Landroid/media/AudioTrack;");
    jobject audio_track = env->CallObjectMethod(jthiz, create_audio_track_mid,
                                                player->out_sample_rate, player->out_channel_nb);
    //调用AudioTrack.play方法
    jclass audio_track_class = env->GetObjectClass(audio_track);
    jmethodID audio_track_play_mid = env->GetMethodID(audio_track_class, "play", "()V");
    env->CallVoidMethod(audio_track, audio_track_play_mid);
    //AudioTrack.write
    jmethodID audio_track_write_mid = env->GetMethodID(audio_track_class, "write", "([BII)I");
    //JNI end------------------
    player->audio_track = env->NewGlobalRef(audio_track);
    //env->DeleteGlobalRef
    player->audio_track_write_mid = audio_track_write_mid;
}

/**
 * 给AVPacket开辟空间,后面会将AVPacket栈内存数据拷贝至这里开辟的空间
 */
void *player_fill_packet() {
    //请参照我在vs中写的代码
    AVPacket *packet = (AVPacket *) malloc(sizeof(AVPacket));
    return packet;
}

/**
 * 初始化音频,视频AVPacket队列,长度50
 */
void player_alloc_queues(Player *player) {
    int i;
    //这里,正常是初始化两个队列
    for (i = 0; i < player->captrue_streams_no; ++i) {
        Queue *queue = queue_init(PACKET_QUEUE_SIZE, (queue_fill_func) player_fill_packet);
        player->packets[i] = queue;
        //打印视频音频队列地址
        LOGE("stream index:%d,queue:%#x", i, queue);
    }
}

/**
 * 生产者线程:负责不断的读取视频文件中AVPacket,分别放入两个队列中
 */
void *player_read_from_stream(void *arg) {
    int index = 0;
    int ret;
    Player *player = (Player *) arg;
    //栈内存上保存一个AVPacket
    AVPacket packet, *pkt = &packet;
    for (;;) {
        ret = av_read_frame(player->input_format_ctx, pkt);
        //到文件结尾了,这里有个bug
        if (ret < 0) {
            sleep(8);
            break;
        }
        //根据AVpacket->stream_index获取对应的队列
        Queue *queue = player->packets[pkt->stream_index];
        //示范队列内存释放
        //queue_free(queue,packet_free_func);
        pthread_mutex_lock(&player->mutex);
        //将AVPacket压入队列
        AVPacket *packet_data = (AVPacket *) queue_push(queue, &player->mutex, &player->cond);
        //拷贝(间接赋值,拷贝结构体数据)
        *packet_data = packet;
        pthread_mutex_unlock(&player->mutex);
        LOGE("queue:%#x, packet:%#x", queue, packet);
    }
}


/**
 * 解码视频
 */
void decode_video(Player *player, AVPacket *packet) {
    //像素数据(解码数据)
    AVFrame *yuv_frame = av_frame_alloc();
    AVFrame *rgb_frame = av_frame_alloc();
    //绘制时的缓冲区
    ANativeWindow_Buffer outBuffer;
    AVCodecContext *codec_ctx = player->input_codec_ctx[player->video_stream_index];
    int got_frame;
    //解码AVPacket->AVFrame
    avcodec_decode_video2(codec_ctx, yuv_frame, &got_frame, packet);
    //Zero if no frame could be decompressed
    //非零,正在解码
    if (got_frame) {
        //lock
        //设置缓冲区的属性(宽、高、像素格式)
        ANativeWindow_setBuffersGeometry(player->nativeWindow, codec_ctx->width, codec_ctx->height,
                                         WINDOW_FORMAT_RGBA_8888);
        ANativeWindow_lock(player->nativeWindow, &outBuffer, NULL);

        //设置rgb_frame的属性(像素格式、宽高)和缓冲区
        //rgb_frame缓冲区与outBuffer.bits是同一块内存
        avpicture_fill((AVPicture *) rgb_frame, (const uint8_t *) outBuffer.bits, AV_PIX_FMT_RGBA,
                       codec_ctx->width, codec_ctx->height);

        //YUV->RGBA_8888
        libyuv::I420ToARGB(yuv_frame->data[0], yuv_frame->linesize[0],
                           yuv_frame->data[2], yuv_frame->linesize[2],
                           yuv_frame->data[1], yuv_frame->linesize[1],
                           rgb_frame->data[0], rgb_frame->linesize[0],
                           codec_ctx->width, codec_ctx->height);

        //unlock
        ANativeWindow_unlockAndPost(player->nativeWindow);
        usleep(1000 * 16);
    }
    av_frame_free(&yuv_frame);
    av_frame_free(&rgb_frame);
}

/**
 * 音频解码
 */
void decode_audio(Player *player, AVPacket *packet) {
    AVCodecContext *codec_ctx = player->input_codec_ctx[player->audio_stream_index];
    LOGE("%s", "decode_audio");
    //解压缩数据
    AVFrame *frame = av_frame_alloc();
    int got_frame;
    avcodec_decode_audio4(codec_ctx, frame, &got_frame, packet);

    //16bit 44100 PCM 数据(重采样缓冲区)
    uint8_t *out_buffer = (uint8_t *) av_malloc(MAX_AUDIO_FRME_SIZE);
    //解码一帧成功
    if (got_frame > 0) {
        swr_convert(player->swr_ctx, &out_buffer, MAX_AUDIO_FRME_SIZE,
                    (const uint8_t **) frame->data, frame->nb_samples);
        //获取sample的size
        int out_buffer_size = av_samples_get_buffer_size(NULL, player->out_channel_nb,
                                                         frame->nb_samples, player->out_sample_fmt,
                                                         1);

        //关联当前线程的JNIEnv
        JavaVM *javaVM = player->javaVM;
        JNIEnv *env;
        javaVM->AttachCurrentThread(&env, NULL);
        //out_buffer缓冲区数据,转成byte数组
        jbyteArray audio_sample_array = env->NewByteArray(out_buffer_size);
        jbyte *sample_bytep = env->GetByteArrayElements(audio_sample_array, NULL);
        //out_buffer的数据复制到sampe_bytep
        memcpy(sample_bytep, out_buffer, out_buffer_size);
        //同步
        env->ReleaseByteArrayElements(audio_sample_array, sample_bytep, 0);

        //AudioTrack.write PCM数据
        env->CallIntMethod(player->audio_track, player->audio_track_write_mid,
                           audio_sample_array, 0, out_buffer_size);
        //释放局部引用
        env->DeleteLocalRef(audio_sample_array);

        javaVM->DetachCurrentThread();

        usleep(1000 * 16);
    }

    av_frame_free(&frame);
}

/**
 * 解码子线程函数(消费)
 */
void *decode_data(void *arg) {
    DecoderData *decoder_data = (DecoderData *) arg;
    Player *player = decoder_data->player;
    int stream_index = decoder_data->stream_index;
    //根据stream_index获取对应的AVPacket队列
    Queue *queue = player->packets[stream_index];

    AVFormatContext *format_ctx = player->input_format_ctx;
    //编码数据

    //6.一阵一阵读取压缩的视频数据AVPacket
    int video_frame_count = 0, audio_frame_count = 0;
    for (;;) {
        //消费AVPacket
        pthread_mutex_lock(&player->mutex);
        AVPacket *packet = (AVPacket *) queue_pop(queue, &player->mutex, &player->cond);
        pthread_mutex_unlock(&player->mutex);
        if (stream_index == player->video_stream_index) {
            decode_video(player, packet);
            LOGE("video_frame_count:%d", video_frame_count++);
        } else if (stream_index == player->audio_stream_index) {
            decode_audio(player, packet);
            LOGE("audio_frame_count:%d", audio_frame_count++);
        }
    }
}

extern "C"
JNIEXPORT void JNICALL
Java_com_handsome_ndkffmpeg_FFmpegUtils_videoAndSoundPlay(JNIEnv *env, jobject instance,
                                                          jstring input_path_, jobject surface) {
    const char *input_path = env->GetStringUTFChars(input_path_, 0);
    Player *player = (Player *) malloc(sizeof(Player));
    env->GetJavaVM(&(player->javaVM));

    //初始化封装格式上下文
    init_input_format_ctx(player, input_path);
    int video_stream_index = player->video_stream_index;
    int audio_stream_index = player->audio_stream_index;
    //获取音视频解码器,并打开
    init_codec_context(player, video_stream_index);
    init_codec_context(player, audio_stream_index);

    //初始化音视频
    decode_video_prepare(env, player, surface);
    decode_audio_prepare(player);

    //初始化JNI
    jni_audio_prepare(env, instance, player);
    //初始化音视频AVPacket队列
    player_alloc_queues(player);

    pthread_mutex_init(&player->mutex, NULL);
    pthread_cond_init(&player->cond, NULL);

    //生产者线程
    pthread_create(&(player->thread_read_from_stream), NULL, player_read_from_stream,
                   (void *) player);
    sleep(1);

    //消费者线程
    DecoderData data1 = {player, video_stream_index}, *decoder_data1 = &data1;
    pthread_create(&(player->decode_threads[video_stream_index]), NULL, decode_data,
                   (void *) decoder_data1);

    DecoderData data2 = {player, audio_stream_index}, *decoder_data2 = &data2;
    pthread_create(&(player->decode_threads[audio_stream_index]), NULL, decode_data,
                   (void *) decoder_data2);

    pthread_join(player->thread_read_from_stream, NULL);
    pthread_join(player->decode_threads[video_stream_index], NULL);
    pthread_join(player->decode_threads[audio_stream_index], NULL);

    env->ReleaseStringUTFChars(input_path_, input_path);
}
源码下载
源码下载