回顾:
如果您对Robot Framework Selenium(以下简称RFS)没有基础概念和使用经验,请先阅读入门篇,入门篇对RFS有基础的介绍和使用教程。
展望:
本篇主要讲述了如何工程化的使用RFS,并穿插介绍各种常用关键字和使用技巧,希望能给大家带来帮助。
目录
工程化---分析自己有什么----UI自动化最常用关键字介绍
web页面的元素定位是UI自动化的基石,我在工作中见过无数同事使用工具获取xpath的方式进行元素定位,这样做有以下缺点:
1. 工具获取的元素定位多为从web树状结构的根节点开始,比如这样的:/html/body/div[4]/div[5]/div[2]/div[4]/div[4]/ul[5]/li[2]/ul/a
这样的定位,页面结构略有变化就会找不到这个超链接,导致后面的维护工作量巨大。(正确的定位方法请看本文中的示例)
2. 由于不是自己分析页面结构,就无法提炼出公共的元素定位方法,无法参数化,反而效率会低。并且如果web框架进行整改,由于以上事情没有做,UI自动化的元素定位可能会大面积报错,只能一个一个去修改。
3. 不能更好的理解前端开发设计页面的习惯,无法为之后前端开发植入可测试性代码提出针对性建议。
(接上篇)------以下以华为云VPC的UI自动化为例
测试猿小明自从掌握了RFS的基本用法,感觉UI自动化也就这样了,就是来回点点,输点文字,按下确定键,判断预期是否正确。
公司最近开始准备缩短版本交付周期,要求他写一套UI自动化,用来保障产品功能可用。他迅速的写了30+用例,在本地跑没有问题,就放倒jenkins上(本篇不讨论如何使用jenkins跑RFS,如果有需要,再另起一篇),设置每天凌晨3点定时跑一轮,这样第二天早上就能看到结果了。
第二天,小明傻眼了,测试用例除了头两条,后面的全部失败了,一大片红色的失败图标特别扎眼。
通过仔细的查看log,发现第三条用例创建产品失败了,之后的操作都在这个产品创建成功的基础上进行的。由于找不到指定的实例,之后所有用例全部执行失败了。
小明修改了无法创建产品的bug(查明是环境原因造成的),重新上传了新的自动化用例,并直接开启新一轮测试。结果这次还是失败了,原因是登录时,由于浏览器没有完全加载完,导致登录按钮没有找到,用例执行全军覆没。
小明继续修复了这个问题,再次执行(xN)…..
一天过去了,仅有一次非常幸运的跑完了全部用例,小明也搞的头昏眼花。
第三天,小明看着用例执行报告中一大片红色,已经没那么大干劲了,觉得这简直是无法解决的问题。只好求助公司的老测试Aino。
Aino查看了小明写的测试用例,指着各个测试用例说:“你这测试用例都是一条流水线,中间任何一环失败,后面的测试用例都无法执行,自动化用例不能这么写。”
小明:“那应该怎么办?”
Aino:“这个项目你时间还充裕吧,我这有一套乐高积木,刚好明天是周末,回去和小小明好好玩玩。”

周一,小明把乐高积木还给Aino。
Aino笑咪咪的问他:“怎么样,好玩么?”
小明:“好玩,一开始随意组装,能逗的儿子哈哈大笑。后来儿子想搞个大的,要组合个小汽车出来。经过我们不断的组合,拆除,计划后重新组合,终于做出了像样的小汽车。”
Aino:“总结下造这个汽车的经验吧~”。
小明:
1. 首先,要分析下小汽车的形状,把汽车拆分成底盘,车身,轮子等等。(分析测试对象)
2. 其次,要知道手头的乐高积木有哪些形状,形状之间如何组合。(分析自己有什么)
3. 设计底盘,车身和轮子的大小,并分别组装好,预留最后组装用的接口。(模块化)
4. 组合整体(中间还出现各种一开始没有考虑到的组装先后问题)。(组合)
Aino拍了拍小明的肩膀:“你已经掌握了工程化最基本的思路,现在,我给你讲讲这个UI自动化项目该怎么做吧。”
我们先看一下被测对象---华为云---VPC。(简单的说,就是云上机房)
访问地址(需注册)https://console.huaweicloud.com/vpc/
虚拟私有云(Virtual Private Cloud,以下简称VPC),为弹性云服务器构建隔离的、用户自主配置和管理的虚拟网络环境,提升用户云中资源的安全性,简化用户的网络部署。
您可以在VPC中定义安全组、VPN、IP地址段、带宽等网络特性。用户可以通过VPC方便地管理、配置内部网络,进行安全、快捷的网络变更。同时,用户可以自定义安全组内与组间弹性云服务器的访问规则,加强弹性云服务器的安全保护。


根据这个图,我大概讲一下VPC各个成员(不用完全理解):
1. VPC可以理解为云上的局域网。
2. 这个局域网可以划分若干个子网。(广播范围)
3. 子网内的设备ECS(云主机)上绑定了安全组规则。
4. 子网和外界通讯可以绑定ACL(防火墙)规则。
5. ECS和互联网通讯,可以单独绑定EIP(弹性公网IP)直接和外网通讯。
6. 子网内所有ECS也可以通过子网绑定的NAT(网络地址转换)网关和外界通讯
7. VPC有两种连接方式,VPN(虚拟局域网)和云专线(直接给你拉条网线/光纤)
【重要理论】对于绝大部分的自动化(无论是UI还是接口),都是完成了增删改查功能。

所以,我们的自动化也要围绕着增删改查来进行,对测试用例细粒度把控,也要能细化到具体项的增删改查功能。
大多数情况下,自动化测试由于牵扯到资源释放的问题,都会遵循增---查---改---查---删---查的顺序进行。这样在一个正常的情况下,创建出来的资源都在正确执行后被删除。一套无法恢复环境到执行前状态的自动化是不合格的。
我们写测试用例,里面就有一项“前置条件”,里面基本是对测试环境的描述。
在自动化中,前置条件可以认为是对资源状态的控制,这个控制可以是显性的(比如设置在setup中),也可以是隐性的(之前执行的测试用例)。
前置条件有问题,是导致测试用例大面积失败的主要原因。小明之前编写的测试用例,创建一个VPC就是作为其他用例执行的大前提,所以如果VPC创建失败,所有的用例都会失败。
那怎样避免这种情况发生?
答案是无法避免,但是可以尽量缩小因失败影响的范围。
比如以上例子,我们的VPC修改,可以放到一个已经创建好的VPC上去进行,这样即使目前VPC的创建自动化用例失败了,我们一样也可以测试VPC的修改功能。
这样,就牵扯到我们的另一个话题:预置资源。
预置资源,就是我们在测试对象中创建好的资源,比如各个模块的实例。
可是,这样有什么用?
这可不是为你节省了创建资源的时间:)
我们不希望自动化测试是在一个不稳定或者什么都没有的环境下进行,因为如果那样做,不稳定性会大大增加,任何一个微小的错误都会被无限放大。
如果所有的模块之间都是继承关系(很遗憾,实际大部分情况都是如此),比如有A才有B,有B才有C,有C才有D这样的调用链,我们写了分别创建A,B,C,D的自动化用例,如果A创建失败,会造成BCD全部失败。B失败,会造成CD全部失败。
即使非常幸运的ABCD都创建成功了,我们又有另一个问题:删除。
因为调用链的关系,删除一般都得反着来,即删除的顺序为DCBA,同样的,删除调用链上的任何一个环节的失败,也会影响到后面用例的执行。
那怎么办呢?
当然是创建预置资源了J
我们创建预置资源a,b,c,(分别对应ABC)(资源创建一般都是一条调用链上的,因为这样节省资源),然后就成了这样(自己思考下这样有什么好处):
A资源凭空造,然后测试增删改查。(最后A资源被自动删除)
a资源下创建B资源,然后测试增删改查。(最后B资源被自动删除)
b资源下创建C资源,然后测试增删改查。(最后C资源被自动删除)
c资源下创建D资源,然后测试增删改查。(最后D资源被自动删除)
----------------------------------------思考时间------------------------------------------------
想好了么?(有时候,思考的过程比你得到的结果更宝贵)
这样做最大的好处,就像把整个调用链上的各个节点放了checkpoint,如果本小结失败了,可以从下个小结从头(checkpoint)开始,因为资源已经创建好了。
如果以后完成了自动化用例,创作者能很清晰的指出“这几个是一个循环”,“这里使用了我预置好的资源”。
细心的小明又指出了另一个问题:“那我如何判断我该创建多少这样的资源?”
这里,就牵扯到预置资源创建的细粒度问题。
根据Aino的个人经验,如果自动化测试调用链上游的资源会影响8-10条以上的用例,就应该为这组自动化用例创建一个预置资源。因为我们能承受的自动化失败浪费的时间,就在这个范围内。
预置资源还有一个好处,一些我们测试的前提条件,可能是外部的,这些外部的资源创建,不在我们的考虑范围内。比如ECS(云主机)的创建,是需要消耗大量时间的,那我们就可以提前创建好它。
是自动化测试就会存在失败,失败一般有以下几种可能:
1. 自动化用例本身的问题,比如UI测试的元素定位不唯一,接口测试的传参错误等等。(这种就是我们需要人工维护的部分了)
2. 执行的前置条件未满足。(这条我们已经使用预置资源尽量避免)
3. 环境不稳定,比如UI测试的页面加载不出来(服务器卡了),接口测试的响应超时等等。
其实第三种是很常见的情况。自动化从某种层面上来讲,是很“僵硬”的。
这里我们可以学习TCP/IP,对失败的部分进行重试。
重试的原理也很简单,就是对结果进行判断,如果不是想要的结果,就再试试。
这个“重试”也可大可小,可以是自动化中的某一个步骤,也可以是整条自动化用例,甚至是某个模块全部的自动化用例。
根据在实际操作中的经验,重试机制会大大提高自动化测试的成功率,并且排除了很多因为环境不稳定造成的失败。
IT行业有个很明显的特点,就是复用率特别高。或者通俗点说,大家的代码可能都很像:)。一块代码逻辑,处处使用,是很正常的。
所以后面就有了框架,有了组件,大家统一抄。
既然这样,就知道开发同学一定会遵循框架,使用组件。我们在做自动化之前,需要分析下框架和组件,从中抽象出共通的部分。
抽取出的公共部分,会很好的指导我们进行自动化用例的参数化。
比如:
1. 抽象出所有的创建资源的按钮的元素定位。
2. 抽象出搜索框的一系列操作,并做成一个关键字(函数)。
3. 抽象出需要更改的配置信息,并参数化。
4. 抽象出浏览器分辨率和显示按钮的关系,并在某个地方判断,选择。
5. 抽象出调用链的出入参关系。
这里只列举了几个,只要你觉得对你的工作有意义,就可以找出规律并使用它。
如果你研究多了,你可以给开发提建议:“伙计,在这给我加个ID如何~”。
工欲善其事,必先利其器。先看看我们有什么样的武器。(以下截图中使用seleniumLibary,实际应该使用Selenium2Library)


Click Element
页面操作使用最多的关键字,点击元素,可以不用点击的特别“具体”,比如某个div下只有一个a链接,那么点击div也可以。但是,如果元素定位不唯一或者点击对象的覆盖范围有其它可点击元素,会报错---“其它元素收到了点击”。
此外,可用的点击关键字还有Click Element At Coordinates,用于无法确认元素的情况,比如复杂控件中的点击。一般不使用,因为X轴和Y轴的绝对位置可能会因为环境的变化而变化。
在某些情况下,也会使用Double Click Element,唯一的差别是这个关键字是双击。
Input Text
输入文字的关键字,一般来说,对象都是一个input或者textarea。要注意的是,至今为止Selenium2Library中这个操作都有个bug,当连续在多个元素上输入文字的时候,中间如果不加sleep,概率有输入错乱的情况发生。
还有个关键字,在这里要特别指出,那就是Input Password,因为这个和Input Test唯一的区别是,在log中不打印,以防别人通过log就知道密码,所以这个关键字可不仅仅是能在输入密码的时候使用:)。
作为一位资深点点点,大家都懂,如果页面没加载出来按钮,我们不会去点按钮的。但是程序就是这么傻,咋办,先等待元素状态稳定再操作呗。
在RFS中,智能等待主要分为三种:
1. 判断页面元素状态的智能等待:
Wait Until Page Contains Element
判断页面是否包含元素,唯一要注意的是,如果页面包含多个符合定位条件的元素,此关键字只要其中一个满足条件,即为成功。
对应的反向关键字为Wait Until Page Does Not Contain Element,这里和上面相反,页面不能有任何一个元素符合定位条件,才为成功。
Wait Until Element Is Enabled
在这里的Enabled是指的元素的Enbale/Disable属性,当元素属性为Disabled时,元素是不可操作的,有时候,在页面加载的元素之间有逻辑判断,比如a的状态为1时,b的元素才会从Disabled变成Enabled(页面由于加载顺序的问题,这种情况经常发生),所以我们要确认目标元素的状态为Enabled,然后再对元素进行操作。
Wait Until Element Is Visible
原理同上,有时页面的元素虽然已经加载了,但是不是Visible状态,实际页面是不显示的,这样的情况下,对元素的操作也是无效的。
对应的反向关键字为Wait Until Element Is Not Visible,不过一般这条和上面的Wait Until Page Does Not Contain Element一样,大多数情况下是作为断言用的。
用户自定义关键字---元素等待:
以上三个关键字,我喜欢一起使用,因为一般操作的元素一定是页面包含,并且可用,可见的,这里,我们引入了用户自定义关键字:
用户自定义关键字就是编程中封装,可以把相对应的一组操作放到一起,并且抽取其中可能的变量([Arguments])(也可以不抽取):
wait element
    [Arguments]    ${element locator}
    comment    这里的文字可以在log中看到,本用户自定义关键字检察元素是否被包含,可用,可见,以下依次判断:
    Wait Until Page Contains Element    ${element locator}    20s
    Wait Until Element Is Enabled    ${element locator}    20s
    Wait Until Element Is Visible    ${element locator}    20s
    sleep    1
上面代码中的${wait time}是在资源文件中已定义的变量,sleep 1 的作用是降低运行速度,增加容错率。
2. 断言用的智能等待:
【Tips】断言在这里是指对某个操作结果的判断。
Wait Until Page Contains
强烈推荐,不用元素定位,全页面等待某个文本,出现即为断言结果为True,在超时时间过了不出现即为False,适用于关键操作有页面提示的框架。
相对应的反向关键字为Wait Until Page Does Not Contain,适用于在业务状态变化后,页面某文字消失的情况,不是特殊情况,不建议使用,因为大部分情况下,某文字的消失,并不能说明业务一定成功了。
Wait Until Page Contains Element
在页面上等待符合定位的某元素出现,即为判断结果为True,在超时时间过了不出现即为False,某些情况下比较好用。
相对应的反向关键字为Wait Until Page Does Not Contain Element,使用方法和上面一样,这里就不再描述。
Wait Until Element Contains
判断元素包含的文本,其实这个有3个需要注意的地方:
1. 元素先被找到,如果页面未包含元素,直接报错。
3. 文本是“包含”,比如目标文本内容为"123",我们断言的内容为"23",也会判断为True。
2. 如果定位有多个符合的元素,就会依次查找。
所以这个关键字是判断某一瞬页面是中某元素是否包含某文本,如果文本在这一瞬没有出现,就会判断为False。
相对应的反向关键字为Wait Until Element Does Not Contain,使用方法和上面一样,这里就不再描述。
用户自定义关键字---断言:
由于华为云在关键操作后(一般是提交表单),都会有后台响应的页面提示,会显示5秒,为了方便定位,我们在提交表单3秒后,可以先做一次截屏(Capture Page Screenshot),这样通过截图能分析失败原因,然后再断言:
wait contains
    [Arguments]    ${wait text}
    comment    先sleep3秒等待响应出现并截图,之后再断言我们需要断言的内容
    sleep    3
    Capture Page Screenshot
    wait until page contains    ${wait text}    20s
    sleep    1
这里sleep 1 的作用是降低运行速度,增加容错率。
3. 重试用的智能等待:
记得我们上面说的“重试机制”么,大部分情况下的重试,都使用这个关键字来完成。
Wait Until Keyword Succeeds
这个关键字很重要,这个关键字很重要,这个关键字很重要
我们做手工测试,如果看到某个按钮没有加载出来,或者点击无反应,我们会稍等下再点点看。
默认情况下,自动化脚本如果点击失败,直接就会报错,然后本条自动化直接失败。这个是造成自动化稳定性的罪魁祸首。
使用这个关键字,可以在失败的情况下重试。
使用方法如下:
Wait Until Keyword Succeeds 3x 5s click element css=#123
其中,3x代表重试次数,5s代表每次重试间隔时间,后面就是关键字和其参数了,这里是点击ID为123的元素。
这样,就做到了如果点击ID为123的元素,如果成功,继续往下走;如果失败,隔5秒后重新点击试试。成功了继续,失败了再来,直到三次都失败为止。
这样,我们就可以这样封装点击和输入的操作了:
wait click
    [Arguments]    ${element locator}
    comment    这里使用了上面已经建立好的wait element用户自定义关键字
    wait element    ${element locator}
    comment    使用focus可以聚焦元素
    focus    ${element locator}
    comment    尝试点击元素,成功继续,失败5秒后重试,3次失败后本行失败
    Wait Until Keyword Succeeds    3x    5s    click element    ${element locator}

wait input
    [Arguments]    ${element locator}    ${input text}
    comment    这里使用了上面已经建立好的wait element用户自定义关键字
    wait element    ${element locator}
    comment    使用focus可以聚焦元素
    focus    ${element locator}
    comment    尝试输入文字,成功继续,失败5秒后重试,3次失败后本行失败
    Wait Until Keyword Succeeds    3x    5s    input text    ${element locator}    ${input text}
扩展下,以上关键字click element也可以是某个用户自定义关键字,比如登录,这样可以做到登录失败,就可以再次登录,比如以下写法:
loginHEC
    comment    使用google chrome浏览器打开网址
    comment    网址后面使用get参数直达我们想要到的页面
    Open Browser    https://console.huaweicloud.com/vpc/?region=cn-east-2&locale=zh-cn#/vpc/vpcmanager/dashboard    gc
    comment    由于默认打开的浏览器是小窗口,这里设置浏览器的大小为1920 1080
    Set Window Size    1920    1080
    comment    最大化浏览器,最大化后,会根据windows系统桌面的分辨率重置浏览器分辨率,有可能会导致上面设置1080p分辨率失效
    Maximize Browser Window
    comment    尝试登录系统,如果其中任意一步失败,则重试
    Wait Until Keyword Succeeds    3x    5s    login_retry

login_retry
    comment    go to是在当前浏览器中跳转到url,这里使用go to是因为使用这个可以重置浏览器到输入用户名和密码的界面,方便retry
    go to    https://console.huaweicloud.com/vpc/?region=cn-east-2&locale=zh-cn#/vpc/vpcmanager/dashboard
    comment    输入用户名和密码,并点击确定
    wait input    css=#userNameId    username
    wait input    css=#pwdId    password
    wait click    css=#btn_submit
    comment    断言是否页面上有“快速指南”,如果有,登陆成功
Wait Contains 快速指南看到这里,小明提出一个问题,要是在Open Browser就失败了,后面岂不是没有重试了?
所以我们也要把loginHEC的关键字通过这种方式,放到test suite的setup中去:

这样就做到了打开浏览器重试3次 乘以 登录重试3次,不是特殊中的特殊情况,这样足够了。
以上就是我们能处理90%以上UI自动化用到的关键字了,是不是很少 :)
后面我会在实际例子中穿插介绍其它常用的关键字,但是在这之前,我们还有个很重要的事要做,那就是:
参数化一般有两个用处:
1. 使用比较多的参数,我们如果需要更改,就得手动去每个脚本中修改,其实我们可以把这个值提取到变量中,这样就能做到全局修改,比如最典型的超时等待时间的参数化。
2. 一条用例使用多个参数进行测试的情况,比如下拉列表的遍历,边界值的测试等等。
比如综合上面所有一定义的关键字,可以把所有的超时时间20s修改为参数${wait time},失败重试的次数参数化为${retry times},用户名和密码修改为${username}和${password},并参数化访问的网址为${VPC Dashboard URL},替换后,资源文件就变成了这样:
*** Settings ***
Library           Selenium2Library
Library           Collections

*** Variables ***
${wait time}      20s
${retry times}    3x
${username}       你申请的用户名
${password}       你设置的密码
${VPC Dashboard URL}    https://console.huaweicloud.com/vpc/?region=cn-east-2&locale=zh-cn#/vpc/vpcmanager/dashboard

*** Keywords ***
wait element
    [Arguments]    ${element locator}
    comment    这里的文字可以在log中看到,本用户自定义关键字检察元素是否被包含,可用,可见,以下依次判断:
    Wait Until Page Contains Element    ${element locator}    ${wait time}
    Wait Until Element Is Enabled    ${element locator}    ${wait time}
    Wait Until Element Is Visible    ${element locator}    ${wait time}
    sleep    1

wait click
    [Arguments]    ${element locator}
    comment    这里使用了上面已经建立好的wait element用户自定义关键字
    wait element    ${element locator}
    comment    使用focus可以聚焦元素
    focus    ${element locator}
    comment    尝试点击元素,成功继续,失败5秒后重试,${retry times}次失败后本行失败
    Wait Until Keyword Succeeds    ${retry times}    5s    click element    ${element locator}

wait input
    [Arguments]    ${element locator}    ${input text}
    comment    这里使用了上面已经建立好的wait element用户自定义关键字
    wait element    ${element locator}
    comment    使用focus可以聚焦元素
    focus    ${element locator}
    comment    尝试输入文字,成功继续,失败5秒后重试,${retry times}次失败后本行失败
    Wait Until Keyword Succeeds    ${retry times}    5s    input text    ${element locator}    ${input text}

wait contains
    [Arguments]    ${wait text}
    comment    先sleep3秒等待响应出现并截图,之后再断言我们需要断言的内容
    sleep    3
    Capture Page Screenshot
    wait until page contains    ${wait text}    ${wait time}
    sleep    1

loginHEC
    comment    使用google chrome浏览器打开网址
    Open Browser    ${VPC Dashboard URL}    gc
    comment    由于默认打开的浏览器是小窗口,这里设置浏览器的大小为1920 1080
    Set Window Size    1920    1080
    comment    最大化浏览器,最大化后,会根据windows系统桌面的分辨率重置浏览器分辨率,有可能会导致上面设置1080p分辨率失效
    Maximize Browser Window
    comment    尝试登录系统,如果其中任意一步失败,则重试
    Wait Until Keyword Succeeds    ${retry times}    5s    login_retry

login_retry
    comment    go to是在当前浏览器中跳转到url,这里使用go to是因为使用这个可以重置浏览器到输入用户名和密码的界面,方便retry
    go to    ${VPC Dashboard URL}
    comment    输入用户名和密码,并点击确定
    wait input    css=#userNameId    ${username}
    wait input    css=#pwdId    ${password}
    wait click    css=#btn_submit
    comment    断言是否页面上有“快速指南”,如果有,登陆成功
    Wait Contains    快速指南
准备工作就做好了,这样我们就可以创建我们本文第一条自动化测试用例。
【Tips】由于本文要示例元素定位的方法,所以元素定位均未参数化,而使用comment对操作进行说明。元素定位使用chrome开发者模式。
在这里,我建议测试用例封装成一个关键字,因为只有这样,才方便测试用例进行整体重试。
我们准备写一条创建VPC的测试用例,主要操作步骤如下图所示:

(Chrome浏览器)右键点要操作的对象(此处是“虚拟私有云”),选择“检察(N)”

当把鼠标放在阴影部分(
在Selenium中,对元素的操作要求不是那么严格,我们可以把鼠标从span依次往上移,看看父元素和周边元素的作用域。只要这个作用域还在我们鼠标可点击的范围内,均可以作为点击的对象来操作。
向上移动后,我们发现父元素的div中有一个属性id="_vpc" ,并且它的作用域也是在我们要点击的范围内:

由此,我们可以使用css选择器来定位元素,在css中,#_vpc可以理解为"选择所有id为_vpc的元素":
分析出的定位结果为: #_vpc
验证的方法很简单,点击开发控制台元素页面任意元素,按Ctrl+F出现元素搜索框(注意不要点到Web页面上了)

输入我们分析出的css选择器结果:

被选择器选中的元素会标记为黄色,可以把鼠标放到上面,看看是Web页面上显示的作用域是不是我们的预期结果。
同时有个很关键的点,在搜索框的最后有个“1 of 1”,如果选择器查到的结果有多个,可能会对操作有影响,一般我们要确保此处是“1 of 1”。如果有多个,可以使用后面紧跟的上下箭头来切换标黄被选中的元素。
有了元素定位,我们的用例就有了第一条脚本:
create VPC
    comment    点击dashboard的“虚拟私有云”按钮,进入虚拟私有云页面
    wait click    css=#_vpc
进入虚拟私有云页面,我们要点击“创建虚拟私有云”按钮进入创建虚拟私有云的页面,定位如下:

这里有唯一的class属性可以定位到按钮,和id有简写一样,class可以用"."来简写,所以定位结果为:
.cti-btn-label
更新到测试脚本中:
create VPC
    comment    点击dashboard的“虚拟私有云”按钮,进入虚拟私有云页面
    wait click    css=#_vpc
    comment    点击拟私有云页面中右上角的创建虚拟私有云按钮,进入虚拟私有云创建页面
    wait click    css=.cti-btn-label
进入创建页面后,需要输入新创建的VPC的名字,输入框一般在html中有两种,一种叫input,一种叫textarea,下图中的input框中有个属性是唯一的,我们可以通过它来对这个input框进行定位:

元素类型[属性名称和其对应值]也可以作为选择器来使用,所以这个输入框的定位结果为:
input[meta-data-uba="www_v1_vpc.click.vpc_createVpcList_name_input"]
更新到测试脚本中:
create VPC
    comment    点击dashboard的“虚拟私有云”按钮,进入虚拟私有云页面
    wait click    css=#_vpc
    comment    点击拟私有云页面中右上角的创建虚拟私有云按钮,进入虚拟私有云创建页面
    wait click    css=.cti-btn-label
    comment    输入新的虚拟私有云名字:vpc-temp
    wait input    css=input[meta-data-uba="www_v1_vpc.click.vpc_createVpcList_name_input"]    vpc-temp
同理,子网的名字输入也可以定位出来:

更新到测试脚本中:
create VPC
    comment    点击dashboard的“虚拟私有云”按钮,进入虚拟私有云页面
    wait click    css=#_vpc
    comment    点击拟私有云页面中右上角的创建虚拟私有云按钮,进入虚拟私有云创建页面
    wait click    css=.cti-btn-label
    comment    输入新的虚拟私有云名字:vpc-temp
    wait input    css=input[meta-data-uba="www_v1_vpc.click.vpc_createVpcList_name_input"]    vpc-temp
    comment    输入新的子网名字:Subnet-temp
    wait input    css=input[meta-data-uba="www_v1_vpc.click.vpc_createVpcList_portal_input"]    subnet-temp
最后点击创建按钮:

create VPC
    comment    点击dashboard的“虚拟私有云”按钮,进入虚拟私有云页面
    wait click    css=#_vpc
    comment    点击拟私有云页面中右上角的创建虚拟私有云按钮,进入虚拟私有云创建页面
    wait click    css=.cti-btn-label
    comment    输入新的虚拟私有云名字:vpc-temp
    wait input    css=input[meta-data-uba="www_v1_vpc.click.vpc_createVpcList_name_input"]    vpc-temp
    comment    输入新的子网名字:Subnet-temp
    wait input    css=input[meta-data-uba="www_v1_vpc.click.vpc_createVpcList_portal_input"]    subnet-temp
    comment    点击创建按钮创建VPC
    wait click    css=.cti-btn-label
创建成功后,会显示如下页面,我们可以判断页面中是否出现红框的文字,从而判断创建虚拟私有云是否成功:

create VPC
    comment    点击dashboard的“虚拟私有云”按钮,进入虚拟私有云页面
    wait click    css=#_vpc
    comment    点击拟私有云页面中右上角的创建虚拟私有云按钮,进入虚拟私有云创建页面
    wait click    css=.cti-btn-label
    comment    输入新的虚拟私有云名字:vpc-temp
    wait input    css=input[meta-data-uba="www_v1_vpc.click.vpc_createVpcList_name_input"]    vpc-temp
    comment    输入新的子网名字:Subnet-temp
    wait input    css=input[meta-data-uba="www_v1_vpc.click.vpc_createVpcList_portal_input"]    subnet-temp
    comment    点击创建按钮创建VPC
    wait click    css=.cti-btn-label
    comment    判断页面上是否出现“任务提交成功!”来判断提交是否成功
    wait contains    任务提交成功!
整个用例就完成了,在测试用例中调用这个关键字,就能自动化执行创建一个虚拟私有云:

*** Settings ***
Suite Setup       Wait Until Keyword Succeeds    ${retry times}    5s    loginHEC
Suite Teardown    Close All Browsers
Resource          Resource.txt

*** Test Cases ***
VPC Create vpc-temp
    create vpc
等等,如果这么做,失败了就没有重试了,根据我们之前讲的,是可以通过关键字重试的:
*** Settings ***
Suite Setup       Wait Until Keyword Succeeds    ${retry times}    5s    loginHEC
Suite Teardown    Close All Browsers
Resource          Resource.txt

*** Test Cases ***
VPC Create vpc-temp
Wait Until Keyword Succeeds ${retry times} 5s create vpc仔细观察创建VPC的关键字,如果真的在过程中失败了,重试也是无效的,因为我们创建的过程中,失败可能在任何界面:
所以,我们需要在这条用例的关键字的最前面加一个重置,即无论在哪失败,测试用例都能回到用例最初的页面。
最常用的方法有两个:
1. 使用go to关键字强制跳转到web页面(可参考login retry的用法)
2. 使用Open Browser打开一个新的浏览器,并访问web页面
绝大多数情况下,使用方法1,因为开新的浏览器会消耗执行机资源。
又因为这个重置在我们测试”虚拟私有云“这个模块时会用的比较多,所以我们把这个动作封装成一个关键字,叫"Enter VPC Board"
修改后的完美结果为:
Enter VPC Board
    comment    通过go to打开VPC dashboard
    go to    ${VPC Dashboard URL}
    comment    点击dashboard的“虚拟私有云”按钮,进入虚拟私有云页面
    wait click    css=#_vpc

create VPC
    Enter VPC Board
    comment    点击拟私有云页面中右上角的创建虚拟私有云按钮,进入虚拟私有云创建页面
    wait click    css=.cti-btn-label
    comment    输入新的虚拟私有云名字:vpc-temp
    wait input    css=input[meta-data-uba="www_v1_vpc.click.vpc_createVpcList_name_input"]    vpc-temp
    comment    输入新的子网名字:Subnet-temp
    wait input    css=input[meta-data-uba="www_v1_vpc.click.vpc_createVpcList_portal_input"]    subnet-temp
    comment    点击创建按钮创建VPC
    wait click    css=.cti-btn-label
    comment    判断页面上是否出现“任务提交成功!”来判断提交是否成功
    wait contains    任务提交成功!
这样,即使在任务中任意地方失败,用例都会从头重试整个创建过程。
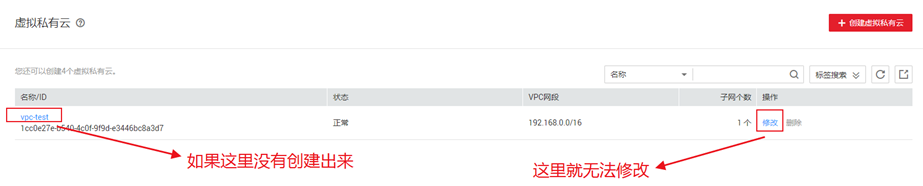
观察下我们已经创建的VPC。可以看到对新的VPC,有修改和删除操作:

在进行修改和删除操作之前,我们观察到有组件提供的搜索实例功能,为了能唯一确定我们的操作对象,可以使用这个功能先搜索出我们要操作的对象,并把这个动作封装成一个关键字:

我们可以看到上图中,其实是有两个可以使用的属性,但是这里选择了下面的,因为下面的属性是所有搜索框输入都能使用的属性,我们可以根据它创建整个自动化中都适用的搜索用户自定义关键字,后面的定位方法略,最后关键字内容为:
Search
    [Arguments]    ${Search Text}
    comment    输入搜索对象
    wait input    css=.ti-searchbox-input    ${Search Text}
    comment    点击搜索按钮
    wait click    css=.ti-searchbox-search
    sleep    1
以后我们遇到搜索框,就可以使用这个关键字,使要操作的实例唯一。
创建完成后,自然是要进行修改了,这里有个小技巧,修改这个功能,可以修改内容后再修改回来,万一修改功能不可用,我们后面对这条实例的其它操作也不会受影响。
先定位下“修改”的位置,这里使用Xpath的text()进行定位,当然,也可以使用jquery进行定位,后面再演示:

然后是修改名字输入框,修改CIDR输入框和提交修改的按钮的元素定位:


提交成功后,再次操作,把修改的内容全部修改回来,注意,这里搜索时使用新的vpc名字,最后完成的脚本为:
modify VPC
    comment    先通过go to URL的方式重置本用例,进入VPC模块页面
    Enter VPC Board
    comment    通过用户自定义搜索关键字,唯一要操作的实例对象
    Search    vpc-temp
    comment    点击修改按钮(这里其实是个链接)
    wait click    xpath=//a[text()='修改']
    comment    修改vpc的名字和cidr
    wait input    css=input[meta-data-uba="www_v1_vpc.click.vpc_detail_editVpcModel_name_input"]    vpc-modify-temp
    wait input    css=input[meta-data-uba="www_v1_vpc.click.vpc_detail_editVpcModel_cidrMask_input"]    17
    comment    点击确定按钮提交修改
    wait click    css=button[ng-click="clickOK()"]
    comment    判断页面上是否出现“成功”来判断提交是否成功
    wait contains    成功
    comment    通过用户自定义搜索关键字,唯一要操作的实例对象
    Search    vpc-modify-temp
    comment    点击修改按钮(这里其实是个链接)
    wait click    xpath=//a[text()='修改']
    comment    修改vpc的名字和cidr
    wait input    css=input[meta-data-uba="www_v1_vpc.click.vpc_detail_editVpcModel_name_input"]    vpc-temp
    wait input    css=input[meta-data-uba="www_v1_vpc.click.vpc_detail_editVpcModel_cidrMask_input"]    16
    comment    点击确定按钮提交修改
    wait click    css=button[ng-click="clickOK()"]
    comment    判断页面上是否出现“成功”来判断提交是否成功
    wait contains    成功
尝试进行删除操作,但是这里无法直接删除:

要进入VPC去删除里面的子网,才能进行进一步的VPC删除,所以我们先进行子网的删除(由于定位没有难点,此处省略):
delete subnet
    comment    先通过go to URL的方式重置本用例,进入VPC模块页面
    Enter VPC Board
    comment    通过用户自定义搜索关键字,唯一要操作的实例对象
    Search    vpc-temp
    comment    点击VPC详情链接
    wait click    css=a[meta-data-uba="www_v1_vpc.click.vpcList_vpc_detail"]
    comment    通过用户自定义搜索关键字,唯一要操作的实例对象
    search    subnet-temp
    comment    点击subnet后面的删除按钮
    wait click    xpath=//a[text()='删除']
    comment    点击确认删除按钮
    wait click    css=button[ng-click="clickOK()"]
    comment    判断页面上是否出现“成功”来判断提交是否成功
    wait contains    成功
这次可以对VPC进行删除操作了:
delete VPC
    comment    先通过go to URL的方式重置本用例,进入VPC模块页面
    Enter VPC Board
    comment    通过用户自定义搜索关键字,唯一要操作的实例对象
    Search    vpc-temp
    comment    点击删除按钮(这里其实是个链接)
    wait click    xpath=//a[text()='删除']
    comment    点击确认删除按钮
    wait click    css=button[ng-click="clickOK()"]
    comment    判断页面上是否出现“成功”来判断提交是否成功
    wait contains    成功
把以上的创建---修改---删除放在一起,连跑下,一个最小的循环体就完成了:

如果所有的用例不出错,创建-修改-删除,最后资源会恢复到最初的状态。由于目前这个小循环体只牵扯4条用例,我们不需要添加预置资源。如果后面做自动化用例设计,创建的资源要被数十条用例使用,就可以事先创建好这个资源。
当然,事先创建资源也有不好的地方,主要体现在以下两个方面:
1. 某些新创建资源和以前创建的资源(预置资源)有差别,比如创建时加入了新的属性。
2. 用例有失败,复杂的预置资源会影响自动化环境手动恢复的时间。
所以,可以根据业务的不同,有节制的使用预置资源,如果自动化创建的资源,和后面多条用例都有耦合,我们可以这么做:
此资源创建完成后,判断资源是否完全创建成功,并把这个结果传给一个变量,并把这个变量设置为全局变量。和此资源耦合的用例,先判断这个变量的值,符合条件再跑。这样,有耦合的这些用例就不会傻傻的跑很久。
我们还是用上面VPC的创建-修改-删除来做个例子。需要做的是:
1. 新增一个判断VPC创建状态并返回这个状态值的用户关键字:
check VPC
    comment    初始化一个套件内使用的公共变量,并赋值为uncreated,用来记录VPC创建是否完成的状态
    Set Suite Variable    ${vpc created status}    uncreated
    comment    先通过go to URL的方式重置本用例,进入VPC模块页面
    Enter VPC Board
    comment    直接检查页面上是否存在刚才创建的VPC
    wait contains    vpc-temp
    comment    由于RF会在失败后停止执行,如果上面的检查成功了,才能执行以下这条,并赋新值
    Set Suite Variable    ${vpc created status}    created
2. 在第一个使用刚才创建VPC的资源的用例之前执行这个用户关键字,并在后面所有要使用这个资源的前面先判断资源状态,如果有资源就执行,否者直接跳过:
*** Settings ***
Suite Setup       Wait Until Keyword Succeeds    ${retry times}    5s    loginHEC
Suite Teardown    Close All Browsers
Resource          Resource.txt

*** Test Cases ***
VPC Create vpc-temp
    Wait Until Keyword Succeeds    ${retry times}    5s    create vpc

check VPC Resource
    Wait Until Keyword Succeeds    ${retry times}    5s    check vpc

modify VPC vpc-temp
    Run keyword if    '${vpc created status}'=='created'    Wait Until Keyword Succeeds    ${retry times}    5s    modify vpc

delete subnet subnet-temp
    Run keyword if    '${vpc created status}'=='created'    Wait Until Keyword Succeeds    ${retry times}    5s    delete subnet

delete VPC vpc-temp
    Run keyword if    '${vpc created status}'=='created'    Wait Until Keyword Succeeds    ${retry times}    5s    delete vpc
小明马上跳出来问:为什么不把这个资源判断放在setup中执行?
其实也可以放在modify vpc vpc-temp的setup中,但是由于RF的限制,setup中不太方便使用wait until keyword succeeds,除非再封装一层。而且把这条放在外面,在分析的时候,能一眼看到是资源文件没有创建成功。
——————————————————追加部分 自动滚屏————————————————
至此,只要按照上面的方法,绝大部分的UI自动化问题都能解决。但是对绝大部分Selenium使用者来说,还有一个让很多人头大的问题,那就是需要操作必须滚动后才能看见的元素。
网上有很多办法,一般来说简单的有以下三种方法:
1. 使用focus,可以聚焦元素后,自动滚屏过去。
2. 使用Scroll Element Into View (Selenium2Library3.0)自动滚到元素可见。
3. 直接用scroll down这个关键字滚屏,但是我们不知道需要滚屏多少,很多时候都是估算。
其中1和2的方法,有时候能生效,有时候有莫名其妙的失败。3的方法每次滚屏都可以成功,但是有可能因为版本的变更,自动化执行机分辨率的变化等等造成滚过了或者没滚到。
然后,笔者自己写了一个用户关键字,改造了我们上文提到的用户关键字wait element,使用了3的方法,但是可以智能的获取滚动高度,大家可以根据需要取用:
scroll to
    [Arguments]    ${scroll value}
    comment    由于部分Selenium2Library不支持Scroll Down,故自己写一个用js滚屏的关键字
    Execute Javascript    var q=document.documentElement.scrollTop=${scroll value}


wait element
    [Arguments]    ${Element_LOCATOR}
    wait until page contains element    ${Element_LOCATOR}    ${wait time}
    Wait Until Element Is Enabled    ${Element_LOCATOR}    ${wait time}
    comment    这里重试是因为有小概率会发生因为页面加载不完全导致的获取滚动高度有问题的情况
    Wait Until Keyword Succeeds    4x    5s    get scroll height    ${Element_LOCATOR}
    comment    当被操作额元素在屏幕一半以上时,会出现计算的滚屏高度为负值的情况,故先判断下
    run keyword if    ${scroll} >= 0    scroll to    ${scroll}
    Wait Until Element Is Visible    ${Element_LOCATOR}    ${wait time}
    Capture Page Screenshot
    sleep    2

get scroll height
    [Arguments]    ${Element_LOCATOR}
    comment    先滚动屏幕到最上方,这样获取的垂直高度才是正确的
    scroll to    0
    comment    获取当前屏幕的高度(因为可能有变化)
    ${window-width}    ${window-height}=    get window size
    comment    获取目标元素距离浏览器顶端的滚屏垂直高度,有兴趣的可以看源码如何实现
    ${Vertical Position}    Get Vertical Position    ${Element_LOCATOR}
    log    ${Vertical Position}
    comment    计算从web顶端需要滚屏多少像素才能(尽量)把元素放在屏幕水平中间
    ${scroll}=    Evaluate    ${Vertical Position}-(${window-height}/2)
    comment   设置这个变量为suite内均可使用,这样才能跨关键字使用
    Set Suite Variable    ${scroll}
剩下的部分,我又要唠叨回到我们文章最早强调的:元素定位
目前,要解决元素定位不稳定的问题,有两个方面:
1. 给操作的元素增加id
2. 使用更优的元素定位写法
这两个不冲突,但是1是一种可测试性的植入,需要开发配合(除非你被允许改开发的代码)。2就是我们需要自己提高的部分了。
我目前使用的元素定位,主要使用css选择器和xpath选择器,这两个基本可以搞定绝大部分元素定位的工作。
我在这可以放置一些常用的语法,方便各位取用:
CSS部分:
css=span.icon-cloud-action-add ---------根据class属性值寻找元素
css=input[tester="JustTest"] ----------根据非class属性值寻找元素
css=#PRcx tbody tr>td:first-child>a ----------父元素ID+子元素层级+多平级元素选第一个
Xpath部分:
xpath=//span[text()='提交'] -----------根据文字寻找元素
xpath=//span[contains(text(),'提交')] -----------根据部分文字寻找元素
xpath=//span[@class="resourceGroupText ng-binding"] ----------根据class属性寻找元素
xpath=//span[contains(@class,'resourceGroupText')] ----------根据部分class属性寻找元素
xpath=//li//span[text()="Stop"]/parent::*/parent::*//span[text()='Start'] -----------根据某唯一元素,反向找到其父元素,再重新向下找
xpath=//li//span[text()="Stop"]//following-sibling::*//span[text()='Start'] -----------根据某唯一元素,找到其后的兄弟元素
xpath=//li//span[text()="Stop"]//preceding-sibling::*//span[text()='Start'] -----------根据某唯一元素,找到其前的兄弟元素
xpath=//div[@id="menu"]/div[last()] ---------某div的下级div的最后一个
xpath=//div[@id="menu"]/div[last()-1] ---------某div的下级div的倒数第二个
xpath=//span[string-length(text())=10] ----------根据对象的某个值的长度寻找元素
我们有很多情况会使用到循环,比如循环遍历某下拉菜单,或者需要循环删除一些资源,甚至更为复杂的循环场景。要实现这些,其实只要掌握两点:
1. 一个最基本的循环实现。
2. 如何实现二层及二层以上的循环。
我们先看一下最基本的循环,以下是一个最基本的循环的关键字用法,是一个实际(目前)可用的RF用例:
clean order
    comment    打开浏览器并登录
    Login_HEC
    comment    通过go to直接跳转到华为云订单管理页面
    go to    https://account.huaweicloud.com/usercenter/?region=cn-southwest-2_pankerong&locale=en-us#/userindex/myOrder
    comment    设置循环的次数为2000,注意以下的写法,循环将会从0开始,到1999结束(如果没有满足退出条件的话)
    : FOR    ${i}    IN RANGE    2000
    comment    使用run keyword and return status返回后面等待元素的结果,元素定位为本页订单第一行的删除按钮
    \    ${status}=    run keyword and return status    wait element    css=#row_0_1
    comment    打印这个结果
    \    log    ${status}
    comment    给出循环跳出条件,这里是第一行不存在(如果全部order都删完了,第一行自然没有了)
    \    run keyword if    '${status}'=='False'    Exit For Loop
    comment    这里能执行,其实是因为'${status}'=='True',因为只有两个可能,所以省略
    \    wait click element    css=#row_0_1
    \    wait click element    css=#cancle_msg_ok_btn
如果是二层或者二层以上的循环,在RF中不能用我们平常写代码的方式实现,只能把第二层的循环封装到关键字中,在第一层循环中调用,这部分我就不给大家举例子了,自己试试比较好。
————————————追加部分 获取符合条件的实例个数——————
很多情况下,我们需要获取当前页面一些符合条件的实例的个数,比如下图:

我想获取子网个数为1个的虚拟私有云的个数,应该如何做?
其实很简单,我们先找出要找出共同点,这几行的共同点就是它们都有一个span的文字内容是‘一个’,我们用xpath定位如下:

在页面上符合我们定位结果的是5个,这个也是目前实际确实只有1个子网的VPC的个数,RF提供了一个关键字,我们可以直接把这个5提取出来:
get number we need
    comment    首先要等页面加载数据完成,因为获取是“一瞬完成”
    wait element    xpath=//span[text()='1 个']
    comment    获取符合条件的xpath筛选结果的个数,注意,这里限定只能是xpath,所以后面不要用xpath=
    ${count number}    Get Matching Xpath Count    //span[text()='1 个']
    comment    打印这个值
    log    ${count number}
当然,如果你已经知道结果是5个,只是想判断是不是5个,可以用这个方法:
must 5 res
    comment    先等待
    wait element    xpath=xpath=//span[text()='1 个']
    comment    注意不用加xpath=
Xpath Should Match X Times //span[text()='1 个'] 5有很多弹窗,会判断你的cookie,如果cookie没有打开记录,就会在进入页面时显示。
我们的webdiriver打开浏览器时,一定是个全新的浏览器,所以一般都会有这个弹窗,我们可以直接关掉,但是如果之后再到这个页面,就不会有弹窗,如果我们的脚本中还要去关,就会失败。
针对这种情况,我们有两种解决方法,各有利弊:
1. 使用 Run Keyword And Ignore Error这个关键字去关掉弹窗,如果下次弹窗没有出现,也会继续执行用例且不报错。缺点是如果你使用智能等待,就必须等满时间,比如20秒。
2. 使用Reload Page来刷新当前页,由于刷新前已经记录打开页面的cookie,弹窗会直接消失。缺点是适用场景比较苛刻。
————追加部分 如何使用RFS来检查元素字体,字号,颜色等信息—————
在Selenium2Library库中,有一个关键字大大扩展了我们能做的事,那就是Execute Javascript,用它能执行JS脚本,而通过JS脚本我们可以做很多事,比如下面的例子:
link color check
    Login_HEC
    comment    获取创建VPC的帮助链接颜色并比较
    wait element    xpath=//a[text()='Creating a VPC']
    comment    通过JS获取帮助链接的颜色
    ${link_normal_color}    Execute Javascript    return window.getComputedStyle(document.evaluate("//a[text()='Creating a VPC']",document).iterateNext()).color
    comment    直接和目的颜色比对
    should be true    '${link_normal_color}'=='rgb(0, 115, 159)'
    comment    获取创建VPC的帮助链接hover颜色并比较
    wait element    xpath=//a[text()='Creating a VPC']
    mouse over    xpath=//a[text()='Creating a VPC']
    sleep    1
    ${link_hover_color}    Execute Javascript    return window.getComputedStyle(document.evaluate("//a[text()='Creating a VPC']",document).iterateNext()).color
    should be true    '${link_hover_color}'=='rgb(0, 101, 140)'
以上只是一个简单的例子,提供一个思路,能使用的场景太多,需要各位自行探索。
除了系统自带的库BuiltIn和我们必须使用的Selenium2Library库以外,还有几个库,很多时候都能用得上:
1. BuiltIn ----不用引入即可使用的库,RF中控制的语句,基本都来自这里
2. Selenium2Library ----控制web上的操作,只能靠它
3. AutoItLibrary ----windows下自动化的库,可以直接控制窗口和发送动作,最常见的使用场景是上传文件或下载文件,关闭Alarm,或者我在修改了Cookie后,发送^F5来强制刷新资源等等
4. Collections ----这个库包括了python对数据处理的各种方法,比如Append To List或者Count Values In List等等
5. String ----字符串处理,你一定需要这个库
UI自动化,执行的效率不是很高,接口自动化执行100条,UI可能一条都没有执行完。为了提高执行效率,我们最常用的方法有:
1. 尽量减少sleep的使用
2. 减少setup和teardown的使用,资源使用要巧妙
3. 使用多线程来跑UI自动化
前两个是我们要不断磨练,在实战中逐渐优化的,第三个是可以立竿见影的方法
目前在RFS上,能支持多线程的工具叫pabot,用它替换我们默认使用的pybot,可以轻易的实现UI自动化多线程,具体操作如下:
1. 去下一个pabot:https://pypi.org/project/robotframework-pabot/ 或者直接安装个:pip install robotframework-pabot
2. 在命令行直接使用pabot --help查看支持的参数,其实常用的是以下几个:
--verbose 控制台输出更多信息,一般最好打开
--processes 并发线程数设置,也可以用这个参数,不适用的情况下,会根据你的CPU核心数调整,比如你是4核的,会开4个线程
--pabotlib 如果你有远程的执行机,你需要这个参数
--suitesfrom 每个线程去执行一个suite,所以这里给的是你存放suite的文件夹,pabot会分别装载suite并执行
--argumentfile 如果你的用例有需要读取的参数,通过这个可以实现
3. 其实pabot还有个功能,在执行suite的时候,会优先加载上次有失败的,如果上次执行均成功,会按照上次执行时常的顺序加载
4. 如果需要使用pabot,就需要解耦suite,每个suite不能互相干扰,主要两方面需要注意:资源抢占和登录
以下是华为云上我编写的脚本,可以作为参考学习,这里由于用例相对简单,所以没有做POM封装,但是基本的思路已经都有了。
代码分4个testcase的suite和一个resource,可以复制到本地试试,但是由于华为云在不断更新,可能少部分在更新后需要修改:
4个testcase的suite:
*** Settings ***
Test Teardown     stopall
Resource          ../resource/resource.txt

*** Test Cases ***
TC_01_ECSUI_ECS_Create_Temp
    [Tags]    HEC
    ${Fatal Error}    Set Variable    True
    Set Suite Variable    ${Fatal Error}
    log    ${Fatal Error}
    Wait Until Keyword Succeeds    ${retry times}    ${retry interval time}    Create ECS Temp3
    Set Suite Variable    ${Fatal Error}    False
    log    ${Fatal Error}
    [Teardown]    run keyword if    '${Fatal Error}'=='True'    Fatal Error Exit

TC_02_ECSUI_ECS_Delete
    [Tags]    HEC
    Wait Until Keyword Succeeds    ${retry times}    ${retry interval time}    ECS Delete3
*** Settings ***
Test Teardown     stopall
Resource          ../resource/resource.txt

*** Test Cases ***
TC_01_ECSUI_Keypair_Create
    [Tags]    HEC
    Wait Until Keyword Succeeds    ${retry times}    ${retry interval time}    Keypair Create

TC_02_ECSUI_Keypair_Query
    [Tags]    HEC
    Wait Until Keyword Succeeds    ${retry times}    ${retry interval time}    Keypair Query

TC_03_ECSUI_Keypair_DeleteCreate
    [Tags]    HEC
    Wait Until Keyword Succeeds    ${retry times}    ${retry interval time}    Keypair DeleteCreate

TC_04_ECSUI_Keypair_Import
    [Tags]    HEC
    Wait Until Keyword Succeeds    ${retry times}    ${retry interval time}    Keypair Import

TC_05_ECSUI_Keypair_DeleteImport
    [Tags]    HEC
    Wait Until Keyword Succeeds    ${retry times}    ${retry interval time}    Keypair DeleteImport

TC_06_ECSUI_ECsGroup_Create
    [Tags]    HEC
    Wait Until Keyword Succeeds    ${retry times}    ${retry interval time}    ECS Group Create

TC_07_ECSUI_ECsGroup_Query
    [Tags]    HEC
    Wait Until Keyword Succeeds    ${retry times}    ${retry interval time}    ECS Group Query

TC_08_ECSUI_ECsGroup_Delete
    [Tags]    HEC
    Wait Until Keyword Succeeds    ${retry times}    ${retry interval time}    ECS Group Delete
*** Settings ***
Test Teardown     stopall
Resource          ../resource/resource.txt

*** Test Cases ***
TC_08_ECSUI_ECS_Create_Temp
    [Tags]    HEC
    Wait Until Keyword Succeeds    ${retry times}    ${retry interval time}    Create ECS Temp

TC_00_ECSUI_VNC_Check
    [Tags]    HEC
    Wait Until Keyword Succeeds    ${retry times}    ${retry interval time}    ECS VNC Check

TC_01_ECSUI_Restart
    [Tags]    HEC
    Wait Until Keyword Succeeds    ${retry times}    ${retry interval time}    ECS Restart

TC_02_ECSUI_Stop
    [Tags]    HEC
    Wait Until Keyword Succeeds    ${retry times}    ${retry interval time}    ECS Stop

TC_03_ECSUI_Start
    [Tags]    HEC
    Wait Until Keyword Succeeds    ${retry times}    ${retry interval time}    ECS Start

TC_04_ECSUI_Stop2
    [Tags]    HEC
    Wait Until Keyword Succeeds    ${retry times}    ${retry interval time}    ECS Stop

TC_05_ECSUI_ResetPassword
    [Tags]    HEC
    Wait Until Keyword Succeeds    ${retry times}    ${retry interval time}    ECS Reset Password

TC_06_ECSUI_AddTag
    [Tags]    HEC
    Wait Until Keyword Succeeds    ${retry times}    ${retry interval time}    ECS Add Tag

TC_07_ECSUI_ECS_Delete
    [Tags]    HEC
    Wait Until Keyword Succeeds    ${retry times}    ${retry interval time}    ECS Delete
*** Settings ***
Test Teardown     stopall
Resource          ../resource/resource.txt

*** Test Cases ***
TC_05_ECSUI_ECS_Create_Temp
    [Tags]    HEC
    Wait Until Keyword Succeeds    ${retry times}    ${retry interval time}    Create ECS Temp2

TC_01_ECSUI_Modify Spcifications
    [Tags]    HEC
    Wait Until Keyword Succeeds    ${retry times}    ${retry interval time}    ECS Modify Specifications

TC_02_ECSUI_Reinstall OS
    [Tags]    HEC
    Wait Until Keyword Succeeds    ${retry times}    ${retry interval time}    ECS Reinstall OS

TC_03_ECSUI_Change OS
    [Tags]    HEC
    [Setup]
    Wait Until Keyword Succeeds    ${retry times}    ${retry interval time}    ECS Change OS

TC_04_ECSUI_ECS_Delete
    [Tags]    HEC
    Wait Until Keyword Succeeds    ${retry times}    ${retry interval time}    ECS Delete2
一个resource:
*** Settings ***
Library Selenium2Library
Library String
Library DateTime
*** Variables ***
${retry times} 3x
${retry interval time} 5s
${wait time} 20s
${ECS_DASHBOARD_URL} https://console.huaweicloud.com/ecm/?locale=en-us®ion=cn-east-2#/ecs/manager/dashboard
${KeypairAndEcsGroup Test Timeout} 10 minutes
${LifeCycle Test Timeout} 20 minutes
${LifeCycle2 Test Timeout} 20 minutes
${LinkCheck Test Timeout} 10 minutes
${PageCheck Test Timeout} 10 minutes
${Login Test Timeout} 5 minutes
${ECSCreateDelete Test Timeout} 40 minutes
${is Keypair Enabled} True
${is DEHS Enabled} True
*** Keywords ***
Login_HEC
open browser ${ECS_DASHBOARD_URL} gc
Set Window Size 1920 1080
Reload Page
maximize browser window
${windowsize}= get window size
log ${windowsize}
wait click element css=#subUserLogin
wait input element xpath=//span[@id="IAMAccountInputId"]//input|//input[contains(@placeholder,'account')] username
wait input element xpath=//span[@id="IAMUsernameInputId"]//input|//input[contains(@placeholder,'user name')] accountname
input password xpath=//span[@id="IAMPasswordInputId"]//input|//input[contains(@placeholder,'password')] password
wait click element id=btn_submit
wait contains Quick Start Guide
log url cookie
stopall
Run Keyword And Ignore Error log url cookie
Run Keyword And Ignore Error go to https://console.huaweicloud.com/ecm/logout
sleep 5s
Run Keyword And Ignore Error Capture Page Screenshot
Run Keyword And Ignore Error close all browsers
wait element
[Arguments] ${Element_LOCATOR}
wait until page contains element ${Element_LOCATOR} ${wait time}
Wait Until Element Is Enabled ${Element_LOCATOR} ${wait time}
Wait Until Keyword Succeeds 4x 5s get scroll height ${Element_LOCATOR}
run keyword if ${scroll} >= 0 scroll to ${scroll}
Wait Until Element Is Visible ${Element_LOCATOR} ${wait time}
#Capture Page Screenshot
sleep 2
get scroll height
[Arguments] ${Element_LOCATOR}
scroll to 0
${window-width} ${window-height}= get window size
${Vertical Position} Get Vertical Position ${Element_LOCATOR}
log ${Vertical Position}
${scroll}= Evaluate ${Vertical Position}-(${window-height}/2)
Set Suite Variable ${scroll}
scroll to
[Arguments] ${scroll value}
Execute Javascript var q=document.documentElement.scrollTop=${scroll value}
wait input element
[Arguments] ${Element_LOCATOR} ${input_text}
wait element ${Element_LOCATOR}
input text ${Element_LOCATOR} ${input_text}
wait click element
[Arguments] ${Element_LOCATOR}
wait element ${Element_LOCATOR}
Wait Until Keyword Succeeds 3 1s click element ${Element_LOCATOR}
wait mouse down up element
[Arguments] ${Element_LOCATOR}
wait element ${Element_LOCATOR}
Selenium2Library.Mouse Down ${Element_LOCATOR}
Selenium2Library.Mouse Up ${Element_LOCATOR}
wait input element no scroll
[Arguments] ${Element_LOCATOR} ${input_text}
wait until page contains element ${Element_LOCATOR} ${wait time}
Wait Until Element Is Visible ${Element_LOCATOR} ${wait time}
Wait Until Element Is Enabled ${Element_LOCATOR} ${wait time}
sleep 1
input text ${Element_LOCATOR} ${input_text}
Capture Page Screenshot
wait click element no scroll
[Arguments] ${Element_LOCATOR}
wait until page contains element ${Element_LOCATOR} ${wait time}
Wait Until Element Is Visible ${Element_LOCATOR} ${wait time}
Wait Until Element Is Enabled ${Element_LOCATOR} ${wait time}
sleep 1
Wait Until Keyword Succeeds 3 1s click element ${Element_LOCATOR}
Capture Page Screenshot
wait mouse down up element no scroll
[Arguments] ${Element_LOCATOR}
wait until page contains element ${Element_LOCATOR} ${wait time}
Wait Until Element Is Enabled ${Element_LOCATOR} ${wait time}
Wait Until Element Is Visible ${Element_LOCATOR} ${wait time}
Selenium2Library.Mouse Down ${Element_LOCATOR}
Capture Page Screenshot
Selenium2Library.Mouse Up ${Element_LOCATOR}
wait contains
[Arguments] ${PAGE_CONTAINS}
sleep 3
Capture Page Screenshot
Wait Until Page Contains ${PAGE_CONTAINS} ${wait time}
sleep 1
Search_Common
[Arguments] ${Peering_value}
Wait Until Keyword Succeeds 3x 1s Search_Common_retry ${Peering_value}
Search_Common_retry
[Arguments] ${Peering_value}
${is common search} Run Keyword And Return Status Wait Until Element Is Visible css=.ti-searchbox-input 5s
run keyword if '${is common search}'=='True' Common_Search ${Peering_value}
run keyword if '${is common search}'!='True' Search_ECS_By_Name ${Peering_value}
Capture Page Screenshot
Search_ECS_By_Name
[Arguments] ${Peering_value}
wait click element css=#ecsListSearchbox
wait mouse down up element no scroll xpath=//div[@id="ecsListSearchbox_prop"]//li/span[text()='Name']
wait input element css=#ecsListSearchbox_input ${Peering_value} #等待并输入搜索内容
wait click element no scroll css=#ecsListSearchbox_search #点击搜索按钮
sleep 2 #降速用,防止运行过快,也给资源搜索后的加载预留时间
Common_Search
[Arguments] ${Peering_value}
wait input element css=.ti-searchbox-input ${Peering_value} #等待并输入搜索内容
wait click element css=.ti-searchbox-search #点击搜索按钮
sleep 2 #降速用,防止运行过快,也给资源搜索后的加载预留时间
log url cookie
${cookies} get cookies
${url} Get Location
log ${cookies}
log ${url}
select default EnterpriseProject
wait click element css=div[select="childrenScope.enterpriseProjectModel.select"]
wait click element no scroll xpath=//li/span[text()='default']
sleep 1
close security verification
comment 点击去掉二次认证
Comment wait click element xpath=//label[text()="Enable later"]
Comment wait click element css=button[ng-click="alertTipModel.okBtn.click()"]
sleep 0.1
verify link text
[Arguments] ${verify text}
wait and select new window
wait contains ${verify text}
Close Window
select window
Enter ECS Board
Run Keyword And Ignore Error close all browsers
Login_HEC
wait click element xpath=//span[text()='ECSs']
wait contains Operation
wait contains Buy ECS
Create ECS Temp
Run Keyword And Ignore Error close all browsers
is nearly day pass
run keyword if '${is nearly day pass}'=='True' Pass Execution is nearly day passs
Create ECS Temp use Arguments ym autoui-temp1-
ECS Restart
Run Keyword And Ignore Error close all browsers
run keyword if '${is nearly day pass}'=='True' Pass Execution is nearly day passs
Enter ECS Board
comment 使用搜索唯一化ECS,点击More里的Restart重启ECS
search common ${New ECS Name}
wait contains Running
${Monitoring} Run Keyword And Return Status wait contains Monitoring
Wait Until Keyword Succeeds 3x 1s More Restart Action
Run Keyword And Ignore Error close security verification
Run Keyword And Ignore Error wait until page contains element css=span.ecs_reStart 20s
Wait Until Keyword Succeeds 10x 1s Check ECS Status css=span.icon-cloud-action-state-run 20s
More Restart Action
wait click element css=span.ti-menu-toggle-menu
wait mouse down up element no scroll xpath=//li//span[text()="Stop"]/parent::*/parent::*//span[text()='Restart']
: FOR ${i} IN RANGE 0 3
\ wait click element xpath=//span[text()='Yes']
\ ${status}= run keyword and return status wait contains right
\ log ${status}
\ run keyword if '${status}' == 'True' Exit For Loop
ECS Stop
Run Keyword And Ignore Error close all browsers
run keyword if '${is nearly day pass}'=='True' Pass Execution is nearly day passs
ECS Stop use Arguments ${New ECS Name}
ECS Start
Run Keyword And Ignore Error close all browsers
run keyword if '${is nearly day pass}'=='True' Pass Execution is nearly day passs
Enter ECS Board
comment 使用搜索唯一化ECS,点击More里的Start启动ECS
search common ${New ECS Name}
wait contains CentOS
${Status} get text css=td span.icon-action-state-txt
log ${Status}
run keyword if '${Status}'=='Running' Capture Page Screenshot
run keyword if '${Status}'=='Stopped' Wait Until Keyword Succeeds 3x 1s More Start Action
run keyword if '${Status}'=='Stopped' Run Keyword And Ignore Error close security verification
run keyword if '${Status}'=='Stopped' Wait Until Keyword Succeeds 10x 1s Check ECS Status css=span.icon-cloud-action-state-run
... 20s
More Start Action
wait click element css=span.ti-menu-toggle-menu
wait mouse down up element no scroll xpath=//li//span[text()="Stop"]/parent::*/parent::*//span[text()='Start']
: FOR ${i} IN RANGE 0 3
\ wait click element xpath=//span[text()='Yes']
\ ${status}= run keyword and return status wait contains right
\ log ${status}
\ run keyword if '${status}' == 'True' Exit For Loop
ECS Reset Password
Run Keyword And Ignore Error close all browsers
run keyword if '${is nearly day pass}'=='True' Pass Execution is nearly day passs
Enter ECS Board
comment 使用搜索唯一化ECS,点击More里的Reset Password更改ECS登录密码
search common ${New ECS Name}
wait contains Stopped
Wait Until Keyword Succeeds 3x 1s More Reset Password Action
wait input element css=input[meta-data-uba="www_v1_ecs.click.ecs_list_resetPassword_confirmPassword_input"] Huawei@4321
wait click element css=div[meta-data-uba="www_v1_ecs.click.ecs_list_resetPassword_confirm_button"]
Run Keyword And Ignore Error close security verification
wait contains right
More Reset Password Action
wait click element css=span.ti-menu-toggle-menu
wait mouse down up element no scroll xpath=//li//span[text()="Stop"]/parent::*/parent::*//span[text()='Reset Password']
wait input element css=input[meta-data-uba="www_v1_ecs.click.ecs_list_resetPassword_password_input"] Huawei@4321
ECS Add Tag
Run Keyword And Ignore Error close all browsers
run keyword if '${is nearly day pass}'=='True' Pass Execution is nearly day passs
Enter ECS Board
Comment 使用搜索唯一化ECS,点击ECS详情后点击Tags页签,增加一个tags
search common ${New ECS Name}
Run Keyword And Ignore Error wait click element css=a[meta-data-uba="www_v1_ecs.click.ecs_list_go_ecsDetail"]
Run Keyword And Ignore Error wait click element css=a[meta-data-uba="www_v1_ecs.click.ecs_list_go_new_ecsDetail"]
sleep 60s
wait click element xpath=//ti-tab-head[text()='Tags']
wait click element css=div[meta-data-uba="www_v1_ecs.click.ecs_detail_tagtable_addTag_button"]
wait input element css=input[meta-data-uba="www_v1_ecs.click.ecs_detail_addTag_key_input"] 1234
wait input element css=input[placeholder="Empty value"] 4321
wait click element css=div[meta-data-uba="www_v1_ecs.click.ecs_detail_addTag_confirm_button"]
wait contains right
ECS Delete
Run Keyword And Ignore Error close all browsers
run keyword if '${is nearly day pass}'=='True' Pass Execution is nearly day passs
ECS Delete use Arguments ym autoui-temp1
Enter Key Pairs Board
Run Keyword And Ignore Error close all browsers
Login_HEC
${is KMS} Run Keyword And Return Status Wait Until Page Does Not Contain Element xpath=//div[@class="cti-res-card-title"]/span[text()='Key Pairs'] 5s
run keyword if '${is KMS}'=='True' Pass Execution use KMS
wait click element xpath=//div[@class="cti-res-card-title"]/span[text()='Key Pairs']
wait contains Operation
wait contains Create Key Pair
Keypair Create
Run Keyword And Ignore Error close all browsers
Enter Key Pairs Board
comment 点击创建key pairs按钮,创建名为KeyPair-temp,提交
wait click element xpath=//span[text()='Create Key Pair']
${Random string} Generate Random String 4
${New Keypair Name} Evaluate 'KeyPair-create-temp-' + '${Random string}'
Set Suite Variable ${New Keypair Name}
wait input element css=input[meta-data-uba="www_v1_keypair.click.keypair_createKeypairName_button"] ${New Keypair Name}
wait click element css=button[meta-data-uba="www_v1_keypair.click.keypair_createKeypair_confirm_button"]
wait contains successfully
Keypair Query
Run Keyword And Ignore Error close all browsers
Enter Key Pairs Board
wait contains ${New Keypair Name}
Keypair Import
Run Keyword And Ignore Error close all browsers
Enter Key Pairs Board
comment 点击创建key pairs按钮,创建名为KeyPair-temp,提交
wait click element xpath=//span[text()='Import Key Pair']
${Random string} Generate Random String 4
${New Keypair Name} Evaluate 'KeyPair-import-temp-' + '${Random string}'
Set Suite Variable ${New Keypair Name}
wait input element css=input[meta-data-uba="www_v1_keypair.click.keypair_importKeyPair_name_input"] ${New Keypair Name}
wait input element css=textarea[meta-data-uba="www_v1_keypair.click.keypair_importKeyPair_publicKey_content"] ssh-rsa AAAAB3NzaC1yc2EAAAADAQABAAABAQDV9luoG0IvjlGbMZs8I6pVSe0HvirOiNdB8rf5moZnEp3EIuPGeewqRiCQAnRoclr1FVmxbiN6gQuznmp37GYNHdpuXIzTT4rzo+ODxFDa3d1d7jyYP5thS3oj6hCv4+6doXQ4NUQitgl0RUt9u/dRzcc0yu8BEHAbVhactBMvvWysvuOd1Urin7EA2kNTc7ez+2CzJjiTmUIXkQaDQlwj+V6EQrbfrCF6Ng1HbKVf4qcW0JvhNcikW4LVjI1yU6SnpK7VFqvqkoSL/r+yu14IWPdpDoYhFh554vlLPzO3JGdEn4zY6ych+Fk5+3j+IppONuXhipR8bEYxdig17zeZ root@13B08932-1DD2-11B2-B852-000000821800
wait click element css=button[meta-data-uba="www_v1_keypair.click.keypair_importKeyPair_confirm_button"]
wait contains right
Keypair Delete
[Arguments] ${KeyPair Name}
Enter Key Pairs Board
wait input element xpath=//input[@placeholder="Enter a name."] ${KeyPair Name}
wait click element css=.ti-icon-search
sleep 3
: FOR ${i} IN RANGE 1 11
\ ${Delete Status} Run Keyword And Return Status Wait Until Page Contains Element xpath=//div[@displayed-data="$root.keypairsTable.display"]//tbody/tr[1]//a[text()='Delete'] 10s
\ Run Keyword If '${Delete Status}'=='False' Exit For Loop
\ wait click element xpath=//div[@displayed-data="$root.keypairsTable.display"]//tbody/tr[1]//a[text()='Delete']
\ wait click element css=button[meta-data-uba="www_v1_keypair.click.keypair_deleteKeypair_confirm_button"]
\ wait contains right
Keypair DeleteCreate
Run Keyword And Ignore Error close all browsers
Keypair Delete KeyPair-create-temp
Keypair DeleteImport
Run Keyword And Ignore Error close all browsers
Keypair Delete KeyPair-import-temp
Enter ECS Groups Board
Run Keyword And Ignore Error close all browsers
Login_HEC
wait click element xpath=//span[text()='ECS Groups']
wait contains Operation
wait contains Create ECS Group
ECS Group Create
Run Keyword And Ignore Error close all browsers
Enter ECS Groups Board
comment 点击创建ECS Group按钮,创建名为KeyPair-temp,提交
wait click element xpath=//span[text()='Create ECS Group']
${Random string} Generate Random String 4
${New Ecs Group Name} Evaluate 'SvrGrp-temp-' + '${Random string}'
Set Suite Variable ${New Ecs Group Name}
wait input element css=input[meta-data-uba="www_v1_groups.click.groups_create_name_input"] ${New Ecs Group Name}
${Policy select} Run Keyword And Return Status Wait Until Page Contains Element xpath=//div[@id="$ctrl.policyModel.elementId"] 5s
run keyword if '${Policy select}'=='True' wait click element xpath=//div[@id="$ctrl.policyModel.elementId"]
run keyword if '${Policy select}'=='True' wait click element no scroll xpath=//li/span[contains(text(),'Anti')]
wait click element css=button[meta-data-uba="www_v1_groups.click.groups_create_confirm_button"]
wait contains right
ECS Group Query
Run Keyword And Ignore Error close all browsers
Enter ECS Groups Board
wait contains ${New Ecs Group Name}
ECS Group Delete
Run Keyword And Ignore Error close all browsers
Enter ECS Groups Board
: FOR ${i} IN RANGE 1 11
\ wait input element css=.ti-searchbox-input SvrGrp-temp
\ wait click element css=.ti-icon-search
\ sleep 3
\ ${Delete Status} Run Keyword And Return Status Wait Until Page Contains Element xpath=//tbody/tr[1]//a[text()='Delete'] 10s
\ Run Keyword If '${Delete Status}'=='False' Exit For Loop
\ wait click element xpath=//tbody/tr[1]//a[text()='Delete']
\ wait click element css=button[meta-data-uba="www_v1_groups.click.groups_delete_confirm_button"]
\ wait contains right
Enter Create Vm Page
Run Keyword And Ignore Error close all browsers
Enter ECS Board
wait click element xpath=//span[text()='Buy ECS']
wait contains vCPUs
Enter Dedicated Host Page
Run Keyword And Ignore Error close all browsers
Login_HEC
${is KMS} Run Keyword And Return Status Wait Until Page Does Not Contain Element xpath=//div[@class="cti-res-card-title"]/span[text()='DeHs'] 5s
run keyword if '${is KMS}'=='True' Pass Execution No DEHs
wait click element xpath=//div[@class="cti-res-card-title"]/span[text()='DeHs']
wait contains Buy DeH
Enter ECS Detail Page
Enter ECS Board
search common ecs-autoui-preset
wait click element css=a[meta-data-uba="www_v1_ecs.click.ecs_list_go_new_ecsDetail"]
wait contains ECS Information
Dashbord Creating an ECS
Run Keyword And Ignore Error close all browsers
Login_HEC
wait click element xpath=//a[text()='Creating an ECS']
verify link text ECS
Dashbord Creating a Disk
Run Keyword And Ignore Error close all browsers
Login_HEC
wait click element xpath=//a[text()='Creating a Disk']
verify link text Disk
Dashbord Assigning an EIP
Run Keyword And Ignore Error close all browsers
Login_HEC
wait click element xpath=//a[text()='Assigning an EIP']
verify link text EIP
Dashbord Configuring a Key Pair
Run Keyword And Ignore Error close all browsers
Login_HEC
wait click element xpath=//a[text()='Configuring a Key Pair']
verify link text Key Pair
Dashbord Learnmore
Run Keyword And Ignore Error close all browsers
Login_HEC
wait click element xpath=//p/a[text()='Learn more']
verify link text ECS
Dashbord Here
Run Keyword And Ignore Error close all browsers
Login_HEC
wait click element css=a[meta-data-uba="www_v1_dec.click.dashboard_cloudWatch_here_link"]
verify link text Alarm
Dashbord Outer Link
Run Keyword And Ignore Error close all browsers
Login_HEC
wait contains Cloud Backup and Recovery
wait contains Cloud Server Backup Service
wait contains Volume Backup Service
wait contains Elastic Load Balance
wait contains Elastic IP
wait contains Security Group
ECS VNC Check
Run Keyword And Ignore Error close all browsers
run keyword if '${is nearly day pass}'=='True' Pass Execution is nearly day passs
Enter ECS Board
comment 使用搜索唯一化ECS,点击远程登录后检查css=canvas#noVNC_canvas是否出现
search common ${New ECS Name}
wait contains Running
wait click element xpath=//a[text()='Remote Login']
Run Keyword And Ignore Error wait click element css=*[meta-data-uba="www_v1_hecs.click.lightserver_list_hiShellLogin_linux_vnclogin"]
wait and select new window
sleep 10
${iframe} Get Matching Xpath Count //iframe
run keyword if '${iframe}'!='0' select frame css=#vnc
wait element css=#noVNC_screen
ECS Modify Specifications
Run Keyword And Ignore Error close all browsers
ECS Stop2
Enter ECS Board
Search_common ${New ECS Name}
Wait Until Keyword Succeeds 3x 1s More Modify Specifications Action
sleep 10
wait click element css=.cti-buyLayer-btns-item
wait click element xpath=//input[@meta-data-uba="www_v1_ecs.click.ecs_list_modifySpec_confirm_protocol_checkbox"]/following-sibling::label/span/span
wait click element xpath=//span[text()='Submit Application']
wait until page contains element xpath=//div[@class="cti-wizard-content ng-hide"] ${wait time}
select window
Reload page
Search_common ${New ECS Name}
Run Keyword And Ignore Error Check ECS Status Resizing 20s
Wait Until Keyword Succeeds 10x 1s Check ECS Status css=span.ecs_shutOff 30s
More Modify Specifications Action
wait click element css=span.ti-menu-toggle-menu
wait mouse down up element no scroll xpath=//span[text()='Reset Password']/parent::*/parent::*//span[text()='Modify Specifications']
wait and select new window
close new select old
[Documentation] 关键字动作:
... 关闭新打开的窗口,返回主窗口
...
... 参数:
... 无
...
... 设计思路:
... 如果点击链接后打开新浏览器,操作完后需要返回主浏览器,即可使用此关键字
close window #关闭当前浏览器窗口
select window #选择主浏览器窗口
ECS Stop2
ECS Stop use Arguments ${New ECS Name}
ECS Stop use Arguments
[Arguments] ${ECS NAME}
Enter ECS Board
comment 使用搜索唯一化ECS,点击More里的Stop关闭ECS
search common ${ECS NAME}
wait contains CentOS
${Status} get text css=td span.icon-action-state-txt
log ${Status}
run keyword if '${Status}'=='Stopped' Capture Page Screenshot
run keyword if '${Status}'=='Running' Wait Until Keyword Succeeds 3x 1s More Stop Action
run keyword if '${Status}'=='Running' Run Keyword And Ignore Error close security verification
run keyword if '${Status}'=='Running' Wait Until Keyword Succeeds 10x 1s Check ECS Status css=span.ecs_shutOff
... 20s
More Stop Action
wait click element css=span.ti-menu-toggle-menu
wait mouse down up element no scroll xpath=//li//span[text()="Stop"]/parent::*/parent::*//span[text()='Stop']
: FOR ${i} IN RANGE 0 3
\ wait click element xpath=//span[text()='Yes'] #要执行的循环操作
\ ${status}= run keyword and return status wait contains right
\ log ${status}
\ run keyword if '${status}' == 'True' Exit For Loop
ECS Reinstall OS
Run Keyword And Ignore Error close all browsers
ECS Stop2
Enter ECS Board
Search_common ${New ECS Name}
Wait Until Keyword Succeeds 3x 1s More Reinstall OS Action
wait input element css=input[meta-data-uba="www_v1_ecs.click.ecs_list_reinstallOs_password_input"] Huawei@1234
wait input element css=input[meta-data-uba="www_v1_ecs.click.ecs_list_reinstallOs_confirmPassword_input"] Huawei@1234
wait click element css=div[meta-data-uba="www_v1_ecs.click.ecs_list_reinstallOS_confirm_button"]
wait and select new window
wait click element css=.ti-checkbox-inner
wait click element css=.cti-buyLayer-btns-item
wait until page contains element xpath=//div[@class="cti-wizard-content ng-hide"] ${wait time}
select window
Wait Until Keyword Succeeds 10x 1s Check ECS Status css=span.icon-cloud-action-state-run 20s
More Reinstall OS Action
wait click element css=span.ti-menu-toggle-menu
Run Keyword And Ignore Error mouse over xpath=//span[text()='Manage Image/Disk']
wait mouse down up element no scroll xpath=//li/span[text()='Modify Specifications']/parent::*/parent::*//span[text()='Reinstall OS']
wait click element xpath=//button[text()='Password']
ECS Change OS
Run Keyword And Ignore Error close all browsers
ECS Stop2
Enter ECS Board
Search_common ${New ECS Name}
Wait Until Keyword Succeeds 3x 1s More Change OS Action
sleep 10
${Current Image OS}= get text css=span[ng-bind="metadata.image_name"]
wait click element css=#osPlatform
wait click element no scroll xpath=//span[text()='CentOS']
wait click element css=#osImageModel
run keyword if '${Current Image OS}'=='CentOS 7.5 64bit' wait click element no scroll xpath=//span[contains(text(),'CentOS 7.4')]
run keyword if '${Current Image OS}'!='CentOS 7.5 64bit' wait click element no scroll xpath=//span[contains(text(),'CentOS 7.5')]
wait click element xpath=//button[text()='Password']
wait input element css=input[meta-data-uba="www_v1_ecs.click.ecs_list_changeOS_password_input"] Huawei@1234
wait input element css=input[meta-data-uba="www_v1_ecs.click.ecs_list_changeOS_confirm_password_input"] Huawei@1234
wait click element css=div[meta-data-uba="www_v1_ecs.click.ecs_list_changeOS_confirm_button"]
wait and select new window
wait click element css=.ti-checkbox-inner
wait click element css=.cti-buyLayer-btns-item
wait until page contains element xpath=//div[@class="cti-wizard-content ng-hide"] ${wait time}
select window
Wait Until Keyword Succeeds 10x 1s Check ECS Status css=span.icon-cloud-action-state-run 20s
More Change OS Action
wait click element css=span.ti-menu-toggle-menu
Run Keyword And Ignore Error mouse over xpath=//span[text()='Manage Image/Disk']
wait mouse down up element no scroll xpath=//li/span[text()='Change OS']
wait element css=#osPlatform
Check ECS Status
[Arguments] ${status Loc} ${WaitTime}
wait click element css=div[meta-data-uba="www_v1_ecs.click.ecs_list_refresh_ecs_button"]
sleep 2
wait until page contains element ${status Loc} ${WaitTime}
Capture Page Screenshot
ECS Delete use Arguments
[Arguments] ${ECS Name}
Enter ECS Board
comment 使用搜索唯一化ECS,点击More里的Delete删除ECS
Search_Common_Mulit ${ECS Name}
sleep 3s
wait click element xpath=//table/thead/tr//span[@class="ti-checkbox-inner"]
wait click element xpath=//div[@class="ti-button-select-wrapper ng-scope ng-isolate-scope"]
wait mouse down up element no scroll xpath=//span[text()='Modify Bandwidth']/parent::*/parent::*//span[text()='Delete']
wait click element xpath=//div[@class="delete_all_confirm clearfix"]/div[1]//span/span
wait click element xpath=//div[@class="delete_all_confirm clearfix"]/div[2]//span/span
Capture Page Screenshot
wait click element css=div[meta-data-uba="www_v1_ecs.click.ecs_list_delete_confirm_button"]
wait contains right
Capture Page Screenshot
Wait Until Keyword Succeeds 10x 1s Check page not contains ${New ECS Name} 10s
Check page not contains
[Arguments] ${text} ${WaitTime}
wait click element css=div[meta-data-uba="www_v1_ecs.click.ecs_list_refresh_ecs_button"]
sleep 2
Wait Until Page Does Not Contain ${text} ${WaitTime}
Capture Page Screenshot
More Delete Action
wait click element css=span.ti-menu-toggle-menu
wait mouse down up element no scroll xpath=//li//span[text()="Stop"]/parent::*/parent::*//span[text()='Delete']
wait click element css=div[meta-data-uba="www_v1_ecs.click.ecs_list_delete_confirm_button"]
ECS Delete2
Run Keyword And Ignore Error close all browsers
ECS Delete use Arguments autoui-temp2
Create ECS Temp use Arguments
[Arguments] ${ECS Name}
Enter ECS Board
comment 点击创建ECS按钮
wait click element xpath=//span[text()='Buy ECS']
sleep 20
comment 选择按需,系统和对应版本,并点击下一步
wait click element xpath=//button[text()='Pay-per-use']
wait click element css=#osPlatform
sleep 10
wait click element no scroll xpath=//span[text()='CentOS']
wait click element css=div.secondGoldImageSelectEn
wait click element no scroll xpath=//span[text()='CentOS 7.5 64bit(40GB)']
wait click element css=.cti-btn-container
comment 选择VPC(使用搜索进行筛选),选择不需要EIP,并点击下一步
wait click element css=span[placeholder="--Select VPC--"]
Comment wait input element no scroll css=div[class="ti-dropdown-container ng-isolate-scope ti-dropdown-container-down"] input vpc-ecs-preset-do-not-delete
wait click element no scroll xpath=//span[text()='vpc-ecs-preset-do-not-delete(192.168.0.0/16)']
wait element xpath=//div/span[text()='Automatically-assigned IP address']
wait click element xpath=//*[text()='Not required']
wait click element xpath=//span[text()='Next: Configure Advanced Settings']
comment 输入ECS名字和密码,并点击下一步
${Random string} Generate Random String 4
${New ECS Name} Evaluate '${ECS Name}' + '${Random string}'
Set Suite Variable ${New ECS Name}
wait input element css=#ecsHostName input[type="text"] ${New ECS Name}
wait click element xpath=//button[text()='Password']
wait input element css=input[meta-data-uba="www_v1_ecs.click.ecs_create_login_password_input"] Huawei@1234
wait input element css=input[meta-data-uba="www_v1_ecs.click.ecs_create_login_confirmPassword_input"] Huawei@1234
Run Keyword And Ignore Error wait click element xpath=//button[text()='Not required']
wait click element xpath=//span[text()='Next: Confirm']
comment 选择default企业项目,并提交,断言成功关键字,并点击返回VM列表,断言列表有创建的ECS
Run Keyword And Ignore Error select default EnterpriseProject
wait click element xpath=//*[contains(text(),'I have read and agree')]/parent::*/label
wait click element xpath=//span[text()='Next']
wait contains Request submitted successfully
comment 点击返回ECS列表页,刷新寻找Running状态的新建ECS主机
wait click element css=div[options="goEcsListBtn"]
Search_common ${New ECS Name}
Wait Until Keyword Succeeds 10x 1s Check ECS Status css=span.icon-cloud-action-state-run 20s
Create ECS Temp2
Run Keyword And Ignore Error close all browsers
Create ECS Temp use Arguments autoui-temp2-
Search_Common_Mulit
[Arguments] ${Peering_value}
${is common search} Run Keyword And Return Status Wait Until Element Is Visible css=.ti-searchbox-input 5s
run keyword if '${is common search}'=='True' Common_Search ${Peering_value}
run keyword if '${is common search}'!='True' Search_ECS_By_Name ${Peering_value}
Capture Page Screenshot
wait contains right
sleep 3
Capture Page Screenshot
Wait Until Page Contains Element css=div[style="float:right;"] ${wait time}
sleep 1
wait and select new window
sleep 3s
select window new
Create ECS Temp use Arguments ym
[Arguments] ${ECS Name}
Enter ECS Board
comment 点击创建ECS按钮
wait click element xpath=//span[text()='Buy ECS']
sleep 20
comment 选择按需,系统和对应版本,并点击下一步
wait click element xpath=//button[text()='Yearly/Monthly']
wait click element css=#osPlatform
sleep 10
wait click element no scroll xpath=//span[text()='CentOS']
wait click element css=div.secondGoldImageSelectEn
wait click element no scroll xpath=//span[text()='CentOS 7.5 64bit(40GB)']
wait click element css=.cti-btn-container
comment 选择VPC(使用搜索进行筛选),选择不需要EIP,并点击下一步
wait click element css=span[placeholder="--Select VPC--"]
Comment wait input element no scroll css=div[class="ti-dropdown-container ng-isolate-scope ti-dropdown-container-down"] input vpc-ecs-preset-do-not-delete
wait click element no scroll xpath=//span[text()='vpc-ecs-preset-do-not-delete(192.168.0.0/16)']
wait element xpath=//div/span[text()='Automatically-assigned IP address']
wait click element xpath=//*[text()='Not required']
wait click element xpath=//span[text()='Next: Configure Advanced Settings']
comment 输入ECS名字和密码,并点击下一步
${Random string} Generate Random String 4
${New ECS Name} Evaluate '${ECS Name}' + '${Random string}'
Set Suite Variable ${New ECS Name}
wait input element css=#ecsHostName input[type="text"] ${New ECS Name}
wait click element xpath=//button[text()='Password']
wait input element css=input[meta-data-uba="www_v1_ecs.click.ecs_create_login_password_input"] Huawei@1234
wait input element css=input[meta-data-uba="www_v1_ecs.click.ecs_create_login_confirmPassword_input"] Huawei@1234
Run Keyword And Ignore Error wait click element xpath=//button[text()='Not required']
wait click element xpath=//span[text()='Next: Confirm']
comment 选择default企业项目,并提交,断言成功关键字,并点击返回VM列表,断言列表有创建的ECS
Run Keyword And Ignore Error select default EnterpriseProject
wait click element xpath=//*[contains(text(),'I have read and agree')]/parent::*/label
wait click element xpath=//span[text()='Next']
Wait Until Page Contains Element xpath=//*[@id='balance_totalpay']|//*[@id='tab_monthend_balance_totalpay2'] 200s
wait click element xpath=//*[@id='monthEndConfirm']|//*[@id='tabMonthEndConfirm']
wait contains Payment processed successfully
comment 点击返回ECS列表页,刷新寻找Running状态的新建ECS主机
go to ${ECS_DASHBOARD_URL}
wait click element xpath=//span[text()='ECSs']
wait contains Operation
wait contains Buy ECS
Search_common ${New ECS Name}
Wait Until Keyword Succeeds 10x 1s Check ECS Status css=span.icon-cloud-action-state-run 20s
ECS Delete use Arguments ym
[Arguments] ${ECS Name}
Enter ECS Board
comment 使用搜索唯一化ECS,点击More里的Delete删除ECS
Search_Common_Mulit ${ECS Name}
sleep 3s
wait click element xpath=//table/thead/tr//span[@class="ti-checkbox-inner"]
wait click element xpath=//div[@class="ti-button-select-wrapper ng-scope ng-isolate-scope"]
wait mouse down up element no scroll xpath=//span[text()='Modify Bandwidth']/parent::*/parent::*//span[text()='Unsubscribe']
wait click element css=button[meta-data-uba="www_v1_ecs.click.ecs_list_unsubscribe_confirm_button"]
sleep 3s
select window new
sleep 20s
wait click element //tr[@ng-if="isRetreatUsingRes"]//label[@class="ti-checkbox"]
wait click element css=#retreat_btn
wait click element css=#confirm_btn
Capture Page Screenshot
wait contains submitted
Capture Page Screenshot
select window
Wait Until Keyword Succeeds 40x 10s Check page not contains ${New ECS Name} 20s
is nearly day pass
Set Suite Variable ${is nearly day pass} False
log ${is nearly day pass}
${now date} Get Current Date
log ${now date}
${20min later date} Add Time To Date ${now date} 20m
log ${20min later date}
${now date converted} Convert Date ${now date} datetime
${20min later date converted} Convert Date ${20min later date} datetime
log ${now date converted}
log ${20min later date converted}
log ${now date converted.day}
log ${20min later date converted.day}
run keyword if '${now date converted.day}'!='${20min later date converted.day}' Set Suite Variable ${is nearly day pass} True
log ${is nearly day pass}
Fatal Error Exit
stopall
#Fatal Error
ECS Delete3
Run Keyword And Ignore Error close all browsers
run keyword if '${is nearly day pass}'=='True' Pass Execution is nearly day passs
ECS Delete use Arguments ym autoui-temp3
Create ECS Temp3
Run Keyword And Ignore Error close all browsers
is nearly day pass
run keyword if '${is nearly day pass}'=='True' Pass Execution is nearly day passs
Create ECS Temp use Arguments ym autoui-temp3-
其实本文还可以继续扩展,比如参数化的使用,tag的使用,用例结构化等等,但是本文的目的是授之以渔,这些就让大家自己来解决吧。
后面也许根据情况,我会编写高级篇,主要内容可能会是自定义Library的编写和使用,也许因为玩katalon导致没有高级篇。
总之感谢各位能看完我这絮絮叨叨的文章。